


quarkus和vertx
This post covers
这篇文章涵盖
- What is Quarkus?什么是Quarkus?
- Getting started with Quarkus Quarkus入门
- What is native executable?什么是本机可执行文件?
Building native executable from Java using Quarkus
使用Quarkus从Java构建本机可执行文件
- Startup time difference for Jar and native executablesJar和本机可执行文件的启动时间差
Hot code replacement for Java (For me this is one of the biggest USP of the framework)
Java的热代码替换(对我来说,这是框架中最大的USP之一)
什么是Quarkus? (What is Quarkus?)
Quarkus is a full-stack, Kubernetes-native Java framework made for Java virtual machines (JVMs) and native compilation, optimizing Java specifically for containers and enabling it to become an effective platform for serverless, cloud, and Kubernetes environments.
Quarkus是针对Java虚拟机(JVM)和本机编译的全栈Kubernetes本地Java框架,专门针对容器优化了Java,使其成为无服务器,云和Kubernetes环境的有效平台。
Quarkus入门 (Getting started with Quarkus)
You would need to have Java 8 or Java 11 installed along with Maven to get started with Quarkus.
您需要与Maven一起安装Java 8或Java 11才能开始使用Quarkus。
创建样板REST项目 (Create a Boilerplate REST project)
Let’s use the Maven plugin to create a boilerplate
让我们使用Maven插件创建样板
mvn io.quarkus:quarkus-maven-plugin:1.8.1.Final:createNow it would ask for the groupId, artifcatId, version to be entered. It would also ask if we want a REST resource (say yes) followed by the classname and the path of the rest resource. This is how it would look like
现在,它将要求输入groupId,artifcatId,版本。 它还会询问我们是否要使用REST资源(例如“是”),后跟类名和其余资源的路径。 这就是它的样子

Now we have a Quarkus boilerplate project ready to be build and run.
现在我们有一个Quarkus样板项目准备好构建和运行。
建立项目 (Build the project)
To create a Jar run the following command.
要创建一个Jar,请运行以下命令。
mvn package
mvn package

The build took around 16 seconds.
构建过程耗时约16秒。
We cover building native executable in the next section.
在下一节中,我们将介绍构建本机可执行文件。
运行项目 (Run the project)
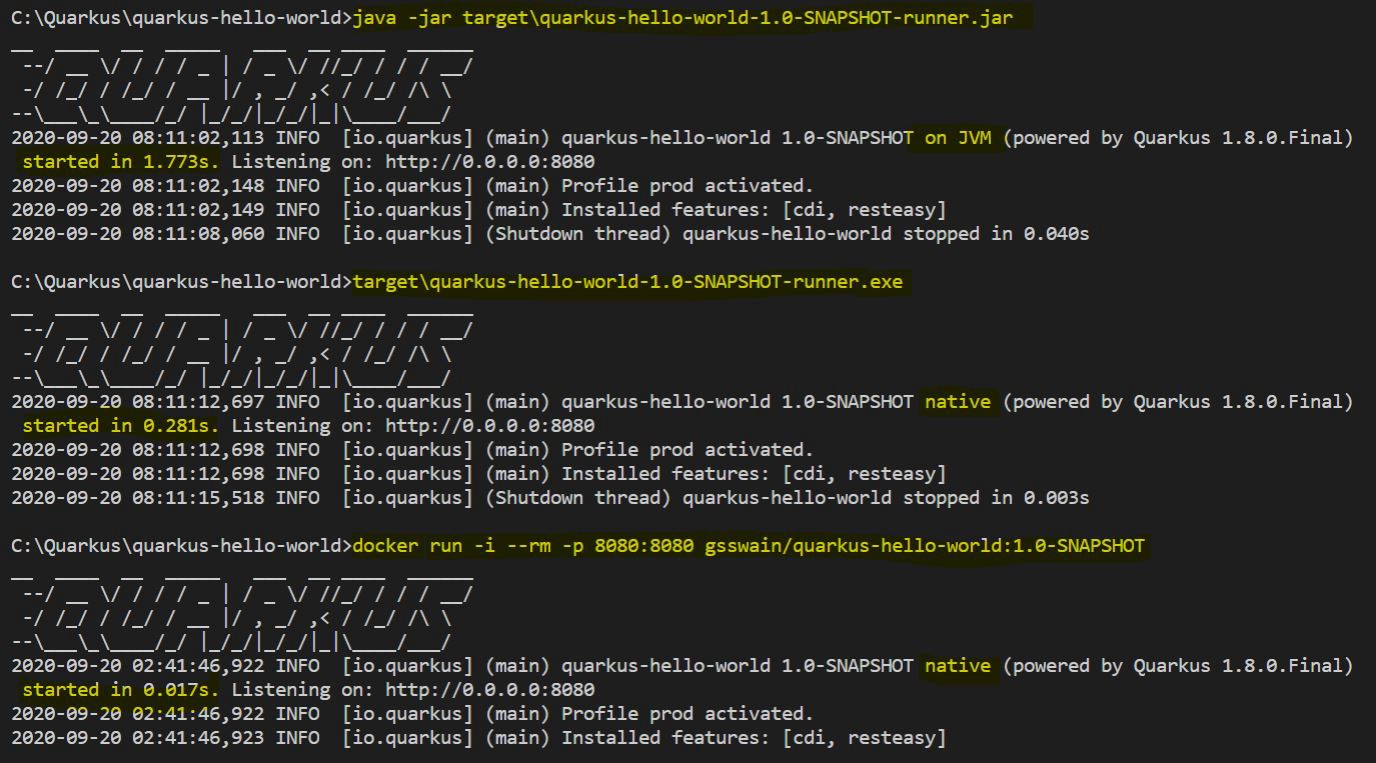
java -jar target/quarkus-hello-world-1.0-SNAPSHOT-runner.jar
java -jar target/quarkus-hello-world-1.0-SNAPSHOT-runner.jar
测试项目 (Test the project)
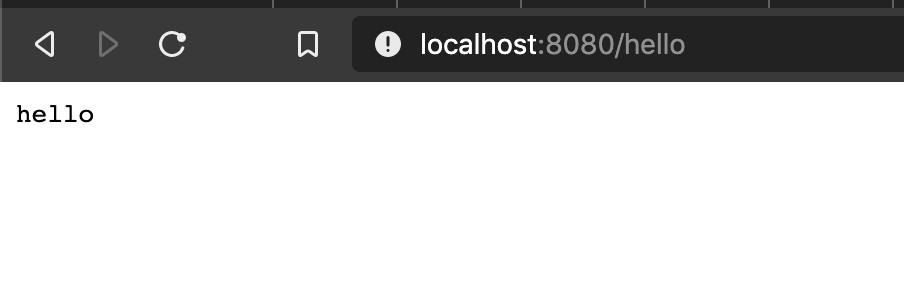
Either use curl or open it on a browser and check
使用curl或在浏览器中打开并检查
curl http://localhost:8080/hello
curl http://localhost:8080/hello
什么是本机可执行文件? (What is native executable?)
In the world of Java, we compile the source code to Java byte code (Job of javac). When we run this compiled code, the Java byte code is converted to machine specific code (JRE does this). What if we could compile the Java source code to machine specific code and run the machine code directly without a JRE. This is exactly what a native executable is and GraalVM native-image can do this for us.
在Java的世界中,我们将源代码编译为Java字节码( javac的Job)。 当我们运行此编译代码时,Java字节代码将转换为机器特定的代码( JRE会执行此操作)。 如果我们可以将Java源代码编译为机器专用代码并直接运行机器代码而无需JRE,该怎么办? 这正是本机可执行文件,而GraalVM本机映像可以为我们做到这一点。
With native executables, we don’t need the JRE to run java code anymore . Those native executables are faster to bootstrap and need less resources to run. The only thing we need to give up is the Write Once Run Anywhere (WORA). That means the code would only run on similar systems on which it was compiled. But wait! Can’t we build for a specific machine and run the code along with that machine? Yes, we could do this with a container-image. So we still get WORA as long as the container run time can run on any machine.
使用本机可执行文件,我们不再需要JRE运行Java代码。 这些本机可执行文件的引导速度更快,并且所需的资源更少。 我们唯一需要放弃的是随时随地写入一次写入(WORA) 。 这意味着代码只能在编译该代码的类似系统上运行。 可是等等! 我们不能为特定的机器构建并与该机器一起运行代码吗? 是的,我们可以使用container-image做到这一点。 因此,只要容器运行时间可以在任何计算机上运行,我们仍然可以获得WORA。
使用Quarkus从Java构建本机可执行文件 (Building native executable from Java using Quarkus)
With Quarkus we can build the following native executables
使用Quarkus,我们可以构建以下本地可执行文件
- Native executable for our development machine (Won’t run on different OS or even with same OS)我们的开发机器的本机可执行文件(不会在不同的操作系统上运行,甚至不会在相同的操作系统上运行)
- Container image with native executable (Runs everywhere where the container runtime is supported) 具有本机可执行文件的容器映像(在支持容器运行时的任何地方运行)
1.为我们的开发机器构建本机可执行文件 (1. Build native executable for our development machine)
Following are the steps to create a native executable for your development machine.
以下是为开发计算机创建本机可执行文件的步骤。
Set GRAALVM_HOME environment variable
设置GRAALVM_HOME环境变量
Add GRAALVM_HOME/bin directory to PATH
将GRAALVM_HOME / bin目录添加到PATH
Install GraalVM native-image utility (Run
gu install native-image)安装GraalVM本机映像实用程序(运行
gu install native-image)Set up
CLangauge environment (Varies for different OS and covered below)设置
C语言环境(因不同的操作系统而异,在下面介绍)Finally run
maven packagewith thenativeprofile enabled (On Windows an extra step is required and covered below)最后,在启用了
native配置文件的情况下运行maven package(在Windows上,需要执行一个额外的步骤,下面将进行介绍)
设置C (Setting up C)
On a Mac run the following command
在Mac上,运行以下命令
xcode-select --installOn a Linux based system run the following command
在基于Linux的系统上,运行以下命令
# dnf (rpm-based)
sudo dnf install gcc glibc-devel zlib-devel libstdc++-static
# Debian-based distributions:
sudo apt-get install build-essential libz-dev zlib1g-dev
On Windows 10, get the Visual Studio 2019 C++ build tools and install the checked optional packages (I have used the community edition)
在Windows 10上,获取Visual Studio 2019 C ++生成工具并安装已检查的可选包(我已使用社区版)

构建本机可执行文件 (Build native executable)
For building the native image, we need to run the following command
为了构建本机映像,我们需要运行以下命令
mvn package -Pnative
mvn package -Pnative
For Windows 10, you must be using the command prompt (does not work on PowerShell yet). You need to run the following batch file before running the native maven build (The path to this file would vary depending upon the version of Visual Studio e.g. 2019, 2017 and if it Community or not)
对于Windows 10,您必须使用命令提示符(尚不能在PowerShell上运行)。 您需要在运行本机Maven构建之前运行以下批处理文件(此文件的路径将根据Visual Studio的版本而有所不同,例如2019、2017,以及是否为Community)
"C:\Program Files (x86)\Microsoft Visual Studio\2019\Community\VC\Auxiliary\Build\vcvars64.bat"I have created a cmd file (native-build-windows.cmd) which runs both the commands for me.
我创建了一个cmd文件(native-build-windows.cmd),该文件可以为我运行两个命令。
call "C:\Program Files (x86)\Microsoft Visual Studio\2019\Community\VC\Auxiliary\Build\vcvars64.bat"mvn package -PnativeOnce you run this, you would get a native executable
运行此命令后,您将获得一个本机可执行文件
On Mac, it creates an executable file named quarkus-hello-world-1.0-SNAPSHOT-runner under the target directory.
在Mac上,它将在目标目录下创建一个名为quarkus-hello-world-1.0-SNAPSHOT-runner的可执行文件。
On Windows-10 an exe named quarkus-hello-world-1.0-SNAPSHOT-runner.exe is created under the target diectory.
在Windows-10上, exe文件名为 在目标quarkus-hello-world-1.0-SNAPSHOT-runner.exe下创建了quarkus-hello-world-1.0-SNAPSHOT-runner.exe 。
Run this file and do a round of testing. Note this executable will not run on different OS and may not run on different machines with same OS as well. So we need to create a container image which would run irrespective of the OS.
运行此文件并进行一轮测试。 请注意,此可执行文件将无法在不同的操作系统上运行,也可能无法在具有相同操作系统的不同计算机上运行。 因此,我们需要创建一个容器映像,该映像将与操作系统无关。
2.使用本地可执行文件构建容器映像 (2. Building container image with native executable)
Let’s start Docker and get going. (Allow file sharing on Docker)
让我们启动Docker并开始吧。 (允许在Docker上共享文件)
Run the following command
运行以下命令
mvn package -Pnative -Dquarkus.native.container-build=true
mvn package -Pnative -Dquarkus.native.container-build=true
It would again build an executable but this time if you run it on your own machine, it would fail as the container build happens on the ubi-quarkus-native-image:20.2.0-java11 container.
它会再次生成一个可执行文件,但是这一次,如果您在自己的计算机上运行它,则由于容器构建发生在ubi-quarkus-native-image:20.2.0-java11容器上而将失败。
To run the executable, we can create a container image and run that with the following command
要运行可执行文件,我们可以创建一个容器映像并使用以下命令运行该映像
# Build the image
docker build -f src/main/docker/Dockerfile.native -t quarkus/quarkus-hello-world .# Run the image
docker run -i --rm -p 8080:8080 quarkus/quarkus-hello-world
This brings ubi8/ubi-minimal:8.1 image as the runtime for the executable.
这将ubi8/ubi-minimal:8.1映像作为可执行文件的运行时。
There is an easier way to create the container image. Just add the following Quarkus extension using the below command
有一种更简单的方法来创建容器映像。 只需使用以下命令添加以下Quarkus扩展名
mvn quarkus:add-extension -Dextensions=quarkus-container-image-jib
mvn quarkus:add-extension -Dextensions=quarkus-container-image-jib
Run the following command to build the Docker image
运行以下命令以构建Docker映像
mvn package -Pnative -Dquarkus.native.container-build=true -Dquarkus.container-image.build=true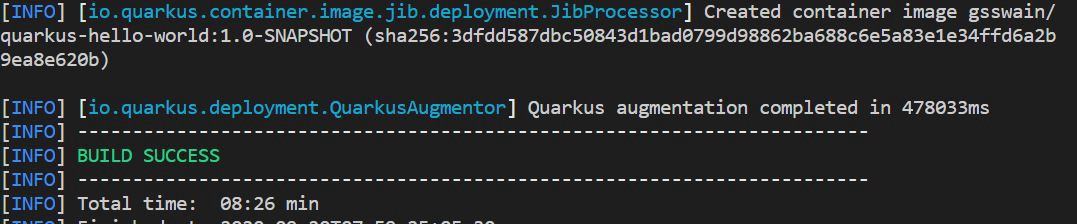
The build took around 8 minutes.
构建过程耗时约8分钟。
By default the container image group is your user-name of the PC. You can change it with setting a different value for quarkus.container-image.group in the application.properties file
默认情况下,容器映像组是您的PC用户名。 您可以quarkus.container-image.group在application.properties文件中为quarkus.container-image.group设置不同的值来更改它
Now run the docker image (Replace the container-image-group value)
现在运行docker映像(替换container-image-group值)
docker run -I --rm -p 8080:8080 <container-image-group>/quarkus-hello-world:1.0-SNAPSHOT
docker run -I --rm -p 8080:8080 <container-image-group>/quarkus-hello-world:1.0-SNAPSHOT
Jar和本机可执行文件的启动时间差 (Startup time difference for Jar and native executables)
Here is a quick summary of the startup time for the various kinds of builds and runtime on a Windows 10 with 20GB of RAM with intel i5 processor.
这是Windows 10上具有intel i5处理器的20GB RAM上各种构建和运行时的启动时间的快速摘要。
The jar version took around 1.773 seconds, the native machine executable started in 0.281 seconds and the native container image started in 0.017 seconds 😊.
jar版本耗时约1.773秒,本机可执行文件在0.281秒内启动,本机容器映像在0.017秒内启动。
Java的热代码替换 (Hot code replacement for Java)
Hot code replacement is the idea, where we replace code which is already running. This was always there, SpringBoot Dev-tools does this when the classpath gets updated. The hot code replacement with Quarkus is cool and very similar in experience to the NodeJS based eco-system (with a watch option on source files). It detects the changes on the source files, compiles them and replaces them.
热代码替换是一种想法,我们在这里替换已经运行的代码。 一直在那里, SpringBoot开发工具会在更新类路径时执行此操作。 用Quarkus进行热代码替换非常酷,并且在体验上与基于NodeJS的生态系统非常相似(在源文件上带有监视选项)。 它检测源文件上的更改,将其编译并替换。
Let’s see this in action
让我们看看这个动作
Start the project in dev mode
在开发人员模式下启动项目
mvnw quarkus:dev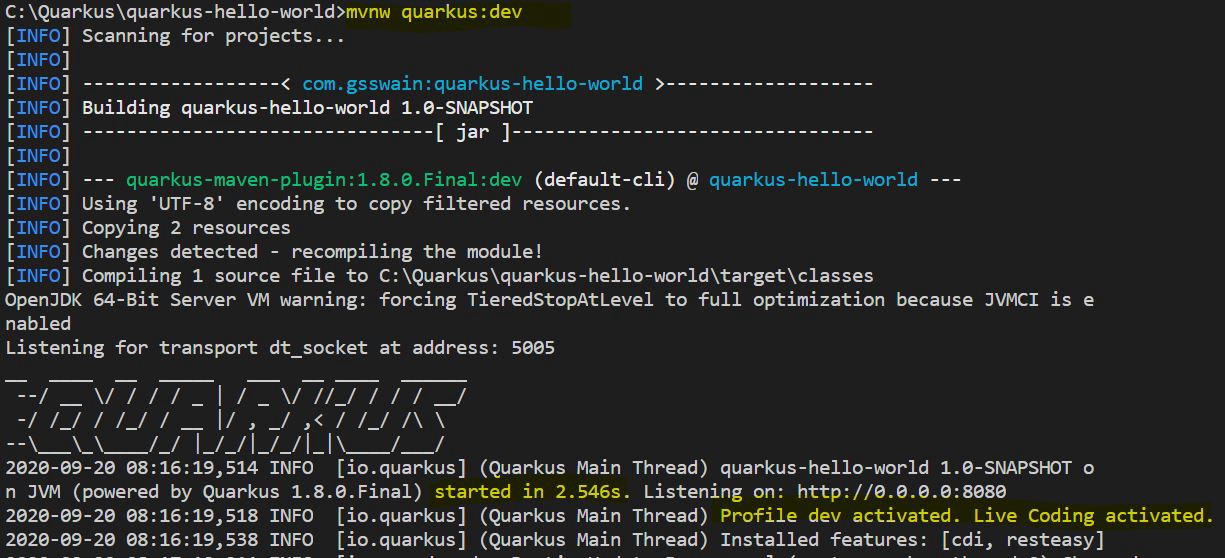
Now let’s return “hi” instead of “hello” (any change would do) and save the file. You would notice the source file change would be detected and it would hot replace the code.
现在,让我们返回“ hi”而不是“ hello” (可以进行任何更改)并保存文件。 您会注意到将检测到源文件更改,并将热替换该代码。
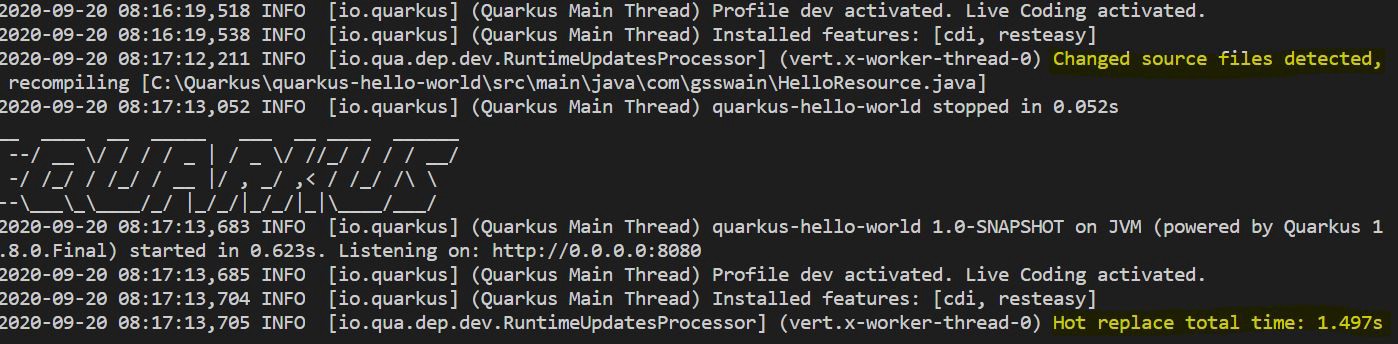
This certainly saves a few seconds to minutes (depending on your machine 😜). ❤️ this feature.
当然可以节省几秒钟到几分钟(取决于您的机器machine)。 ❤️这个功能。
结论: (Conclusion:)
Quarkus looks really good. I like the way it has given the much needed boost to the Java Developer experience and make us feel more productive. The supported eco-system is also promising (See it for yourself with mvn quarkus:list-extensions). I hope you would give it a try and discover for yourself.
Quarkus看起来真的很好。 我喜欢它为Java开发人员带来了急需的体验,并使我们感到更加富有成效。 受支持的生态系统也很有希望(请通过mvn quarkus:list-extensions亲自查看)。 希望您能尝试一下并自己发现。
翻译自: https://medium.com/@girijashankar.swain/quarkus-and-the-java-developer-experience-b9817fe4e3d7
quarkus和vertx


 930
930

 被折叠的 条评论
为什么被折叠?
被折叠的 条评论
为什么被折叠?
 到【灌水乐园】发言


