


storybook
Storybook is a great way to develop and test components in isolation and leveraging React Native for Web we can create React Native components and view them in a browser.
故事书是一种独立开发和测试组件并利用React Native for Web的好方法,我们可以创建React Native组件并在浏览器中查看它们。
In this article we’ll be setting up a new project, creating a simple React Native component and viewing two stories. Note that this assumes a basic understanding of creating a React component.
在本文中,我们将建立一个新项目,创建一个简单的React Native组件并查看两个故事。 请注意,这是对创建React组件的基本了解。
1. Set up a new project
1.建立一个新项目
Run npm init in an empty folder to set up a new package.json file.
在一个空文件夹中运行npm init来设置一个新的package.json文件。
2. Add dependencies
2.添加依赖项
Add the following dependencies.
添加以下依赖项。
npm i -S react react-native react-native-web @types/react @types/react-native @storybook/react3. Configure Storybook
3.配置故事书
Add a folder in the root directory called .storybook . Now add main.js to the newly created storybook folder. This acts as the main configuration file for Storybook.
在根目录中添加一个名为.storybook的文件夹。 现在将main.js添加到新创建的main.js文件夹中。 这充当Storybook的主要配置文件。
4. Create a component
4.创建一个组件
For the purpose of this we’ll be creating a fairly simple LoadingButton component, this will make use of the React Native Button and ActivityIndicator components, accepting a loading prop which if true, will disable the button and display a loading indicator.
为此,我们将创建一个相当简单的LoadingButton组件,它将利用React Native Button和ActivityIndicator组件,接受一个loading属性,如果为true,则将禁用该按钮并显示一个加载指示器。
Create a src folder in the project root directory, then create a components folder.
在项目根目录中创建一个src文件夹,然后创建一个components文件夹。
Now create LoadingButton.tsx in the components folder and add the following code:
现在在components文件夹中创建LoadingButton.tsx ,并添加以下代码:
5. Create stories
5.创建故事
Now that we’ve created our simple LoadingButton component, it’s time to create stories, again in the components folder, create LoadingButton.stories.tsx and add the following code:
现在我们已经创建了简单的LoadingButton组件,是时候创建故事了,再次在components文件夹中,创建LoadingButton.stories.tsx并添加以下代码:
import React from 'react';
import { storiesOf } from '@storybook/react';
import LoadingButton from './LoadingButton';
storiesOf('LoadingButton', module)
.add('default',
() => <LoadingButton />
)
.add('loading',
() => <LoadingButton loading />
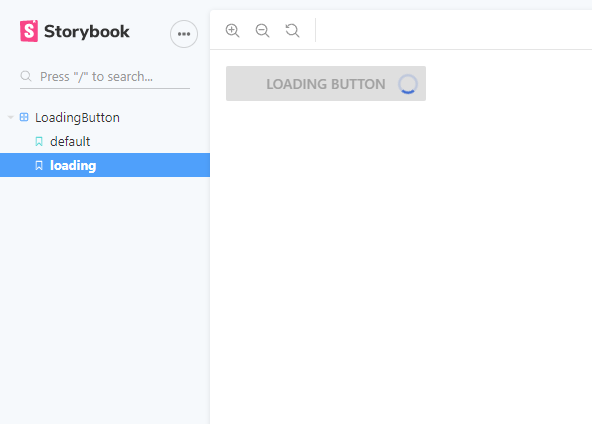
)This will allow us to see the both the default and the loading state of the button when we run Storybook.
这将使我们在运行Storybook时可以看到按钮的默认状态和加载状态。
6. Add Webpack config
6.添加Webpack配置
Now we need to tell Webpack to use react-native-web instead of react-native when bundling the application, we do this by adding an alias.
现在我们需要告诉Webpack在捆绑应用程序时使用react-native-web而不是react-native ,我们通过添加别名来做到这一点。
Back in the .storybook folder, create webpack.config.js and add the following:
返回.storybook文件夹,创建webpack.config.js并添加以下内容:
module.exports = async ({ config }) => {
  config.resolve.alias = {
    'react-native$': 'react-native-web'
  };


  return config;
};
7. Add Storybook script and run
7.添加Storybook脚本并运行
Our final step is to add a script to run Storybook. In the packages.json file, add the following script.
我们的最后一步是添加一个脚本来运行Storybook。 在packages.json文件中,添加以下脚本。
"scripts": {
  ... other scripts
  "storybook": "start-storybook"
},
Now run the script with npm run storybook . This should run the script and open in a new tab and we can view our Loading Button component and the two states we defined.
现在,使用npm run storybook运行脚本。 这应该运行脚本并在新选项卡中打开,我们可以查看“加载按钮”组件和定义的两种状态。
Caveats
注意事项
As we are leveraging React Native for Web to render our React Native components, any limitations will also apply here, such as importing components not supported by React Native for Web.
当我们利用React Native for Web渲染我们的React Native组件时,任何限制也将在这里适用,例如导入React Native for Web不支持的组件。
storybook


 2965
2965


 被折叠的 条评论
为什么被折叠?
被折叠的 条评论
为什么被折叠?
 到【灌水乐园】发言


