


angular2 建立工程
In this article we are going to build shopping cart frontend with Angular 10 for our application.
在本文中,我们将使用Angular 10构建购物车前端。
You can check our backend part built in Nodejs, which we already have published.
您可以检查我们已经发布的内置在Nodejs中的后端部分。
Note that you need to have the angular CLI installed on your local machine. To upgrade to Angular 10 you can follow up this tutorial.
请注意,您需要在本地计算机上安装有角度的CLI。 要升级到Angular 10,您可以继续阅读本教程。
To start up we need to setup our application directory. Create an angular-cart directory in your desktop and run this command to setup a new angular project:
要启动,我们需要设置应用程序目录。 在桌面上创建一个angular-cart目录,然后运行以下命令来设置新的angular项目:
cd desktop
mkdir angular-cart && cd angular-cart
ng new angular-cart
Running the ng new command will prompt some questions for the project scaffolding. Type y to add Angular routing to that project and select css as the default stylesheet.
运行ng new命令将提示一些有关项目脚手架的问题。 键入y将Angular路由添加到该项目,然后选择css作为默认样式表。
Selecting this two things will create a new Angular 10 project. You can move into the project directory and then use the code . command to open up our project in VS Code.
选择这两项将创建一个新的Angular 10项目。 您可以进入项目目录,然后使用code . 命令以VS Code打开我们的项目。
To serve our application we can run ng serve which will open up our application on port 4200.
要为我们的应用程序ng serve ,我们可以运行ng serve ,它将在端口4200上打开我们的应用程序。
We will continue by setting up our user interface for the application. You can get all our UI components from WrapPixel’s UI Kit.
我们将继续为应用程序设置用户界面。 您可以从WrapPixel的UI Kit中获得我们所有的UI组件。
WrapPixel获得最佳角度资源 (WrapPixel for Best Angular Resources)
WrapPixel is an online template store where you could get great Angular Dashboard Template and Angular Material Themes.
WrapPixel是一个在线模板商店,您可以在其中获得出色的Angular仪表板模板和Angular材质主题。
We will create our components for listing of products and cart details. We will also define a navbar component for page navigation.
我们将创建用于列出产品和购物车详细信息的组件。 我们还将为页面导航定义一个导航栏组件。
To create a component run this on your terminal:
要创建组件,请在终端上运行此命令:
ng g c components/cart
ng g c components/navbar
ng g c components/products
This will create a components directory and create a cart modules where we will define our markup and styles.
这将创建一个components目录并创建一个cart模块,在其中我们将定义标记和样式。
We need to configure Bootstrap into our application by adding the CDN into the src/dex.html file.
我们需要通过将CDN添加到src/dex.html文件中来将Bootstrap配置到我们的应用程序中。
<!doctype html>
<html lang="en">
<head>
  <meta charset="utf-8">
  <title>AngularCart</title>
  <base href="/">
  <meta name="viewport" content="width=device-width, initial-scale=1">
  <link rel="stylesheet" href="https://stackpath.bootstrapcdn.com/bootstrap/4.4.1/css/bootstrap.min.css"
    integrity="sha384-Vkoo8x4CGsO3+Hhxv8T/Q5PaXtkKtu6ug5TOeNV6gBiFeWPGFN9MuhOf23Q9Ifjh" crossorigin="anonymous">
  <link rel="icon" type="image/x-icon" href="favicon.ico">
</head>
<body>
  <app-root></app-root>
</body>
</html>
定义导航栏 (Define the Navbar)
Let’s define our navbar by editing the codes in the components/navbar/navbar.components.html to this:
让我们通过将components/navbar/navbar.components.html的代码编辑为以下内容来定义导航components/navbar/navbar.components.html :
<nav class="navbar navbar-expand-lg navbar-light bg-info">
   <div class="container">
     <a routerLink="/" class="navbar-brand">Angular Cart</a>
     <button class="navbar-toggler" type="button" data-toggle="collapse" data-target="#navbarNav"
       aria-controls="navbarNav" aria-expanded="false" aria-label="Toggle navigation">
       <span class="navbar-toggler-icon"></span>
     </button>
     <div class="collapse navbar-collapse justify-content-end" id="navbarNav">
       <ul class="navbar-nav">
         <li class="nav-item active">
           <a routerLink="/" class="nav-link">Home </a>
         </li>
         <li class="nav-item">
           <a routerLink="/cart" class="nav-link">Cart </a>
         </li>
       </ul>
     </div>
   </div>
 </nav>
And then modify the codes in the app/app.components.html to this:
然后将app/app.components.html的代码修改为此:
<app-navbar></app-navbar>
<section>
  <div class="banner-innerpage" style="
          background-image: url(https://images.pexels.com/photos/1005638/pexels-photo-1005638.jpeg?cs=srgb&dl=pexels-oleg-magni-1005638.jpg&fm=jpg);
        ">
    <div class="container">
      <!-- Row  -->
      <div class="row justify-content-center">
        <!-- Column -->
        <div class="col-md-6 align-self-center text-center" data-aos="fade-down" data-aos-duration="1200">
          <h1 class="title">Shop listing</h1>
          <h6 class="subtitle op-8">
            We are small team of creative people working together.
          </h6>
        </div>
        <!-- Column -->
      </div>
    </div>
  </div>
</section>
<router-outlet></router-outlet>
We will add some styles in the app.component.css :
我们将在app.component.css添加一些样式:
.banner-innerpage {
  padding: 150px 0 100px;
  background-size: cover;
  background-position: center center;
}
.banner-innerpage .title {
  color: #ffffff;
  text-transform: uppercase;
  font-weight: 700;
  font-size: 40px;
  line-height: 40px;
}
.banner-innerpage .subtitle {
  color: #ffffff;
}
.shop-listing .shop-hover {
  position: relative;
}
.shop-listing .shop-hover .card-img-overlay {
  display: none;
  background: rgba(255, 255, 255, 0.5);
  -webkit-box-pack: center;
  -webkit-justify-content: center;
  -ms-flex-pack: center;
  justify-content: center;
}
.shop-listing .shop-hover:hover .card-img-overlay {
  display: -webkit-box;
  display: -webkit-flex;
  display: -ms-flexbox;
  display: flex;
}
.shop-listing .shop-hover .label {
  padding: 5px 10px;
  position: absolute;
  top: 10px;
  right: 10px;
}
/*******************
shop table
*******************/
.shop-table td {
  padding: 30px 0;
}
Let’s register our routes in the app/app-routing.module.ts file :
让我们在app/app-routing.module.ts文件中注册我们的路线:
import { NgModule } from '@angular/core';
import { Routes, RouterModule } from '@angular/router';
import { CartComponent } from './components/cart/cart.component';
import { ProductsComponent } from './components/products/products.component';
const routes: Routes = [
  { path: '', component: ProductsComponent },
  { path: 'cart', component: CartComponent },
];
@NgModule({
  imports: [RouterModule.forRoot(routes)],
  exports: [RouterModule],
})
export class AppRoutingModule {}
With this done we can now handle routing in our navbar component by define the router links:
完成此操作后,我们现在可以通过定义路由器链接来处理导航栏组件中的路由:
<nav class="navbar navbar-expand-lg navbar-light bg-info">
   <div class="container">
     <a routerLink="/" class="navbar-brand">Angular Cart</a>
     <button class="navbar-toggler" type="button" data-toggle="collapse" data-target="#navbarNav"
       aria-controls="navbarNav" aria-expanded="false" aria-label="Toggle navigation">
       <span class="navbar-toggler-icon"></span>
     </button>
     <div class="collapse navbar-collapse justify-content-end" id="navbarNav">
       <ul class="navbar-nav">
         <li class="nav-item active">
           <a routerLink="/" class="nav-link">Home </a>
         </li>
         <li class="nav-item">
           <a routerLink="/cart" class="nav-link">Cart </a>
         </li>
       </ul>
     </div>
   </div>
 </nav>
We now can create some services that will handle our HTTP requests. To create a service in Angular, open up your terminal and type the following:
现在,我们可以创建一些服务来处理我们的HTTP请求。 要在Angular中创建服务,请打开您的终端并输入以下内容:
ng g s httpThis will create a http.service.ts file. We will bring in the Angular HttpClient for making http request and then define our http services:
这将创建一个http.service.ts文件。 我们将引入用于发出http请求的Angular HttpClient ,然后定义我们的http服务:
import { Injectable } from '@angular/core';
import { HttpClient } from '@angular/common/http';
import { environment } from '../environments/environment';
@Injectable({
  providedIn: 'root',
})
export class HttpService {
  constructor(private http: HttpClient) {}
  getAllProducts() {
    return this.http.get(`${environment.baseURL}/product`);
  }
  addToCart(payload) {
    return this.http.post(`${environment.baseURL}/cart`, payload);
  }
  getCartItems() {
    return this.http.get(`${environment.baseURL}/cart`);
  }
  increaseQty(payload) {
    return this.http.post(`${environment.baseURL}/cart`, payload);
  }
  emptyCart() {
    return this.http.delete(`${environment.baseURL}/cart/empty-cart`);
  }
}
We store our server baseURL in the environment.ts file:
我们将服务器baseURL存储在environment.ts文件中:
baseURL: 'http://localhost:4000'Let’s start from the products component, where we will be implementing listing of products and adding of product items to cart.
让我们从产品组件开始,在该组件中,我们将实现产品列表并将产品项添加到购物车。
To be able to use the Angular httpClient module we have to register it globally in our application by importing it into our app/app.module.ts file:
为了能够使用Angular httpClient模块,我们必须通过将其导入到我们的app/app.module.ts文件中在应用程序中进行全局注册:
import { HttpClientModule } from '@angular/common/http';
imports: [... other modules,HttpClientModule]
Let’s modify our codes in app/components/products.component.ts file to this:
让我们将app/components/products.component.ts文件中的代码修改为此:
import { Component, OnInit } from '@angular/core';
import { HttpService } from '../../http.service';
@Component({
  selector: 'app-products',
  templateUrl: './products.component.html',
  styleUrls: ['./products.component.css'],
})
export class ProductsComponent implements OnInit {
  products: Array<object> = [];
  constructor(private http: HttpService) {}
  _getProducts(): void {
    this.http.getAllProducts().subscribe((data: any) => {
      this.products = data.data;
      console.log(this.products);
    });
  }
  _addItemToCart( id, quantity): void {
    let payload = {
      productId: id,
      quantity,
    };
    this.http.addToCart(payload).subscribe(() => {
      this._getProducts();
      alert('Product Added');
    });
  }
  ngOnInit(): void {
    this._getProducts();
  }
}
And then setup our template for the application by editing the products.component.ts file to this:
然后通过将products.component.ts文件编辑为以下内容为应用程序设置我们的模板:
<section>
        <div class="spacer">
          <div class="container">
            <div class="row mt-5">
              <div class="col-lg-9">
                <div class="row shop-listing">
                  <div class="col-lg-4" *ngFor="let product of products">
                    <div class="card shop-hover border-0">
                      <img [src]="'http://localhost:5000/' + product.image" alt="wrapkit" class="img-fluid" />
                      <div class="card-img-overlay align-items-center">
                        <button class="btn btn-md btn-info" (click)="_addItemToCart(product._id, 1)">Add to Cart</button>
                      </div>
                    </div>
                    <div class="card border-0">
                      <h6>
                        <a href="#" class="link">{{ product.name }}</a>
                      </h6>
                      <h6 class="subtitle">by Wisdom</h6>
                      <h5 class="font-medium m-b-30">
                        ${{product.price}}
                      </h5>
                    </div>
                  </div>
                </div>
              </div>
            </div>
          </div>
        </div>
      </section>
With this we can now list all our products and also add product items to cart.
现在,我们可以列出所有产品,也可以将产品添加到购物车。
We will proceed by implementing the cart section. Let’s define all our cart methods in the app/components/cart.component.ts file:
我们将继续执行购物车部分。 让我们在app/components/cart.component.ts文件中定义所有购物车方法:
import { Component, OnInit } from '@angular/core';
import { HttpService } from '../../http.service';
@Component({
  selector: 'app-cart',
  templateUrl: './cart.component.html',
  styleUrls: ['./cart.component.css'],
})
export class CartComponent implements OnInit {
  carts;
  cartDetails;
  constructor(private http: HttpService) {}
  _getCart(): void {
    this.http.getCartItems().subscribe((data: any) => {
      this.carts = data.data;
      // this.cartDetails = data.data;
      console.log(this.carts);
    });
  }
  _increamentQTY(id, quantity): void {
    const payload = {
      productId: id,
      quantity,
    };
    this.http.increaseQty(payload).subscribe(() => {
      this._getCart();
      alert('Product Added');
    });
  }
  _emptyCart(): void {
    this.http.emptyCart().subscribe(() => {
      this._getCart();
      alert('Cart Emptied');
    });
  }
  ngOnInit(): void {
    this._getCart();
  }
}
And also setup a template for listing the cart items in the html file:
并且还设置了一个模板,用于在html文件中列出购物车商品:
<section>
        <div class="spacer">
          <div class="container">
            <div class="row mt-5">
              <div class="col-lg-9">
                <div class="row shop-listing">
                  <table class="table shop-table" *ngIf="carts">
                    <tr>
                      <th class="b-0">Name</th>
                      <th class="b-0">Price</th>
                      <th class="b-0">Quantity</th>
                      <th class="b-0 text-right">Total Price</th>
                    </tr>
                    <tr *ngFor="let item of carts.items">
                      <td>{{ item.productId.name }}</td>
                      <td>{{ item.productId.price }}</td>
                      <td>
                        <button class="btn btn-primary btn-sm" (click)="_increamentQTY(item.productId._id,1)">+</button>
                        {{ item.quantity }}
                        <button class="btn btn-primary btn-sm">-</button>
                      </td>
                      <td class="text-right">
                        <h5 class="font-medium m-b-30">{{ item.total }}</h5>
                      </td>
                    </tr>
                    <tr>
                      <td colspan="3" align="right">Subtotal :{{ carts.subTotal }}</td>
                      <td colspan="4" align="right">
                        <button class="btn btn-danger" (click)="_emptyCart()">Empty Cart</button>
                      </td>
                    </tr>
                  </table>
                </div>
              </div>
            </div>
          </div>
        </div>
      </section>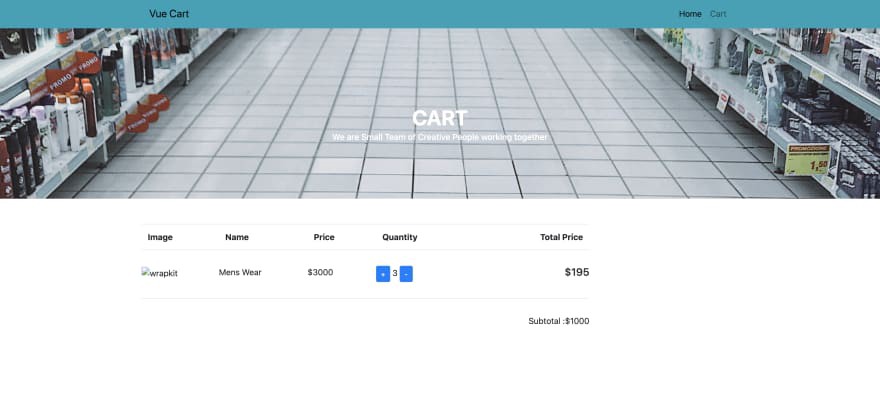
行使 (Exercise)
- Implement the decrement feature实施减量功能
- Implement remove product from cart实施从购物车中删除产品
After implementing this, Push your work to git and add the link in the comment section. Lets have some fun😁
完成此操作后,将您的工作推送到git并将链接添加到注释部分。 让我们玩得开心😁
翻译自: https://medium.com/swlh/build-a-shopping-cart-in-angular10-756bd3b1ae32
angular2 建立工程


 96
96

 被折叠的 条评论
为什么被折叠?
被折叠的 条评论
为什么被折叠?
 到【灌水乐园】发言


