


 本文详细介绍了如何在GitHub上通过Fork和Pull Request流程协作。从创建分支、提交更改到发起请求,再到合并代码,全程指导如何为开源项目贡献力量。
github请求超时
I recently worked with a team that was lacking a bit of documentation, so I took it upon myself to create some. In the process, I gained sympathy for authors of documentation. Documentation can often seem incomprehensible, and that’s in part because when you write documentation, you have to assume your audience has some baseline level of knowledge. We can all agree, your project’s README isn’t the place to explain if/else statements! So I wrote some documentation outlining the steps required to make a pull request… only to realize some people on my team didn’t know what a pull request was. Whoops. So let’s clear that up!
我最近与一个缺乏文档的团队合作,因此我自己创建了一些文档。 在此过程中,我对文档作者深表同情。 文档似乎常常难以理解,部分原因是编写文档时,您必须假设您的听众具有一定的基础知识水平。 我们都可以同意,您的项目的自述文件不是解释if / else语句的地方! 因此,我写了一些文档,概述了提出请求的步骤…只是为了意识到我们团队中的某些人不知道请求是什么。 哎呀 因此,让我们澄清一下!
协作存储库的问题 (The Problem with Collaborative Repositories)
If you’re reading this article, I’m going to assume you’ve used Github before. You’ve made a personal repository for your own code, created commits, and then pushed those commits to that repository. This is a fantastic milestone in your development journey! Now you want to contribute to someone else’s repository. Perhaps this repository is open source, or perhaps it is a team’s repository. Okay, but simple enough, right? Let’s just clone this repo and push commits to it, just like you did with your personal repo.
如果您正在阅读本文,我将假设您以前使用过Github。 您已经为自己的代码创建了一个个人存储库,创建了提交,然后将这些提交推送到该存储库。 这是您开发过程中一个梦幻般的里程碑! 现在,您想为其他人的存储库做出贡献。 该存储库也许是开源的,或者它可能是团队的存储库。 好的,但是很简单,对吧? 就像克隆个人存储库一样,让我们克隆该存储库并推送提交。
BUT WAIT! That’s dangerous territory. What if someone pushes error-filled code to this shared repository? Or even worse, what if some malicious Github user intentionally breaks the app with pernicious code? We can’t have that! Therefore, this collaborative repo needs one or more trusted maintainers that review all incoming changes. Now the question is: how do you run your code by these maintainers?
可是等等! 那是危险的领域。 如果有人将错误填充的代码推送到此共享存储库怎么办? 甚至更糟的是,如果某个恶意的Github用户故意用有害代码破坏应用程序怎么办? 我们不能拥有那个! 因此,此协作存储库需要一个或多个可信任的维护者来审查所有传入的更改。 现在的问题是:如何由这些维护者运行代码?
答案:你叉了 (Answer: You Make a Fork)
A fork is simply a copy of the repo that lives on your own personal Github profile. You can make any changes you want to this fork and experiment all you want with its code, and that’s fine! Any changes you make to your fork have no effect on the original (henceforth, “upstream”) repository you forked from. In fact, the only way your changes make it into the upstream repo is through pull requests.
叉子只是存储在您自己的Github个人资料中的回购副本。 您可以对此分支进行任何更改,并尝试使用其代码进行所有操作,这很好! 您对fork所做的任何更改都不会影响您从中派生的原始存储库(此后称为“上游”)。 实际上,您的更改进入上游存储库的唯一方法是通过请求。
“拉请求? 告诉我更多!” (“Pull requests? Tell me more!”)
Let’s say you code an awesome feature for the project. You make your final commit and push it to your fork. Great work! Now we just need to show your awesome feature to the upstream repo maintainers so it can get included in the project.
假设您为该项目编写了一个很棒的功能。 您进行最后一次提交,并将其推送到分叉。 做得好! 现在,我们只需要向上游回购维护者展示您的出色功能,就可以将其包含在项目中。
If you make a pull request, the maintainers can look at your new code, make sure it jives with the rest of the project, and then merge it into the upstream. And if your code doesn’t 100% jive just yet, the maintainers can comment on your pull request to tell you what you need to fix.
如果发出请求,则维护人员可以查看您的新代码,确保它与项目的其余部分配合使用,然后将其合并到上游。 而且,如果您的代码还不是100%活跃,维护人员可以对您的请求请求发表评论,以告诉您您需要修复什么。
Sounds great, right? Now let’s learn how to get this done.
听起来不错,对吗? 现在让我们学习如何完成这项工作。
发出拉取请求 (Making a Pull Request)
I actually have to make a pull request today. It’s super simple and doesn’t even involve code! I’m just updating the README to let my team members know I’m no longer actively working on the project (sad day). Let’s make this pull request together.
实际上,我今天必须提出请求请求。 它非常简单,甚至不涉及代码! 我只是在更新自述文件,以使我的团队成员知道我不再积极从事该项目(悲伤的日子)。 让我们一起提出拉取请求。
要叉! (To the fork!)
I’ve been working on this project for a while, and I already have a fork. If you don’t have a fork for the project you want to contribute to, you’ll have to make one by clicking the Fork icon in the top right of the repo:
我已经在这个项目上工作了一段时间,而且我已经有了叉子。 如果您没有要贡献的项目的分支,则必须通过单击存储库右上方的Fork图标来创建分支:

Then, of course, you’ll run git clone on your new fork (not the upstream!) to download it to your computer. After you clone, you’ll have to run git remote add upstream insert_upstream_repo's_url_here to connect your local repo to the upstream repo. After you’ve done so, you can run git remote -v to make sure you have both origin and upstream remotes.
然后,当然,您将在新的fork(而不是上游!)上运行git clone ,以将其下载到计算机上。 克隆后,您必须运行git remote add upstream insert_upstream_repo's_url_here将本地存储库连接到上游存储库。 完成此操作后,可以运行git remote -v以确保您同时具有原始远程和上游远程。
Now let’s begin! If you’ve literally just cloned a new fork, this first step doesn’t apply to you. But imagine you’ve had this repository on your computer for a while, and since you last contributed to it, other people have made changes to the upstream repo. Perhaps they’ve written code that’s going to affect the way you approach your issue. Perhaps someone has already solved the issue you were about to solve! In any case, we don’t want to be working with outdated code. We want the latest and freshest code on our computer before we start working on anything.
现在开始吧! 如果您实际上只是克隆了一个新的fork,则此第一步不适用于您。 但是想像一下您已经在计算机上拥有此存储库一段时间了,并且自从您上次对其进行贡献以来,其他人已经对上游存储库进行了更改。 也许他们编写的代码会影响您解决问题的方式。 也许有人已经解决了您要解决的问题! 无论如何,我们都不希望使用过时的代码。 在开始进行任何工作之前,我们需要计算机上最新,最新鲜的代码。
获取最新代码 (Getting the Latest Code)
To get this most current code, we’ll run two commands. First, we have to download the upstream repo’s code. Here’s how:
为了获得最新的代码,我们将运行两个命令。 首先,我们必须下载上游仓库的代码。 这是如何做:
git fetch --all
git fetch --all
Easy, right? Though if you want to specify that you only want to download from upstream, you’d you’d run:
容易吧? 尽管如果要指定仅从上游下载,则可以运行:
git fetch upstream
git fetch upstream
Note that this works because we defined upstream earlier when we ran git remote add upstream whatever_the_upstream's_url_was.
注意,这是可行的,因为我们在运行git remote add upstream whatever_the_upstream's_url_was时较早地定义了upstream git remote add upstream whatever_the_upstream's_url_was 。
So now we’ve downloaded the upstream’s code! But hold up. Our code doesn’t look any different. Well, we’ve downloaded the code, but we still have to merge it into our local project. Let’s do that now:
因此,现在我们已经下载了上游的代码! 但是请稍等。 我们的代码看起来没有什么不同。 好了,我们已经下载了代码,但是我们仍然必须将其合并到我们的本地项目中。 让我们现在开始:
git merge upstream/master
git merge upstream/master
Excellent! You should now see that the code on your computer is the same as the upstream repo’s master branch. Great job getting this far.
优秀的! 现在,您应该看到计算机上的代码与上游存储库的master分支相同。 取得如此出色的成就。
One last step! If the project is using something like npm or Yarn, someone might have added an npm package since you last worked on the code. Therefore, to get everything running correctly, we need to add those new packages:
最后一步! 如果项目使用的是npm或Yarn之类的东西,那么自您上一次处理代码以来,可能有人已经添加了npm软件包。 因此,为了使一切正常运行,我们需要添加以下新软件包:
npm install
*****OR*****
yarn install
“ git pull怎么样?” (“What about git pull?”)
Git has a command, git pull, that actually has nothing to do with making a pull request. That command is simply a combination of the git fetch and git merge upstream/master commands we just ran. All this Git stuff is actually way more intricate than I’m making it sound, so if you’d like, you can read more about fetching and pulling.
Git有一个命令git pull ,它实际上与发出拉取请求无关。 该命令只是我们刚刚运行的git fetch和git merge upstream/master命令的组合。 实际上,所有这些Git东西都比我说的要复杂得多,因此,如果您愿意,可以阅读有关fetch和pull的更多信息。
做出改变 (Making a Change)
Whew! Now let’s code our new feature. Whenever we code a new feature, it’s best practice to make a new branch. That way, if everything devolves into a fiery mess, we can always escape by going back to our master branch.
ew! 现在,让我们编写新功能的代码。 每当我们编写新功能代码时,最好的做法是创建一个新分支。 这样,如果一切演变成一团糟,我们总是可以回到主分支来逃脱。
The process of navigating between branches and commits is called a git checkout. Here’s a neat command that lets us create a new branch and checkout it immediately:
在分支和提交之间导航的过程称为git checkout 。 这是一个简洁的命令,可让我们创建一个新分支并立即checkout它:
git checkout -B your_new_branch_name_here
git checkout -B your_new_branch_name_here
Like I said, I’m removing my name from the README, so I’ll make my branch:
就像我说的那样,我将从README中删除我的名字,所以我将创建自己的分支:

I make the changes to the README, and then commit and push my changes:
我对自述文件进行了更改,然后提交并推送了更改:
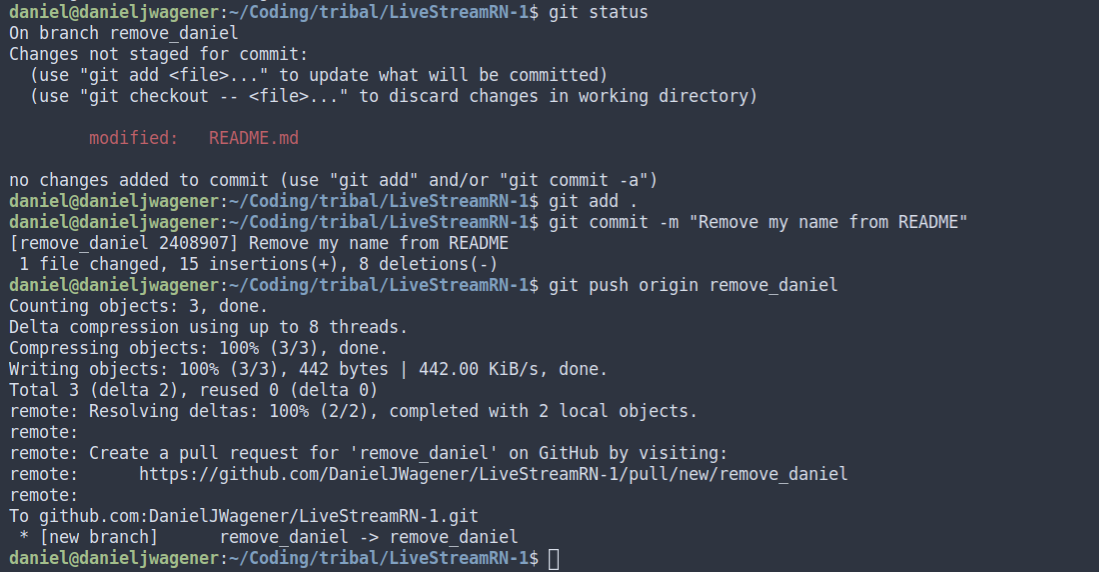
Note that since I made a new branch, I’m running git push origin remove_daniel instead of git push origin master. Also note that here, origin is my fork. Again, if you get lost, git remote -v is your friend.
请注意,由于创建了新分支,因此我正在运行git push origin remove_daniel而不是git push origin master 。 这里还要注意, origin就是我的叉子。 同样,如果您迷路了, git remote -v是您的朋友。
We’re almost there! Time for…
我们快到了! 的时间…
实际拉取请求 (The Actual Pull Request)
If I now go to Github and navigate to the upstream repo, I’ll probably see this notification:
如果现在转到Github并导航到上游仓库,则可能会看到以下通知:

Github makes things easy, thankfully. But if you don’t see this notification for some reason, no problem! Just click on the “Pull requests” tab and click the green “New pull request” button.
幸运的是,Github使事情变得简单。 但是,如果由于某种原因而没有看到此通知,那就没问题! 只需单击“拉取请求”选项卡,然后单击绿色的“新拉取请求”按钮。

We don’t see our fork anywhere, and that’s because we have to click “compare across forks.” Now you’ll see dropdowns for two repositories: the base repository and the head repository. In this scenario, the base repository is the upstream repo and the head repository should be my fork. Thus, I go to the second set of dropdowns and select my repo and branch accordingly:
我们在任何地方都看不到叉子,这是因为我们必须单击“比较叉子”。 现在,您将看到两个存储库的下拉列表:基础存储库和头存储库。 在这种情况下,基础存储库是上游存储库,而主存储库应该是我的fork。 因此,我转到第二组下拉菜单,然后选择我的仓库并相应地分支:

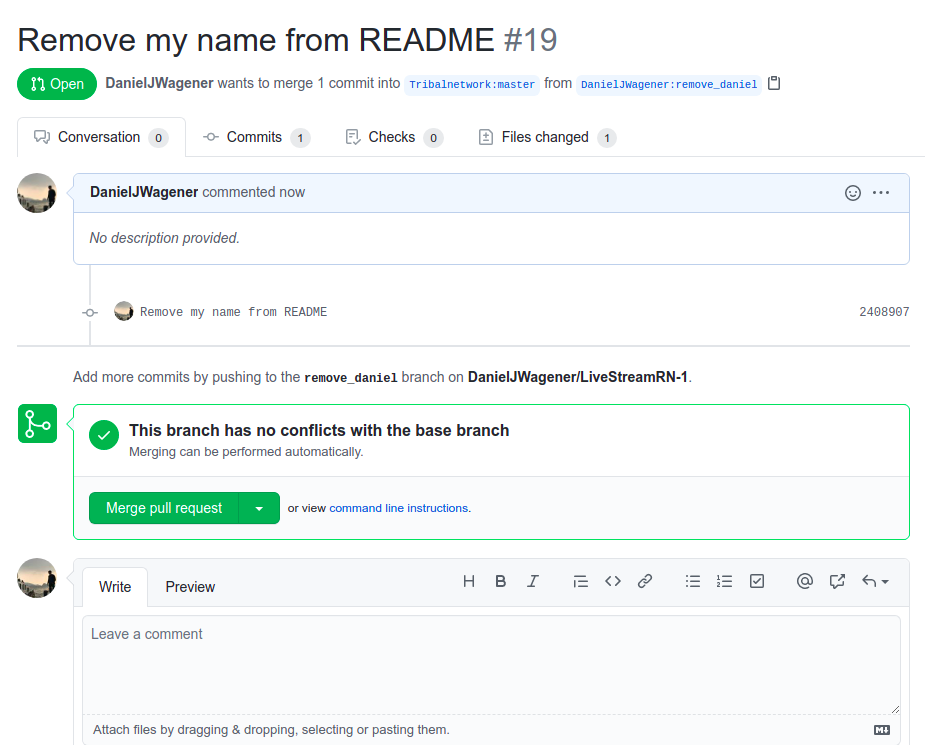
At last! I now click “Create pull request” so the maintainers can see my changes.
最后! 现在,我单击“创建请求请求”,以便维护人员可以看到我的更改。
接受和合并拉取请求 (Accepting and Merging a Pull Request)
As it so happens, I am (for now) a maintainer of the repo I just contributed to. So from a maintainer’s perspective, here’s what the new pull request looks like:
碰巧的是,我(目前)是我刚刚贡献的回购协议的维护者。 因此,从维护者的角度来看,新的拉取请求如下所示:
As a maintainer, I can click on a commit to inspect the changes that were made. I also have the ability to leave a comment, among other things. If I decide everything looks good, I click “Merge pull request” to complete the process.
作为维护者,我可以单击一个提交来检查所做的更改。 我还可以发表评论,等等。 如果我确定一切看起来都不错,请单击“合并拉取请求”以完成该过程。
We’re done! My update is now in the upstream repo. The concept of pull requests should be demystified now that you’ve seen one in action from beginning to end.
大功告成! 我的更新现在在上游存储库中。 既然您已经从头到尾看到了一个实际的请求,那么就应该将拉取请求的概念弄混了。
Hope this helps!
希望这可以帮助!
翻译自: https://medium.com/swlh/forks-and-pull-requests-how-to-contribute-to-github-repos-8843fac34ce8
github请求超时


 被折叠的 条评论
为什么被折叠?
被折叠的 条评论
为什么被折叠?
 到【灌水乐园】发言


