


gitlab 与 ci
词汇表 (Glossary)
SCM: Source Code Management.
SCM :源代码管理。
CI: Continuous Integration.
CI :持续集成。
CD: Continuous Delivery.
CD :连续交付。
GCP: Google Cloud Platform.
GCP: Google Cloud Platform。
Continuous Integration is the practice of integrating changes from different developers in the team into a shared repository, each integration can then be verified by an automated build and automated tests. There are many CI tools or service out there, you can look at Codeship, TravisCI, CircleCI, Jenkins, or many others.
持续集成是将团队中不同开发人员的更改集成到共享存储库中的实践,然后可以通过自动构建和自动化测试来验证每个集成。 那里有许多CI工具或服务,您可以查看Codeship,TravisCI,CircleCI,Jenkins或其他许多工具。
I’m going to be writing about the Similarities and differences between GitLab CI and Cloud build; how the pipeline looks like, connection to the repository, and others. In order to create this blog, I used the generate RSS feed repository for the purpose to create a CI / CD workflow.
我将写有关GitLab CI与Cloud build之间的异同的文章。 管道的外观,与存储库的连接等。 为了创建此博客,我使用了生成RSS提要存储库来创建CI / CD工作流。
If you are interested in know more about the RSS feed project, please read Troubleshooting Terraform on a serverless world where I explained how I created the serverless infrastructure with Terraform on GCP and I showed you during the implementation the decision I made to fix problems.
如果您有兴趣了解有关RSS feed项目的更多信息,请阅读在无服务器世界中对Terraform进行故障排除,在其中我解释了如何在GCP上使用Terraform创建无服务器基础结构,并在实施过程中向您展示了解决问题的决定。
In this article I’m going to be leveraging the following technologies:
在本文中,我将利用以下技术:
- Cloud Build. 云构建。
- Compute Engine. 计算引擎。
- GitHub. GitHub。
- Gitlab & Gitlab CI. Gitlab和Gitlab CI。
- Terraform & Terraform Cloud. 地形和地形云。
要求: (Requirements:)
I’ll try to make this as clear as possible, but you’ll need at least a basics knowledge in the following topics to be able to follow this article efficiently:
我将尽力使这一点变得清晰,但您至少需要具备以下主题的基础知识才能有效地阅读本文:
- GNU / Linux distribution. GNU / Linux发行版。
- Cloud Computing. 云计算。
在你开始之前: (Before you begin:)
Create a project in the Google Cloud Console and set up the billing.
在Google Cloud Console中创建一个项目并设置帐单。
- Create repositories on GitHub and Gitlab. 在GitHub和Gitlab上创建存储库。
将GitHub用于仅SCM和将CloudBuild用于CI / CD (Using GitHub for SCM-only and CloudBuild for CI/CD)
Cloud Build is a service that executes your builds on Google Cloud Platform’s infrastructure. You can Integrate your working repositories in order to start creating build triggers; Build triggers automatically build containers based on source code or tag changes in a repository, you cannot manually start a new build using Google Cloud Console, however, you can retry a previous build.
Cloud Build是一项服务,可在Google Cloud Platform的基础架构上执行您的构建。 您可以集成您的工作存储库以开始创建构建触发器。 构建触发器会根据源代码或存储库中的标签更改自动构建容器,您无法使用Google Cloud Console手动启动新的构建,但是,您可以重试以前的构建。
You must first connect Cloud Build to your source repository before building the code in that repository.
您必须先将Cloud Build连接到源存储库,然后才能在该存储库中构建代码。

Select the repository where you’ve stored your source code, click Continue, and authenticate to your source repository with your username and password.
选择存储源代码的存储库,单击继续,然后使用用户名和密码对源存储库进行身份验证。

From the list of available repositories, select the desired repository, then click the Connect repository button.
从可用存储库列表中,选择所需的存储库,然后单击“ 连接存储库”按钮。

Click the Add trigger button to continue creating a build trigger to automate builds for the source code in the repository.
单击“ 添加触发器”按钮以继续创建构建触发器,以自动执行存储库中源代码的构建。
You need either a Dockerfile or a Cloud Build config file configured using a YAML format. In this blog, I’m going to use the Cloud Build build config to build my containers. If you selected the Cloud Build config file as your build config option, you can add variable values to substitute specific variables at build time.
您需要使用YAML格式配置的Dockerfile或Cloud Build配置文件 。 在此博客中,我将使用Cloud Build构建配置来构建我的容器。 如果选择了Cloud Build配置文件作为build config选项,则可以在构建时添加变量值以替换特定变量。

Let me show you my cloudbuild.yaml file for this project, the following piece of information explains how works in each field for my file:
让我向您展示我用于该项目的cloudbuild.yaml文件,以下信息说明了我的文件在每个字段中的工作方式:
The
stepsfield in the build config file specifies a build step that specifies an action that you want Cloud Build to perform.构建配置文件中的
steps字段指定了构建步骤,该步骤指定了您希望Cloud Build执行的操作。The
idfield sets a unique identifier for a build step.id字段为构建步骤设置唯一标识符。The
namefield of a build step specifies a cloud builder, which is a container image running common tools. You use a builder in a build step to execute your tasks. In my case, I’m usingstashconsulting/terraform-docker:entrypoint-latestversion that’s a custom image that I created.构建步骤的
name字段指定一个云构建器 ,它是运行常用工具的容器映像。 您在构建步骤中使用构建器来执行任务。 就我而言,我使用的是stashconsulting/terraform-docker:entrypoint-latest版本,它是我创建的自定义映像。
This image was born when we wanted to manage the infrastructure with terraform and we required to build a docker image for a project but it was not possible because the terraform image does not have docker; If you’re interested in know more about this project you can find the source code on terraform-docker repository on GitHub. Also, you can find the custom images on stashconsulting/terraform-docker repository on docker hub. Please tell others about this project. 📢 Hehe..!
当我们想使用terraform管理基础架构并且需要为项目构建docker映像时,该映像就诞生了,但是这是不可能的,因为terraform映像没有docker。 如果您有兴趣了解有关此项目的更多信息,可以在GitHub的 terraform-docker存储库中找到源代码。 此外,您还可以找到自定义图像stashconsulting / terraform,码头工人在码头工人枢纽库。 请将此项目告诉其他人。 📢呵呵..!
The
argsfield of a build step takes a list of arguments and passes them to the builder referenced by thenamefield.构建步骤的
args字段获取参数列表,并将其传递给name字段引用的构建器。The
entrypointin a build step specifies an entrypoint if you don't want to use the default entrypoint of the builder.该
entrypoint在构建步骤规定,如果你不想使用生成器的默认入口点的入口点。
Look at line 13, I use gsutil rsync for the purpose of managing the terraform’s state. The gsutil rsync command makes the contents under destination URL the same as the contents under source URL, by copying any missing files/objects or those whose data has changed.
看第13行,我使用gsutil rsync来管理terraform的状态。 gsutil rsync命令通过复制所有丢失的文件/对象或数据已更改的文件/对象,使目标URL下的内容与源URL下的内容相同。

We have created an automated CI/CD workflow that starts new builds in response to code changes in any branch.
我们已经创建了一个自动化的CI / CD工作流,该工作流可以响应任何分支中的代码更改而启动新的构建。

Something to keep it mind GitHub App builds started more than 3 days ago cannot be rebuilt. To retry a previous build:
请记住,超过三天前开始的GitHub App构建无法重建。 重试以前的版本:
Select your project and click Open.
选择您的项目,然后单击“ 打开” 。
Open the Build History page in the Cloud Build section in the Google Cloud Console.
在Google Cloud Console的Cloud Build部分中打开Build History页面。
In the Build history page, click on a build that you wish to rebuild.
在“ 构建历史记录”页面中,单击要重建的构建。
Click Rebuild.
单击重建 。
将GitHub用于仅SCM,将GitLab CI用于CI / CD (Using GitHub for SCM-only and GitLab CI for CI/CD)
GitLab CI/CD is part of GitLab where you execute your builds specifying a pipeline configured using a YAML format called .gitlab-ci.yml within the project.
GitLab CI / CD是GitLab的一部分,您可以在其中执行构建, .gitlab-ci.yml在项目中指定使用称为.gitlab-ci.yml的YAML格式配置的管道 。
First, I connected my GitHub repository with GitLab CI using a personal access token. To create a Personal Access Token you have to authenticate to your source repository. This token will be used to access your repository and push commit statuses to GitHub. The repo and admin:repo_hook should be enabled to allow GitLab access to your project, update commit statuses, and create a web hook to notify GitLab of new commits.
首先,我使用个人访问令牌将GitHub存储库与GitLab CI连接。 创建个人访问令牌 您必须对源存储库进行身份验证。 该令牌将用于访问您的存储库并将提交状态推送到GitHub。 应该启用repo和admin:repo_hook来允许GitLab访问您的项目,更新提交状态并创建Web挂钩以将新提交通知GitLab。

You have a couple of options to start a new project. To perform an authorization with GitHub to grant GitLab access to your repositories, you choose Run CI/CD for an external repository.
您有两个选择可以启动一个新项目 。 要通过GitHub执行授权以授予GitLab访问您的存储库的权限,请为外部存储库选择Run CI / CD。

You have two options to connect repositories, I choose GitHub Option.
您有两个连接存储库的选项,我选择GitHub Option。

Paste the token into the Personal access token field and click List Repositories. Click Connect to select the repository.
将令牌粘贴到“ 个人访问令牌”字段中,然后单击“ 列出存储库” 。 单击“ 连接”以选择存储库。

GitLab maintains a synced copy of the GitHub repository.
GitLab维护GitHub存储库的同步副本。

To perform the build, you need to install GitLab Runner on any platform for which you can build Go binaries, including Linux, macOS, Windows, FreeBSD, and Docker. In my case, I’m going to create an instance based on Debian in Compute Engine.
要执行构建,您需要在可以构建Go二进制文件的任何平台上安装GitLab Runner ,包括Linux,macOS,Windows,FreeBSD和Docker。 就我而言,我将在Compute Engine中基于Debian创建一个实例。
To download the appropriate package for Debian or Ubuntu:
要下载适用于Debian或Ubuntu的软件包:
curl -LJO https://gitlab-runner-downloads.s3.amazonaws.com/latest/deb/gitlab-runner_amd64.debYou can check other releases here.
您可以在此处查看其他版本。
You have to install Git or you’ll get this error at the moment to install the package:
您必须安装Git或在安装软件包时会出现此错误:
dpkg: dependency problems prevent configuration of gitlab-runner: gitlab-runner depends on git; however: Package git is not installed.First, use the apt package management tools to update your local package index. With the update complete, you can download and install Git:
首先,使用apt软件包管理工具更新您的本地软件包索引。 完成更新后,您可以下载并安装Git:
sudo apt update
sudo apt install git
If you get this message E: Unmet dependencies. Try 'apt--fix-broken install' with no packages(or specify a solution) run the following:
如果收到此消息,则E: Unmet dependencies. Try 'apt--fix-broken install' with no packages(or specify a solution) E: Unmet dependencies. Try 'apt--fix-broken install' with no packages(or specify a solution)运行以下命令:
sudo apt --fix-broken install -yInstall the package for your system as follows:
如下安装系统软件包:
sudo dpkg -i gitlab-runner_amd64.debNow we have to register a runner. Registering a Runner is the process that binds the Runner with a GitLab instance. Before registering a Runner, you need to obtain a token for a project-specific Runner
现在我们必须注册一个跑步者。 注册Runner是将Runner与GitLab实例绑定的过程。 注册Runner之前,您需要获取特定于项目的Runner的令牌
Select your Project.
选择您的项目 。
Go to Settings in the left navigation.
转到左侧导航栏中的设置 。
Click on CI/CD.
单击CI / CD。
Expand the Runners section.
展开“ 跑步者”部分。
Read the Set up a specific Runner automatically section.
阅读自动设置特定的运行器部分。
To register a Runner under GNU/Linux run the following:
要在GNU / Linux下注册Runner,请运行以下命令:
sudo gitlab-runner registerYou’ll be asked for the following:
系统会要求您提供以下信息:
- The gitlab-ci coordinator URL (e.g. https://gitlab.com ) gitlab-ci协调器URL(例如https://gitlab.com)
- The gitlab-ci token obtained in the runner's section for this runner. 在跑步者部分为此跑步者获得的gitlab-ci令牌。
- The gitlab-ci description for this runner. 该跑步者的gitlab-ci描述。
- The gitlab-ci tags for this runner. 该跑步者的gitlab-ci标签。
- The executor (e.g. ssh, docker+machine, docker-ssh+machine, kubernetes, docker, parallels, virtualbox, docker-ssh, shell: docker). 执行程序(例如ssh,docker + machine,docker-ssh + machine,kubernetes,docker,并行,virtualbox,docker-ssh,shell:docker)。
If you chose Docker as your executor, you’ll be asked for the default image to be used for projects that do not define one in
.gitlab-ci.yml.如果您选择Docker作为执行程序,则会要求您为未在
.gitlab-ci.yml定义一个的项目使用默认映像。
For my project, I have a docker builder module on terraform that creates a tag to the kong image and pushes it to the Container Registry.
对于我的项目,我在terraform上有一个docker builder模块 ,该模块为kong图像创建一个标签并将其推送到Container Registry。

So, I have to mount a docker volume when creating a register or we’ll get this error at the moment to build the kong image.
因此,我必须在创建寄存器时挂载docker卷 ,否则我们现在会在构建kong映像时收到此错误。
exit status 1. Output: Cannot connect to the Docker daemon at unix:///var/run/docker.sock. Is the docker daemon running?Cannot connect to the Docker daemon at unix:///var/run/docker.sock. Is the docker daemon running?Also, I choose to authenticate with my GCP credentials when creating the register instead of specifying in my pipeline.
另外,我选择在创建注册时使用GCP凭据进行身份验证,而不是在管道中进行指定。
I ran the following commands in my instance.
我在实例中运行了以下命令。
sudo gitlab-runner register -n \
  --url https://gitlab.com/ \
  --registration-token my_token \
  --executor docker \
  --description "runner with gcp credentials" \
  --docker-image "docker:19.03.12" \
  --docker-volumes /var/run/docker.sock:/var/run/docker.sock \
  --env "GOOGLE_CREDENTIALS=$service_account"
You can add your environment variables on setting > CI/CD > Expand variable section.
您可以在设置 > CI / CD >扩展变量部分中添加环境变量 。

If you choose to authenticate with the GCP credentials specifying in the .gitlab-ci.yml put the following in the file
如果您选择使用.gitlab-ci.yml指定的GCP凭据进行身份验证,请在文件中添加以下内容
script:
- echo -n $service_account > credentials.json
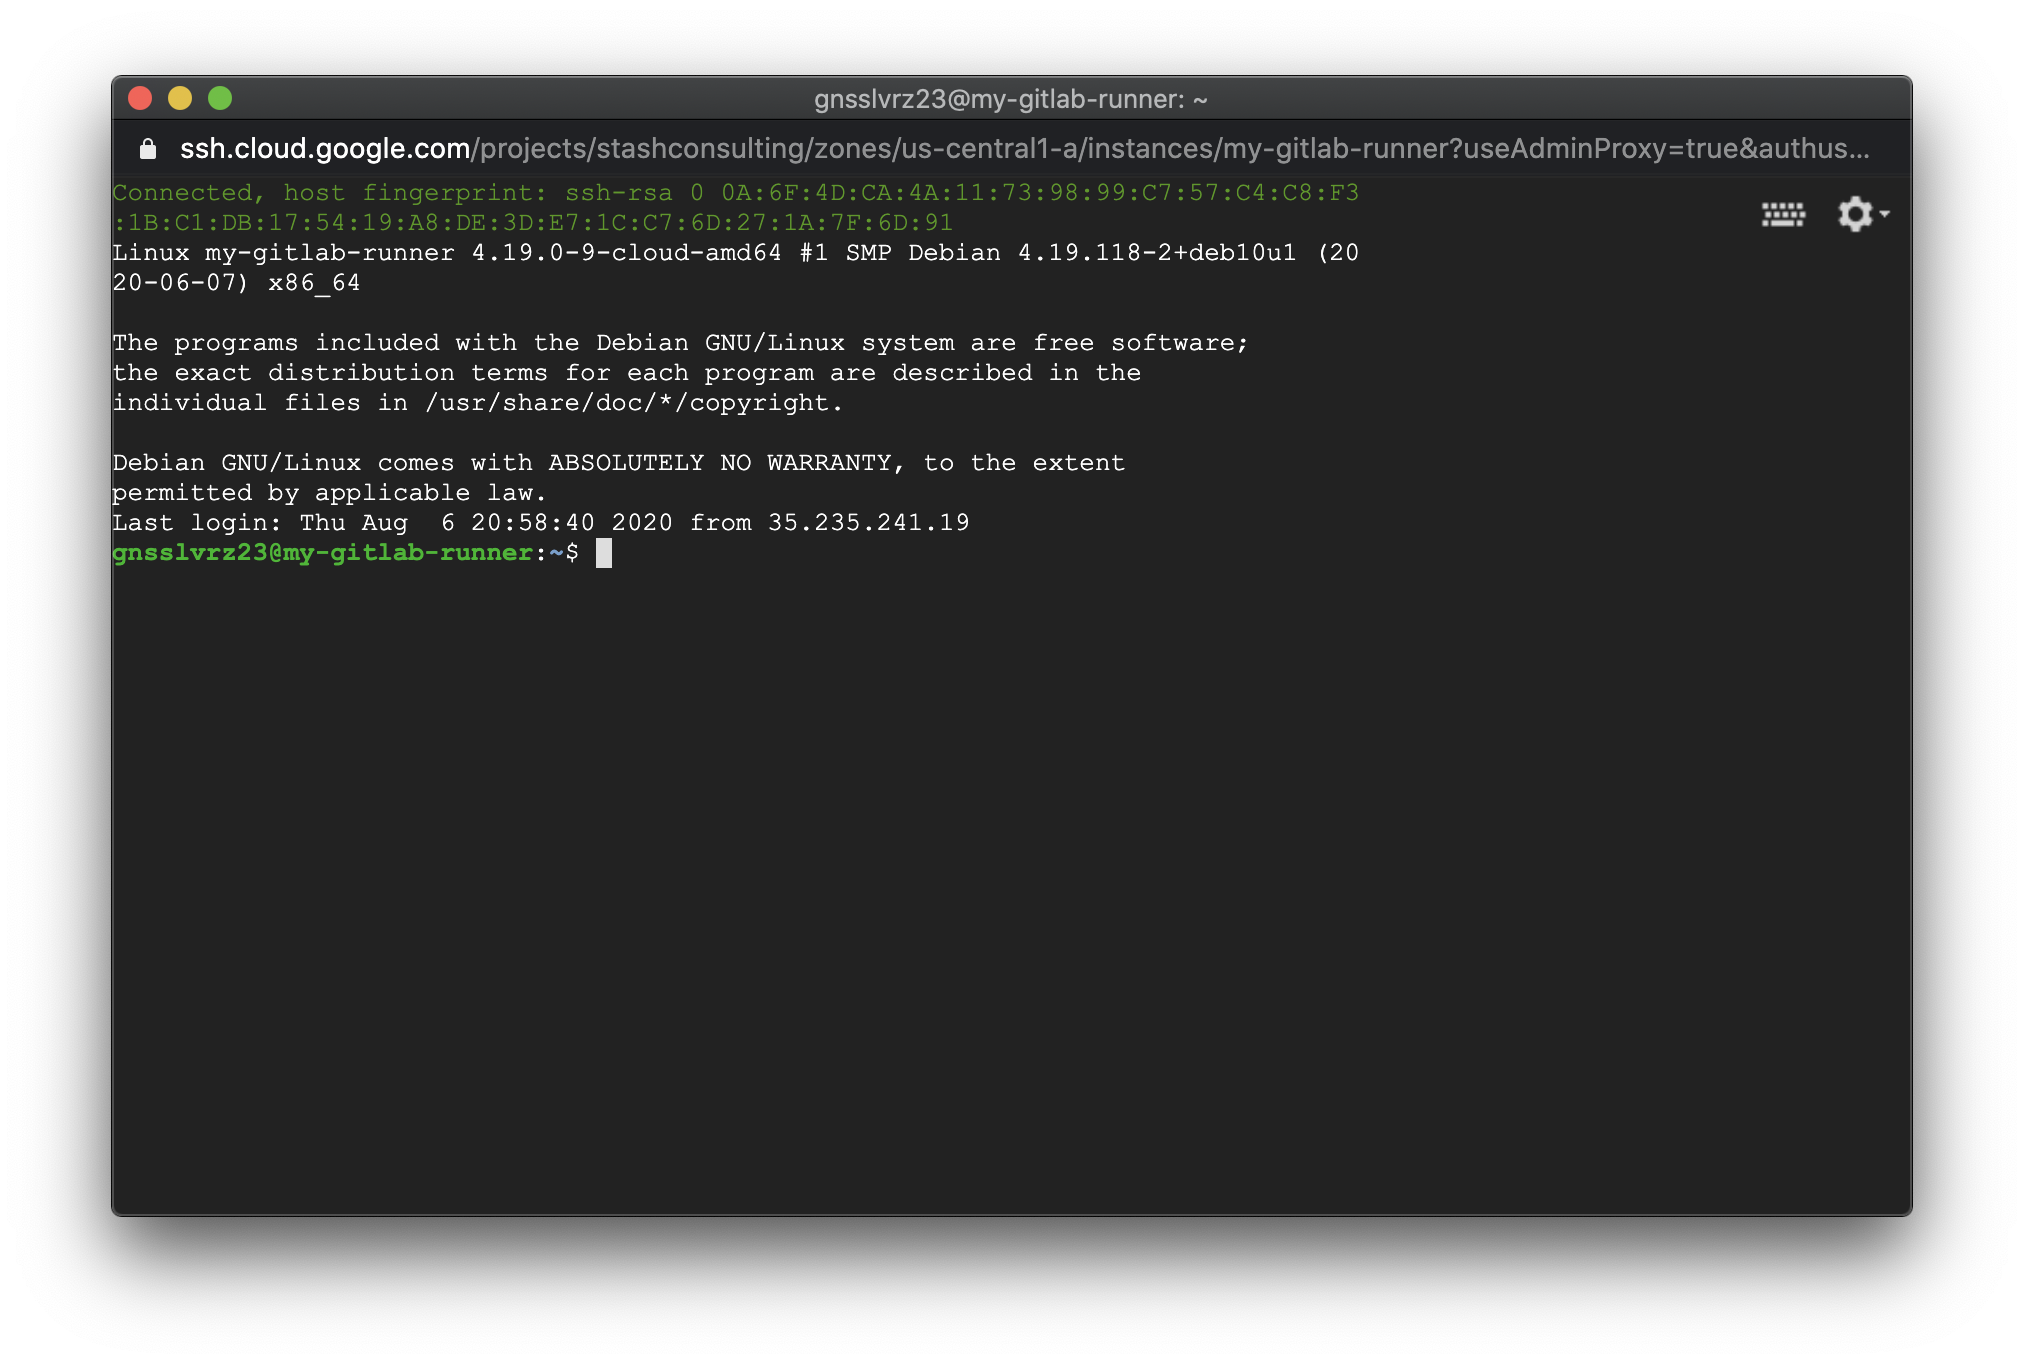
- gcloud auth activate-service-account --key-file credentials.jsonNow go to setting > CI/CD > Expand runner section to see your configured runner in the Specific Runners side. First, the runner will show a strange status for a couple of minutes until it is “available”, the reason is the runner is not connected yet, it only happens when I add the environment variable of the google credentials, I don’t know that details in depth. Look at the example image below taken from the issue page.
现在转到设置 > CI / CD >扩展流道部分,以在“ 特定流道”侧查看已配置的流道。 首先,跑步者将在几分钟内显示一个奇怪的状态 ,直到“可用”为止,原因是跑步者尚未连接,仅当我添加google凭据的环境变量时才会发生,我不知道详细介绍。 查看下面从问题页面获取的示例图像。

If you want you can edit the runner for the purpose to add the tags or others. I just edited it.
如果需要,您可以编辑运行器以添加标签或其他标签。 我刚刚编辑了它。

In the Compute Engine instance run the following that runs the multi runner service if you don't do the job will be pending state and will be waiting to be picked by a runner:
在Compute Engine实例中,运行以下命令,该命令将运行多运行程序服务,如果您不这样做,则该作业将处于待处理状态,并将等待运行程序进行选择。
sudo gitlab-runner runThen in GitHub, add a .gitlab-ci.yml to configure GitLab CI/CD.
然后在GitHub中添加.gitlab-ci.yml以配置GitLab CI / CD 。

Now let me show you my .gitlab-ci.yml file for this project which was adapted to do the same as cloudbuild.yaml. The following piece of information explains how works in each field for my file:
现在,让我向您展示我的.gitlab-ci.yml文件,该文件适用于与cloudbuild.yaml相同的cloudbuild.yaml 。 以下信息说明了文件中每个字段的工作方式:
The Jobs which define what to do.
定义做什么的工作。
The
stagesdefines a job stage.这些
stages定义了一个工作阶段。The
deployfield is a stage.deploy字段是一个阶段。The
imagefield is the name of the Docker image the Docker executor runs to perform the CI tasks.image字段是Docker执行程序运行以执行CI任务的Docker映像的名称。The
nameis the full name of the image that should be used.name是应使用的图像的全名。
With the image
stashconsulting/terraform-docker:gcloud-lastestversion you can run bash based in ubuntu, terraform and gcloud commands.使用图像
stashconsulting/terraform-docker:gcloud-lastest版本,您可以基于ubuntu,terraform和gcloud命令运行bash。
The
entrypointfield is a command or script that should be executed as the container’s entrypoint.entrypoint字段是应作为容器的入口点执行的命令或脚本。The
scriptfield is the shell script that is executed by Runner.script字段是由Runner执行的Shell脚本。The
tagsfield is a list of tags which are used to select Runner.tags字段是用于选择Runner的标签列表。

Jobs are executed by Runners. Multiple jobs in the same stage are executed in parallel if there are enough concurrent runners. If all jobs in a stage succeed, the pipeline moves on to the next stage. If any job in a stage fails, the next stage is not (usually) executed and the pipeline ends early. In my case, we have only one stage.
作业由跑步者执行。 如果有足够的并发运行程序,则可以并行执行同一阶段中的多个作业。 如果一个阶段中的所有作业都成功,则管道将继续进行下一个阶段。 如果某个阶段中的任何作业失败,则(通常)不会执行下一阶段,并且管道会提早结束。 就我而言,我们只有一个阶段。

To execute a pipeline manually:
要手动执行管道:
Navigate to your project’s CI/CD > Pipelines.
导航到项目的CI / CD>管道 。
Click on the Run Pipeline button.
单击运行管道按钮。
On the Run Pipeline page:
在“ 运行管道”页面上:
- Select the branch to run the pipeline. 选择分支以运行管道。
- Enter any environment variables required for the pipeline run. 输入管道运行所需的任何环境变量。
Click the Create pipeline button.
单击创建管道按钮。
- The pipeline now executes the jobs as configured. 管道现在按照配置执行作业。
将GitLab用于SCM和CI / CD (Using GitLab for SCM & CI/CD)
As well you can use only GitLab to storage the code and create the CI / CD workflow, select Projects (in the top navigation bar) > Your projects > select the Project you’ve already created.
同样,您只能使用GitLab来存储代码并创建CI / CD工作流程,选择“ 项目” (在顶部导航栏中)> “项目” >选择您已经创建的项目。
If you want to configure the pipeline select CI / CD in the left navigation to start setting up CI / CD in your project.
如果要配置管道,请在左侧导航栏中选择CI / CD ,以开始在项目中设置CI / CD。
The steps to create the GitLab Runner, register a runner, handle the terraform state specified in Using GitHub for SCM-only and GitLab CI for CI/CD, and the pipeline will the same only you won’t need run CI/CD for an external repository.
创建GitLab运行器,注册运行器,处理将GitHub用于仅SCM和将GitLab CI用于CI / CD中指定的地形状态的步骤,管道将相同 只有您不需要为外部存储库运行CI / CD。
处理Terraform状态的其他方法 (Other ways to handle the status of terraform)
Now, we have to handle the status of terraform there are two options, the first one is to add a backend.tf file to define the remote backend in your project.
现在,我们要处理terraform的状态,有两种选择,第一种是添加backend.tf文件来定义项目中的远程后端。
terraform {
  backend "gcs" {
    bucket = "my-bucket"
  }
}
And resolving the error locking state:
并解决错误锁定状态:
Error: Error locking state: Error acquiring the state lock: writing "gs://my-bucket/default.tflock" failed: googleapi: Error 412: Precondition Failed, conditionNotMetLock Info:
 ID:        1595382417218702
 Path:      gs://tf-state-backup-terraform/default.tflock
 Operation: OperationTypeApply
 Who:       root@runner-9r6gkzht-project-19731653-concurrent-0
 Version:   0.12.18
 Created:   2020-07-22 01:46:57.177190723 +0000 UTC
 Info:
Terraform acquires a state lock to protect the state from being    written by multiple users at the same time. Please resolve the issue   above and try again. For most commands, you can disable locking with the "-lock=false" flag, but this is not recommended.
Or using the HTTP backend
或使用HTTP后端
terraform {
  backend "http" {
    = "http://myrest.api.com/foo"
    lock_address = "http://myrest.api.com/foo"
    unlock_address = "http://myrest.api.com/foo"
  }
}
The second one is using terraform cloud which is an application that lets me manage Terraform runs (plans and applies) in a consistent and reliable environment. You have to create an account. Terraform Cloud will prompt you to create a new organization after you sign in for the first time.
第二个是使用terraform cloud ,它是一个应用程序,可让我在一致且可靠的环境中管理Terraform运行(计划和应用)。 您必须创建一个帐户 。 首次登录后,Terraform Cloud会提示您创建一个新组织。

Also, create a new workspace by choosing “Workspaces” from the main menu, and then the “New Workspace” button. Then I choose GitHub and authenticate.
另外,通过从主菜单中选择“工作区”,然后单击“新建工作区”按钮,创建一个新的工作区。 然后,我选择GitHub并进行身份验证。

We make the configurations in order for the state is handled automatically on Terraform Cloud, and my CI /CD will take care of the applies.
我们进行配置,以便在Terraform Cloud上自动处理状态,而我的CI / CD将负责处理。

We run terraform login command for the purpose to obtain automatically and save an API token for Terraform Cloud, we have to adapt this part in the pipeline. You need Terraform v0.13.0 or higher for the correct operation of the command.
为了自动获取并保存Terraform Cloud的API令牌,我们运行terraform login命令, 我们必须在管道中调整此部分 。 您需要Terraform v0.13.0或更高版本才能正确执行命令。


We create acredentials.tfrc.json file inside of .terraform.d folder for the purpose of terraform store the token.
我们创建了一个credentials.tfrc.json的文件中.terraform.d文件夹terraform店令牌的目的。
{
   "credentials": {
     "app.terraform.io": {
       "token": "TOKEN_TO_BE_REPLACED"
       }
    }
}
We modify the pipeline look at the lines 13 and 14. Sed is a stream editor, meaning you can search and replace strings in files and use regex if needed. I’m using variables as replace and search values sed -i “s/TOKEN_TO_BE_REPLACED/${token}/g" to the location of the file. Then, creating the folder and moving the credentials file.
我们在第13和14行修改管道。Sed是流编辑器,这意味着您可以搜索和替换文件中的字符串,并在需要时使用regex。 我将变量用作替换和搜索值sed -i “s/TOKEN_TO_BE_REPLACED/${token}/g"到文件的位置,然后创建文件夹并移动凭据文件。

Now we add this piece of code on the top of main.tf file and we’re finished!
现在,将这段代码添加到main.tf文件的顶部,我们完成了!
terraform {
  backend "remote" {
    organization = "my-organization"
    workspaces {
      name = "my-workspace"
    }
  }
}
Jobs succeded!
工作成功!
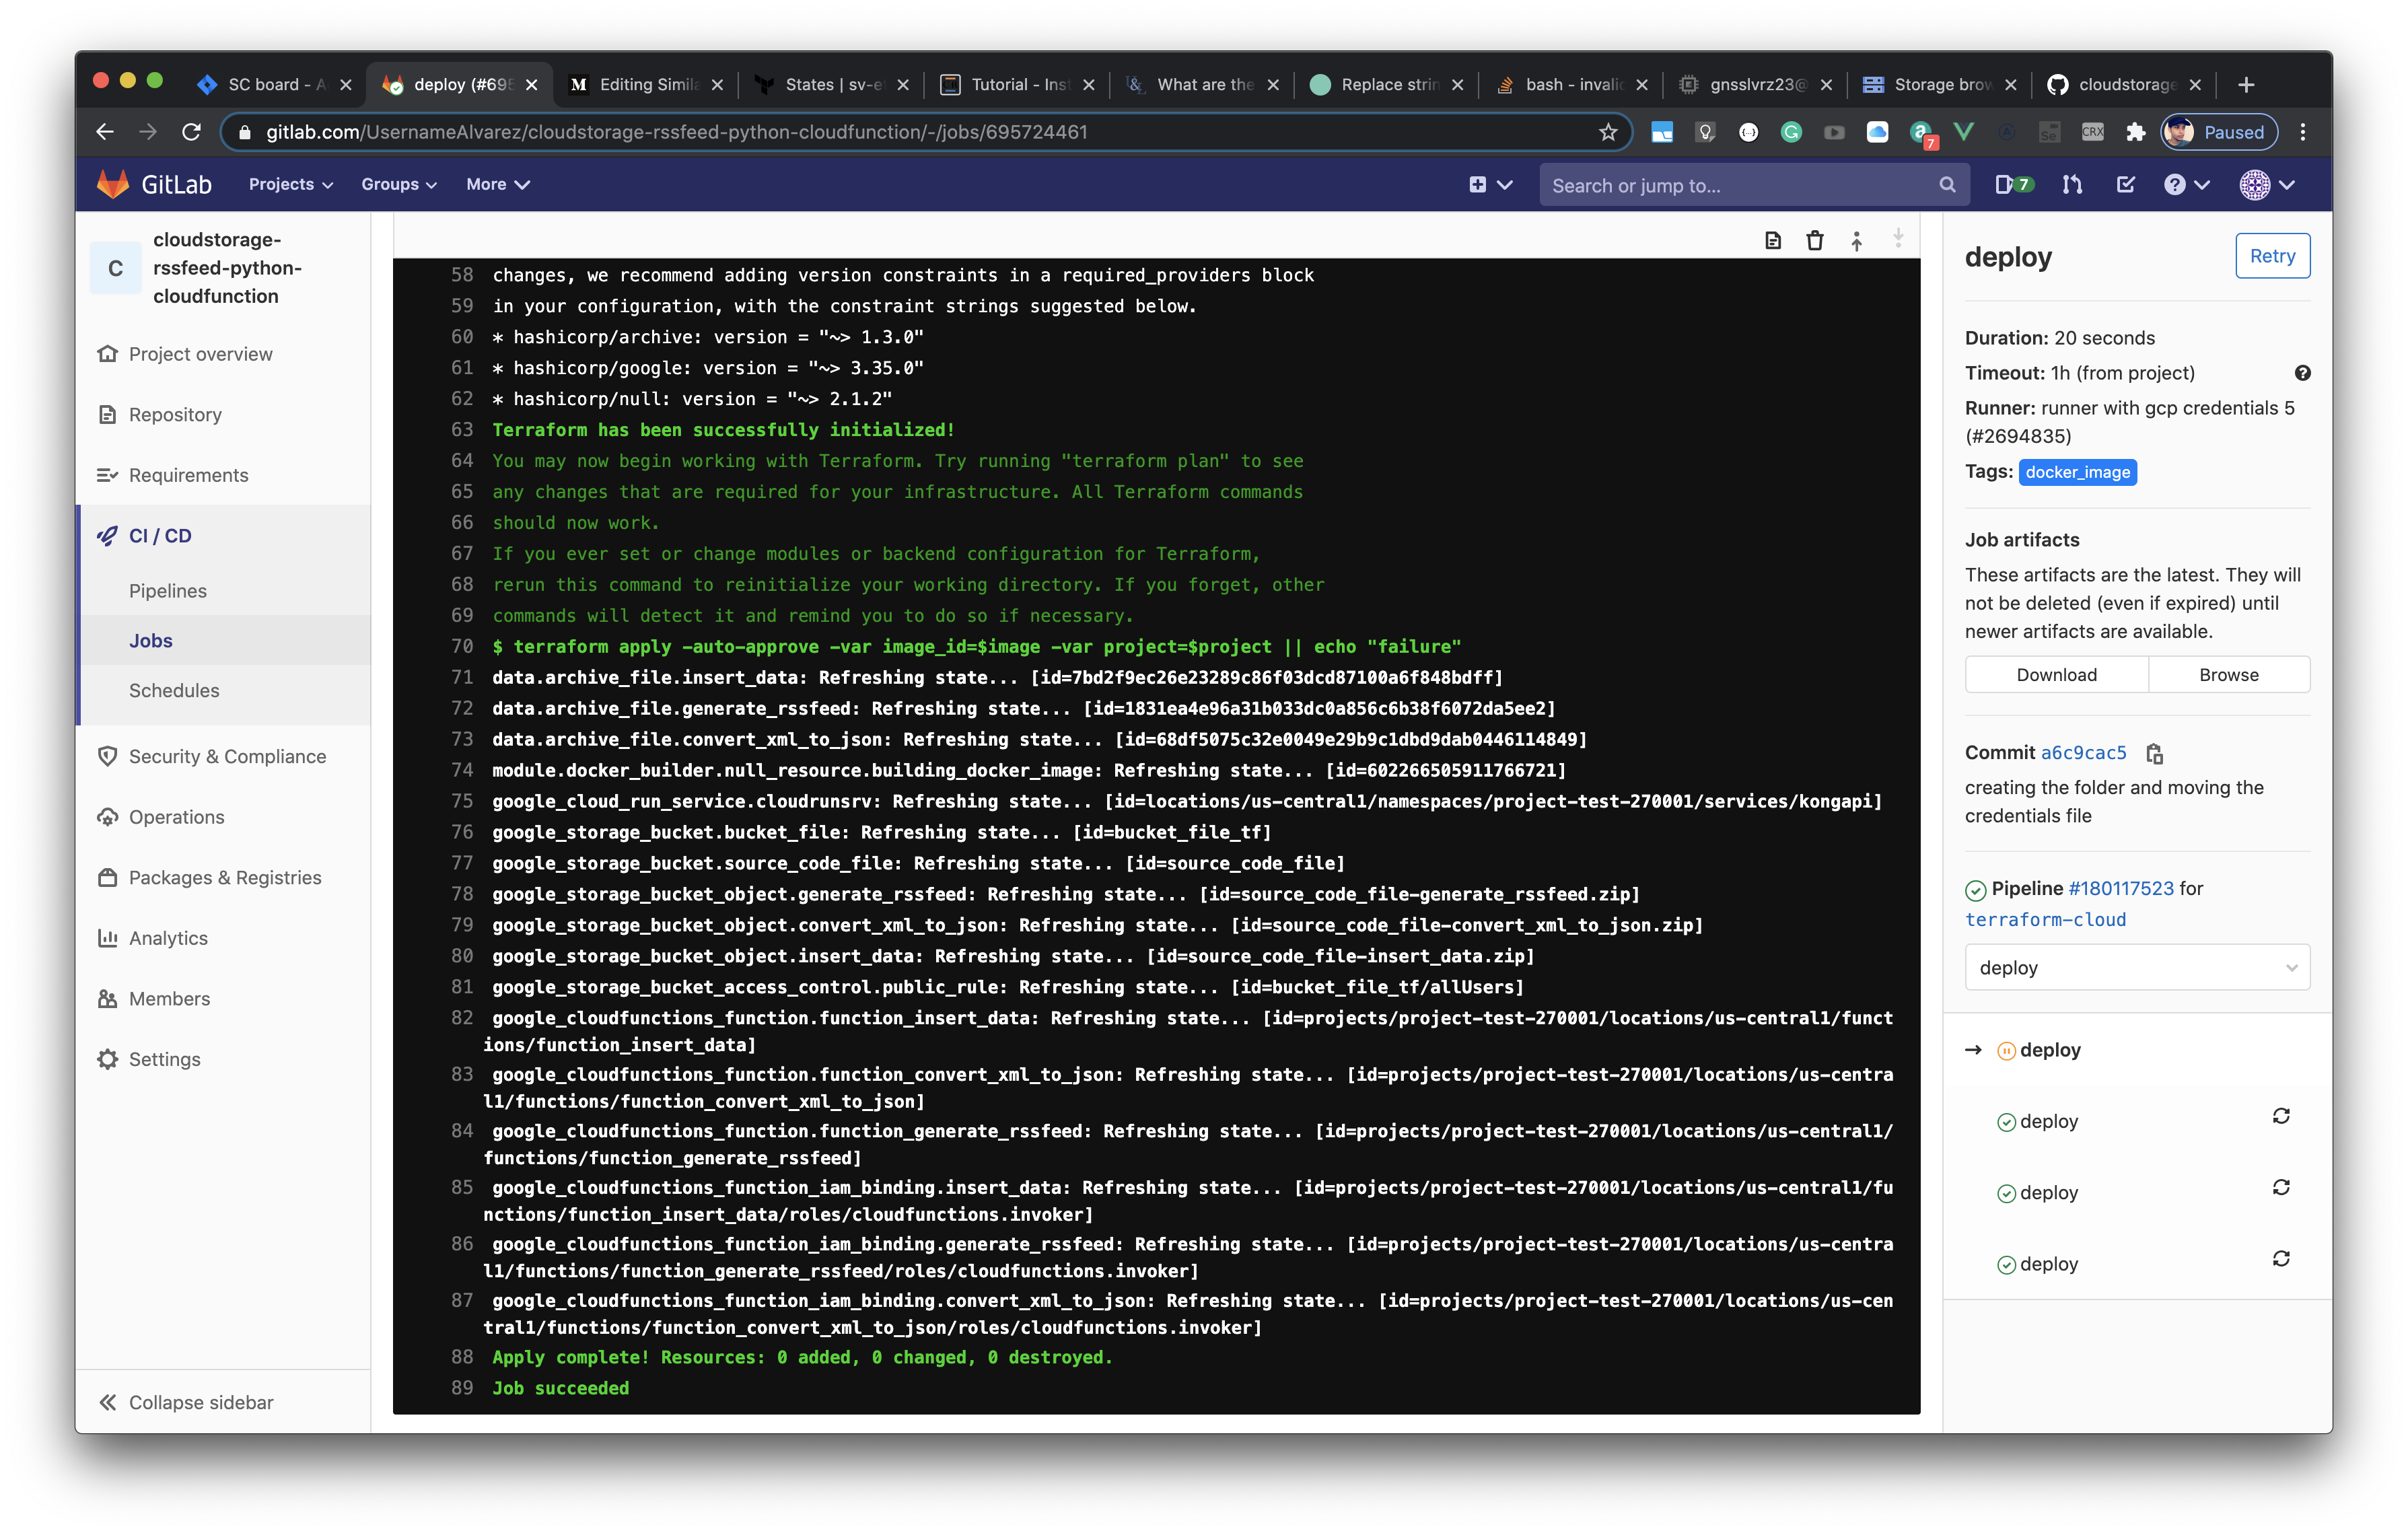
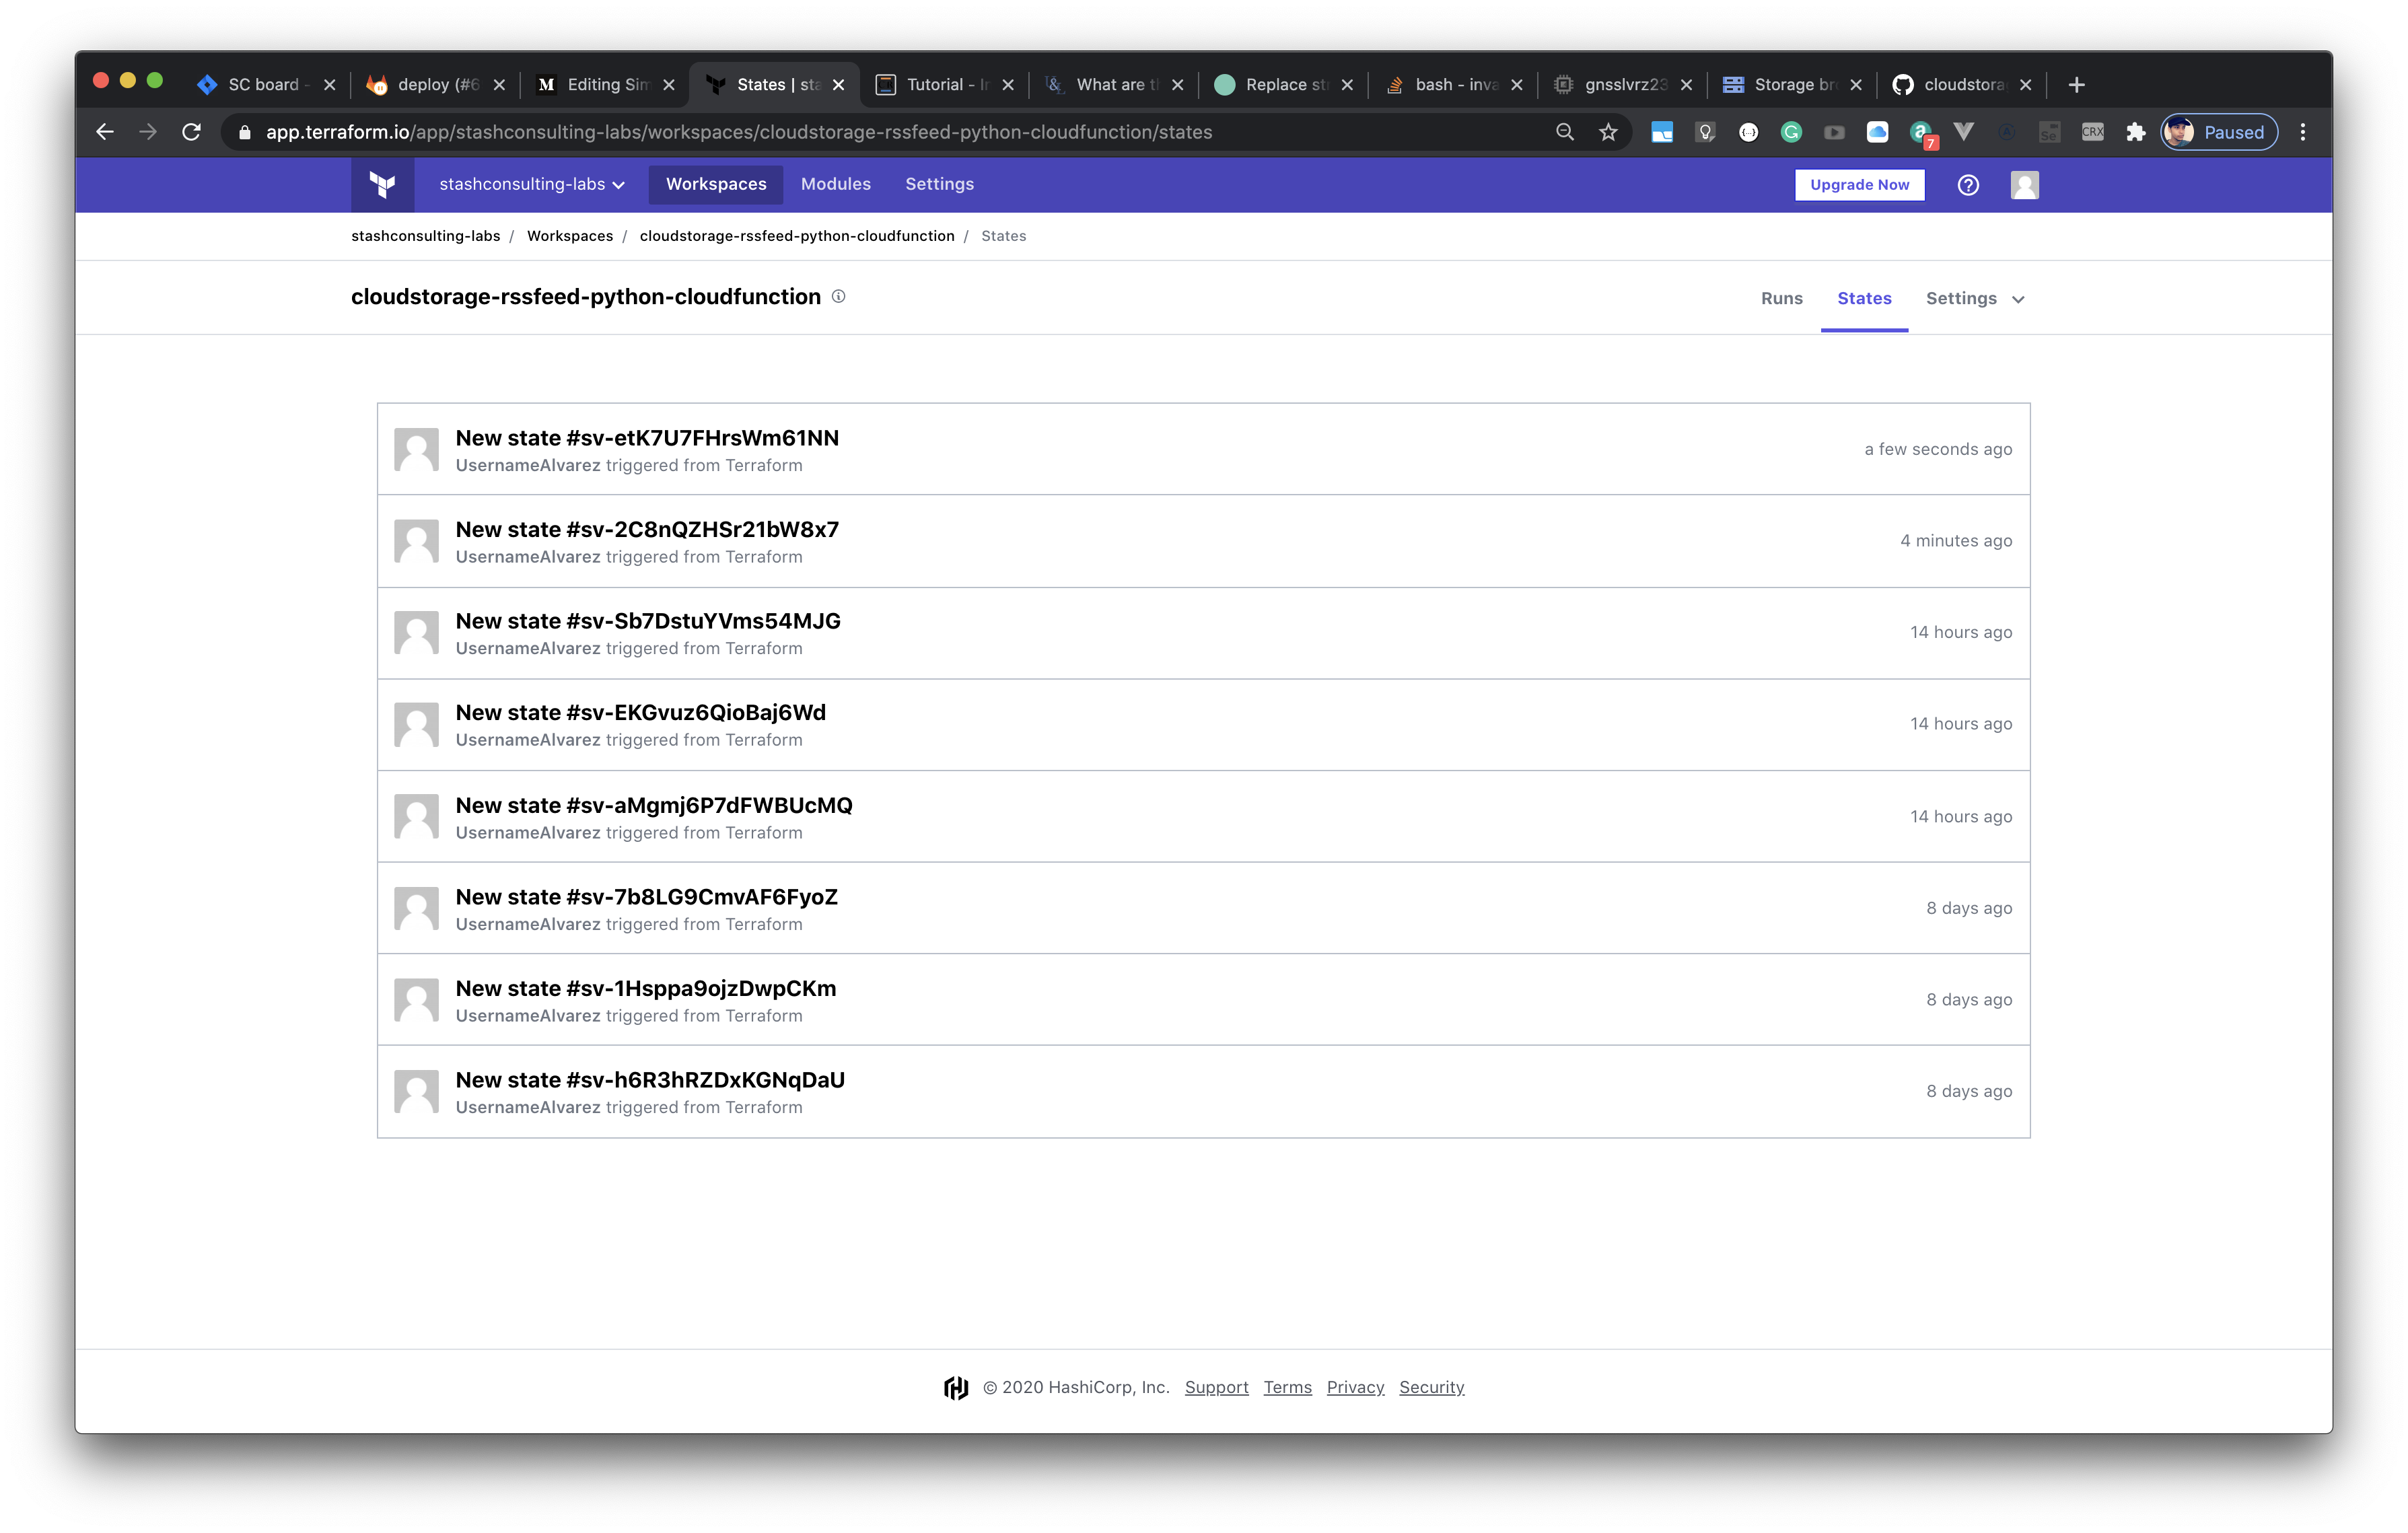
We can see the status file in Terraform Cloud.
我们可以在Terraform Cloud中查看状态文件。

Thanks for your support, please share this post. If you are interested in learning this workflow in another CI lets me know!
感谢您的支持,请分享这篇文章。 如果您有兴趣在另一个CI中学习此工作流程,请告诉我!
For another type of information click the comparison of Continuous Integration servers.
gitlab 与 ci


 3081
3081

 被折叠的 条评论
为什么被折叠?
被折叠的 条评论
为什么被折叠?
 到【灌水乐园】发言


