


The world’s simplest facial recognition API for Python and the command line
全球最简单的Python和命令行面部识别API
In this article, we’ll explore the ‘face_recognition’ library and implement a face recognition system.
在本文中,我们将探索“ face_recognition”库并实现人脸识别系统。
大纲: (Outline:)
- Step 1: Installation 步骤1:安装
- Step 2: Finding Faces in Image 第2步:在图像中查找人脸
- Step 3: Identifying Facial Features 第3步:识别面部特征
- Step 4: Identifying Known Faces 步骤4:识别已知面Kong
步骤1:安装: (Step 1: Installation:)
要求 (Requirements)
- Python 3.3+ or Python 2.7 Python 3.3+或Python 2.7
- macOS or Linux (Windows not officially supported, but it will work fine) macOS或Linux(不正式支持Windows,但可以正常使用)
For windows, First make sure that you have dlib installed. If you don’t have dlib installed. Follow these steps
对于Windows,首先请确保已 安装 dlib 。 如果您尚未安装 dlib 。 跟着这些步骤
- Clone the code from GitHub: 从GitHub克隆代码:
git clone https://github.com/davisking/dlib.git- Install with Python Extension: 使用Python Extension安装:
cd ..
python3 setup.py install
After this step, you should be able to run import dlib successfully.
完成此步骤后,您应该能够成功运行import dlib 。
After successful installation of
dliblibrary, installface_recognitionusing this pip command成功安装
dlib库后, 使用此pip命令 安装face_recognition
pip3 install face_recognitionNow, you are ready to implement a real-time face recognition system.
现在,您准备实施实时面部识别系统。
第2步:在图像中查找面Kong: (Step 2: Finding Faces in Image:)
we’ll start by importing face_recognition library
我们将从导入face_recognition库开始
import face_recognitionUsing the built-in function load_image_file() to load the image. And then using face_locations() which gives an array listing the co-ordinates of each face!
使用内置函数load_image_file()加载图像。 然后使用face_locations()给出一个列出每个面Kong坐标的数组!
image = face_recognition.load_image_file("picture.jpg")
face_locations = face_recognition.face_locations(image)
The output will be something like this!
输出将是这样的!
I found 1 face(s) in this photograph.
A face is located at pixel location Top: 241, Left: 419, Bottom: 562, Right: 740
第3步:识别面部特征: (Step 3: Identifying Facial Features:)
The face_landmarks() function locates all the landmarks in a face and returns a Dictionary containing the landmarks.
face_landmarks()函数可定位人脸中的所有地标,并返回包含地标的Dictionary。
# Find all facial features in all the faces in a image face_landmarks_list = face_recognition.face_landmarks(image)print(face_landmarks_list)And the output will be something like this!
输出将是这样!
[{'chin': [(429, 328), (426, 368), (424, 408), (425, 447), (437, 484), (460, 515), (490, 538), (524, 556), (562, 564), (600, 566), (630, 554), (655, 533), (672, 507), (684, 476), (694, 445), (702, 413), (707, 382)],
'left_eyebrow': [(488, 294), (509, 279), (535, 278), (561, 283), (584, 296)],
'right_eyebrow': [(622, 307), (646, 305), (670, 309), (691, 321), (698, 344)],
'nose_bridge': [(601, 328), (599, 352), (598, 375), (596, 400)], 'nose_tip': [(555, 414), (570, 421), (586, 428), (601, 428), (614, 426)],
'left_eye': [(512, 320), (528, 316), (544, 319), (557, 331), (541, 330), (525, 327)],
'right_eye': [(629, 348), (647, 342), (661, 346), (672, 357), (659, 358), (644, 354)],
'top_lip': [(519, 459), (545, 455), (566, 456), (580, 462), (595, 462), (610, 470), (627, 480), (620, 477), (593, 470), (579, 468), (564, 463), (527, 459)],
'bottom_lip': [(627, 480), (606, 482), (589, 479), (575, 477), (560, 473), (540, 468), (519, 459), (527, 459), (563, 461), (577, 466), (592, 468), (620, 477)]}]
步骤4:识别已知面Kong: (Step 4: Identifying Known Faces:)
First, we need pictures of people we want to recognize.
首先,我们需要要认识的人的照片。
- Make Sure there is one person in each photo 确保每张照片中只有一个人


Now, we’ll use face_encodings() function which returns a list of results of identified faces. Note that we will use [0] to grab the first person’s Face Encoding’s.
现在,我们将使用face_encodings()函数,该函数返回已识别面Kong的结果列表。 请注意,我们将使用[0]来获取第一人称的人脸编码。
kohli = face_recognition.load_image_file("Virat Kohli.jpg")
kohli_face_encoding = face_recognition.face_encodings(kohli)[0]ronaldo = face_recognition.load_image_file("Ronaldo.jpg")
ronaldo_face_encoding= face_recognition.face_encodings(ronaldo)[0]
Now, Create arrays of known face encodings and their names
现在,创建已知面部编码及其名称的数组
known_face_encodings = [kohli_face_encoding, ronaldo_face_encoding]known_face_names = ["Virat Kohli" , "Ronaldo"]Now, To recognize a face from the Unknown Image. We should load an unknown image and Find face locations and face encodings of the unknown image.
现在,要从未知图像中识别出一张脸。 我们应该加载未知图像并查找未知图像的脸部位置和脸部编码。
unknown_image = face_recognition.load_image_file("Unknown.jpg")face_locations = face_recognition.face_locations(unknown_image)
face_encodings = face_recognition.face_encodings(unknown_image, face_locations)
Converting the image into a PIL-format image. So that we can draw bounding boxes on the image.
将图像转换为PIL格式的图像。 这样我们就可以在图像上绘制边框。
from PIL import Image, ImageDraw
pil_image = Image.fromarray(unknown_image)# Create a Pillow ImageDraw Draw instance to draw
draw = ImageDraw.Draw(pil_image)
Now, Loop through each face in the Image and draw bounding Boxes:
现在,循环遍历图像中的每个面并绘制边界框:
for (t, r, b, l), in zip(face_locations, face_encodings):
  matches = face_recognition.compare_faces(known_face_encodings, face_encoding)# Instead, use face_distance to calculate similarities
    face_distances = face_recognition.face_distance(known_face_encodings, face_encoding)  best_match_index = np.argmin(face_distances)
  name = "Unknown"
  if matches[best_match_index]:
    name = known_face_names[best_match_index]# Draw a box around the face using the Pillow module
  draw.rectangle(((l, t), (r, b)), outline=(0, 0, 255))# Draw a label with a name below the face
  width, height = draw.textsize(name)
  draw.rectangle(((l, b - height - 10), (r, b)), fill=(0, 0, 255),     outline=(0, 0, 255))
  draw.text((l + 6, b - height - 5), name, fill=(255, 255, 255, 255))display(pil_image)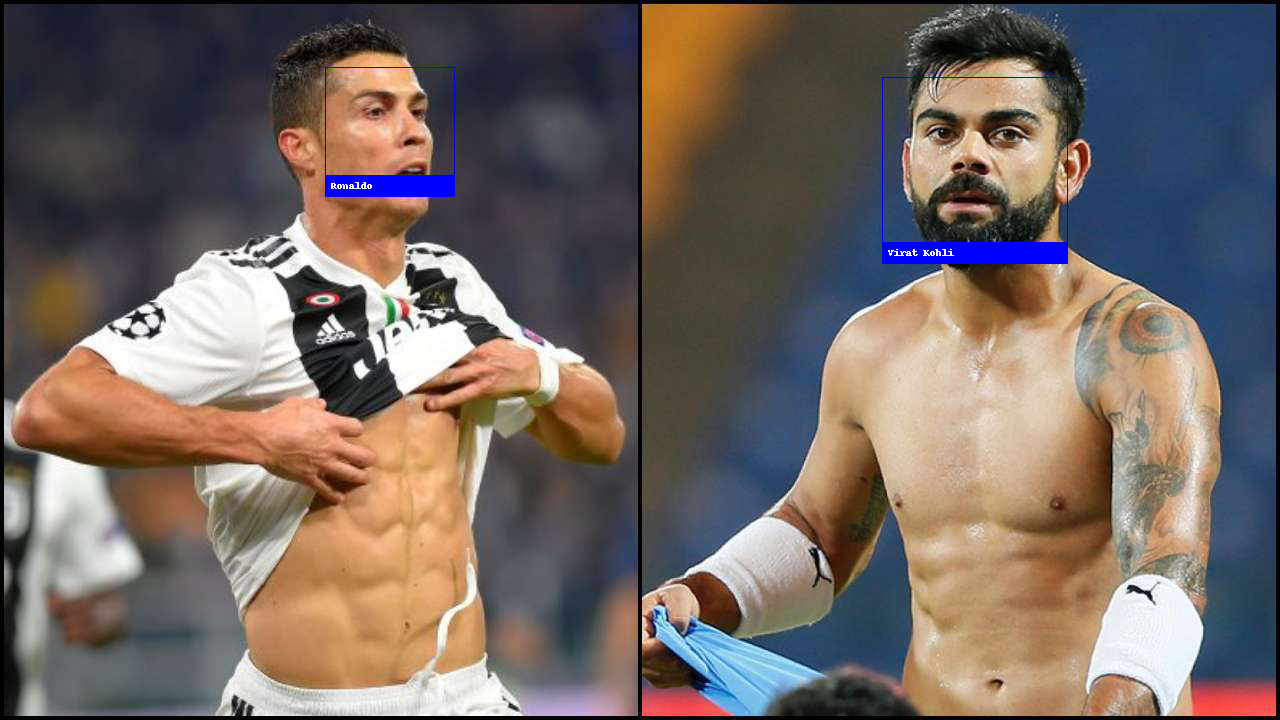

That’s it!!!
而已!!!
I hope this gives you a more visual, hands on, insight into how to use face_recognition API.
我希望这可以使您对如何使用face_recognition API有更直观的了解。
参考: (Reference:)
https://github.com/ageitgey/face_recognition
Face RecognitionFace DetectionDeep LearningMachine LearningConvolutional Neural NetworksData Sciencehttps://github.com/ageitgey/face_recognition
Face RecognitionFace DetectionDeep LearningMachine LearningConvolutional Neural NetworksData Science
翻译自: https://medium.com/swlh/face-recognition-using-face-recognition-api-e7fa4dcabbc3


 90
90

 被折叠的 条评论
为什么被折叠?
被折叠的 条评论
为什么被折叠?
 到【灌水乐园】发言


