


 本文介绍了如何在Windows操作系统中创建Python虚拟环境,并在虚拟环境中本地运行Flask应用程序,以确保项目依赖的隔离和管理。
flask怎么创建虚拟环境
编程 系统 (Programming, Systems)
什么是虚拟环境? (What is a Virtual Environment?)
A virtual environment creates separate space for a project with its dependencies at a definite place. This environment is distinct to the specific project and doesn’t interfere with other project dependencies.
虚拟环境为项目创建了单独的空间,并在一定位置上具有依赖项。 此环境与特定项目不同,并且不会干扰其他项目依赖项。

虚拟环境的优势? (Advantages of Virtual Environment?)
A virtual environment creates it’s own dependencies and space instead of disturbing the local environment.
虚拟环境会创建自己的依赖关系和空间,而不会干扰本地环境。
After activating the virtual environment, it provides the facility to freeze the current state of the environment packages.
激活虚拟环境后,它提供了冻结环境软件包当前状态的工具。
Virtual Environment provides a facility to install any packages as well as notebooks.
虚拟环境提供了一种安装所有软件包和笔记本的功能。
动机 (Motivation)
Everybody might come across this term called Virtual Environment. For the people who work with multiple projects in the localhost. Due to the requirements of each project, there is more chance of jumbling all packages in the same localhost. This leads to the improper organization of all the packages and mixing up of all packages. This is a time-consuming process to debug the projects.
每个人都可能遇到称为虚拟环境的术语。 对于在本地主机中处理多个项目的人员。 由于每个项目的要求,更有可能在同一个本地主机中装满所有软件包。 这导致所有包装的不正确组织和所有包装的混合。 这是调试项目的耗时过程。
If you want to check and run the other’s project in your localhost. You need to install dependencies and packages related to the corresponding project. So, While working with multiple projects. It is better to create Virtual Environments instead of disturbing local environments and dependencies.
如果要在本地主机中检查并运行其他人的项目。 您需要安装与相应项目相关的依赖项和软件包。 因此,在处理多个项目时。 最好创建虚拟环境,而不要打扰本地环境和依赖项。
In simple words, Let me give you an example :
简单来说,让我举一个例子:
So, You have created a flask app which is an interface of the Machine Learning model and website. You used scikit_learn package version 0.21.3 to create pickle files. Your friend asked you to check his/her project which is having the pickle files containing scikit_learn package version 0.23.1. To help your friend, you have installed all the requirements of that project and you helped your friend. But, The first project won’t work. Because you have installed some other versions of packages. So you need some time to re-install your packages and make your first project work. Instead of facing these types of issues, it’s better to create virtual environments while working with multiple projects.
因此,您创建了一个flask应用程序,它是机器学习模型和网站的接口。 您使用scikit_learn软件包0.21.3版创建了pickle文件。 您的朋友要求您检查他/她的项目,该项目的泡菜文件包含scikit_learn软件包版本0.23.1。 为了帮助您的朋友,您已经安装了该项目的所有要求,并帮助了您的朋友。 但是,第一个项目将无法正常工作。 因为您已经安装了其他版本的软件包。 因此,您需要一些时间来重新安装软件包并开始第一个项目的工作。 最好不要在处理多个项目时创建虚拟环境,而要面对这些类型的问题。
入门 (Getting Started)
This article guides you to create a virtual environment and run your flask application in your localhost containing the Windows Operating system by using various methods:
本文指导您使用各种方法创建虚拟环境并在包含Windows操作系统的本地主机中运行flask应用程序:
Command prompt
命令提示符
Anaconda prompt
Anaconda提示
Ubuntu application
Ubuntu应用程序
使用命令提示符创建虚拟环境 (Create virtual Environment using Command prompt)
- Installation of Python and pip : 安装Python和pip:
Open the command prompt. Check your laptop is having Python as well as pip or not. Use the below commands to check them. you should write two hyphens as in the image. The latest version of python contains pip pre_installed only for older versions you need to install manually.
打开命令提示符。 检查您的笔记本电脑是否具有Python和pip。 使用以下命令进行检查。 您应该像图片中那样写两个连字符 。 最新版本的python包含pip pre_installed仅适用于您需要手动安装的旧版本。
python — version
python —版本
pip — version
点-版本

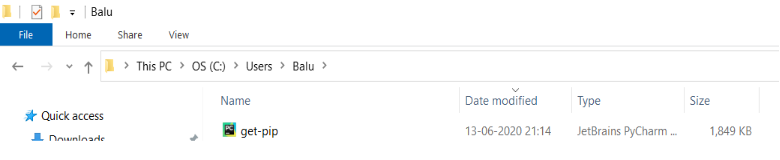
If you don’t have python in your computer download it here and add the path to the environment variables. If you don’t have pip installed in your computer download it here to a folder on your computer and save it with the same name “get-pip.py”. Open a command prompt and navigate to the folder containing the get-pip.py installer.
如果您的计算机中没有python,请在此处下载 python,然后将路径添加到环境变量中。 如果您的计算机中未安装pip,请在此处将其下载到计算机上的文件夹中,并使用相同的名称“ get-pip.py”进行保存 。 打开命令提示符,然后导航到包含get-pip.py安装程序的文件夹。
Run the following command:
运行以下命令:
python get-pip.py
python get-pip.py

2. Navigate to the directory contains the Flask application.
2.导航到包含Flask应用程序的目录。
Make sure that your flask folder containing all the files required to run on your laptop.
确保您的flask文件夹包含在笔记本电脑上运行所需的所有文件。
Use these commands to navigate the command prompt:
使用以下命令导航命令提示符:
To navigate one step back from the current path use:
要从当前路径向后退一步,请使用:
cd..
光盘..
To move into the folder from the current path use:
要从当前路径移入文件夹,请使用:
cd<space>[specified_folder]
cd <空格> [specified_folder]
This is the path of my flask app on my laptop.
这是我的烧瓶应用程序在笔记本电脑上的路径。

Using the above commands and navigate to the flask app folder.
使用以上命令并导航至flask应用程序文件夹。

( or )
( 要么 )
2. Clone the directory from GitHub.
2.从GitHub克隆目录。
If you don’t have Git installed in your Computer download it here. Clone the repository by using the following commands. On running the first command a folder is created(clone) in your specified path.
如果您的计算机中未安装Git,请在此处下载 。 使用以下命令克隆存储库。 在运行第一个命令时,将在您指定的路径中创建一个文件夹(克隆)。
git clone [link_of_repository]
git clone [link_of_repository]
cd [repository_name]
cd [repository_name]

3. Check the list of files in your flask app folder by using the following command:
3.使用以下命令检查flask应用程序文件夹中的文件列表:
dir
目录

4. Install Virtual environment in your folder by using the following command:
4.使用以下命令在您的文件夹中安装虚拟环境:
pip install virtualenv
pip安装virtualenv

5. Name your virtual environment by using the following command:
5.使用以下命令命名您的虚拟环境:
virtualenv [virtual_environment_name]
virtualenv [virtual_environment_name]

6. Navigate to your virtual environment folder and there you will see scripts folder.
6.导航到您的虚拟环境文件夹,您将在其中看到脚本文件夹。
That is the folder which contains all operations of Virtual environment and “activate” your venv by using the command:
该文件夹包含虚拟环境的所有操作,并使用以下命令“ 激活 ”您的虚拟电话:
activate
启用

You will see a name on the left side of the terminal in brackets. By this, A virtual environment is activated.
您将在终端的左侧方括号中看到一个名称。 由此,激活了虚拟环境。
您的工作完成了... !!!🔥🔥🔥 (Your Job is done…!!!🔥🔥🔥)
7. If you want to run your flask application in your local, you need to install all the requirements in the Virtual environment and these dependencies do not reflect the dependencies in your laptop.
7.如果要在本地运行Flask应用程序,则需要在虚拟环境中安装所有要求,这些依赖关系不能反映笔记本电脑中的依赖关系。
Make sure, you must have a requirements text file which contains all dependencies along with the version.
确保,您必须具有包含所有依赖项以及版本的需求文本文件。

8. Navigate back to the folder which contains requirements.txt file and install all the requirements in your virtual environment by using the following command:
8.使用以下命令导航回到包含requirements.txt文件的文件夹,并在虚拟环境中安装所有需求:
pip install -r requirements.txt
点安装-r requirements.txt

9. Run your python file to see your application by the following command:
9.通过以下命令运行python文件以查看您的应用程序:
python [python_file_name].py
python [python_file_name] .py

10. Copy the URL and paste in the Browser. You will see the flask application running in your localhost.
10.复制URL并粘贴到浏览器中。 您将看到在本地主机中运行的flask应用程序。

使用Anaconda提示创建虚拟环境 (Create Virtual Environment using Anaconda prompt)
Open the Anaconda command prompt. Check your laptop is having Python as well as pip or not. Use the below commands to check them.you should write two hyphens as in the image. The latest version of python contains pip pre_installed only for older versions you need to install manually.
打开Anaconda命令提示符。 检查您的笔记本电脑是否具有Python和pip。 使用以下命令进行检查。您应如图所示写两个连字符 。 最新版本的python包含pip pre_installed仅适用于您需要手动安装的旧版本。
python — version
python —版本
pip — version
点-版本

View the list of available version by using the following command:
使用以下命令查看可用版本的列表:
conda search python
conda搜索python
To install a specific version of python by using the following command:
要使用以下命令安装特定版本的python:
conda install python=[version]
conda安装python = [版本]
Install pip in Anaconda command prompt by using the following command:
使用以下命令在Anaconda命令提示符中安装pip:
conda install pip
conda安装点
2. Navigate to the directory contains the Flask application.
2.导航到包含Flask应用程序的目录。
Make sure that your flask folder containing all the files required to run on your laptop.
确保您的flask文件夹包含在笔记本电脑上运行所需的所有文件。
Use these commands to navigate the Anaconda command prompt:
使用以下命令浏览Anaconda命令提示符:
To navigate one step back from the current path use:
要从当前路径向后退一步,请使用:
cd..
光盘..
To move into the folder from the current path use:
要从当前路径移入文件夹,请使用:
cd<space>[specified_folder]
cd <空格> [specified_folder]
This is the path of my flask app on my laptop.
这是我的烧瓶应用程序在笔记本电脑上的路径。
Using the above commands and navigate to the flask app folder.
使用以上命令并导航至flask应用程序文件夹。

( or )
( 要么 )
2. Clone the directory from GitHub.
2.从GitHub克隆目录。
If you don’t have Git installed in your Computer download it here. Clone the repository by using the following commands. On running the first command a folder is created(clone) in your specified path.
如果您的计算机中未安装Git,请在此处下载 。 使用以下命令克隆存储库。 在运行第一个命令时,将在您指定的路径中创建一个文件夹(克隆)。
git clone [link_of_repository]
git clone [link_of_repository]
cd [repository_name]
cd [repository_name]

3. Check the list of files in your flask app folder by using the following command:
3.使用以下命令检查flask应用程序文件夹中的文件列表:
dir
目录

4. Install Virtual environment in your folder by using the following command:
4.使用以下命令在您的文件夹中安装虚拟环境:
conda install virtualenv
conda安装virtualenv
5. Name your virtual environment by using the following command:
5.使用以下命令命名您的虚拟环境:
virtualenv [virtual_environment_name]
virtualenv [virtual_environment_name]

6. Navigate to your virtual environment folder and there you will see scripts folder.
6.导航到您的虚拟环境文件夹,您将在其中看到脚本文件夹。
That is the folder which contains all operations of Virtual environment and “activate” your venv by using the command:
该文件夹包含虚拟环境的所有操作,并使用以下命令“ 激活 ”您的虚拟电话:
activate
启用

You will see a name on the left side of the terminal in brackets. By this, A virtual environment is activated.
您将在终端的左侧方括号中看到一个名称。 由此,激活了虚拟环境。
您的工作完成了... !!!🔥🔥🔥 (Your Job is done…!!!🔥🔥🔥)
7. If you want to run your flask application in your local, you need to install all the requirements in the Virtual environment and these dependencies do not reflect the dependencies in your laptop.
7.如果要在本地运行Flask应用程序,则需要在虚拟环境中安装所有要求,这些依赖关系不能反映笔记本电脑中的依赖关系。
Make sure, you must have a requirements text file which contains all dependencies along with the version.
确保,您必须具有包含所有依赖项以及版本的需求文本文件。
8. Navigate back to the folder which contains requirements.txt file and install all the requirements in your virtual environment by using the following command:
8.浏览回包含requestions.txt文件的文件夹,并使用以下命令在虚拟环境中安装所有需求:
pip install -r requirements.txt
点安装-r requirements.txt

9. Run your python file to see your application by the following command:
9.通过以下命令运行python文件以查看您的应用程序:
python [python_file_name].py
python [python_file_name] .py

10. Copy the URL and paste in the Browser. You will see the flask application running in your localhost.
10.复制URL并粘贴到浏览器中。 您将看到在本地主机中运行的flask应用程序。

使用Ubuntu应用程序创建虚拟环境 (Create Virtual Environment using Ubuntu application)
This method is mainly recommended to install packages and notebooks not to do projects. You can follow a similar process to create a Virtual Environment in Linux.
主要建议使用此方法安装软件包和笔记本而不要做项目。 您可以按照类似的过程在Linux中创建虚拟环境。
- Open Windows Powershell App and run it as administrator. 打开Windows Powershell App并以管理员身份运行它。

To do that First, enable the “Windows Subsystem for Linux” feature in Windows Powershell App by using the following command.
为此,请首先使用以下命令在Windows Powershell App中启用“ Linux的Windows子系统 ”功能。
Enable-WindowsOptionalFeature -Online -FeatureName Microsoft-Windows-Subsystem-Linux
Enable-WindowsOptionalFeature -Online -FeatureName Microsoft-Windows-Subsystem-Linux
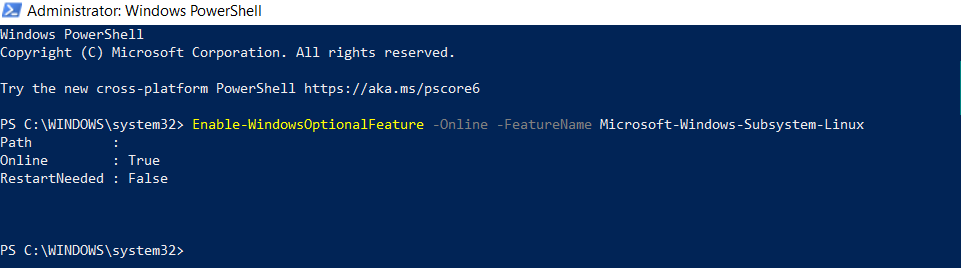
After it is prompted, Restart your laptop.
出现提示后,重新启动笔记本电脑。
2. Download the Ubuntu App from the Windows Store. Ubuntu 20.04LTS is used in the article to show demo.
2.从Windows应用商店下载Ubuntu应用程序。 本文中使用Ubuntu 20.04LTS进行演示。

Lunch Ubuntu App and make sure that Windows PowerShell is opened. Because Ubuntu App is running on behalf of the Windows PowerShell App.
午餐Ubuntu应用程序,并确保已打开Windows PowerShell。 因为Ubuntu应用程序代表Windows PowerShell应用程序运行。
3. Set up a new user name and password and remember your password. It will be used further to install packages.
3.设置新的用户名和密码,并记住您的密码。 它将进一步用于安装软件包。

To paste the commands in Ubuntu use:
要在Ubuntu中粘贴命令 ,请使用:
Right-click
右键点击
Ctrl +Shift+v
Ctrl + Shift + v
4. Update and upgrade your Ubuntu packages by using the following command:
4.使用以下命令更新和升级您的Ubuntu软件包:
sudo apt update && sudo apt upgrade
sudo apt更新&& sudo apt升级

5. Now, Install all the dependencies of python to create a virtual environment and pip in the Ubuntu App by using the following commands:
5.现在,使用以下命令安装python的所有依赖项以创建虚拟环境并在Ubuntu App中设置pip:
sudo apt-get install -y libstdc++6 python-setuptools
须藤apt-get install -y libstdc ++ 6 python-setuptools

sudo apt-get install python3-pip
须藤apt-get install python3-pip

6. Clone the repository by using the following commands. On running the first command a folder is created(clone) in your specified path.
6.使用以下命令克隆存储库。 在运行第一个命令时,将在您指定的路径中创建一个文件夹(克隆)。
git clone [link_of_repository]
git clone [link_of_repository]

cd [repository_name]
cd [repository_name]

7. Install Virtual environment in the flask app folder by using the following command:
7.使用以下命令在flask应用程序文件夹中安装虚拟环境:
sudo pip3 install virtualenv
sudo pip3安装virtualenv

8. Name your Virtual Environment accordingly by using the following command:
8.使用以下命令相应地命名您的虚拟环境:
virtualenv [virtual_environment_name]
virtualenv [virtual_environment_name]

9. Activate Virtual Environment by using the following command:
9.使用以下命令激活虚拟环境:
source venv/bin/activate
来源venv / bin / activate

您的工作完成了... !!!🔥🔥🔥 (Your Job is done…!!!🔥🔥🔥)
10. Install requirements in the virtual environment.
10.在虚拟环境中安装需求。
If you want to run your flask application in your local, you need to install all the requirements in the Virtual environment and these dependencies do not reflect the dependencies in your laptop.
如果要在本地运行flask应用程序,则需要在虚拟环境中安装所有要求,并且这些依赖关系不能反映笔记本电脑中的依赖关系。
Make sure, you must have a requirements text file which contains all dependencies along with the versions.
确保,您必须具有一个要求文本文件,其中包含所有依赖性以及版本。
pip install -r requirements.txt
点安装-r requirements.txt

11. Run your python file to see your application by the following command:
11.通过以下命令运行python文件以查看您的应用程序:
python [python_file_name].py
python [python_file_name] .py

12. Copy the URL and paste in the Browser. You will see the flask application running in your localhost.
12.复制URL并粘贴到浏览器中。 您将看到在本地主机中运行的flask应用程序。

This article is helpful for you while doing projects and courses. I suggest following this way which differentiates all your system dependent projects and places them in an organized manner.
本文对您在进行项目和课程时很有帮助。 我建议按照这种方式来区分所有与系统相关的项目,并以有组织的方式进行放置。
I hope, You do well and correct me if anything is wrong…!!! 🤝🤝🤝
希望您做得好,如果有任何问题请纠正我……! 🤝🤝🤝
祝您学习愉快!😎 (Happy Learning!😎)
flask怎么创建虚拟环境


 1226
1226

 被折叠的 条评论
为什么被折叠?
被折叠的 条评论
为什么被折叠?
 到【灌水乐园】发言


