


ci/cd heroku
A popular feature offered by Heroku is their Review Apps solution. It generates a disposable environment and instance of an app during a pull request (PR), and after merging the PR, it destroys the temp environment.
Heroku提供的一项流行功能是其Review Apps解决方案。 它在拉取请求(PR)期间生成一个可使用的环境和一个应用程序实例,并且在合并PR之后,它会破坏临时环境。
Inspired by this concept and a recent DoiT International customer meeting, I set out recreate the behavior atop Google Cloud Platform (GCP) using a cloud native approach and popular open source tools.
受此概念和最近的DoiT International客户会议的启发,我着手使用云原生方法和流行的开源工具在Google Cloud Platform(GCP)上重新创建行为。
开发人员经验(20分钟演示) (Developer experience (20 minute demo))
By adhering to GitOps principles, your development team only has to worry about writing code and when they create a PR, within seconds or minutes a ready-to-review version of their latest code is accessible online.
通过遵循GitOps原则 ,您的开发团队只需要担心编写代码,当他们创建PR时,就可以在几秒钟或几分钟之内在线访问其最新代码的随时可查看的版本。
Subsequent commits will update the review app until reviewers/testers are satisfied and approve/merge the PR. Once the app is pushed to a higher environment, the review app is destroyed — rinse and repeat per feature.
随后的提交将更新审阅应用程序,直到审阅者/测试人员满意并批准/合并PR。 将应用程序推送到更高的环境后,评论应用程序将被销毁-冲洗并按功能重复。
涉及的组件 (Components involved)
Github — source control
Github-源代码管理
Kustomize — Kubernetes-native config management
Kustomize -Kubernetes本地配置管理
Argo CD — declarative GitOps CD for Kubernetes
Argo CD — Kubernetes的声明性GitOps CD
Kong Ingress Controller — API gateway
Kong Ingress Controller — API网关
Google Kubernetes Engine (GKE) — managed Kubernetes
Google Kubernetes引擎 (GKE)-托管的Kubernetes
Google Cloud Build — CI server
Google Cloud Build -CI服务器
Google Container Registry (GCR) — private container image registry
Google Container Registry (GCR)-私有容器映像注册表
Google Secret Manager — centralized secrets management
Google Secret Manager-集中式秘密管理
Google Cloud DNS — API-enabled DNS service (optional)
Google Cloud DNS-启用API的DNS服务( 可选 )
建筑 (Architecture)
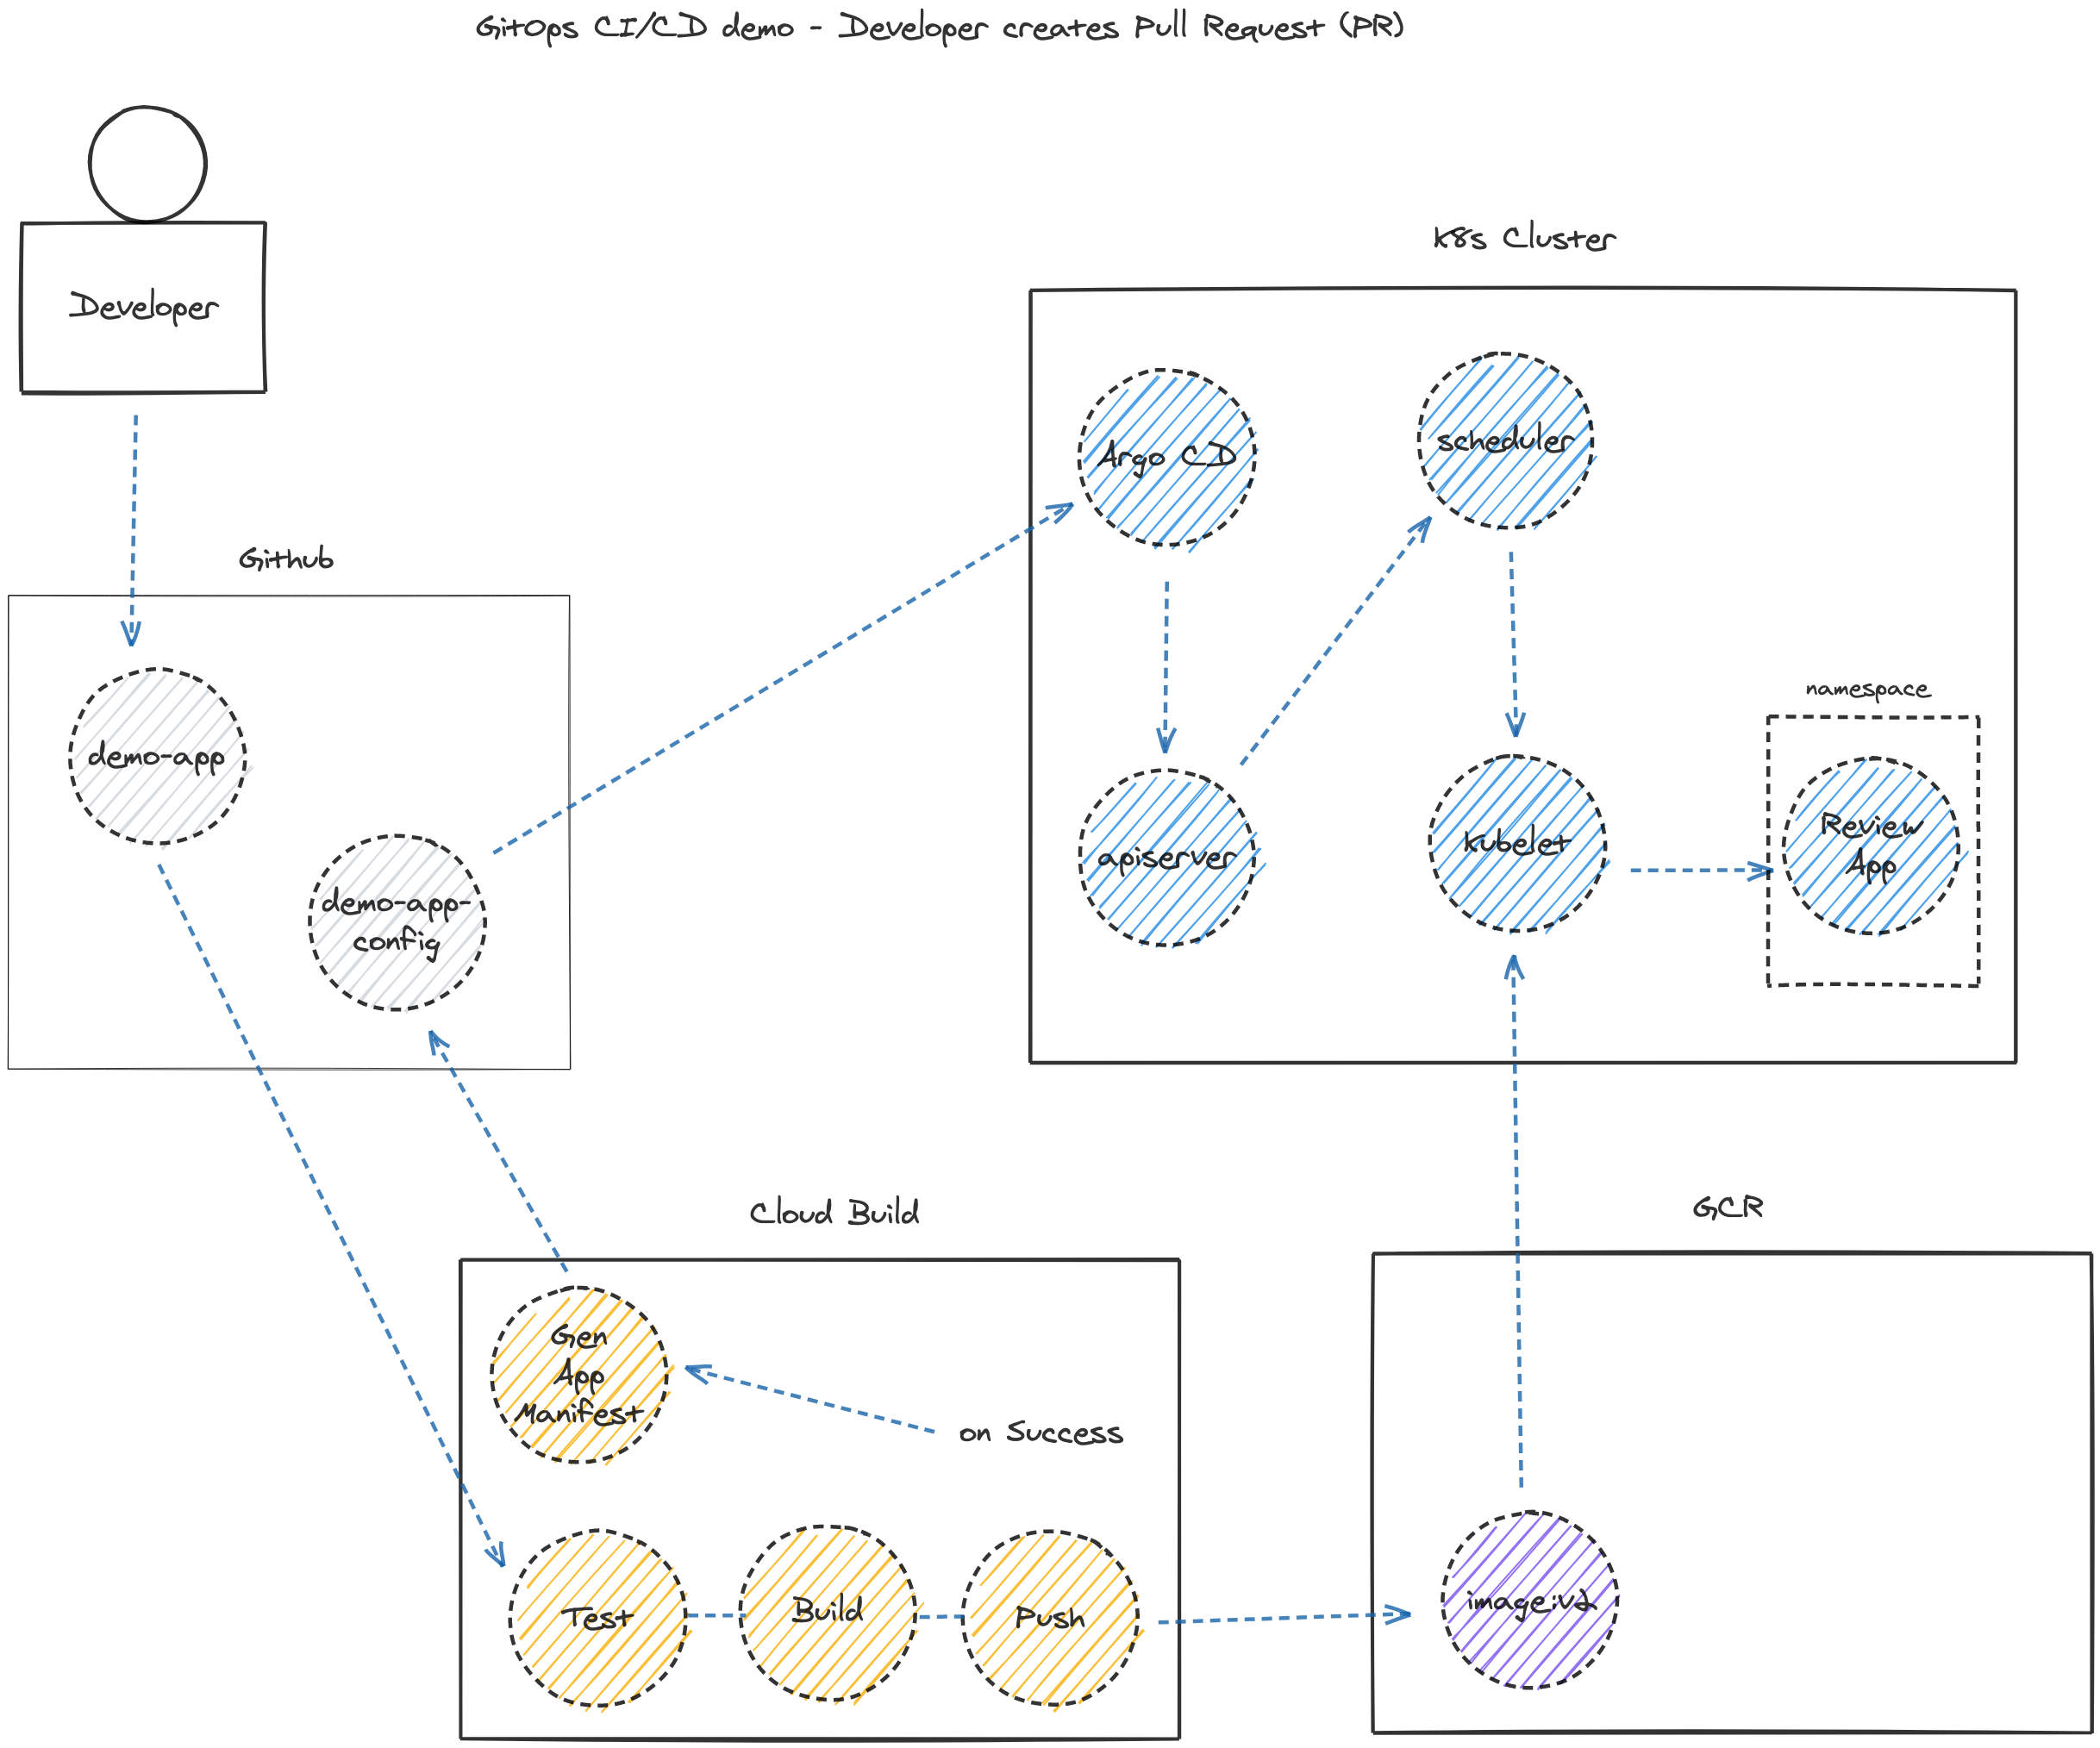
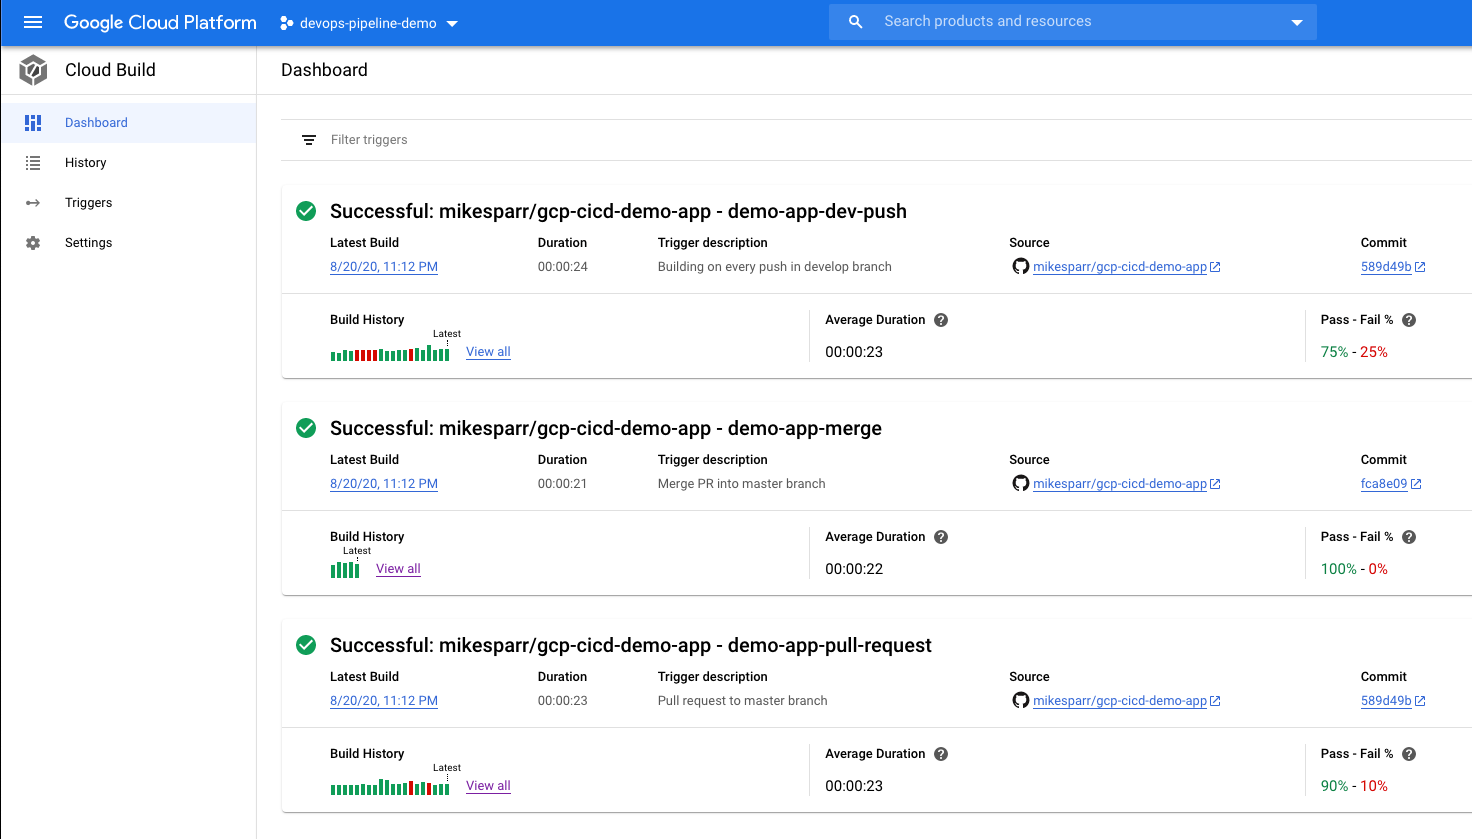
The primary functionality for review apps is that upon a developer creating a pull request (PR) in source control, the deployment pipeline will build a copy of the app and host it in an isolated environment with unique URL for others to review.
审核应用程序的主要功能是,开发人员在源代码管理中创建拉取请求(PR)后,部署管道将构建该应用程序的副本,并将其托管在具有唯一URL的隔离环境中,以供其他人员查看。
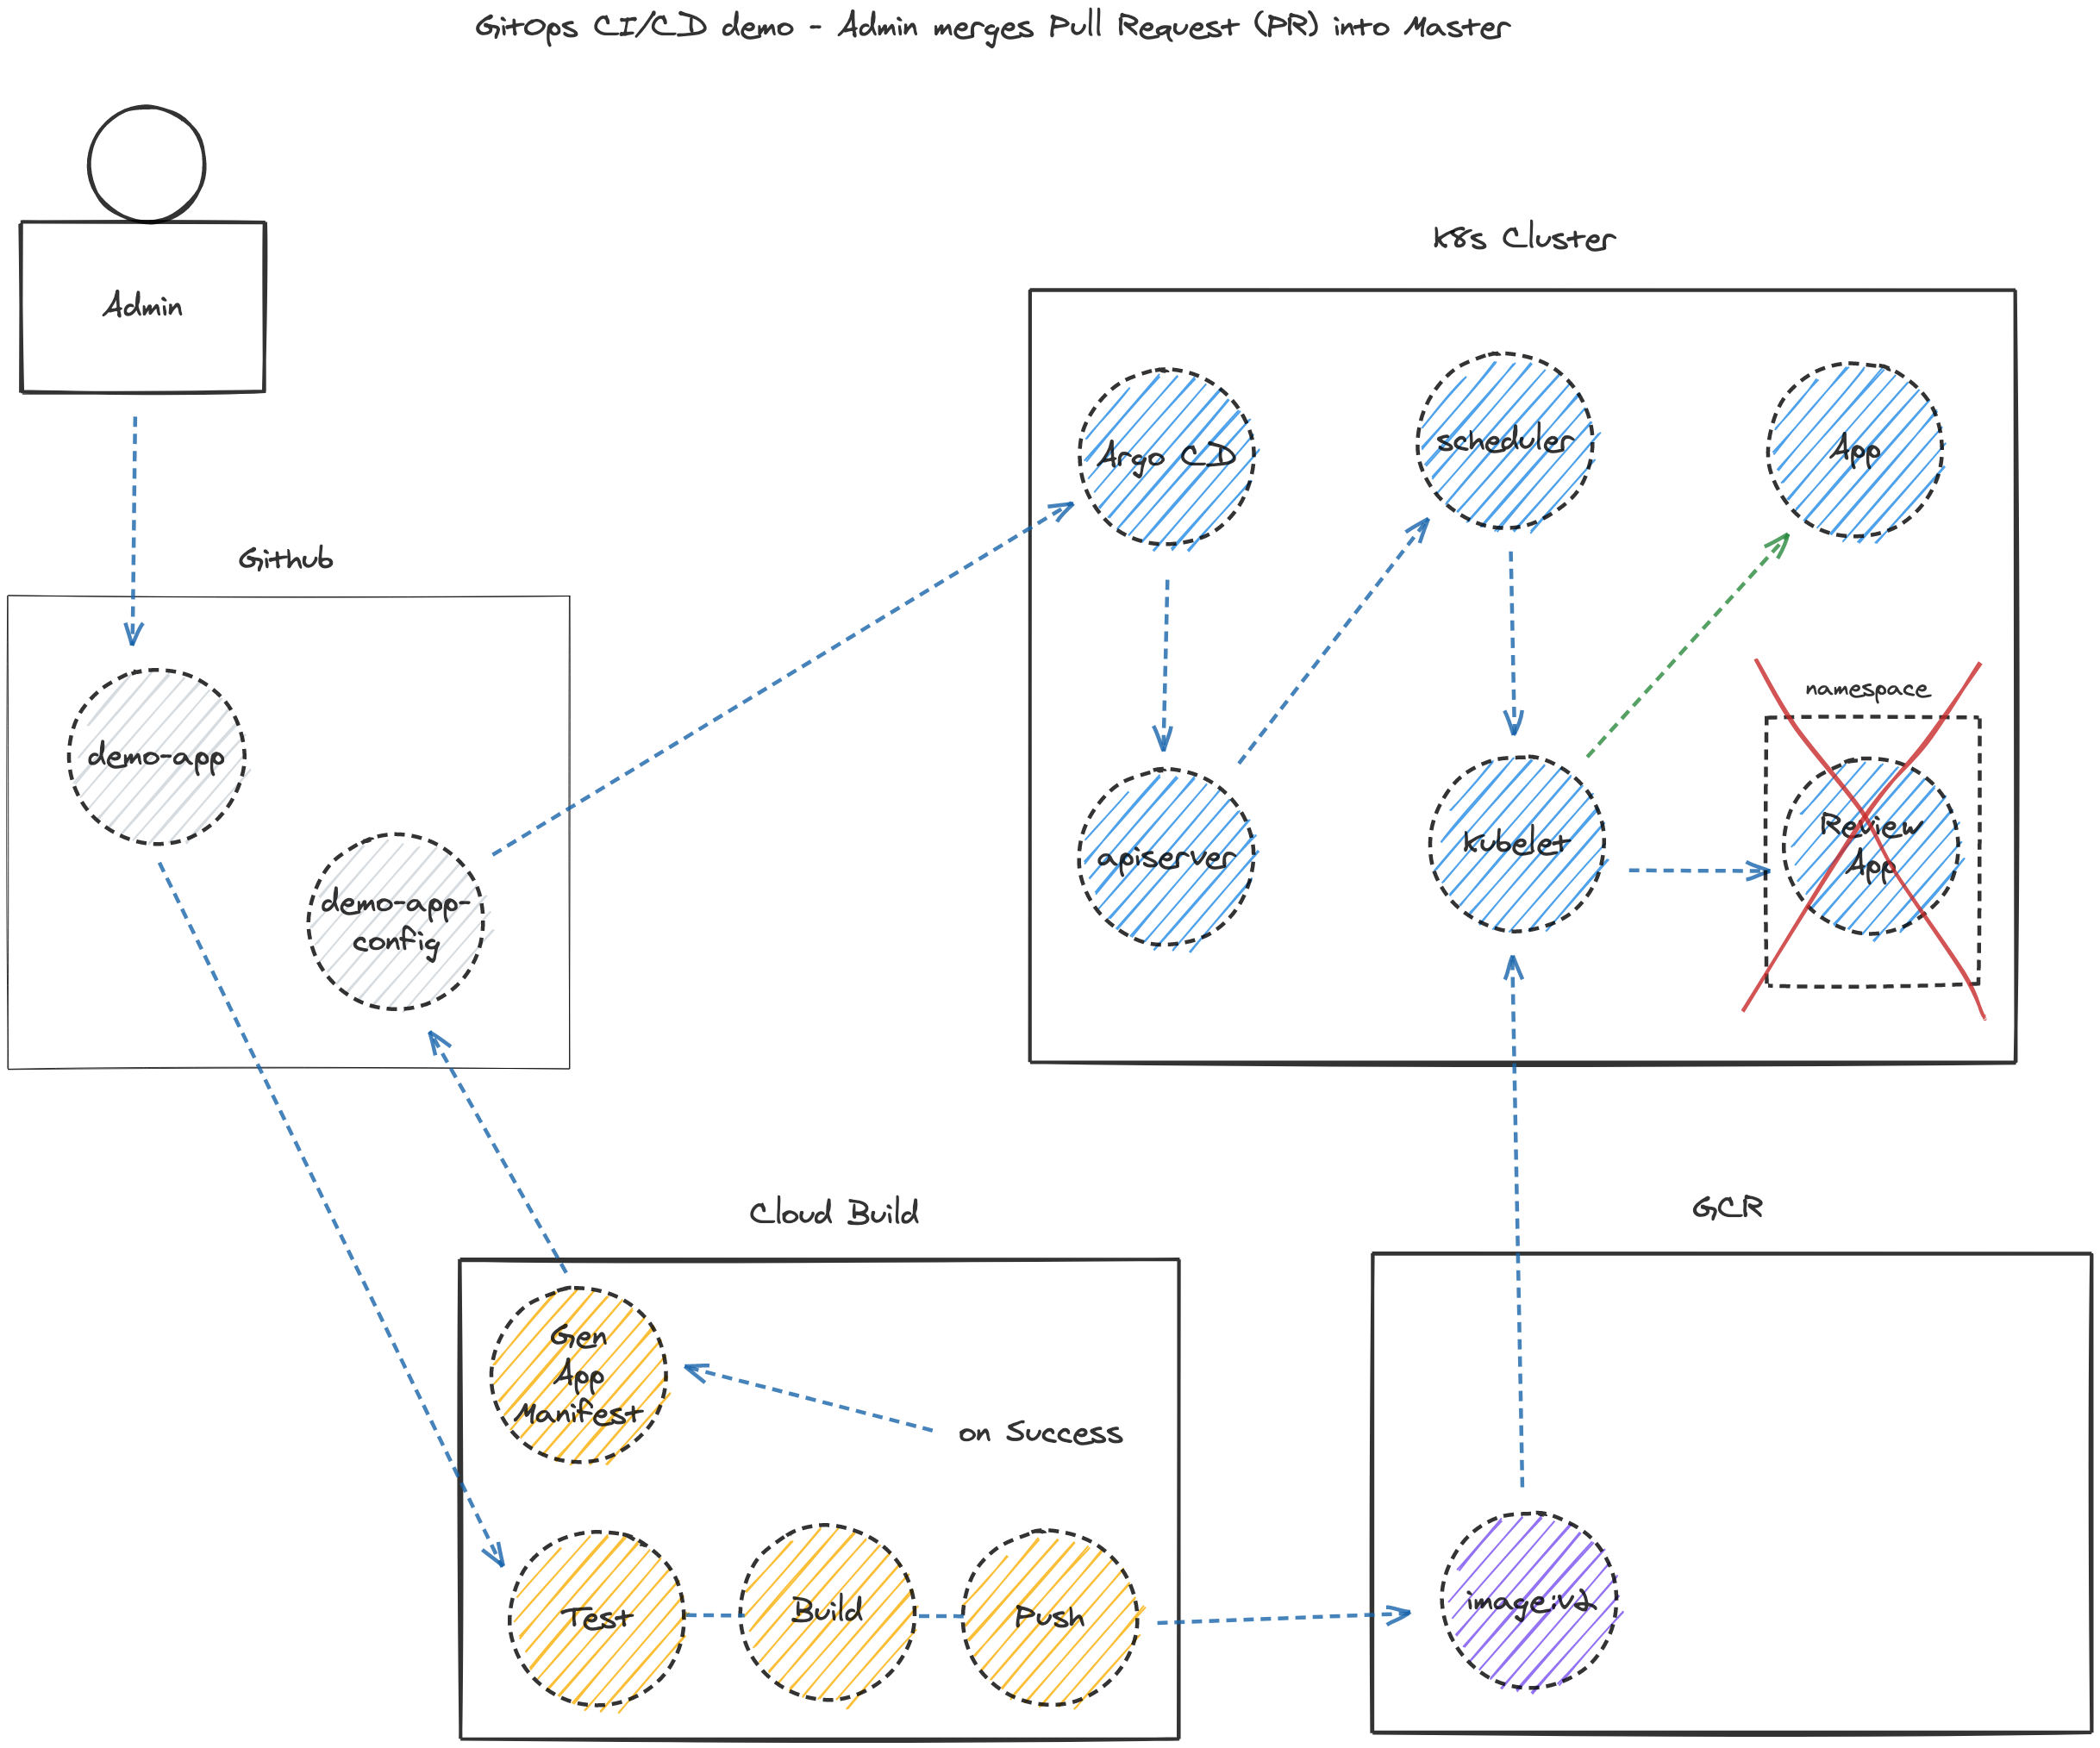
The additional functionality includes promoting the application to production after merging the PR, and removing the review app.
附加功能包括在合并PR后将应用程序推广到生产环境,以及删除评论应用程序。
TL; DR (TL;DR)
To make everything work as shown requires the following steps:
要使所有内容如所示工作,需要执行以下步骤:
Create separate App and Config source repos on Github
在Github上创建单独的App和Config源仓库
- Enable Google APIs and bootstrap GKE cluster and Argo CD 启用Google API并引导GKE群集和Argo CD
Install Kong API Gateway (ingress controller) via Config repo
通过C onfig回购安装Kong API Gateway(入口控制器)
Create DNS A record to kong-proxy external IP
创建DNS A记录到kong-proxy外部IP
- Connect Cloud Build to your Github repository 将Cloud Build连接到您的Github存储库
- Create private key and store in Google Secret Manager 创建私钥并存储在Google Secret Manager中
Add pub key to Github Config repo
将发布密钥添加到Github Config存储库
Create 3 Cloud Build triggers (push , PR, merge)
创建3个Cloud Build触发器( push , PR , merge )
- Authorize Cloud Build service account to access Secrets 授权Cloud Build服务帐户访问机密
Add Cloud Build config files to App repo
将Cloud Build配置文件添加到App回购
Add Kubernetes manifests and Kustomize overlays to Config repo
添加Kubernetes清单并将Kustomize叠加层添加到Config存储库
创建Github源代码库 (Create Github source repositories)
The following repositories are working examples but I’ll cover the steps to build them in sections to follow.
以下存储库是有效的示例,但是我将在后续章节中介绍构建它们的步骤。
Demo App — Dockerfile and Cloud Build CI scripts)
演示应用程序 -Dockerfile和Cloud Build CI脚本)
Demo App Config — setup scripts and Kubernetes manifests for Argo CD
演示应用程序配置 -Argo CD的安装脚本和Kubernetes清单
启用API,引导GKE和Argo CD (Enable APIs, bootstrap GKE and Argo CD)
In the following script I enabled the Google Cloud service APIs and spin up a Kubernetes cluster.
在以下脚本中,我启用了Google Cloud服务API并启动了Kubernetes集群。
#!/usr/bin/env bash


source .env
# export PROJECT_ID=<from .env>
# export AUTH_NETWORK=<from .env>


export GCP_REGION=us-central1
export GCP_ZONE=us-central1-b
export CLUSTER_VERSION="1.16.13-gke.1"


# enable apis
gcloud services enable cloudbuild.googleapis.com \
    container.googleapis.com \
    storage.googleapis.com \
    containerregistry.googleapis.com \
    secretmanager.googleapis.com \
    dns.googleapis.com


# authorize cloud build to connect to demo app Github repo (not config repo)
# https://console.cloud.google.com/cloud-build/triggers/connect?project=${PROJECT_ID}&provider=github_app


# helper functions
set_location () {
    case $1 in
        "west")
            export ZONE="us-west2-b"
            export REGION="us-west2"
            ;;
        "central")
            export ZONE="us-central1-a"
            export REGION="us-central1"
            ;;
        "east")
            export ZONE="us-east1-c"
            export REGION="us-east1"
            ;;
        *)
            echo $"Usage: $0 {west|central|east}"
            exit 1
    esac
}


install_argo_cd () {
    echo "Installing Argo CD ..."


    kubectl create clusterrolebinding cluster-admin-binding \
        --clusterrole=cluster-admin --user="$(gcloud config get-value account)"
    kubectl create namespace argocd
    kubectl apply -n argocd \
        -f https://raw.githubusercontent.com/argoproj/argo-cd/stable/manifests/install.yaml


    # configure app-of-apps git repo
    echo "Configuring app-of-apps repo ..."
    kubectl apply -f app-of-apps.yaml
}


install_cert_manager () {
    echo "Installing Cert Manager ..."


    kubectl create namespace cert-manager
    helm repo add jetstack https://charts.jetstack.io
    helm repo update
    # install CRDs
    kubectl apply --validate=false -f https://github.com/jetstack/cert-manager/releases/download/v0.16.1/cert-manager.crds.yaml
    # helm@v3 install
    helm install \
    cert-manager jetstack/cert-manager \
    --namespace cert-manager \
    --version v0.16.1
}


create_cluster () {
    CLUSTER_NAME=$1


    set_location $CLUSTER_NAME


    echo "Creating cluster $CLUSTER_NAME in zone $ZONE ..."


    gcloud beta container --project $PROJECT_ID clusters create "$CLUSTER_NAME" \
        --zone "$ZONE" \
        --no-enable-basic-auth \
        --cluster-version $CLUSTER_VERSION \
        --machine-type "e2-standard-2" \
        --image-type "COS" \
        --disk-type "pd-standard" --disk-size "100" \
        --node-labels location=west \
        --metadata disable-legacy-endpoints=true \
        --scopes "https://www.googleapis.com/auth/compute","https://www.googleapis.com/auth/devstorage.read_write","https://www.googleapis.com/auth/sqlservice.admin","https://www.googleapis.com/auth/logging.write","https://www.googleapis.com/auth/monitoring","https://www.googleapis.com/auth/pubsub","https://www.googleapis.com/auth/servicecontrol","https://www.googleapis.com/auth/service.management.readonly","https://www.googleapis.com/auth/trace.append" \
        --preemptible \
        --num-nodes "1" \
        --enable-stackdriver-kubernetes \
        --enable-ip-alias \
        --network "projects/${PROJECT_ID}/global/networks/default" \
        --subnetwork "projects/${PROJECT_ID}/regions/${REGION}/subnetworks/default" \
        --default-max-pods-per-node "110" \
        --enable-autoscaling --min-nodes "0" --max-nodes "3" \
        --enable-network-policy \
        --enable-master-authorized-networks --master-authorized-networks $AUTH_NETWORK \
        --addons HorizontalPodAutoscaling,HttpLoadBalancing \
        --enable-autoupgrade \
        --enable-autorepair --max-surge-upgrade 1 --max-unavailable-upgrade 1 \
        --labels env=sandbox \
        --enable-vertical-pod-autoscaling \
        --enable-shielded-nodes \
        --shielded-secure-boot \
        --tags "k8s","$1"

    # authenticate
    echo "Authenticating kubectl ..."
    gcloud container clusters get-credentials $CLUSTER_NAME --zone $ZONE


    # install argo cd
    echo "Installing Argo CD ..."
    install_argo_cd


    # install cert-manager
    echo "Installing Cert Manager ..."
    install_cert_manager


    echo "Cluster $CLUSTER_NAME created in zone $ZONE"
}


# create clusters
echo "Creating and configuring clusters ..."
locations=("central")
for loc in ${locations[@]}; do
    create_cluster $loc
done
In a previous article, I introduced the concept of the app of apps pattern used even by the Argo dev team at Intuit. In designing this solution, the dynamic creation and removal of an “Application” works perfectly for our use case of creating and destroying the review apps.
在上一篇文章中 ,我介绍了Intuit的Argo开发团队甚至使用过的应用程序模式的应用程序的概念。 在设计此解决方案时,动态创建和删除“ 应用程序 ”非常适合我们创建和销毁评论应用程序的用例。
安装Kong API Gateway(入口控制器) (Install Kong API Gateway (ingress controller))
For Kong, simply add a kong.yaml file in the /apps folder in the Config repository. Argo CD will detect and monitor any repo or folder you point it to. I chose Kong because every Ingress I create will configure a host making it ideal for dynamically generating new review app host URLs.
对于Kong,只需在Config存储库的/apps文件夹中添加kong.yaml文件。 Argo CD将检测并监视您指向的任何存储库或文件夹。 我之所以选择Kong,是因为我创建的每个Ingress都会配置一个主机,使其非常适合动态生成新的评论应用程序主机URL。
apiVersion: argoproj.io/v1alpha1
kind: Application
metadata:
  name: kong
  namespace: argocd
  finalizers:
  - resources-finalizer.argocd.argoproj.io
spec:
  destination:
    namespace: argocd
    server: https://kubernetes.default.svc
  project: default
  source:
    path: kong
    repoURL: https://github.com/mikesparr/gcp-cicd-demo-config
    targetRevision: HEAD
  syncPolicy:
    automated:
      selfHeal: true
      prune: true
Add the Kong config files in that target folder and it will be installed on your Kubernetes cluster (repeat for any desired apps).
在该目标文件夹中添加Kong配置文件,它将被安装在您的Kubernetes集群上(重复执行任何所需的应用程序)。
Note the source.path (kong). That is the folder in the repo that will include YAML manifests Argo CD will install. I created a file in the repo called 01-install.yaml using Kong’s own single manifest in the /kong folder in the Config repo. ( https://bit.ly/k8k8s points to latest Kong config )
注意source.path (kong)。 这是回购中的文件夹,其中将包含Argo CD将安装的YAML清单。 我在配置存储库的/kong文件夹中使用Kong自己的单个清单在存储库中创建了一个名为01-install.yaml的文件。 ( https://bit.ly/k8k8s指向最新的Kong配置)
curl https://raw.githubusercontent.com/Kong/kubernetes-ingress-controller/master/deploy/single/all-in-one-dbless.yaml --output kong/01-install.yaml为Kong Proxy创建DNS A记录 (Create DNS A record for Kong Proxy)
After Kong installs on your cluster it creates an external TCP load balancer (Service) with external IP.
在您的群集上安装Kong之后,它会使用外部IP创建一个外部TCP负载平衡器(服务)。

You want to point your domain to this IP and can manually using your provider. For my initial demo I just configured the A record and some CNAME aliases like below.
您想将您的域指向该IP,并可以手动使用您的提供商。 对于我的初始演示,我只配置了A记录和一些CNAME别名,如下所示。
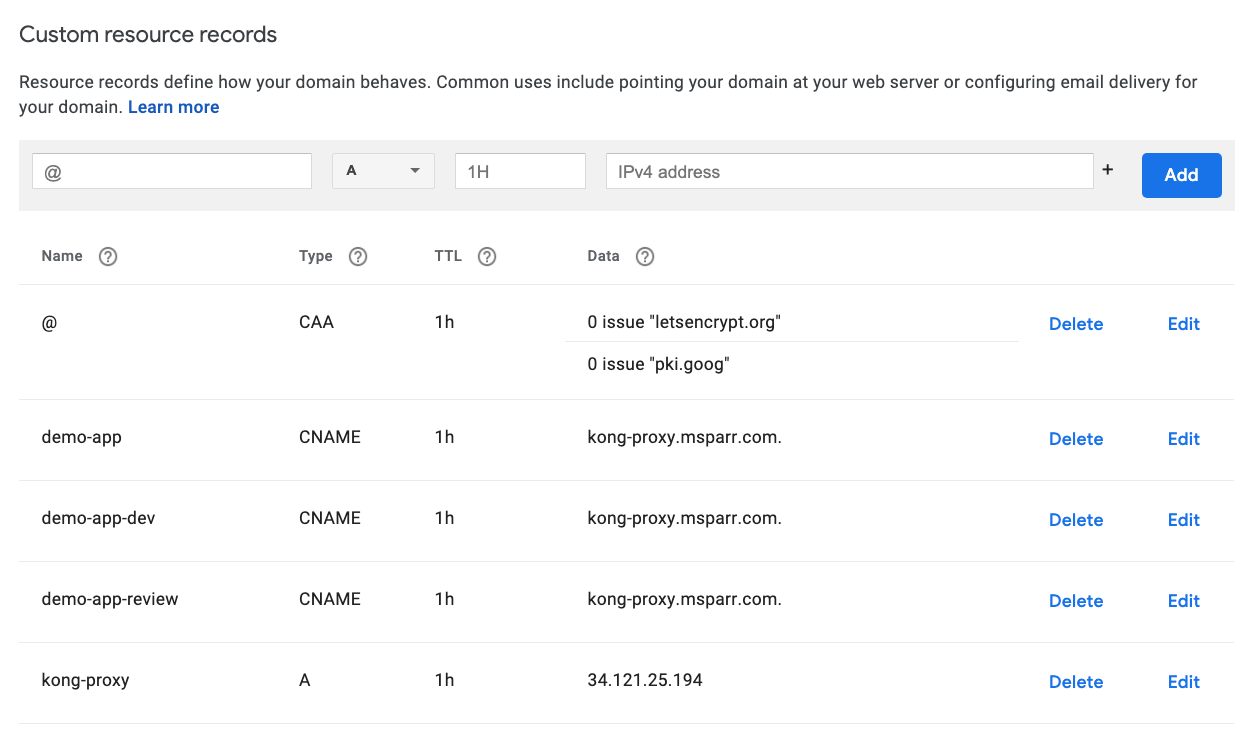
An alternative approach is to use Google Cloud DNS to manage your domain. I would have to point to Google’s nameservers, and then could dynamically create review app URLs based on PR number (ideal). After the GKE and Kong bootstrapping, you can use the following commands to set it up.
一种替代方法是使用Google Cloud DNS管理您的域。 我必须指向Google的域名服务器,然后才能根据PR号(理想)动态创建评论应用程序URL。 在启动GKE和Kong后,可以使用以下命令进行设置。
source .env
# export PROJECT_ID=<from .env>
# export AUTH_NETWORK=<from .env>
export DNS_ZONE_NAME=msparr-com


# create dns zone (you will need to point nameservers to Cloud DNS)
gcloud beta dns --project=$PROJECT_ID managed-zones create $DNS_ZONE_NAME \
    --description= \
    --dns-name=msparr.com.


# fetch the public IP address of the kong-proxy TCP lb
export KONG_PROXY_IP=$(kubectl get svc/kong-proxy -n kong -o jsonpath='{.status.loadBalancer.ingress[0].ip}')
echo "Kong proxy IP is ${KONG_PROXY_IP}"


# create dns record set for Kong proxy (A record)
gcloud dns --project=$PROJECT_ID record-sets transaction start --zone=$DNS_ZONE_NAME
gcloud dns --project=$PROJECT_ID record-sets transaction add $KONG_PROXY_IP \
    --name=kong-proxy.msparr.com. \
    --ttl=300 \
    --type=A \
    --zone=$DNS_ZONE_NAME
gcloud dns --project=$PROJECT_ID record-sets transaction execute --zone=$DNS_ZONE_NAME


# confirm setup as desired
gcloud dns managed-zones list
gcloud dns record-sets list --zone=$DNS_ZONE_NAME
将Cloud Build连接到Github (Connect Cloud Build to Github)
Normally I despise articles that redirect you to other articles but for brevity sake, please follow these two steps to connect Cloud Build to Github and add an SSH key to Secret Manager are nicely described in the following two articles from Google:
通常,我鄙视将您重定向到其他文章的文章,但是为了简洁起见, 请按照以下两个步骤将Cloud Build连接到Github并将SSH密钥添加到Secret Manager中,这在Google的以下两篇文章中都有很好的描述:
Add key and secret to access private repos — note you want to enable “commit” checkbox on the Config repo so your App build pipeline can then commit changes to the Docker image tag version.
添加密钥和机密以访问私有存储库 -请注意,您要启用Config存储库上的“提交”复选框,以便您的应用构建管道可以将更改提交到Docker映像标签版本。
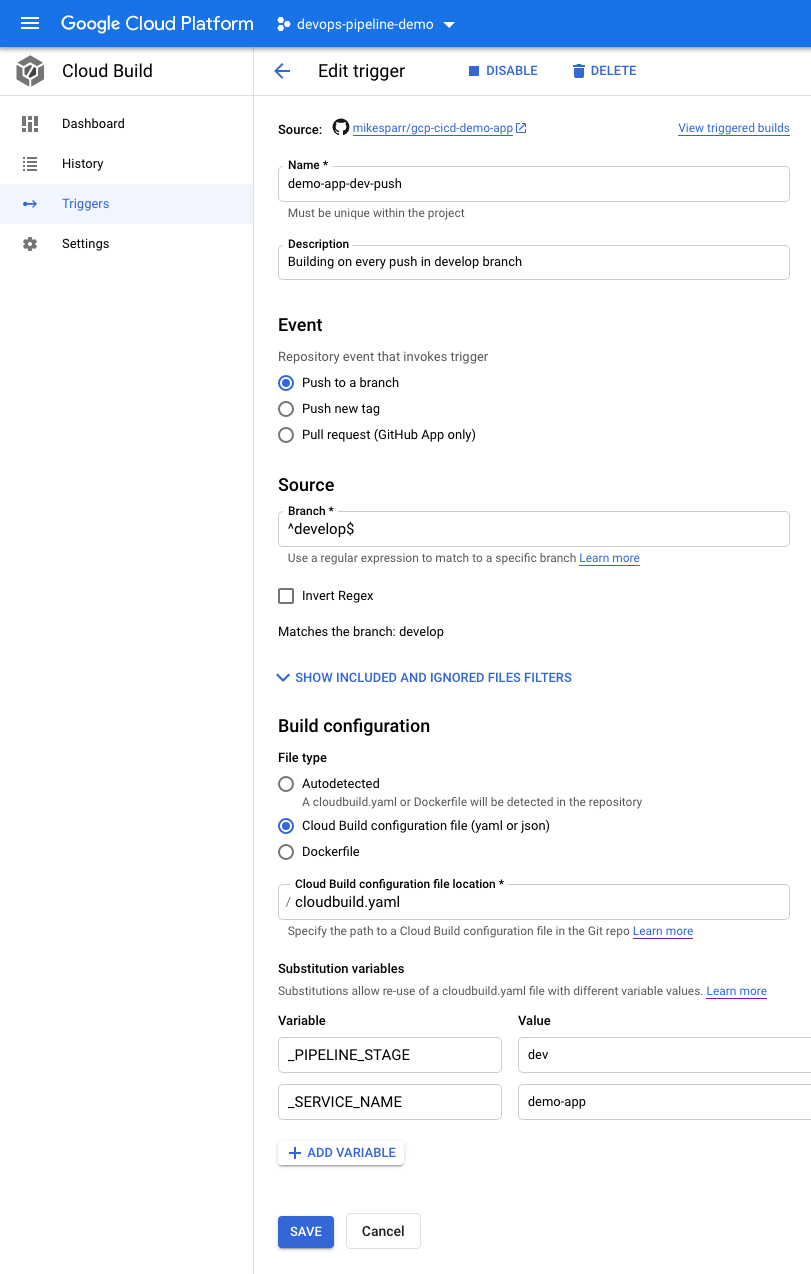
创建3个Cloud Build触发器 (Create 3 Cloud Build triggers)
To simulate the desired behavior technically we would only have to create the PR and merge triggers and respective config files, but normally you would want app builds and deploys for developers too so I included a third push trigger to the develop branch.
为了从技术上模拟所需的行为,我们只需要创建PR并合并触发器和相应的配置文件,但通常情况下,您也希望为开发人员构建和部署应用程序,因此我将第三个推送触发器包括到developer分支。

Note in the configs below I add user-defined ENV vars (bottom of each page). These allow the config files to reference app name and optionally add conditional steps based on stage.
请注意,在下面的配置中,我添加了用户定义的ENV变量(每页的底部)。 这些允许配置文件引用应用程序名称,并根据需要选择添加条件步骤。
For simplicity I created 3 triggers and 3 separate config files (next section) but you could consolidate them using these features.
为简单起见,我创建了3个触发器和3个单独的配置文件(下一部分),但是您可以使用这些功能来合并它们。
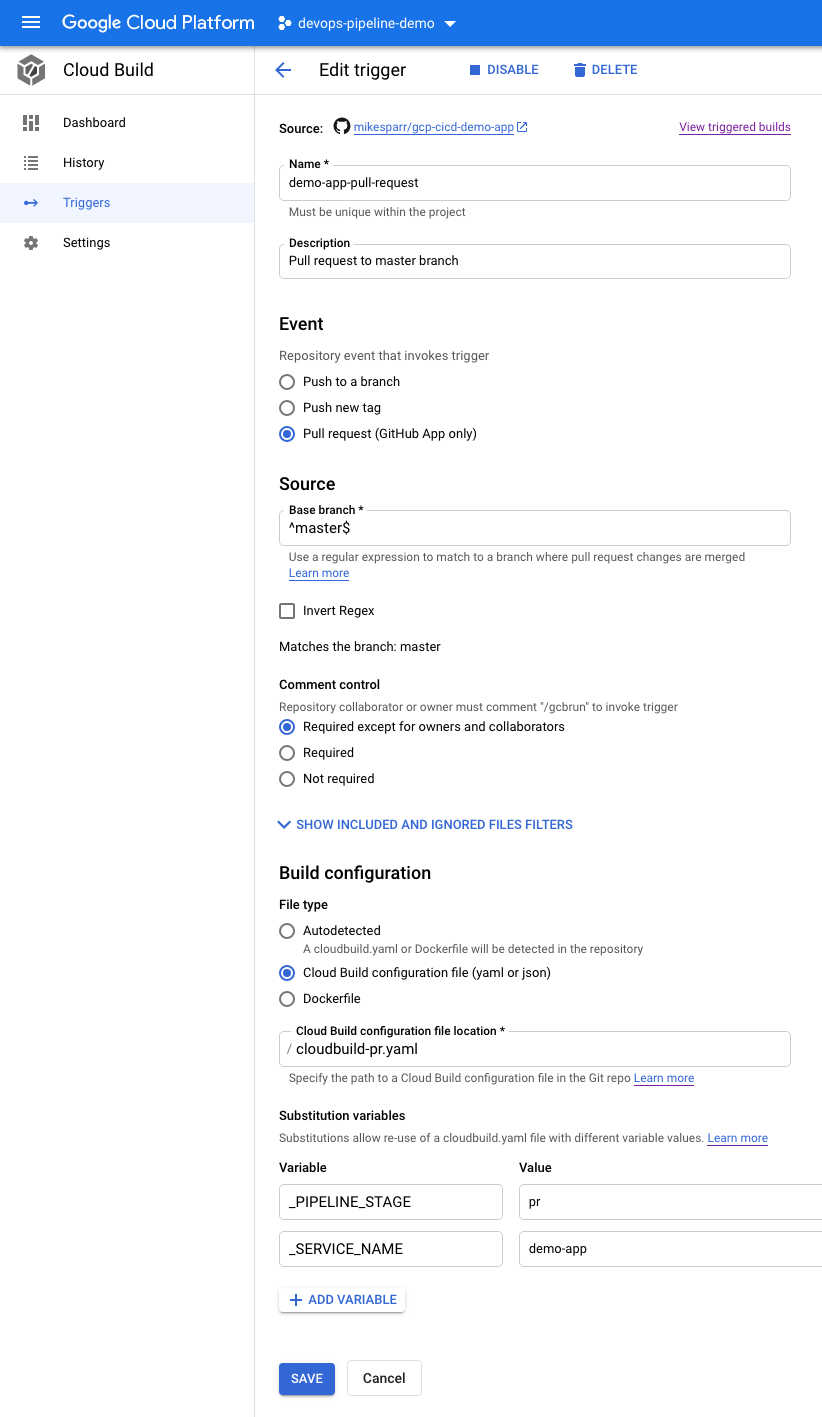
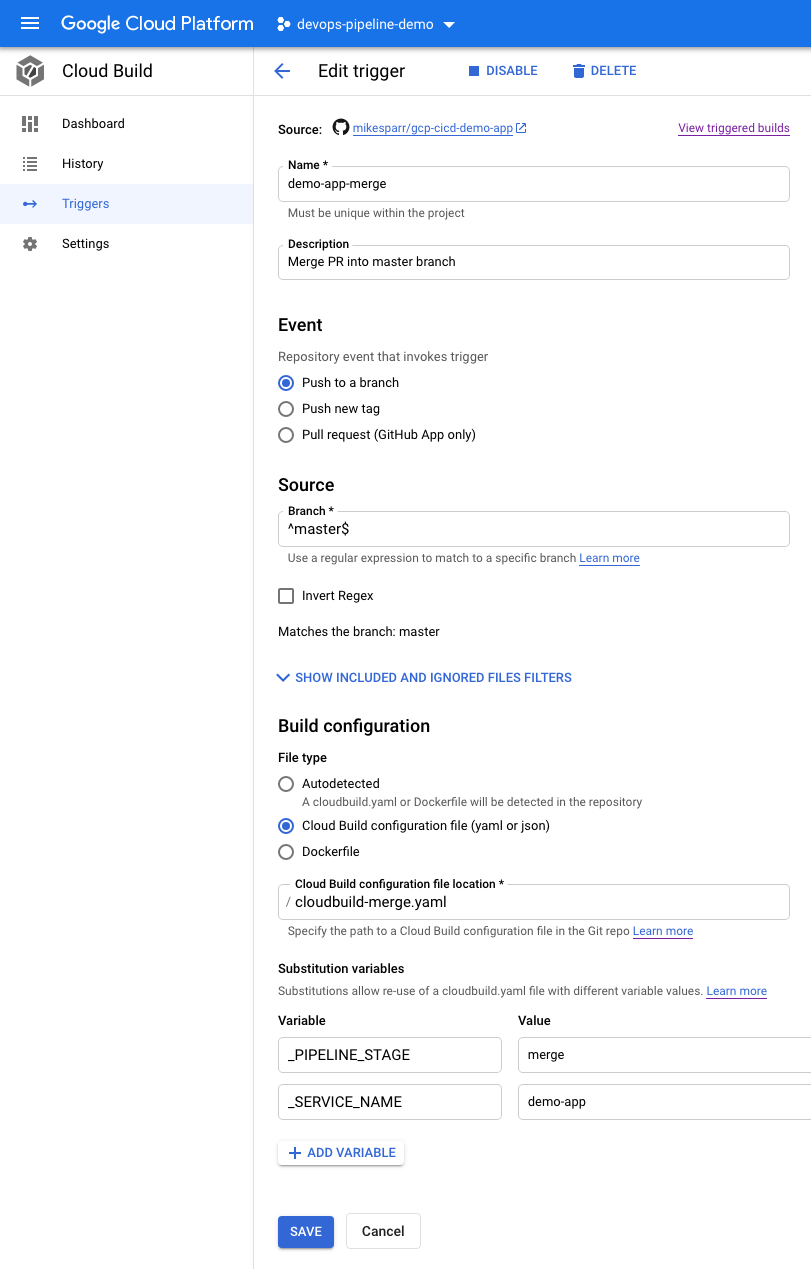
将Cloud Build配置文件添加到App回购 (Add Cloud Build config files to App repo)
The initial part of the build config files are pretty basic and simply build a Docker image and push it to Google Container Registry (GCR). The latter steps use the Secret Manager secret to clone the config repo, make changes to files, and push a commit. This triggers Argo CD to sync the latest changes and update the apps on your GKE cluster.
构建配置文件的初始部分非常基础,只需构建一个Docker映像并将其推送到Google Container Registry(GCR)。 后面的步骤使用Secret Manager机密来克隆配置存储库,更改文件并推送提交。 这将触发Argo CD同步最新更改并更新GKE群集上的应用程序。
steps:
# Build image and push to GCR
- name: 'gcr.io/cloud-builders/docker'
  id: Build
  args:
  - 'build'
  - '-t'
  - 'gcr.io/$PROJECT_ID/$_SERVICE_NAME:$SHORT_SHA'
  - '.'
# TODO: look into [images]
- name: 'gcr.io/cloud-builders/docker'
  id: Push
  args:
  - 'push'
  - 'gcr.io/$PROJECT_ID/$_SERVICE_NAME:$SHORT_SHA'


# Access the id_github file from Secret Manager
- name: gcr.io/cloud-builders/gcloud
  entrypoint: 'bash'
  args: [ '-c', 'gcloud secrets versions access latest --secret=github-ssh-key > /root/.ssh/id_github' ]
  volumes:
  - name: 'ssh'
    path: /root/.ssh


# Set up git with key and domain
- name: 'gcr.io/cloud-builders/git'
  entrypoint: 'bash'
  args:
  - '-c'
  - |
    chmod 600 /root/.ssh/id_github
    cat <<EOF >/root/.ssh/config
    Hostname github.com
    IdentityFile /root/.ssh/id_github
    EOF
    ssh-keyscan -t rsa github.com > /root/.ssh/known_hosts
  volumes:
  - name: 'ssh'
    path: /root/.ssh


# Edit Kustomize layer in config repo and push changes
- name: gcr.io/cloud-builders/git
  entrypoint: 'bash'
  args:
  - '-c'
  - |
    echo "Cloning repo ..."
    git clone --depth 1 git@github.com:mikesparr/gcp-cicd-demo-config
    echo "Updating image tag version ..."
    cd gcp-cicd-demo-config
    ls
    sed -i "s|newTag: .*|newTag: $SHORT_SHA|" demo-app/overlays/develop/kustomization.yaml
    echo "Pushing changes to git config repo ..."
    git config --global user.name mikesparr
    git config --global user.email msparr@gmail.com
    git add -A
    git commit -m "Updated with build ${BUILD_ID} from ${REPO_NAME} commit ${COMMIT_SHA}"
    git push origin master
  volumes:
  - name: 'ssh'
    path: /root/.ssh
Note in this file the sed -i ... is where it updates the image tag to the latest build pushed to GCR.
请注意,在该文件中, sed -i ...将映像标记更新为推送到GCR的最新版本。
steps:
# Build image and push to GCR
- name: 'gcr.io/cloud-builders/docker'
  id: Build
  args:
  - 'build'
  - '-t'
  - 'gcr.io/$PROJECT_ID/$_SERVICE_NAME:v$_PR_NUMBER'
  - '.'
# TODO: look into [images]
- name: 'gcr.io/cloud-builders/docker'
  id: Push
  args:
  - 'push'
  - 'gcr.io/$PROJECT_ID/$_SERVICE_NAME:v$_PR_NUMBER'


# Access the id_github file from Secret Manager
- name: gcr.io/cloud-builders/gcloud
  entrypoint: 'bash'
  args: [ '-c', 'gcloud secrets versions access latest --secret=github-ssh-key > /root/.ssh/id_github' ]
  volumes:
  - name: 'ssh'
    path: /root/.ssh


# Set up git with key and domain
- name: 'gcr.io/cloud-builders/git'
  entrypoint: 'bash'
  args:
  - '-c'
  - |
    chmod 600 /root/.ssh/id_github
    cat <<EOF >/root/.ssh/config
    Hostname github.com
    IdentityFile /root/.ssh/id_github
    EOF
    ssh-keyscan -t rsa github.com > /root/.ssh/known_hosts
  volumes:
  - name: 'ssh'
    path: /root/.ssh


# Edit Kustomize layer in config repo and push changes
- name: gcr.io/cloud-builders/git
  entrypoint: 'bash'
  args:
  - '-c'
  - |
    echo "Cloning repo ..."
    git clone --depth 1 git@github.com:mikesparr/gcp-cicd-demo-config
    echo "Updating image tag version ..."
    cd gcp-cicd-demo-config
    ls
    sed -i "s|newTag: .*|newTag: v$_PR_NUMBER|" demo-app/overlays/review/kustomization.yaml
    echo "Creating review app ..."
    cp templates/demo-app-review.yaml apps/
    echo "Pushing changes to git config repo ..."
    git config --global user.name mikesparr
    git config --global user.email msparr@gmail.com
    git add -A
    git commit -m "Updated with build ${BUILD_ID} from ${REPO_NAME} commit ${COMMIT_SHA}"
    git push origin master
  volumes:
  - name: 'ssh'
    path: /root/.ssh
Note in the PR stage we use the v$_PR_NUMBER for tagging the images so they can be updated on subsequent commits during PR review (I may change this at some point). Another unique aspect is we copy from the /templates/demo-app-review.yaml to the /apps folder so Argo CD begins to monitor the target path.
请注意,在PR阶段,我们使用v$_PR_NUMBER标记图像,以便可以在PR审核期间在后续提交时对其进行更新(我可能会对此进行更改)。 另一个独特的方面是我们从/templates/demo-app-review.yaml复制到/apps文件夹,以便Argo CD开始监视目标路径。
steps:
# Build image and push to GCR
- name: 'gcr.io/cloud-builders/docker'
  id: Build
  args:
  - 'build'
  - '-t'
  - 'gcr.io/$PROJECT_ID/$_SERVICE_NAME:$SHORT_SHA'
  - '.'
# TODO: look into [images]
- name: 'gcr.io/cloud-builders/docker'
  id: Push
  args:
  - 'push'
  - 'gcr.io/$PROJECT_ID/$_SERVICE_NAME:$SHORT_SHA'


# Access the id_github file from Secret Manager
- name: gcr.io/cloud-builders/gcloud
  entrypoint: 'bash'
  args: [ '-c', 'gcloud secrets versions access latest --secret=github-ssh-key > /root/.ssh/id_github' ]
  volumes:
  - name: 'ssh'
    path: /root/.ssh


# Set up git with key and domain
- name: 'gcr.io/cloud-builders/git'
  entrypoint: 'bash'
  args:
  - '-c'
  - |
    chmod 600 /root/.ssh/id_github
    cat <<EOF >/root/.ssh/config
    Hostname github.com
    IdentityFile /root/.ssh/id_github
    EOF
    ssh-keyscan -t rsa github.com > /root/.ssh/known_hosts
  volumes:
  - name: 'ssh'
    path: /root/.ssh


# Edit Kustomize layer in config repo and push changes
- name: gcr.io/cloud-builders/git
  entrypoint: 'bash'
  args:
  - '-c'
  - |
    echo "Cloning repo ..."
    git clone --depth 1 git@github.com:mikesparr/gcp-cicd-demo-config
    echo "Updating image tag version ..."
    cd gcp-cicd-demo-config
    ls
    sed -i "s|newTag: .*|newTag: $SHORT_SHA|" demo-app/overlays/production/kustomization.yaml
    echo "Removing review app ..."
    rm apps/demo-app-review.yaml
    echo "Pushing changes to git config repo ..."
    git config --global user.name mikesparr
    git config --global user.email msparr@gmail.com
    git add -A
    git commit -m "Updated with build ${BUILD_ID} from ${REPO_NAME} commit ${COMMIT_SHA}"
    git push origin master
  volumes:
  - name: 'ssh'
    path: /root/.ssh
What’s unique here is the “Removing review app…” where we rm apps/demo-app-review.yaml file. Since we turned on autoSync and prune in our Application config, ArgoCD will detect this and remove the review app from the GKE cluster.
这里的唯一之处是“正在删除评论应用程序…”,我们在其中存储了rm apps/demo-app-review.yaml文件。 由于我们在“ 应用程序”配置中启用了自动同步和修剪功能,因此ArgoCD将检测到此情况,并将评论应用程序从GKE集群中删除。
添加Kubernetes清单并Kustomize覆盖 (Add Kubernetes manifests and Kustomize overlays)
We could (and should) have another blog post just covering Kustomize and how it enables Kubernetes-native config management. Traditionally you package your apps with Helm charts, or “sonnet” tools using code, but my preference is to keep it simple and extensible with Kustomize.
我们可能(并且应该)还有一篇博客文章,内容仅涉及Kustomize以及它如何启用Kubernetes本地配置管理。 传统上,您使用代码将应用程序与Helm图表或“ sonnet”工具打包在一起,但我的首选是使用Kustomize使其保持简单和可扩展性。
The way the Config repo is organized is each app, in our case /demo-app/base , includes its manifests and a kustomization.yaml file.
Config存储库的组织方式是每个应用程序(在我们的示例中为/demo-app/base ,包括其清单和kustomization.yaml文件。
namespace.yaml — custom namespace
namespace.yaml —自定义名称空间
ingress.yaml — Ingress config that Kong detects and adds route
ingress.yaml — Kong检测并添加路由的Ingress配置
service.yaml — network “wrapper” for backend pods
service.yaml —后端容器的网络“包装器”
deployment.yaml — your actual app (pointing to image)
deployment.yaml-您的实际应用程序(指向图像)
kustomization.yaml — Kustomize config
kustomization.yaml — Kustomize配置
We then add overlays to represent our environments, and these configs will replace or patch the YAML files with environment-specific values like app name suffix, namespace, Ingress host name (to allow dynamic review app URLs).
然后,我们添加叠加层来表示我们的环境,这些配置将使用特定于环境的值(例如,应用程序名称后缀,名称空间,Ingress主机名(以允许动态查看应用程序URL))替换或修补YAML文件。
/overlays/develop— develop env configs/overlays/develop—开发环境配置/overlays/review— review app env configs/overlays/review—查看应用程序环境配置/overlays/production— production env configs/overlays/production生产环境配置
You can see these in the example Github config repo, but below is an example of and overlay config and patch file to create environment-specific URLs in the Ingress.
您可以在示例Github配置库中看到这些内容,但以下是在Ingress中创建特定于环境的URL的示例和覆盖配置和补丁文件。
apiVersion: kustomize.config.k8s.io/v1beta1
kind: Kustomization


bases:
- ../../base


commonLabels:
  env: review


patchesStrategicMerge:
- ingress-host.yaml


commonAnnotations:
  support: support@doit-intl.com


namespace: demo-app-review


nameSuffix: -review


images:
- name: gcr.io/devops-pipeline-demo/demo-app
  newTag: 5af4287 # our CI build file sed command dynamically overwrites this each build
Note the patchesStrategicMerge property points to a file. Kustomize will merge the contents of that file (or files) to override custom values like the Ingress host name below to enable custom URL per environment.
注意patchStrategicMerge属性指向文件。 Kustomize将合并一个或多个文件的内容以覆盖自定义值,例如下面的Ingress主机名,以启用每个环境的自定义URL。
---
apiVersion: extensions/v1beta1 # networking.k8s.io/v1beta1
kind: Ingress
metadata:
  name: demo-app-msparr-com
spec:
#  tls:
#  - secretName: tls-demo-app-msparr-com
#    hosts:
#      - demo-app.msparr.com
  rules:
  - host: demo-app-review.msparr.com # overrides Ingress host so deploys to different URL
    http:
      paths:
      - path: /
        backend:
          serviceName: demo-app
          servicePort: 80
每个PR的可选动态URL (Optional dynamic URLs for each PR)
For my initial demo I just used the same URL but if using Cloud DNS, then add another step to your cloudbuild-pr.yaml file like below to make the URLs dynamic. At the time of this writing, I haven’t tested it yet but intend to update my nameservers and test that too.
在我的初始演示中,我只是使用了相同的URL,但是如果使用Cloud DNS,则向您的cloudbuild-pr.yaml文件添加另一个步骤,如下所示,以使URL动态。 在撰写本文时,我尚未对其进行测试,但是打算更新我的名称服务器并对其进行测试。
# dynamically create DNS CNAME entry for review app
- name: 'gcr.io/cloud-builders/gcloud'
  entrypoint: 'bash'
  args:
  - '-c'
  - |
    gcloud dns --project=devops-pipeline-demo record-sets transaction start --zone=msparr-com
    gcloud dns --project=devops-pipeline-demo record-sets transaction add kong-proxy.msparr.com. \
        --name=demo-app-review-$_PR_NUMBER.msparr.com. \
        --ttl=300 \
        --type=CNAME \
        --zone=msparr-com
    gcloud dns --project=devops-pipeline-demo record-sets transaction execute --zone=msparr-com
You would also add another sed -i ... command in the config script to dynamically replace the ingress-host.yaml patch file each PR deploy.
您还将在配置脚本中添加另一个sed -i ...命令,以动态替换每个PR部署的ingress-host.yaml补丁文件。
摘要 (Summary)
Although there is a lot of content in this post, the overall process is not too difficult and by leveraging the example repos I shared you too could empower your engineers to focus less on infrastructure and more on what they do best.
尽管这篇文章内容很多,但是整个过程并不困难,并且通过利用我分享的示例存储库,也可以使您的工程师减少对基础设施的关注,而将更多的精力放在基础设施上。
加入我的团队 (Join my team)
Join DoiT International and create your own amazing discoveries like this one by visiting our careers page
加入DoiT International,并通过访问我们的职业页面来创建自己的惊人发现。
https://careers.doit-intl.com (remote positions near time zones)
https://careers.doit-intl.com (时区附近的远程位置)
翻译自: https://blog.doit-intl.com/recreating-heroku-ci-cd-review-apps-on-google-cloud-platform-845fa0957232
ci/cd heroku


 2965
2965


 被折叠的 条评论
为什么被折叠?
被折叠的 条评论
为什么被折叠?
 到【灌水乐园】发言


