


ios 容器类
If you start developing a new iOS app, you probably need to use several external libraries. Even if it’s going to be a very simple one, you probably want to gather some statistics, make requests or show a loading indicator. All of this can be done without external libraries. After all, external libraries are also code, and you can write the code yourself. But why would you do something from scratch if someone else has spent months or years doing so and they are ready to give it to you for free?
如果您开始开发新的iOS应用,则可能需要使用多个外部库。 即使这将是一个非常简单的过程,您也可能希望收集一些统计信息,发出请求或显示加载指示器。 所有这些都可以在没有外部库的情况下完成。 毕竟,外部库也是代码,您可以自己编写代码。 但是,如果别人花了数月或数年的时间却准备免费提供这些东西,为什么您会从头开始做呢?
The most popular dependency manager for iOS is Cocoapods. It downloads the libraries you need and their dependencies. It’s very easy to integrate and it has the biggest collection of libraries for iOS. In fact, Cocoapods is a standard dependency manager. All popular open source libraries use it.
iOS上最受欢迎的依赖项管理器是Cocoapods 。 它会下载您需要的库及其依赖项。 它非常易于集成,并且具有适用于iOS的最大的库集合。 实际上, Cocoapods是标准的依赖项管理器。 所有流行的开源库都使用它。
In this article, I’ll show which libraries I use when I start almost every new project and why.
在本文中,我将显示启动几乎每个新项目时使用的库以及原因。
使用可可足类 (Working with Cocoapods)
This is a brief overview of the Cocoapods system. If you’re familiar with it, skip this section.
这是对Cocoapods系统的简要概述。 如果您熟悉它,请跳过本节。
If you still don’t have Cocoapods in your system, open the Terminal app and type:
如果您的系统中仍然没有Cocoapods ,请打开“终端”应用程序,然后键入:
sudo gem install cocoapodsCreate a new project, open the containing folder in Terminal and type:
创建一个新项目,在Terminal中打开包含文件夹,然后键入:
pod init
pod install
You’ll get a workspace file. From this moment, you should only open workspace, not a project, otherwise, Xcode won’t see your dependencies and you’ll get references to a non-existent code. To add dependencies use Podfile. It’s a Ruby script, but you don’t need to know Ruby to edit it. There are several simple rules.
您将获得一个工作区文件。 从这一刻起,Ÿ欧应该只开放工作区,而不是一个项目,否则,Xcode中不会看到你的依赖,你会得到一个不存在的代码引用。 要添加依赖项,请使用Podfile 。 这是一个Ruby脚本,但是您不需要了解Ruby即可对其进行编辑。 有几个简单的规则。
First of all, let Cocoapods know your target system. For example, iOS. And don’t forget to specify your minimum iOS version:
首先,让Cocoapods知道您的目标系统。 例如,iOS。 并且不要忘记指定您的最低iOS版本:
platform :ios, '10.0'As all warnings in external libraries are not my business, I usually add this line:
由于外部库中的所有警告都不关我的事,因此我通常添加以下行:
inhibit_all_warnings!It will silence all the warnings in external libraries.
它将使外部库中的所有警告静音。
If you use Swift, you probably want to use frameworks. Some pods require this:
如果使用Swift,则可能要使用框架。 一些吊舱要求:
use_frameworks!Each target can have separate dependencies. For example:
每个目标可以具有独立的依赖性。 例如:
target 'MyApp' do
  pod 'Alamofire'
  pod 'Kingfisher'
  # ...
end
As you can see, you can add comments with the symbol #.
如您所见,您可以添加带有符号#注释。
Any target can have an unlimited amount of libraries. Sometimes you need to specify a version or a version range. In such cases, web pages of libraries give you instructions, but the general syntax looks like this:
任何目标都可以具有无限数量的库。 有时您需要指定版本或版本范围。 在这种情况下,库的网页会为您提供说明,但是常规语法如下所示:
pod 'Kingfisher', '~> 5.4'And that’s it! Let’s move on to the ten libraries I use the most.
就是这样! 让我们继续使用最常用的十个库。
翠鸟或SDWebImage (Kingfisher or SDWebImage)
These two libraries, Kingfisher for Swift and SDWebImage for Objective-C, allow you to load images from URLs right into your UIImageView. They support caching, transformations, and much more. They’re very effective in recyclable lists, like UITableView and UICollectionView. In other words, if you’re going to load images from the web, one of these libraries is definitely for you.
这两个库(用于Swift的Kingfisher和用于Objective-C的SDWebImage)使您可以将URL中的图像直接加载到UIImageView 。 它们支持缓存,转换等。 它们在可回收列表(如UITableView和UICollectionView非常有效。 换句话说,如果您要从网络上加载图像,那么这些库之一绝对适合您。
Add it to your Podfile:
将其添加到您的Podfile :
pod 'Kingfisher'
# or
pod 'SDWebImage'
Usage with UIKit:
UIKit的用法:
let url = URL(string: "https://example.com/image.png")
imageView.kf.setImage(with: url)
Usage with SwiftUI:
SwiftUI的用法:
import KingfisherSwiftUI

var body: some View {
    KFImage(URL(string: "https://example.com/image.png")!)
}
SDWebImage with Objective-C:
具有Objective-C的SDWebImage:
#import <SDWebImage/SDWebImage.h>// ...[imageView sd_setImageWithURL:[NSURL URLWithString:@"http://www.domain.com/path/to/image.jpg"]
             placeholderImage:[UIImage imageNamed:@"placeholder.png"]];
Both Kingfisher and SDWebImage can be used with Swift and Objective-C. But Kingfisher is written in Swift and SDWebImage is written in Objective-C. I prefer to use them the same way.
Kingfisher和SDWebImage均可与Swift和Objective-C一起使用。 但是Kingfisher是用Swift编写的,而SDWebImage是用Objective-C编写的。 我更喜欢以相同的方式使用它们。
PKHUD (PKHUD)
This library is one of my favourites. I really don’t start a project without it, even the simplest ones.
这个图书馆是我的最爱之一。 没有它,我真的不会开始一个项目, 即使是最简单的。
Any asynchronous process requires visual feedback. It can be data loading, file uploading, processing in a background thread, it doesn’t matter. You need to show an indicator, which will block the screen and show the user that something is going on.
任何异步过程都需要视觉反馈。 可以是数据加载,文件上传,在后台线程中处理,都没关系。 您需要显示一个指示器,它将阻止屏幕并向用户显示发生了什么事情。

It’s exactly what PKHUD can do for you. But it’s not the only usage of this library: it can also show a short message or indicate the success or failure of a process. Visually it looks like it’s a part of iOS, it has a flat design, rounded corners, small animations, exactly like native iOS elements.
这正是PKHUD可以为您做的。 但这不是该库的唯一用法:它还可以显示一条短消息或指示过程的成功或失败。 从外观上看,它似乎是iOS的一部分,它具有平坦的设计,圆角,小的动画,就像本机iOS元素一样。
Add it to your Podfile:
将其添加到您的Podfile :
pod 'PKHUD'Import it:
导入它:
import PKHUDUse it:
用它:
HUD.show(.progress)// Some async processif success {
    HUD.flash(.success)
} else {
    HUD.flash(.error)
}
滑动查看 (SwipeView)
This is an old but rather useful UI library, modifying UIScrollView to respond to slide gestures and change visible pages. In Android, there’s a similar UI component, ViewPager.
这是一个古老而有用的UI库,它修改了UIScrollView以响应滑动手势并更改可见页面。 在Android中,有一个类似的UI组件ViewPager。
The last modification in the library was made five years ago, but it’s written in Objective-C, so it can work in any modern Swift or Objective-C project.
该库中的最后一次修改是在五年前完成的,但是它是用Objective-C编写的,因此可以在任何现代Swift或Objective-C项目中使用。
Add it to your Podfile:
将其添加到您的Podfile :
pod 'SwipeView'Add it to your storyboard or create it in code. You need to implement two protocols: SwipeViewDataSource and SwipeViewDelegate.
将其添加到情节提要或用代码创建。 您需要实现两个协议: SwipeViewDataSource和SwipeViewDelegate 。
This function returns the size of one element. If you want to give an element the same size as the screen, use UIScreen.main.bounds.width for width.
此函数返回一个元素的大小。 如果要为元素提供与屏幕相同的大小,请使用UIScreen.main.bounds.width作为width 。
func swipeViewItemSize(_ swipeView: SwipeView!) -> CGSize {
    return CGSize(width: 250, height: 250)
}
The next function returns UIView representing one item. They can be reused and for good memory management, it’s important to use the old UIView instead of creating a new one. Please note that if this function was called, it doesn’t mean that this UIView will be visible, it creates “neighbours” of visible UIViews to perform a smooth transition between pages. Remember this if you need to start an animation, for example.
下一个函数返回代表一个项目的UIView 。 它们可以重复使用,并且为了实现良好的内存管理,使用旧的UIView而不是创建新的UIView很重要。 请注意,如果调用此函数,并不意味着此UIView将可见,而是创建可见UIView的“邻居”以在页面之间执行平滑过渡。 例如,如果需要开始动画,请记住这一点。
func swipeView(_ swipeView: SwipeView!, viewForItemAt index: Int, reusing view: UIView!) -> UIView! {
    let myView = (view as? MyView) ?? MyView(frame: CGRect(x: 0, y: 0, width: 250, height: 250))
    // ... Set up myView
    return myView
}
This function is called when the user swipes and the current page changes. Also, it will be called if you change the page programmatically. This callback is useful if you have a page indicator:
当用户滑动和当前页面更改时,将调用此函数。 另外,如果您以编程方式更改页面,它将被调用。 如果您有页面指示符,则此回调很有用:
func swipeViewCurrentItemIndexDidChange(_ swipeView: SwipeView!) {
    let index = swipeView.currentItemIndex
    // ...
}
And one more important function returns the total amount of pages:
还有一个更重要的函数返回页面总数:
func numberOfItems(in swipeView: SwipeView!) -> Int {
    items.count
}
可达性 (Reachability)
There’re two modifications of this library, one for Swift and another for Objective-C. They’re almost identical, so I’ll exemplify with the Swift version only. Both libraries report your current state of internet connection. You can either request just one state, or monitor changes using a callback.
这个库有两个修改,一个是对Swift的修改,另一个是对Objective-C的修改。 它们几乎相同,因此我仅以Swift版本为例。 这两个库均报告您当前的Internet连接状态。 您可以只请求一个状态,也可以使用回调监视更改。
But first, add it to Podfile:
但首先,将其添加到Podfile :
pod 'ReachabilitySwift'This example shows how to check if the user is connected to the Internet:
此示例显示如何检查用户是否连接到Internet:
import Reachabilitylazy var reachability: Reachability = try! Reachability()public func isNetworkAvailable() -> Bool {
    reachability.connection != .unavailable
}
On their official website they also provide an example of monitoring the network state.
在他们的官方网站上,他们还提供了监视网络状态的示例。
OneSignal (OneSignal)
If you need to send remote push notifications to iOS, Android, or web, you’ll probably like the OneSignal service. The free account allows you to send an unlimited amount of push notifications to mobile devices.
如果您需要将远程推送通知发送到iOS,Android或Web,您可能会喜欢OneSignal服务。 免费帐户允许您向移动设备发送无限量的推送通知。
First of all, create an account or log in to an existing one.
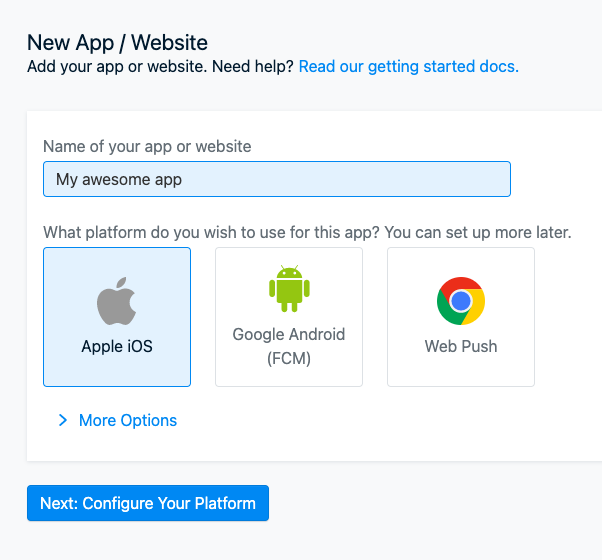
For iOS, you’ll need to upload a certificate from Apple. For Android, a key from Firebase. This document describes how to generate an iOS push certificate.
对于iOS,您需要从Apple上传证书。 对于Android,是Firebase的密钥。 本文档介绍了如何生成iOS推送证书。
The configuration process is rather long, so I won’t copy it all here. Instead, you may read it from the official documentation if you need so:
配置过程很长,因此我不会在这里全部复制。 相反,如果需要,您可以从官方文档中阅读:
It may look complicated, but only the first time. When the integration is over, working with OneSignal will be fast and easy.
它可能看起来很复杂,但这只是第一次。 集成结束后,与OneSignal一起工作将变得轻松快捷。
Now you can send a push notification to your iOS device. Don’t forget that simulators don’t receive push notifications. Also, you need to run the app and accept push notifications.
现在,您可以向您的iOS设备发送推送通知。 不要忘记,模拟器不会收到推送通知。 另外,您需要运行该应用程序并接受推送通知。
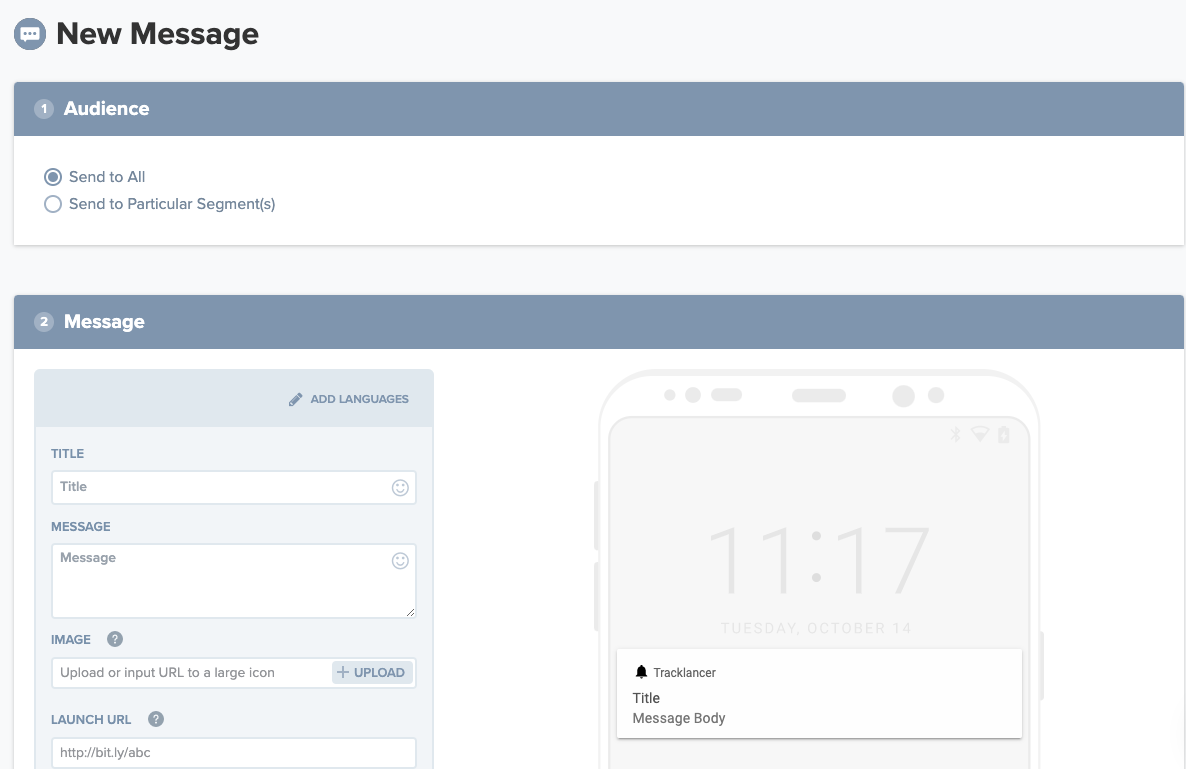
Click “New Push” and enjoy the number of options. You can also send push notification using OneSignal REST API.
单击“新推送”并享受许多选项。 您还可以使用OneSignal REST API发送推送通知。
SwiftEventBus (SwiftEventBus)
This is a small, but very useful library. It sends messages from one part of the code to another. It can send a command in a background thread or jump into a UI thread.
这是一个很小但非常有用的库。 它将消息从代码的一部分发送到另一部分。 它可以在后台线程中发送命令或跳入UI线程。
First of all, update your Podfile:
首先,更新您的Podfile :
pod 'SwiftEventBus'It uses the concept of publishers and subscribers. You can post an event from any part of code using this command:
它使用发布者和订阅者的概念。 您可以使用以下命令从代码的任何部分发布事件:
SwiftEventBus.post("eventName")The event name must be a string and it’s a good practice to create constants for all event types to avoid misspelling. You can also pass a dictionary with parameters and/or specify a sender:
事件名称必须是字符串,并且为所有事件类型创建常量以避免拼写错误是一种很好的做法。 您还可以传递带有参数的字典和/或指定发件人:
SwiftEventBus.post("eventName", sender: anyObject, userInfo: someDictionary)The Sender can be any object including objects of your own type. UserInfo is a dictionary. If you receive an event, you need a subscriber. It’s not compulsory, but if you don’t have it, the message goes nowhere.
Sender可以是任何对象,包括您自己类型的对象。 UserInfo是字典。 如果收到事件,则需要订阅者。 它不是强制性的,但是如果您没有它,则消息无处可去。
SwiftEventBus.onMainThread(target, name: "eventName") { result in
    // This code will be executed in main thread
}
How can it be useful? Let’s say you have a Firebase authentication and you want to update the UI every time the authentication status changes.
有什么用? 假设您具有Firebase身份验证,并且每次身份验证状态更改时都想更新UI。
This can be done in AppDelegate (after Firebase is initialised):
这可以在AppDelegate中完成(Firebase初始化之后):
Auth.auth().addStateDidChangeListener { (auth, user) in

}
As Firebase Auth uses singleton, it’s not necessary to pass any parameters, we can get them from Auth.auth().currentUser.
由于Firebase Auth使用单例,因此不需要传递任何参数,我们可以从Auth.auth().currentUser获取它们。
It’s UIViewController’s responsibility to update the UI, so you can place the subscribing function to viewDidAppear and the unsubscribing one to viewWillDisappear.
更新用户界面是UIViewController的责任,因此您可以将预订功能放置到viewDidAppear ,将取消预订功能放置到viewWillDisappear 。
SwiftEventBus.onMainThread(self, name: "authenticationStatusChanged") { result in
    // Update UI
}// ...SwiftEventBus.unregister(self)
I always assume that if something can go wrong, it will go wrong, so don’t forget to unsubscribe before unloading the activity. Either in viewWillDisappear or in deinit.
我始终认为,如果出现问题,那肯定会出错,所以不要忘记在取消活动之前取消订阅。 在viewWillDisappear或在deinit 。
Web浏览器 (`WebBrowser)
The name of this library is pretty self-descriptive. It’s a separate view controller with WKWebView. It supports sharing, JavaScript, and other features. It can be opened either as a modal or pushed with UINavigationController.
该库的名称很容易描述。 它是带有WKWebView的单独的视图控制器。 它支持共享,JavaScript和其他功能。 它可以作为模式打开,也可以通过UINavigationController推送。
Add this to your Podfile:
将此添加到您的Podfile :
pod 'WebBrowser'When you need to open it, create an instance of WebBrowserViewController and configure it:
当您需要打开它时,请创建一个WebBrowserViewController实例并进行配置:
let webVC = WebBrowserViewController()
webVC.delegate = self// ... other adjustmentswebVC.loadURLString("https://medium.com/")
Push it:
推它:
navigationController?.pushViewController(webVC, animated: true)… or present modally:
…或以形式出现:
let nav = WebBrowserViewController.rootNavigationWebBrowser(webBrowser: webVC)
present(navigationWebBrowser, animated: true, completion: nil)
That’s it! Now you can show a Privacy Policy, instructions, or support chat right from your website without making a native version of it.
而已! 现在,您可以直接在您的网站上显示隐私政策,说明或支持聊天,而无需制作其本机版本。
SWRevealViewController (SWRevealViewController)
Another old but very useful library. The standard ways of navigation in iOS apps are:
另一个旧但非常有用的库。 iOS应用中的标准导航方式为:
- Tab bar in the bottom with up to five items 底部的标签栏最多包含五个项目
- Navigation bar with action buttons带操作按钮的导航栏
These action buttons either do some action or open an alert, action sheet, or popover menu.
这些操作按钮可以执行某些操作,也可以打开警报,操作表或弹出菜单。
Android apps, on the other hand, offer sidebars very often. They’re native there, and you can see them much more often. Using SWRevealViewController, which is written in Objective-C, (meaning it’s compatible with all versions of Swift) you can add such sidebars to your iOS app without much of a headache.
另一方面,Android应用程序经常提供侧边栏。 它们是本地的,您可以经常看到它们。 使用用Objective-C编写的SWRevealViewController(这意味着它与Swift的所有版本兼容),您可以轻松地将此类侧边栏添加到iOS应用中。
First of all, let’s add a pod:
首先,让我们添加一个pod:
pod 'SWRevealViewController'I’ll show how to do it using storyboards, but you can do it with pure code. This library offers rather good documentation with several examples.
我将展示如何使用情节提要来执行此操作,但是您可以使用纯代码来执行此操作。 该库提供了很好的文档,并提供了一些示例。
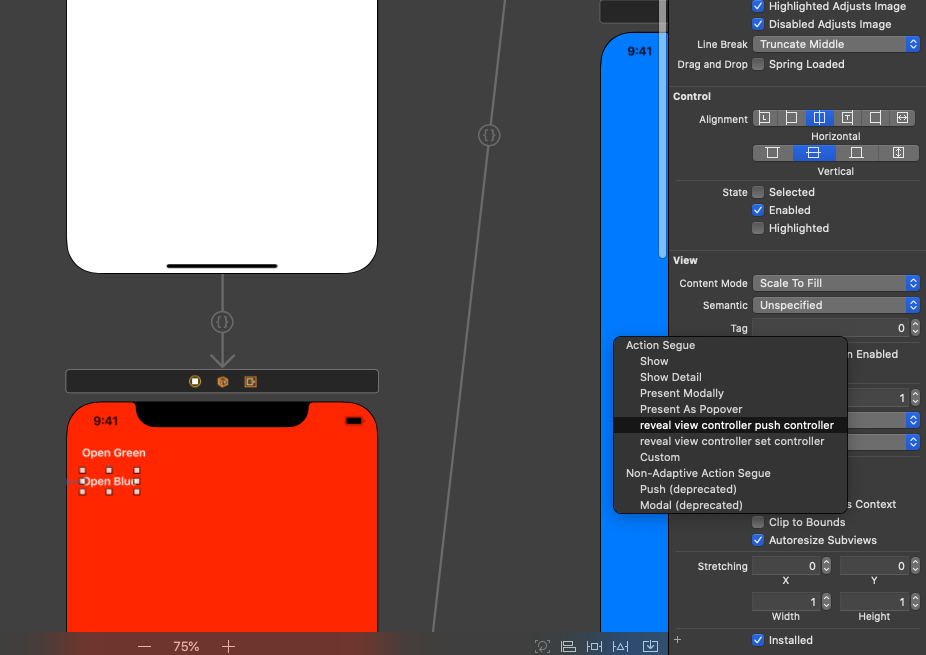
Let’s create fourUIViewControllers (see screenshot):
让我们创建四个UIViewController (请参见屏幕截图):
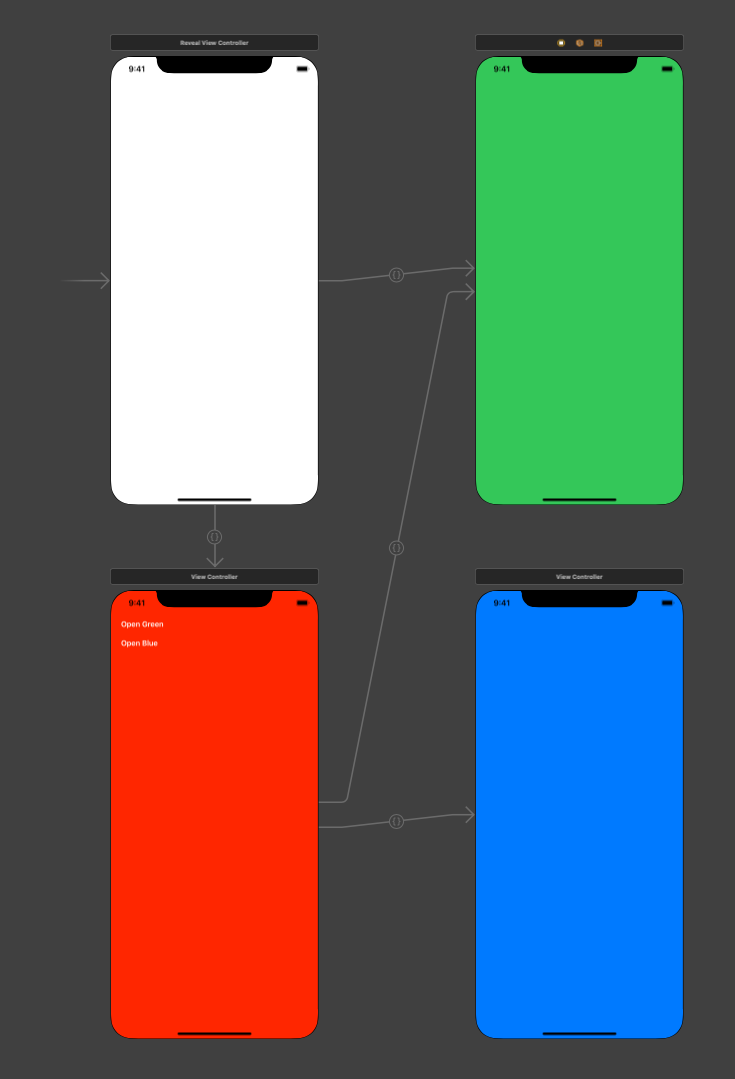
The root
UIViewController(white) should be an instance ofSWRevealViewController.根
UIViewController(白色)应该是SWRevealViewController的实例。The sidebar (red) can be any
UIViewController, but when designing it you should keep in mind that it won’t show completely. The sidebar should be connected to the root screen with a segue of typeSWRevealViewControllerSegueSetController. This segue should have thesw_readidentifier. This is important.边栏(红色)可以是任何
UIViewController,但是在设计时,请记住它不会完全显示。 边栏应使用SWRevealViewControllerSegueSetController类型的segue连接到根屏幕。 此命令应具有sw_read标识符。 这个很重要。The green screen is one of the two front screens and the default one. The default screen should be connected to the root screen with a segue of type
SWRevealViewControllerSegueSetControllerand namesw_front. As it can be opened from the sidebar, we also add a connection withUIButton. It’s the same as if you want to open the screen when the user presses the UIButton, but segue should be of theSWRevealViewControllerSeguePushControllertype. The identifier is not important, it can be empty.绿屏是两个前屏幕之一,也是默认屏幕之一。 默认屏幕应使用类型为
SWRevealViewControllerSegueSetController且名称为sw_front的segue连接到根屏幕。 由于可以从侧栏打开它,因此我们还添加了与UIButton的连接。 就像您要在用户按下UIButton时打开屏幕一样,但是segue应该是SWRevealViewControllerSeguePushController类型。 标识符并不重要,可以为空。- The blue screen is the same as the green one, but without a connection with a root screen. For obvious reasons, there should be only one default front controller. 蓝屏与绿屏相同,但没有与根屏的连接。 出于明显的原因,应该只有一个默认的前端控制器。
One more detail: we need to add a way to open the sidebar. There are two standard ways, to slide from the left and using a button. Add this code to all of your front controllers:
更多细节:我们需要添加一种打开侧边栏的方法。 有两种标准方法,即从左侧滑动和使用按钮。 将此代码添加到所有前端控制器中:
import SWRevealViewController//...override func viewDidLoad() {
    super.viewDidLoad()
    if let gr = revealViewController()?.panGestureRecognizer() {
        self.view.addGestureRecognizer(gr)
    }
}
This will activate the slide gesture. If you want to add a button opening sidebar, add this code to @IBAction:
这将激活滑动手势。 如果要添加按钮打开侧栏,请将此代码添加到@IBAction :
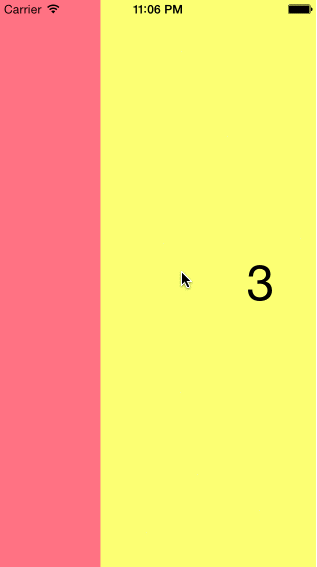
revealViewController()?.revealToggle(sender)What do we get as a result? After starting the app, you’ll see a green screen. Pull the sidebar from the left side of the screen with your finger (mouse on the simulator) and a sidebar will appear.
结果是什么? 启动应用程序后,您将看到一个绿色屏幕。 用手指(模拟器上的鼠标)从屏幕左侧拉动侧边栏,将出现侧边栏。
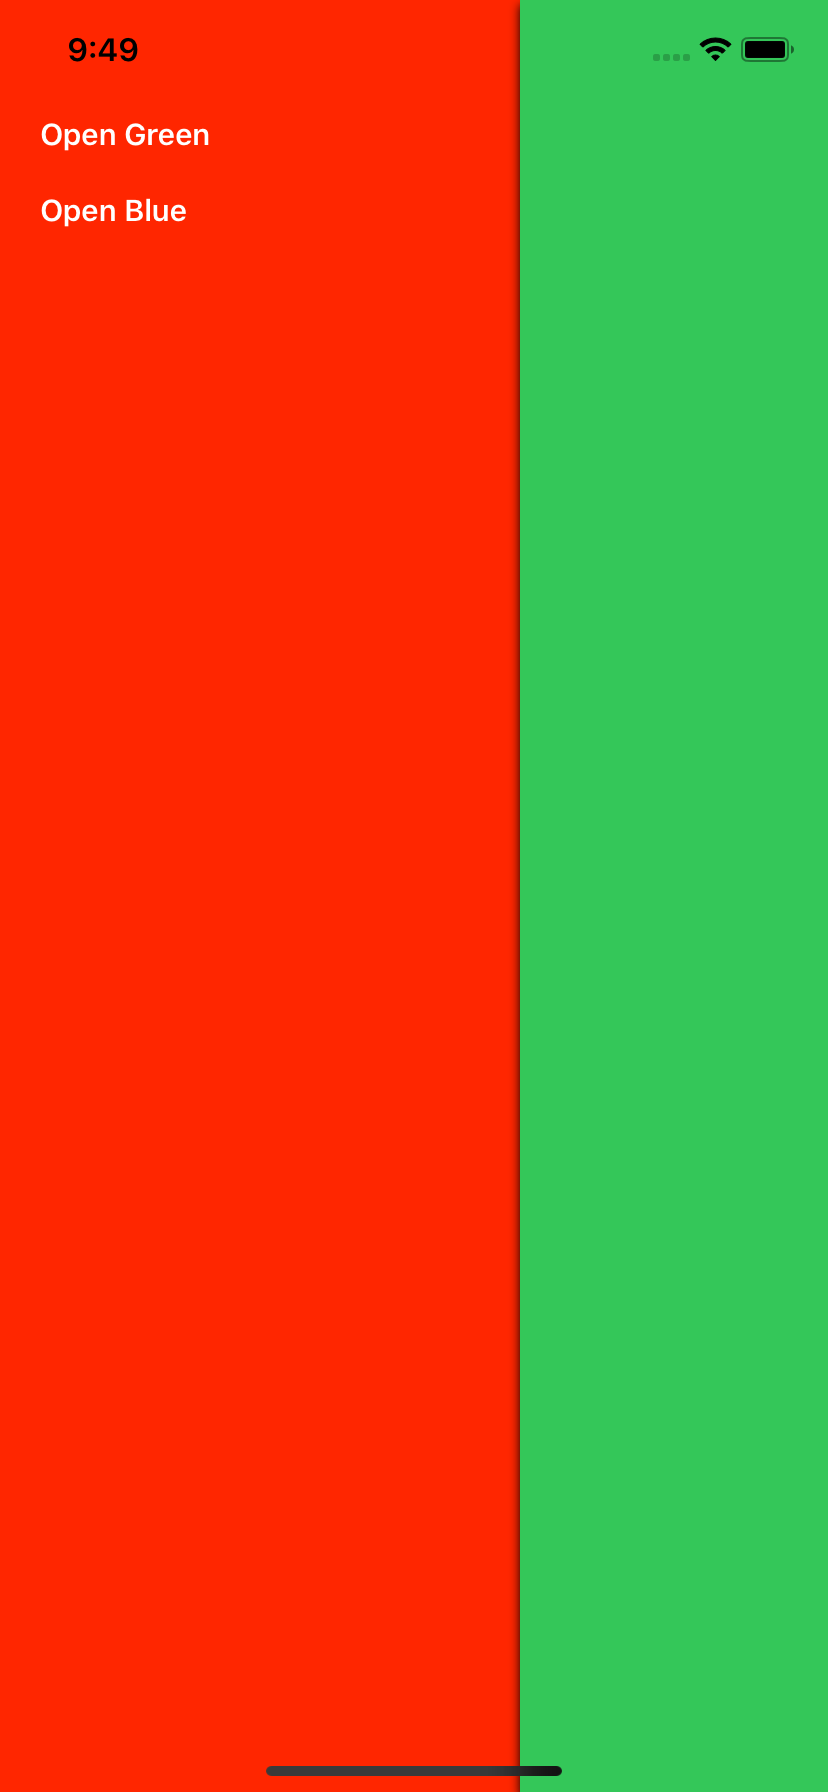
Two buttons on the sidebar will open a green and a blue screen. It can look complicated at the beginning, but when you master it, it won’t be much more difficult than, for example, a tab bar.
侧栏上的两个按钮将打开绿色和蓝色屏幕。 一开始它看起来可能很复杂,但是当您掌握它时,它不会比选项卡栏困难得多。
Front screens can have any type. They can be simple UIViewControllers or something more complex, like UINavigationControllers or UITabBarControllers depending on your needs.
前屏幕可以是任何类型。 它们可以是简单的UIViewController也可以是更复杂的东西,例如UINavigationController或UITabBarController具体取决于您的需求。
SwiftyGif (SwiftyGif)
Using gifs in the app can be a good idea. They’re small and efficient. It’s much easier to show gif, than, for example, an MPEG or QuickTime video. The library SwiftyGif will help you to add gif support with just several lines of code.
在应用程序中使用gif可能是个好主意。 它们体积小且效率高。 比起MPEG或QuickTime视频,显示gif要容易得多。 SwiftyGif库将帮助您通过几行代码来添加gif支持。
Add this to your Podfile:
将此添加到您的Podfile :
pod 'SwiftyGif'SwiftyGif adds gif animations right in UIImageView components, without even subclassing them.
SwiftyGif可以在UIImageView组件中直接添加gif动画,甚至无需对其进行子类化。
You can create it programmatically, by coding:
您可以通过以下方式以编程方式创建它:
import SwiftyGif

do {
    let gif = try UIImage(gifName: "MyImage.gif")
    let imageview = UIImageView(gifImage: gif, loopCount: 3) // Will loop 3 times
    imageview.frame = view.bounds
    view.addSubview(imageview)
} catch {
    print(error)
}
Add it to the existing UIImageView:
将其添加到现有的UIImageView :
let gif = try UIImage(gifName: "MyImage.gif")
self.myImageView.setGifImage(gif, loopCount: -1) // Will loop forever
You can also load it from the web:
您也可以从网上加载它:
let url = URL(string: "...")
let loader = UIActivityIndicatorView(style: .white)
cell.gifImageView.setGifFromURL(url, customLoader: loader)
Example borrowed from the official website.
从官方网站借来的例子。
RSSelectionMenu (RSSelectionMenu)
The last pod I want to talk about is RSSelectionMenu. It’s a good time saver when you need to give the user a way to select from a list. A very typical situation. Instead of creating your own UIViewController with UITableView (or UITableViewController), you can use this library.
我想谈的最后一个pod是RSSelectionMenu 。 当您需要为用户提供从列表中进行选择的方式时,这是节省时间的好方法。 一个非常典型的情况。 您可以使用此库,而不是使用UITableView (或UITableViewController )创建自己的UIViewController 。
Let’s add it to Podfile:
让我们将其添加到Podfile :
pod 'RSSelectionMenu'In the source code, let’s define a list of options:
在源代码中,让我们定义一个选项列表:
let options = ["New York", "London", "Istanbul", "Moscow", "Berlin", "Paris", "Beijing", "Tokyo"]The rest depends on the way you’re going to use it. You can allow only one selection or many. You can preselect some options. You can push it or present it modally.
其余的取决于您使用它的方式。 您只能选择一个或多个。 您可以预选一些选项。 您可以推动它或以模态显示它。
let selectionMenu = RSSelectionMenu(dataSource: options) { (cell, item, indexPath) in
    // ...
}
Let’s push it (we need to have an active UINavigationController):
让我们推动它(我们需要有一个活动的UINavigationController ):
selectionMenu.show(style: .push, from: self)结论 (Conclusion)
External libraries can be extremely useful. And Cocoapods allow you to use them without any headache. Well, almost. Don’t forget to check your version of Swift if the library is written in Swift, the iOS target range, and license before using these frameworks. And don’t be afraid to find new libraries. There’re hundreds of wonderful pods that you can use in your projects.
外部库可能非常有用。 Cocoapods可以让您Cocoapods使用它们。 好吧,差不多。 使用这些框架之前,请不要忘记检查该库的版本是否为Swift,iOS目标范围和许可。 并且不要害怕找到新的库。 您可以在项目中使用数百种出色的Pod。
Happy coding and see you next time!
祝您编程愉快,下次再见!
翻译自: https://medium.com/better-programming/10-pods-to-use-in-a-new-ios-project-5ab7180e794a
ios 容器类


 736
736

 被折叠的 条评论
为什么被折叠?
被折叠的 条评论
为什么被折叠?
 到【灌水乐园】发言


