


On this page:
在本页面:
什么是NPM? (What is NPM?)
NPM stands for Node Package Manager and is the world’s largest software registry. NPM is used to share, borrow, develop packages that can be public or private to your organization. It’s also a command-line utility for interacting with packages and it’s hard to imagine a world without NPM.
NPM代表Node Package Manager,它是世界上最大的软件注册中心。 NPM用于共享,借用,开发可以对组织公开或私有的软件包。 它也是用于与软件包交互的命令行实用程序,很难想象没有NPM的世界。
为什么要使用自定义挂钩? (Why React Custom Hooks?)
As sharp and conscious developers that we all are, we find ourselves many times following the DRY (Don’t Repeat Yourself) principles, therefore building reusable pieces of code within our project. If we’re diving deep in React Hooks that share the same capabilities with cross functionalities, we should be taking advantage of Custom Hooks. Hooks, in nature, are plain JavaScript functions.
作为我们所有人的敏锐和有意识的开发人员,我们发现自己多次遵循DRY(不要重复自己)原则,因此在我们的项目中构建了可重用的代码段。 如果我们要深入研究与跨功能共享相同功能的React Hooks,则应该利用Custom Hooks。 挂钩本质上是普通JavaScript函数。
“Building your own Hooks lets you extract component logic into reusable functions.” — React documentation.
“通过构建自己的Hook,您可以将组件逻辑提取到可重用的函数中。” — React文档。
TypeScript在方程式中适合什么位置? (Where does TypeScript fit in the equation?)
TypeScript is a superset of JavaScript and it’s created and maintained by Microsoft. As a language on its own, it has been designed to offer JavaScript the typing system it was missing. It provides compile-time type validation and will not allow our code to compile if there are any typing errors. It has a huge community support not only in the forms of “how-to”s and documentation but also with declaration files.
TypeScript是JavaScript的超集,由Microsoft创建和维护。 作为一种语言,它被设计为向JavaScript提供它所缺少的键入系统。 它提供了编译时类型验证,如果有任何键入错误,将不允许我们的代码进行编译。 它不仅以“操作方法”和文档的形式提供了巨大的社区支持,而且还具有声明文件。
动机 (The motivation)
Recently, at work, we’ve built a form that was making use of validations. Since the company I work at, has dozens of other React projects, our team thought that it could be useful to publish the Custom Hook as an NPM package so other teams could make use of it as well. Since the package is fully tested and maintained by us, other teams can enjoy the benefits of a package on these terms without having to worry about maintenance. As a plus, developers will be able to generate value in the form of pull-requests and contributions.
最近,在工作中,我们建立了一个使用验证的表单。 由于我所在的公司有数十个其他React项目,因此我们的团队认为将Custom Hook作为NPM软件包发布可能很有用,以便其他团队也可以使用它。 由于该软件包已由我们全面测试和维护,因此其他团队可以按照这些条款享受该软件包的好处,而不必担心维护。 另外,开发人员将能够通过拉动请求和贡献的形式来创造价值。
与TSDX整合在一起 (Putting all together with TSDX)
I started by building the backbone, adding Prettier, ESLint, TypeScript, Rollup, Jest and an example app that would make use of the Custom Hook. It was not as simple as I thought and I stepped on many rocks before I could even start typing any code. My goal was not to spend hours or days on the configuration. I wanted to be reliable, but able to move fast.
我开始建设的骨干,加入更漂亮 , ESLint , 打字稿 , 汇总 , 玩笑和示例应用程序,会利用自定义挂钩的。 这不是我想的那么简单,甚至在我开始输入任何代码之前,我就走了很多路。 我的目标不是在配置上花费数小时或数天。 我想变得可靠,但能够快速前进。
I then found TSDX:
然后我发现了TSDX :
“a zero-config CLI that helps you develop, test, and publish modern TypeScript packages with ease — so you can focus on your awesome new library and not waste another afternoon on the configuration.”
“零配置的CLI,可帮助您轻松开发,测试和发布现代TypeScript软件包-这样您就可以专注于出色的新库,而不会在配置上浪费另一个下午。”
It couldn’t sound better.
听起来还不错。
TSDX is another product from the team that built Formik and has dozens of contributors. Some of the shining features are:
TSDX是构建Formik的团队的另一种产品,有数十名贡献者。 一些闪亮的功能是:
Bundles your code with Rollup and outputs multiple module formats (CJS & ESM by default, and also UMD if you want) plus development and production builds
将代码与汇总捆绑在一起,并输出多种模块格式(默认情况下为CJS和ESM,如果需要还可以提供UMD)以及开发和生产版本
- Live reload / watch-mode 实时重载/观看模式
- Works with React 与React一起使用
- Jest test runner setup with sensible defaults via tsdx test 通过tsdx test设置合理的默认Jest测试运行程序
- Zero-config, single dependency 零配置,单依赖
那就试试吧! (Let’s try it then!)
节点和NPM (Node and NPM)
Make sure you’ve got Node and NPM latest versions installed on your machine.
确保在计算机上安装了Node和NPM最新版本。
为您的包裹选择一个名字 (Choose a name for your package)
Picking a name can be burdensome, especially when it comes to Custom Hooks. As React docs say: “A custom Hook is a JavaScript function whose name starts with “use” and that may call other Hooks.”. If you wanna build something like a “useCounter”, you’ll probably find a dozen of them already registered on https://www.npmjs.com/. I’d suggest something like “@<company/user name>/useCounter”.
选择一个名称可能会很麻烦,尤其是在涉及Custom Hooks时。 正如React文档所说:“自定义的Hook是一个JavaScript函数,其名称以“ use”开头,并且可以调用其他Hook。”。 如果您想构建类似“ useCounter”的东西,您可能会发现其中许多已经在https://www.npmjs.com/上注册。 我建议使用类似“ @ <公司/用户名> / useCounter”的名称。
But we are not going to build a useCounter. There are way too many in this world and there are other things that are not getting enough attention.
但是我们不会构建useCounter。 这个世界上有太多的东西,还有其他一些东西没有引起足够的重视。
We are going to use the Chuck Norris API because life it’s better when you know some Chuck Norris facts.
我们将使用Chuck Norris API,因为当您了解一些Chuck Norris事实时,生活会更好。
The goal of this tutorial is not to understand how to build a Custom Hook. If you’re not sure about it, have a look at the official documentation.
本教程的目的不是要了解如何构建自定义挂钩。 如果不确定,请查看官方文档 。
运行TSDX (Run TSDX)
On your terminal/command line, type the following:
在终端/命令行上,键入以下内容:
npx tsdx create use-norrisThe terminal will prompt a question and we’ll choose “react”
终端将提示问题,我们将选择“React”
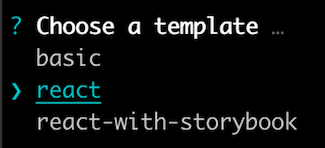
Dependencies will be generated and the boilerplate created.
将生成依赖关系并创建样板。
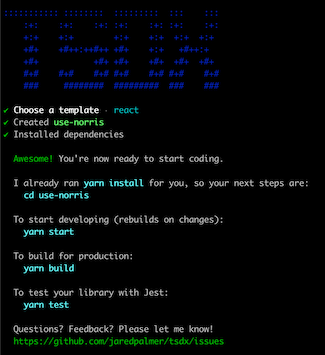
To start developing:
开始开发:
cd use-norrisyarnOur project file tree will look like this:
我们的项目文件树将如下所示:

注意事项 (Things to note)
package.json (package.json)
I’m ok with the package.json for now but I’ll change the name value for what will be my package name to @franciscomcg/use-norris. Like so:
我确定用package.json现在,但我会改的name为这将是我的包名值@franciscomcg/use-norris 。 像这样:
"name": "@franciscomcg/use-norris"Publishing on NPM and creating a git repository are separated tasks and one has nothing to do with another. We can publish and jump git completely but, as we know, is not a great idea. Therefore I’ll add my git repository in the package.json:
在NPM上发布和创建git存储库是单独的任务,一个与另一个无关。 我们可以完全发布并跳过git,但众所周知,这不是一个好主意。 因此,我将git存储库添加到package.json :
"repository": {
   "type": "git",
   "url": "https://github.com/FranciscoMCG/use-norris"
}
tsconfig.json (tsconfig.json)
All good for me but I’d like you to pay special attention to the ”declaration":"true field. This field would make it possible to generate corresponding declaration *.d.ts files for your code and ship them with our package. This would be used by our users to access type definitions.
一切对我都有好处,但我希望您特别注意”declaration":"true字段”。 此字段将可能为您的代码生成相应的声明*.d.ts文件,并将其与我们的软件包一起提供。 用户将使用它来访问类型定义。
ESLint和更漂亮 (ESLint and Prettier)
The package runs with ESLint and Prettier out of the box. You can customize both by adding eslintConfig and prettier blocks to package.json or by creating .eslintrc.js and .prettierrc.js config files.
该程序包开箱即用ESLint和Prettier运行。 您可以通过将eslintConfig和prettier块添加到package.json或通过创建.eslintrc.js和.prettierrc.js配置文件来进行自定义。
建立我们的钩子 (Building our Hook)
Our Hook is going to be very straight forward, and it’s only functionality is to be able to randomly fetch Chuck Norris facts.
我们的挂钩将非常简单,唯一的功能是能够随机获取Chuck Norris的事实。
On our src/index.tsx we will replace the code for the following:
在src/index.tsx我们将替换以下代码:
Initial config:
初始配置:
import { useEffect, useReducer } from 'react';
interface InitialState {
 response: any;
 isLoading: boolean;
 isError: boolean;
 errorMessage: string | null;
}
enum ActionType {
 FETCH_INIT = 'FETCH_INIT',
 FETCH_SUCCESS = 'FETCH_SUCCESS',
 FETCH_FAILURE = 'FETCH_FAILURE',
 DATA_NOT_FOUND = 'DATA_NOT_FOUND',
}
const { FETCH_FAILURE, FETCH_INIT, FETCH_SUCCESS, DATA_NOT_FOUND } = ActionType;
The actions types and initial state:
动作类型和初始状态:
type UseNorrisAction =
 | { type: ActionType.FETCH_SUCCESS; payload: string }
 | {
     type: ActionType.FETCH_FAILURE;
     payload: { isError: boolean; errorMessage: string | null };
   }
 | { type: ActionType.FETCH_INIT }
 | { type: ActionType.DATA_NOT_FOUND; payload: string };
const initialState: InitialState = {
 response: '',
 errorMessage: null,
 isLoading: false,
 isError: false,
};
The reducer:
减速器:
const useNorrisReducer = (
 state: InitialState = initialState,
 action: UseNorrisAction
) => {
 switch (action.type) {
   case FETCH_INIT:
     return {
       ...state,
       isLoading: true,
       isError: false,
     };
   case FETCH_SUCCESS:
     return {
       ...state,
       response: action.payload,
       isLoading: false,
       isError: false,
     };
   case FETCH_FAILURE:
     return {
       ...state,
       isLoading: false,
       isError: action.payload.isError,
       errorMessage: action.payload.errorMessage,
     };
   case DATA_NOT_FOUND:
     return {
       ...state,
       isLoading: false,
       isError: true,
       errorMessage: action.payload,
     };
   default:
     return { ...state };
 }
};
The hook:
挂钩:
const useNorris = (initialState: InitialState) => {
 const [state, dispatch] = useReducer(useNorrisReducer, initialState);
 const { response, errorMessage, isError, isLoading } = state;
 useEffect(() => {
   const fetchNorris = async () => {
     dispatch({ type: FETCH_INIT });
     try {
       const res = await fetch('https://api.chucknorris.io/jokes/random');
       const json = await res.json();
       if (json.error) {
         dispatch({ type: DATA_NOT_FOUND, payload: json.error });
       }
       if (json.value) {
         dispatch({ type: FETCH_SUCCESS, payload: json });
       }
     } catch (error) {
       dispatch({
         type: FETCH_FAILURE,
         payload: { isError: true, errorMessage: error },
       });
     }
   };
   fetchNorris();
 }, []);
 return { response, errorMessage, isLoading, isError };
};
export default useNorris;
测试我们的挂钩 (Testing our Hook)
Testing Custom Hooks can be a daunting task. Normally we’d use a React component to trigger the hook’s various functionalities. But it happens that we don’t have a component. So how will we tackle this problem? We’ll use react-hooks-testing-library.
测试自定义挂钩可能是一项艰巨的任务。 通常,我们将使用React组件来触发钩子的各种功能。 但是碰巧我们没有组件。 那么我们将如何解决这个问题呢? 我们将使用react-hooks-testing-library 。
“Allows you to create a simple test harness for React hooks that handles running them within the body of a function component, as well as providing various useful utility functions for updating the inputs and retrieving the outputs of your amazing custom hook.”
“允许您为React钩子创建一个简单的测试工具,以处理它们在功能组件主体中运行的情况,并提供各种有用的实用程序功能来更新您的惊人定制钩子的输入并检索其输出。”
By using this library we avoid rendering the React component to test our hook.
通过使用这个库,我们避免渲染React组件来测试我们的钩子。
将其安装为开发依赖项: (Install it as a dev dependency:)
(We’ll need also react-test-renderer since it is a peer-dependency and the types for the libraries).
(我们还需要react-test-renderer,因为它是对等依赖性以及库的类型)。
yarn add -D @testing-library/react-hooks react-test-renderer @types/jest @testing-library/react-hooks @testing-library/jest-domNow that we have react-hooks-testing-library installed, we’ll rename the file in the test folder to useNorris.test.ts and replace the code with the following:
现在我们已经安装了react-hooks-testing-library,我们将test文件夹中的文件重命名为useNorris.test.ts并将代码替换为以下代码:
import { renderHook } from '@testing-library/react-hooks';
import useNorris from '../';
const mockedValue = {
 value: 'this is a very good joke',
};
const initialState = {
 response: { value: '' },
 isLoading: false,
 errorMessage: '',
 isError: false,
};
(global.fetch as jest.Mock) = jest.fn(() =>
 Promise.resolve({
   json: () => Promise.resolve(mockedValue),
 })
);
describe('useNorris', () => {
 beforeEach(() => {
   (fetch as jest.Mock).mockClear();
 });
 it('should resolve', async () => {
   const { result, waitForNextUpdate } = renderHook(() =>
     useNorris(initialState)
   );
   await waitForNextUpdate();
   expect(fetch).toHaveBeenCalled();
   expect(result.current).toEqual({
     response: mockedValue,
     errorMessage: '',
     isLoading: false,
     isError: false,
   });
 });
 it('should return an error', async () => {
   (fetch as jest.Mock).mockImplementationOnce(() =>
     Promise.reject('There is an error')
   );
   const { result, waitForNextUpdate } = renderHook(() =>
     useNorris({
       response: { value: '' },
       isLoading: false,
       errorMessage: '',
       isError: false,
     })
   );
   await waitForNextUpdate();
   expect(fetch).toHaveBeenCalled();
   expect(result.current).toEqual({
     errorMessage: 'There is an error',
     isLoading: false,
     response: { value: '' },
     isError: true,
   });
 });
});
示例应用 (The example app)
We wrote a basic test and we should build a usage example so users are able to understand it better.
我们编写了一个基本测试,并且应该构建一个使用示例,以便用户能够更好地理解它。
In the example folder our ./index.ts will look like this:
在示例文件夹中,我们的./index.ts将如下所示:
import * as React from 'react';
import useNorris from '../../src';
const App = () => {
 const initialState = {
   response: '',
   isLoading: false,
   isError: false,
   errorMessage: null,
 };
 const { response, isLoading, isError, errorMessage } = useNorris(
   initialState
 );
 if (errorMessage) {
   return <p>{errorMessage}</p>;
 }
 if (isError) {
   return <p>Something went wrong</p>;
 }
 if (isLoading) {
   return <p>Loading...</p>;
 }
 if (response) {
   return <p>{response.value}</p>;
 }
 return <p>Something went wrong</p>;
};
export default App;
Go to the example folder and type:
转到example文件夹并输入:
This would start the server and if we go to localhost:1234 we’ve got our app running!
这将启动服务器,如果我们转到localhost:1234我们的应用程序正在运行!

添加自述文件 (Add a README file)
Writing a good, concise and meaningful README file is super important. We want our users to enjoy the whole set of features we are providing and examining the code, line by line, it’s not the best use of their time.
编写良好,简洁且有意义的README文件非常重要。 我们希望用户喜欢我们提供的全部功能,并逐行检查代码,这不是他们时间的最佳利用。
发布我们的包 (Publishing our package)
With TSDX, publishing is a simple and quick process:
使用TSDX,发布是一个简单而快速的过程:
1. Register on NPM
1.在NPM上注册
2. Running yarn publish —-access public will bundle our package to the dist folder and will try to access the NPM registry to publish our Hook. Private packages are a paid feature on NPM and we want our Hook to be available to everyone, hence the —-access public flag.
2.运行yarn publish —-access public将我们的软件包捆绑到dist文件夹,并尝试访问NPM注册表来发布我们的Hook。 私有软件包是NPM的一项付费功能,我们希望我们的Hook对所有人都可用,因此提供了—-access public标志。
3. Following the cli instructions, we’ll need to log in on NPM and type the version we want to use.
3.按照cli的说明,我们需要登录NPM并键入我们要使用的版本。
And that’s it, we receive a confirmation email and our amazing useNorris is now available to everyone.
就是这样,我们会收到一封确认电子邮件,我们惊人的用途Norris现在对每个人都可用。
版本控制 (Versioning)
It’s worth noticing that versioning plays an important role in how we update packages. Following the correct semantic versioning will ensure other developers are able to know the extent of changes between versions and adjust if necessary. NPM semantic versioning will give you a good idea about this topic.
值得注意的是,版本控制在更新软件包中起着重要作用。 遵循正确的语义版本控制将确保其他开发人员能够知道版本之间的更改程度,并在必要时进行调整。 NPM语义版本控制将使您对该主题有个好主意。
结论 (Conclusions)
In this tutorial we’ve built a Custom Hook with TypeScript that fetches random Chuck Norris jokes. We’ve published it on NPM and now other developers will have the chance to use it as well.
在本教程中,我们使用TypeScript构建了一个Custom Hook,可获取随机的Chuck Norris笑话。 我们已经在NPM上发布了它,现在其他开发人员也将有机会使用它。
资源资源 (Resources)
- Final repo — https://github.com/FranciscoMCG/use-norris
-最终回购-https: //github.com/FranciscoMCG/use-norris
- NPM package — https://www.npmjs.com/package/@franciscomcg/use-norris
-NPM软件包-https: //www.npmjs.com/package/@franciscomcg/use-norris
- TSDX — https://github.com/formium/tsdx
-TSDX- https://github.com/formium/tsdx
- Chuck Norris API — https://api.chucknorris.io
-Chuck Norris API- https://api.chucknorris.io
- React Hooks Testing Library — https://github.com/testing-library/react-hooks-testing-library
-React Hooks测试库-https: //github.com/testing-library/react-hooks-testing-library
Originally published at https://reactgraphql.academy.
最初在 https://reactgraphql.academy上 发布 。


 174
174


 被折叠的 条评论
为什么被折叠?
被折叠的 条评论
为什么被折叠?
 到【灌水乐园】发言


