


kotlin 依赖注入
什么是依赖注入? (What Is Dependency Injection?)
Dependency injection is a programming pattern with the aim of making the code clearer and more maintainable. You’ve probably heard of inversion of control and separation of concerns principles: dependency injection is the concrete way to do it.
依赖注入是一种编程模式,旨在使代码更清晰,更可维护。 您可能已经听说过控制反转和关注点分离原则:依赖注入是实现此目的的具体方法。
To simplify, each class must declare its dependencies in the constructor. If your class needs a Logger service to work, or a UserRepository to work, your class doesn’t create a new instance of them by itself but lets their instances be injected by an external service: the dependency injection container.
为了简化,每个类都必须在构造函数中声明其依赖项。 如果您的类需要Logger服务才能工作,或者需要UserRepository才能工作,则您的类不会自行创建它们的新实例,而是允许其实例由外部服务(依赖项注入容器)注入。
Why it is called “container”? Because it holds all the object references and manages their lifetimes. You can say you want your Logger to be a singleton, or you may want to create a new instance of your ViewModel class each time it’s requested.
为什么将其称为“容器”? 因为它保存所有对象引用并管理其生存期。 您可以说您希望Logger是单身人士,或者您可能想在每次请求时为ViewModel类创建一个新实例。
Let’s do this in practice, follow me!
让我们在实践中做到这一点,跟着我!
在Android上使用Kotlin进行依赖注入 (Dependency Injection With Kotlin on Android)
Start with an empty activity:
从一个空的活动开始:
class MainActivity : AppCompatActivity() {

    override fun onCreate(savedInstanceState: Bundle?) {
        super.onCreate(savedInstanceState)
        setContentView(R.layout.activity_main)
    }

}
Now consider you have a User to be represented by your activity:
现在考虑您有一个要由您的活动代表的User :
import java.util.*


data class User(
    val UserId : String,
    val Name : String,
    val Surname : String,
    val BirthDate : Date
)
Of course, you also need to get the User from somewhere. The IUsersRepository (“I” is for interface) is the abstraction you were looking for. IUsersRepository is a dependency of your activity:
当然,您还需要从某个地方获取User 。 IUsersRepository (“ I”用于接口)是您要寻找的抽象。 IUsersRepository是您的活动的依赖项:
interface IUsersRepository {
    fun getById(userId : Int) : User
    fun save(user: User)
}
This abstraction could be implemented in a lot of different ways:
这种抽象可以通过许多不同的方式实现:
HttpUsersRepository: if you get the users with Http methods.HttpUsersRepository:如果您使用Http方法获取用户。SQLUsersRepository: if you get the users directly through a SQL database.SQLUsersRepository:如果您直接通过SQL数据库获取用户。RoomUsersRepository: if you want to use another abstraction between you and a SQL database.RoomUsersRepository:如果要在您和SQL数据库之间使用另一个抽象。FakeInMemoryUsersRepository: for testing purposes, to not depend on external components while designing or testing your application.FakeInMemoryUsersRepository:出于测试目的,在设计或测试应用程序时不依赖外部组件。
FakeInMemoryUsersRepository could be like this:
FakeInMemoryUsersRepository可能像这样:
import android.util.Log
import com.example.testdi.domain.User
import java.text.SimpleDateFormat


class FakeInMemoryUsersRepository : IUsersRepository {


    override fun getById(userId: Int): User {
        return User(
            "fbonizzi",
            "Francesco",
            "Bonizzi",
            SimpleDateFormat("dd/MM/yyyy").parse("05/08/1990")!!)
    }


    override fun save(user: User) {
        // Since it's a fake repository, I don't really save the user
        Log.i("FakeInMemoryUsersRepository", "Saved: $user")
    }


}
放在一起 (Putting It All Together)
Let’s go back to our activity.
让我们回到我们的活动。
From our activity we want to be able to:
通过我们的活动,我们希望能够:
- Load a user. 加载用户。
- Show its data. 显示其数据。
- Do some editing. 做一些编辑。
- Save it again. 再次保存。
Our activity, with the objects we have now, should look like this:
我们的活动以及现在拥有的对象应如下所示:
import androidx.appcompat.app.AppCompatActivity
import android.os.Bundle
import com.example.testdi.domain.User
import com.example.testdi.storage.IUsersRepository
import java.text.SimpleDateFormat


class MainActivity : AppCompatActivity() {


    private val dateFormat: SimpleDateFormat = SimpleDateFormat("dd/MM/yyyy")
    private val usersRepository: IUsersRepository // Will compile in the next snippet :)


    override fun onCreate(savedInstanceState: Bundle?) {
        super.onCreate(savedInstanceState)
        setContentView(R.layout.activity_main)


        // Now you can load your User and set all data to the be shown in the Activity
        // Also, you can save the User
        btnSave.setOnClickListener { getAndSaveCurrentUser() }
    }


    private fun getAndSaveCurrentUser() {


        val user = User(
            UserId = "1",
            Name = txtName.text.toString(),
            Surname = txtSurname.text.toString(),
            BirthDate = dateFormat.parse(txtBirthDate.text.toString()))
        usersRepository.save(user)


    }

}
As you can see, we have an instance of IUsersRepository (in the next snippet I’ll show you how to inject it into our activity), a button to save the data (I’m using synthetic to get directly to the button reference), and some layout controls to show the data (omitted to be more concise).
如您所见,我们有一个IUsersRepository实例(在下一个代码段中,我将向您展示如何将其注入到我们的活动中),一个用于保存数据的按钮(我正在使用合成方法直接获取按钮引用) ,以及一些用于显示数据的布局控件(为简洁起见,省略了它们)。
With this kind of coding, you’ve totally decoupled the activity from the user’s storage real implementation. Now you can:
通过这种编码,您已经完全将活动与用户的存储实际实现分离了。 现在你可以:
- Create fake implementations of your abstraction to test the application more quickly. 创建抽象的虚假实现,以更快地测试应用程序。
- Do automatic testing. 做自动测试。
Substitute, when necessary, different kinds of
IUsersRepositorywithout touching a single line of code in the activity class.如有必要,请替换不同种类的
IUsersRepository而无需在活动类中触摸任何一行代码。
注入IUsers系统信息库 (Inject IUsersRepository)
To inject the dependencies in our activity, we need a dependency injection library. I choose Koin, because of its simplicity and lightness.
要在我们的活动中注入依赖项,我们需要一个依赖项注入库。 我选择Koin ,是因为它简单而轻巧。
To your build.gradle (project) file, add this line to the buildscript object:
build.gradle添加到build.gradle (项目)文件中: buildscript对象:
ext.koin_version = "2.1.5"Then, to your build.gradle (Module: app) file, add this line to the dependencies object:
然后, build.gradle添加到您的build.gradle (模块:app)文件中的dependencies对象:
implementation "org.koin:koin-android:$koin_version"At the end, Sync your Gradle files.
最后, Sync您的Gradle文件。
To make your activity build correctly, now you have to change the IUsersRepository private variable declaration to:
为了使您的活动正确构建,现在您必须将IUsersRepository私有变量声明更改为:
private val usersRepository: IUsersRepository by inject()Here, the important part is: by inject() which tells Koin that it should manage that variable initialization.
在这里,重要的部分是: by inject()告诉Koin它应该管理该变量的初始化。
The final step: registering the relation between IUsersRepository and FakeInMemoryUsersRepository.
最后一步:注册IUsersRepository和FakeInMemoryUsersRepository之间的关系。
Create a file named Dependencies.kt. There we will define a module that will hold every dependency relation. Everything in a single file!
创建一个名为Dependencies.kt的文件。 在那里,我们将定义一个包含所有依赖关系的module 。 一切都在一个文件中!
import com.example.testdi.storage.FakeInMemoryUsersRepository
import com.example.testdi.storage.IUsersRepository
import org.koin.dsl.module


val appDependencies = module {


    // Singleton (returns always the same unique instance of the object)
    single<IUsersRepository> { FakeInMemoryUsersRepository() }


    // Transient (returns always the a new instance of the object)
    // factory { FakeInMemoryUsersRepository() }


}
We’re telling Koin that every time some class asks for an IUsersRepository implementation, it should be resolved with a singleton instance of FakeInMemoryRepository.
我们告诉Koin,每当某个类要求IUsersRepository实现时,都应使用FakeInMemoryRepository的单例实例来解决。
Are you feeling the power of this pattern? You define which is the implementation of your dependencies one time in the whole application. It means that when you have to refactor or change the underlying implementation, you have to change one line of code, without touching any other classes because your application relies on abstractions, not concrete types.
您是否感觉到这种模式的力量? 您可以定义在整个应用程序中一次执行依赖项。 这意味着当您必须重构或更改基础实现时,必须更改一行代码, 无需接触任何其他类,因为您的应用程序依赖于抽象而不是具体类型。
Moreover, your dependencies could have a lot of dependencies too or have complex dependencies trees, but they are all managed automatically by Koin.
此外,您的依赖项可能也有很多依赖项或具有复杂的依赖项树,但是它们全部由Koin自动管理。
Finally, let’s tell our Android application to use Koin. Create a class name, for example, MyApp.kt.
最后,让我们告诉我们的Android应用程序使用Koin。 创建一个类名,例如MyApp.kt 。
import android.app.Application
import com.example.testdi.di.appDependencies
import org.koin.android.ext.koin.androidContext
import org.koin.android.ext.koin.androidLogger
import org.koin.core.context.startKoin


class MyApp : Application() {


    override fun onCreate() {
        super.onCreate()


        startKoin {
            androidLogger()
            androidContext(this@MyApp)
            modules(appDependencies)
        }
    }


}
And reference this class in the AndroidManifest.xml, by adding an attribute like this: android:name=”com.example.testdi.MyApp”
并通过添加以下属性在AndroidManifest.xml引用此类: android:name=”com.example.testdi.MyApp”
In my case, the whole manifest is this one:
就我而言,整个清单就是这样的:
<?xml version="1.0" encoding="utf-8"?>
<manifest xmlns:android="http://schemas.android.com/apk/res/android"
    package="com.example.testdi">


    <application
        android:name="com.example.testdi.MyApp"
        android:allowBackup="true"
        android:icon="@mipmap/ic_launcher"
        android:label="@string/app_name"
        android:roundIcon="@mipmap/ic_launcher_round"
        android:supportsRtl="true"
        android:theme="@style/AppTheme">
        <activity android:name=".MainActivity">
            <intent-filter>
                <action android:name="android.intent.action.MAIN" />
                <category android:name="android.intent.category.LAUNCHER" />
            </intent-filter>
        </activity>
    </application>


</manifest>
With startKoin, we are linking our Kotlin application with Koin dependency injection service and make everything run together.
通过startKoin ,我们将Kotlin应用程序与Koin依赖项注入服务链接在一起,并使所有内容一起运行。
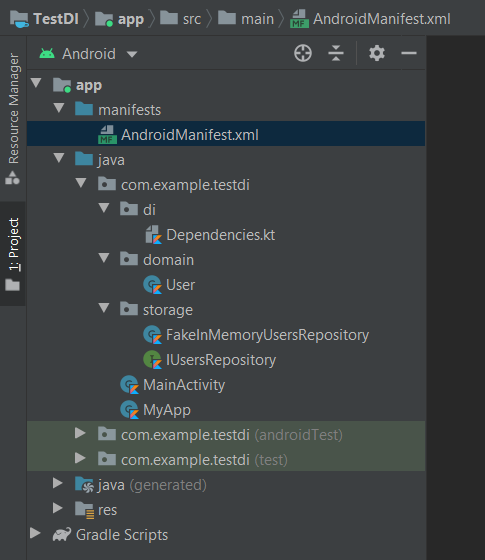
For the sake of completeness, let me show you my full project files hierarchy:
为了完整起见,让我向您展示我的完整项目文件层次结构:
Build, run, and tell me what you think!
建立,运行并告诉我您的想法!
kotlin 依赖注入


 1592
1592

 被折叠的 条评论
为什么被折叠?
被折叠的 条评论
为什么被折叠?
 到【灌水乐园】发言


