


匕首线切割图纸下载
学习Android开发 (Learning Android Development)
About more than 2 years ago, I was on a quest to make Dagger 2 as simple as possible, as it is such a complicated subject. So I came up with the below blog.
一个回合2年多前,我在寻求使匕首2尽可能的简单,因为它是这样一个复杂的课题。 所以我想出了以下博客。
The complication of Dagger has turned some developers away from it, especially from the iOS communities who highly recommend their Android counterpart in not using it.
Dagger的复杂性使一些开发人员远离了Dagger,尤其是iOS社区,他们强烈建议其Android同行不要使用它。
Google is fully aware of Dagger 2 complication of usage, and also the need to self inject itself into the Activities and Application. Last year, Google announced their quest to make it even better!
Google完全意识到Dagger 2使用的复杂性,也需要将自己自我注入到“活动和应用程序”中。 去年,Google宣布了他们的追求,以求更好!
A few weeks ago, I got to know about Dagger Hilt. Let’s look at it!
几周前,我结识了Dagger Hilt 。 让我们看看吧!
在此之前……让我们进行设置。 (Before that… let’s set it up.)
To setup, just add the following in your project build.gradle
要设置,只需在您的项目build.gradle添加以下build.gradle
classpath 'com.google.dagger:hilt-android-gradle-plugin:2.28-alpha'Then followed by the below in your app’s build.gradle
然后在应用程序的build.gradle跟随以下build.gradle
apply plugin: 'dagger.hilt.android.plugin'
apply plugin: 'kotlin-kapt'// ...implementation 'com.google.dagger:hilt-android:2.28-alpha'
kapt 'com.google.dagger:hilt-android-compiler:2.28-alpha'
Ok now, let’s look at it.
好吧,让我们看看。
甚至更容易,更短。 (Even easier and shorter.)
If you have seen my previous blog, which I wrote with 20 lines of code to show how Dagger 2 works. Now it is 18 lines!! (well, although it is only 2 lines, but wait… it means a lot… let me explained later).
如果您看过我以前的博客 ,那么我用20行代码编写了该博客 ,以展示Dagger 2的工作原理。 现在是18行! (嗯,虽然只有2行,但是等等……这意味着很多……让我稍后解释)。
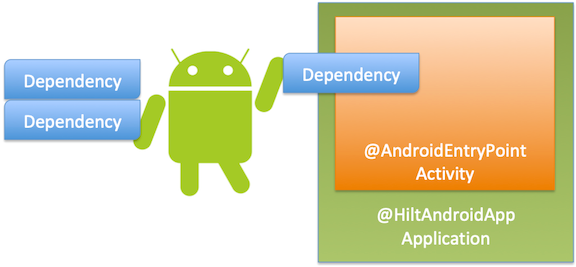
@HiltAndroidApp
class MainApplication: Application()@AndroidEntryPoint
class MainActivity : AppCompatActivity() {@Inject lateinit var info: Infooverride fun onCreate(savedInstanceState: Bundle?) {
        super.onCreate(savedInstanceState)
        setContentView(R.layout.activity_main)
        text_view.text = info.text
    }
}class Info @Inject constructor() {
    val text = "Hello Dagger Hilt"
}
As you see, 2 annotation is introduced
如您所见,引入了2条注释
@HiltAndroidApp: To tell Dagger Hilt, you’ll be using in your application@HiltAndroidApp:要告诉Dagger Hilt,您将在应用程序中使用@AndroidEntryPoint: Your activity needed to be injected with something@AndroidEntryPoint:您的活动需要注入一些东西
Then all you need to do is to state @Inject lateinit var on your needed injectable dependencies, then it will be available to you automatically without one injecting!
然后,您所需要做的就是在所需的可注入依赖项上声明@Inject lateinit var ,然后它将自动为您提供,而无需进行一次注入!
与以前的相比,看起来如何 (How does it look like when compares to previous)
If we’re to look at the previous shortest example I provided in my previous blog, we have dropped two things below.
如果要看一下我在前一个博客中提供的最短的例子,我们在下面做了两件事。
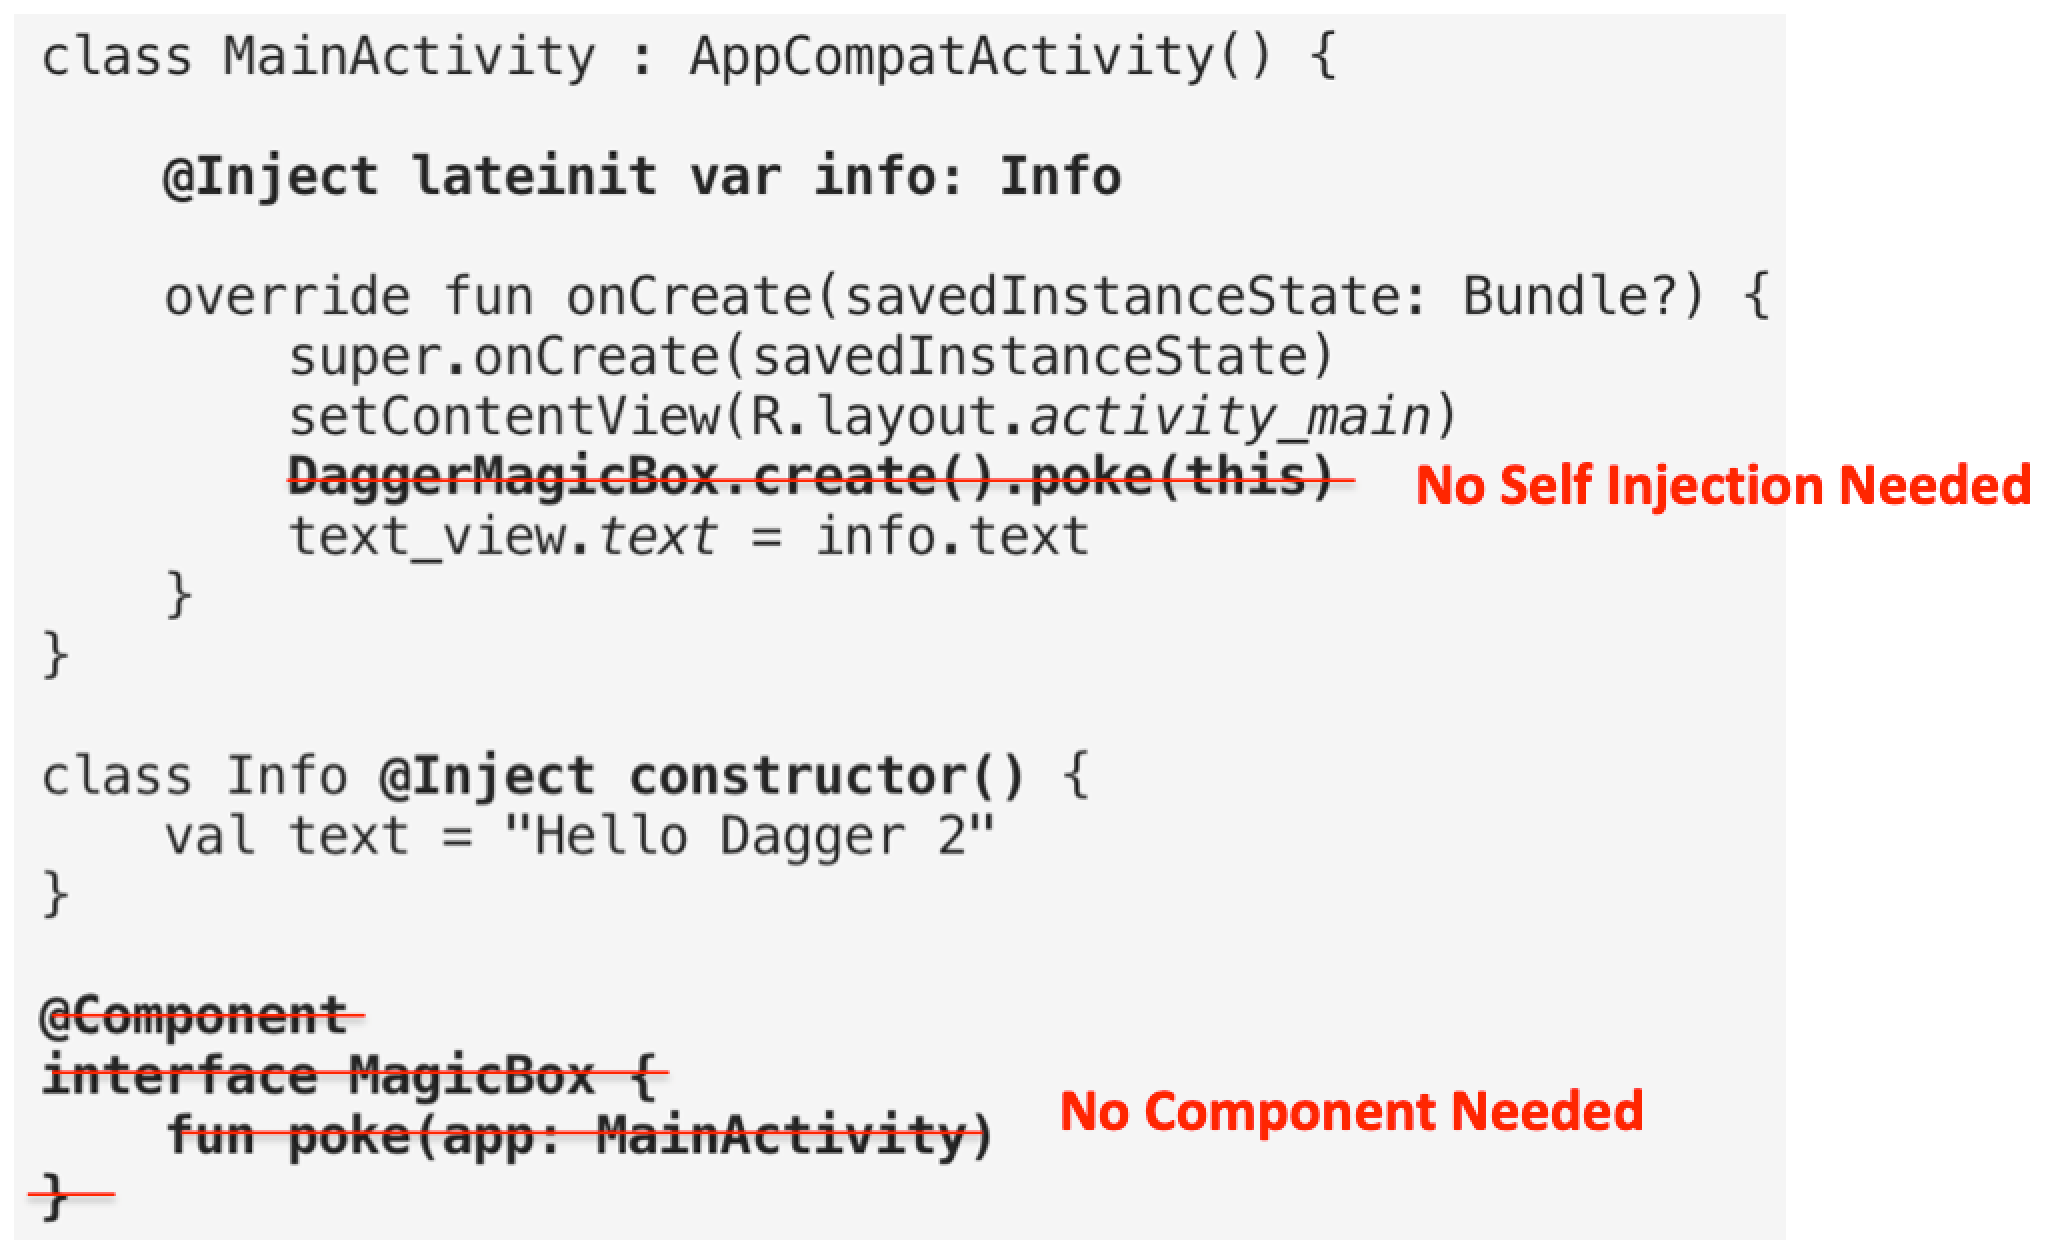
No more self-injection within the
MainActivity. This is pretty cool, as now we feel more like a real Dependency Injection framework.MainActivity不再需要自我注入。 这非常酷,因为现在我们感觉更像一个真正的依赖注入框架。- No need to explicitly declare a component, and create the component (MagicBox in the example above). The components are nothing but just a container to glue things together. It is now got hidden away by the Dagger Hilt! 无需显式声明组件,也无需创建组件(上面示例中的MagicBox)。 这些组件不过是将事物粘合在一起的容器。 现在,它被匕首剑柄隐藏了!
With the additional two annotations, we are now done away with the self-injection and components, how nice!
有了另外两个注释,我们现在就完成了自我注入和组件,这太好了!
等等...如果我有更复杂的依赖关系呢? (Wait… what if I have more complicated dependencies?)
Some dependencies can’t be easily constructed by itself (e.g. dependency on interfaces that need a concrete implementation). In this case, we will still need Dagger’s @Module and @Provides to define them.
某些依赖关系本身无法轻易构建(例如,对需要具体实现的接口的依赖关系)。 在这种情况下,我们仍然需要Dagger的@Module和@Provides来定义它们。
Check out this blog if you like to learn about
@Moduleand@Provides如果您想了解
@Module和@Provides请查看此博客。
But it is much simpler since we no longer have @Component.
但这要简单得多,因为我们不再有@Component 。
应用层模块 (Application Level Module)
Assuming you want a dependency to be available to everyone, then you need to be at the Application level. You just need to add @InstallIn(ApplicationComponent::class) after the @Module as shown below.
假设您希望所有人都可以使用依赖项,那么您需要处于应用程序级别。 您只需要添加@InstallIn(ApplicationComponent::class) 在@Module ,如下所示。
@Module@InstallIn(ApplicationComponent::class)
object ApplicationModule {    @Singleton
    @Provides
    fun provideApplicationWideDependency(some: SomeClass)
            = ApplicationWideDependency(some)
}
Do note at this level, I can use @Singleton if I wanted it to be one and only one copy throughout the life of the application
请注意这一级别,如果我希望它成为整个应用程序生命周期中的唯一副本,则可以使用@Singleton
活动级别模块 (Activity Level Module)
However, there are some dependencies you want it to be at Activity Level, (e.g. each Activity will need to be given its unique dependencies), then you just need to have @InstallIn(ActivityComponent::class) after the @Module as shown below.
但是,您希望它具有一些活动级别的依赖关系(例如,每个活动都需要被赋予其唯一的依赖关系),那么您只需要具有@InstallIn(ActivityComponent::class) 在@Module ,如下所示。
@Module@InstallIn(ActivityComponent::class)
object ActivityModule {    @ActivityScoped
    @Provides
    fun provideActivityWideDependency(some: SomeClass)
            = ActivityWideDependency(some)
}
Do note at this level, I can use @ActivityScoped, if I wanted it to be one and only one copy throughout the life of the activity (for each Activity, it will be a different copy).
请注意,在这个级别上,我可以使用@ActivityScoped ,如果我希望它在整个活动的生命周期中只有一个副本(对于每个Activity,它将是一个不同的副本)。
Unlike the original Dagger,
@ActivityScopedis a provided@Scopeby Dagger Hilt.与原始Dagger不同,
@ActivityScoped是Dagger Hilt提供的@Scope。
In another word, by using @InstallIn(ApplicationComponent::class) and @InstallIn(ActivityComponent::class), we have simplified the use of Dagger from needing to work with @Component and @Subcomponent.
换句话说,通过使用@InstallIn(ApplicationComponent::class) 和 @InstallIn(ActivityComponent::class) ,我们简化了Dagger的使用,而无需使用@Component和@Subcomponent 。
The entire setup of @Component and @Subcomponent is part of the contribution of making using Dagger 2 complicated. Hence this simplifies the entire Dagger 2 usage for Android.
@Component和@Subcomponent的整个设置是使Dagger 2变得复杂的部分贡献。 因此,这简化了整个Dagger 2在Android上的使用。

但是……但是……我需要让每个Activity都具有一组依赖关系(模块等)。 (But… but… I need to have each Activity it’s set of dependencies (module etc).)
For now, Dagger Hilt is heading towards monolithic components (i.e. a single component shared across activities). This is with the purpose of simplifies its usage and many other reasons as shared by Google.
目前,Dagger Hilt正朝着单一组件(即跨活动共享的单个组件)发展。 这样做的目的是简化其用法以及Google共享的许多其他原因。
If you need the complexity of dependencies injection, you probably already have a good understanding of Dagger 2 itself, and comfortable using @Component and @Subcomponent. Perhaps you can consider continue using the original Dagger for your need.
如果您需要依赖项注入的复杂性,则可能已经对Dagger 2本身有了很好的了解,并且可以轻松使用@Component和@Subcomponent 。 也许您可以考虑根据需要继续使用原始的Dagger。
Optionally, you can try Dagger Android, though I’m not a fan of it, as I think it complicates things more in order to avoid self-injection on Android components.
(可选)您可以尝试使用Dagger Android,尽管我不喜欢它,因为我认为它会使事情更加复杂,从而避免在Android组件上进行自我注入。
That’s it for now. If you like the code to play around, you can get it from
现在就这样。 如果您喜欢该代码,可以从
If you like this topic, perhaps the next one would be relevant to you as well.
如果您喜欢此主题,那么下一个主题可能也与您相关。
匕首线切割图纸下载


 1241
1241

 被折叠的 条评论
为什么被折叠?
被折叠的 条评论
为什么被折叠?
 到【灌水乐园】发言


