


dagger 注入
什么是依赖注入? (What is Dependency Injection?)
Before heading on to the what let’s stick to the why. I would like to see Dependency Injection as vaccination for your project and when do you get it done? Right when the project is a baby. I know that it involves a huge learning curve and you must be wondering why should you do it with any project, well you are not forced to adapt to DI, you start a project thinking it is small and it solves a specific set of problems without the need for thinking ahead that there might be more new problems in the future that requires more modules to be built on your app. Complexity increases over time even if you follow a really good architecture with clean code, so DI is basically to avoid that.
在继续之前,让我们坚持为什么。 我希望将依赖注入视为您项目的疫苗接种,何时完成? 对的,当这个项目还是个婴儿时。 我知道它涉及巨大的学习曲线,您一定想知道为什么要在任何项目中使用它,否则您就不会被迫适应DI,而您开始做一个认为它很小并且可以解决一系列特定问题却又没有解决问题的项目需要预先考虑,将来可能会出现更多新问题,需要在您的应用程序上构建更多模块。 即使您遵循具有良好代码的非常好的体系结构,复杂度也会随着时间的推移而增加,因此,DI基本上可以避免这种情况。
Dependency Injection (DI) is a system that ensures the simplicity of your app’s architecture and lets you forget about the worries about the scalability of your app. S.O.L.I.D principles help you make the code simple, dependency injection makes the architecture simple. It prevents your code from getting more complex in the future and easily manageable. Dagger2 and Koin are one of the most used dependency injection frameworks, Hilt is fairly new to the game but my hopes are up because even at its early stages, it has promised a lot of good things.
依赖注入(DI)是一个系统,可确保应用程序体系结构的简单性,并使您无需担心应用程序的可伸缩性。 SOLID原理可帮助您简化代码,而依赖项注入可使体系结构简单。 它可以防止您的代码将来变得更加复杂且易于管理。 Dagger2和Koin是最常用的依赖项注入框架之一, Hilt在游戏中还算是新手,但我的希望越来越高,因为即使在初期,它也承诺了很多美好的事情。
为什么要击剑? (Why Hilt?)
样板 (Boilerplates)
One thing that fears most of the developers to adapt to dependency injection, (even me back in the days), is that DI by itself is complex, hard to configure, and requires a lot of things to look at and put together for it to work. Google always ensures eliminating boilerplates in their frameworks right at the start or in the middle for some frameworks, just like how they managed to bring Kotlin as the go-to language for Android instead of Java. Dagger2 has a lot of boilerplates, right from modules, providers to injections, you have to write them all with respect to how you want them to work. Hilt eliminates all the boilerplates and does all the work for you with the help of a set of pre-defined components and scopes. No more creating components by yourself and creating a component factory.
令大多数开发人员害怕适应依赖注入的一件事(甚至在我过去也是如此)是,DI本身很复杂,难以配置,并且需要很多东西来研究和整合工作。 Google始终确保在某些框架的开头或中间消除其框架中的样板,就像他们设法使Kotlin成为Android(而非Java)的首选语言一样。 Dagger2有很多样板,从模块,提供程序到注入,您都必须就它们的工作方式来编写它们。 Hilt消除了所有样板,并借助一组预定义的组件和作用域为您完成了所有工作。 不再需要自己创建组件和创建组件工厂。
复杂 (Complexity)
Dagger2 is a complex library that does DI by annotations. So, you have components, modules, scopes, and ways to inject them in different parts of your application which can be done in multiple ways. The problem with Dagger2 is, there is no one way in achieving something, so, when a new developer looks at your code, a base knowledge on the components and how you did it is required for them to understand the code better. Hilt, on the other hand, has wrapped all those different possibilities and gives you a clear cut way of implementing DI in your application. One look at it, and you can understand what’s happening under the hood.
Dagger2是一个通过注释执行DI的复杂库。 因此,您具有组件,模块,范围和将它们注入到应用程序不同部分中的方式,可以通过多种方式来完成。 Dagger2的问题是,没有一种方法可以实现某些目标,因此,当新开发人员查看您的代码时,需要有关组件的基础知识以及如何做才能使他们更好地理解代码。 另一方面,Hilt涵盖了所有这些不同的可能性,并为您提供了在应用程序中实现DI的明确方法。 看看它,您就可以了解幕后发生的事情。
ViewModel注入 (ViewModel Injections)
Injecting ViewModels in your Activities was the hardest part with DI using Dagger2. You had to create a ViewModel factory that took in the type and with map bindings and then injecting it via the component in your Activity — I even get tired when explaining it to people. Well, all that has vanished with Hilt. All that it takes is a @ViewModelInject for your constructor injections and a “by viewModels() ktx” extension in your activity. Yup, it’s that good.
使用Dagger2,将活动中的ViewModels注入DI是最难的部分。 您必须创建一个ViewModel工厂,该工厂接受类型并带有地图绑定,然后通过Activity中的组件将其注入—在向人们解释时,我什至感到厌倦。 好吧,所有与希特消失的东西。 它所要做的只是为您的构造函数注入使用@ViewModelInject,并在您的活动中使用“ by viewModels()ktx”扩展名。 是的,就是那样。
碰撞应用 (Hilt Application)
With Dagger2, it is mandatory that you create your own components and map it to the required modules before trying to inject the module functionalities, so you go ahead and create an application-level component mapped to the modules and you write a Factory provider that helps to inject classes across the specified scope.
使用Dagger2,必须先创建自己的组件并将其映射到所需的模块,然后再尝试注入模块功能,因此,继续进行操作并创建映射到模块的应用程序级组件,并编写Factory提供程序以帮助在指定范围内注入类。
You need to create components for each scope types and you may also need to do custom scopes based on your requirements. We will deep dive into what components and modules are, later on when we discuss them with respect to Hilt but here’s the difference in creating an application-level component between Dagger2 and Hilt. With Dagger2, you need an AppComponent that has DaggerApplication access and you need to extend your Application class with DaggerApplication.
您需要为每种合并范围类型创建组件,还可能需要根据需求进行自定义合并范围。 我们将深入探讨什么是组件和模块,稍后在讨论有关Hilt的内容时,但这是在Dagger2和Hilt之间创建应用程序级组件的区别。 使用Dagger2,您需要一个具有DaggerApplication访问权限的AppComponent,并且需要使用DaggerApplication扩展您的Application类。
@Singleton
@Component(modules = [
  ActivityModule::class,
  ViewModelModule::class,
  NetworkModule::class])
interface AppComponent : AndroidInjector<DaggerApplication> {


  @Component.Factory
  interface Factory {
    fun create(@BindsInstance application: Application): AppComponent
  }
}
class App : DaggerApplication() {
override fun applicationInjector() = DaggerAppComponent.factory().create(this)
}With Hilt, all you need to do is annotate your Application class with @HiltAndroidApp annotation and that’s it, done, Hilt takes care of all the rest of the boilerplates by itself. Isn’t this fun? There’s more coming our way, stay tuned.
使用Hilt ,您所需要做的就是使用@HiltAndroidApp注释对Application类进行注释,就这样,Hilt会自己处理所有其余样板。 这不好玩吗? 敬请期待。
@HiltAndroidApp
class App : Application()
刀柄组件 (Hilt Components)
Components are basically different parts of your application at the top-level which may have sub-components under them or modules that are installed under them. Components help the DI framework to generate the contract for you.
组件基本上是顶层应用程序的不同部分,这些组件下可能包含子组件,也可能包含子组件。 组件可帮助DI框架为您生成合同。
Dagger2 requires you to instantiate components directly which is complex to do and repetitive. Rest assured, Hilt packs in with a set of pre-defined components that comes to the rescue. We don’t anymore have to worry about all the components that we had to create and keep track of, you are asked to choose between the components that are already there. This is a good approach to programming as it standardizes your way of approach to DI overall and it is easy to adapt between different developers and easy to onboard basically anybody into your app.
Dagger2要求您直接实例化复杂且重复的组件。 请放心,Hilt附带了一组预定义的组件 ,可以进行救援。 我们不再需要担心我们必须创建并跟踪的所有组件,您将需要在已经存在的组件之间进行选择。 这是一种很好的编程方法,因为它可以标准化您整体上使用DI的方法,并且可以轻松地在不同的开发人员之间进行调整,并且可以轻松地将任何人加入到您的应用程序中。
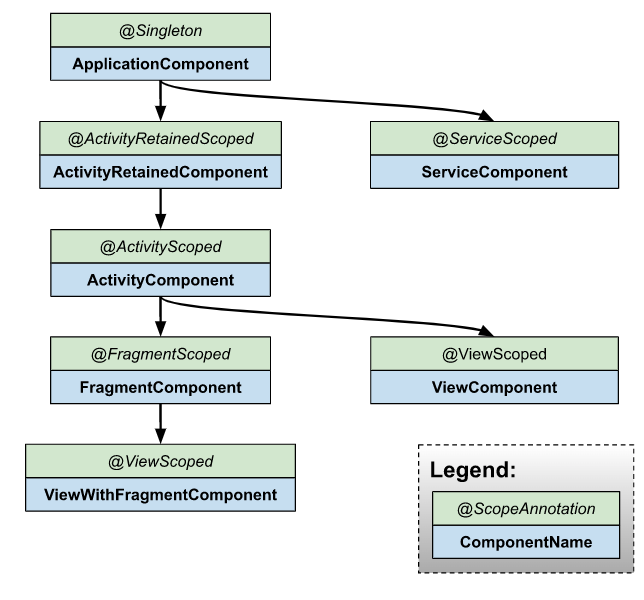
Each component available in Hilt comes with a Scope by itself which derives from its name and easy to understand. For example, ActivityComponent is @ActivityScoped. Here are all the pre-defined components that are readily available for you to use from Hilt. The hierarchies and scopes are accessible just like what is found in the graph below, a provided service declared in the ApplicationComponent is accessible right down till ViewComponents. This is fairly simple rather than defining your own components which mostly becomes a mess at some point.
Hilt中可用的每个组件本身都带有一个范围,该范围源自其名称并且易于理解。 例如, ActivityComponent是@ActivityScoped 。 以下是所有可从Hilt轻松使用的预定义组件。 可以访问层次结构和范围,就像在下图中看到的一样,可以访问ApplicationComponent中声明的提供的服务,直到ViewComponents。 这非常简单,而不是定义自己的组件,而在某些时候,这些组件通常变得一团糟。
拆装模块 (Hilt Modules)
A Module is installed in a Hilt Component by using @Module and @InstallIn(ApplicationComponent::class) and that’s it, you don’t need to mention the module name in any component class.
通过使用@Module和@InstallIn(ApplicationComponent :: class)将模块安装在Hilt组件中, 仅此而已,您无需在任何组件类中提及模块名称。
You can do any number of providers in a Module that takes care of providing the service when required if the scope is satisfied. Which means, you can’t inject a provided service by a module installed in ActivityComponent in a code block that has an application-level scope.
如果满足范围,您可以在模块中执行任何数量的提供程序,这些提供程序负责在需要时提供服务。 这意味着,无法通过安装在ActivityComponent中的模块在具有应用程序级作用域的代码块中注入提供的服务。
@Provides helps you to write the provider for a particular service. @Singleton is to specify that the provider is always accessible across the mentioned scope (component) since all components are by default mapped to a scope.
@Provides可帮助您编写特定服务的提供程序。 @Singleton将指定在上述范围(组件)中始终可访问提供程序,因为默认情况下所有组件都映射到范围。
@Module
@InstallIn(ApplicationComponent::class) // Installs FooModule in the generate ApplicationComponent.
object AppModule {
  @Provides
  fun provideApiService(): ApiService {...}
}
提示入口点 (Hilt Entry Points)
Entry Points allow Hilt to know where exactly to inject what. You can use @AndroidEntryPoint on Activities, Fragments, Views, Services, and BroadcastReceivers. You can use this annotation to start using the injected values right away. You get access to modules depending on the scope of your entry points. For example, an entry point on an activity will allow you to use all the provided services specified on the activity as well as application modules.
入口点允许Hilt知道在哪里准确注入什么。 您可以在Activity,Fragments,Views,Services和BroadcastReceivers上使用@AndroidEntryPoint 。 您可以使用此批注立即开始使用注入的值。 您可以根据入口点的范围访问模块。 例如,活动的入口点将使您可以使用活动中指定的所有提供的服务以及应用程序模块。
@Inject helps you to get the values from the providers, yes, it's that easy, you will never have the need to instantiate/create your components at any point during the development when Hilt is being used. @Inject can also be used for construction injections.
@Inject可帮助您从提供程序中获取值,是的,就是这么简单,在使用Hilt的开发过程中,您将无需在任何时候实例化/创建组件。 @Inject也可以用于建筑注射。
@ViewModelInject is used to inject repository/use-case on your constructor in a ViewModel
@ViewModelInject用于在ViewModel中的构造函数上注入存储库/用例
@AndroidEntryPoint
class MainActivity : MyBaseActivity() {


  @Inject lateinit var apiService: ApiService


  override fun onCreate(savedInstanceState: Bundle?) {
    // Injection happens in super.onCreate().
    super.onCreate()


    // Do something with apiService ...
  }
}
class MainViewModel @ViewModelInject constructor(private val useCase: UseCase) : ViewModel()即时测试 (Testing in Hilt)
Testing is also easy with Hilt as it provides separate bindings for your tests by using specific Hilt test tests and rules. You get to use annotations like @HiltAndroidTest, @Rule — HiltAndroidRule, and HiltTestApplication for testing your application class.
使用Hilt测试也很容易,因为它通过使用特定的Hilt测试测试和规则为您的测试提供了单独的绑定。 您可以使用@ HiltAndroidTest,@ Rule-HiltAndroidRule和HiltTestApplication之类的注释来测试应用程序类。
@HiltAndroidTest
class HiltTest {
  @get:Rule val hiltRule = HiltAndroidRule(this)


  @Inject lateinit var apiService: ApiService


  @Test
  fun testFoo() {
    hiltRule.inject()
  }
}
感谢您的阅读 (Thank You for reading)
That concludes this article. I believe I’ve covered the basics of Hilt and I hope that I was of help. Thanks for your time and please upvote if you liked the read, I’d appreciate it. You can find the sample project where I’ve implemented Hilt below.
到此结束本文。 我相信我已经介绍了Hilt的基础知识,希望对我有所帮助。 感谢您的宝贵时间,如果您喜欢阅读,请投赞成票,我们将不胜感激。 您可以在下面找到我实现Hilt的示例项目。
Github Profile: https://github.com/tizisdeepan
GitHub档案: https : //github.com/tizisdeepan
LinkedIn Profile: www.linkedin.com/in/tizisdeepan
领英简介: www.linkedin.com/in/tizisdeepan
Happy Coding!
编码愉快!
翻译自: https://medium.com/droid-log/dagger-hilt-dependency-injection-on-android-57ee4ca24106
dagger 注入


 606
606

 被折叠的 条评论
为什么被折叠?
被折叠的 条评论
为什么被折叠?
 到【灌水乐园】发言


