


dagger kotlin
In this tutorial series, I will show how to use Room Persistence Library, Kotlin, Data Binding, ViewModel, LiveData, Retrofit 2, Glide, RxJava 2, Dagger 2 together with the MVVM architecture pattern to fetch data from GIPHY API. It will be a simple app, which fetches data from an endpoint, stores the data in a table of a database and shows a list of cards in the UI. This is a step by step tutorial.
在本教程系列中,我将展示如何使用Room Persistence Library , Kotlin , Data Binding , ViewModel , LiveData , Retrofit 2 , Glide , RxJava 2 , Dagger 2以及MVVM体系结构模式从GIPHY API获取数据。 这将是一个简单的应用程序,它将从端点获取数据,将数据存储在数据库表中,并在UI中显示卡列表。 这是一个循序渐进的教程。
先决条件 (Prerequisites)
You should already be familiar with Kotlin, Retrofit 2, RxJava 2 and Android development. A little bit of experience with Room and Dagger 2 would be nice. The GIPHY API requires an API key. In this tutorial, I will fetch data directly from the Trending Endpoint. I am using Android Studio 3.6.3
您应该已经熟悉Kotlin , Retrofit 2 , RxJava 2和Android开发。 拥有Room和Dagger 2的一点经验将是不错的。 GIPHY API需要API密钥。 在本教程中,我将直接从Trending Endpoint获取数据。 我正在使用Android Studio 3.6.3
为什么写这篇文章? (Why this article?)
Recently I wanted to learn how to persist data from an endpoint. My first problem was there were just a few tutorials where Room and RxJava were used. The second problem was almost no tutorial showed it with Kotlin and MVVM architecture. I thought this must change in the year 2020. This will be just a one screen application, but I am using MVVM so everyone can build something on top.
最近,我想学习如何持久存储来自端点的数据。 我的第一个问题是只有几本使用Room和RxJava的教程。 第二个问题是几乎没有教程显示Kotlin和MVVM体系结构。 我认为这必须在2020年改变。这将只是一个屏幕的应用程序,但我使用的是MVVM,因此每个人都可以在顶部构建一些东西。
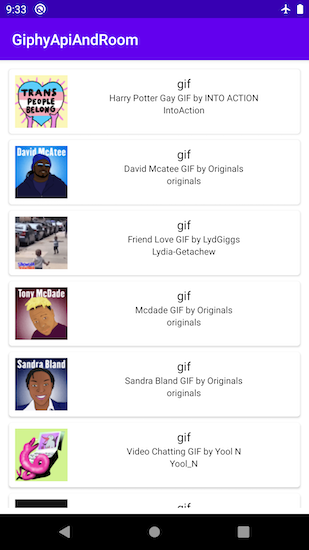
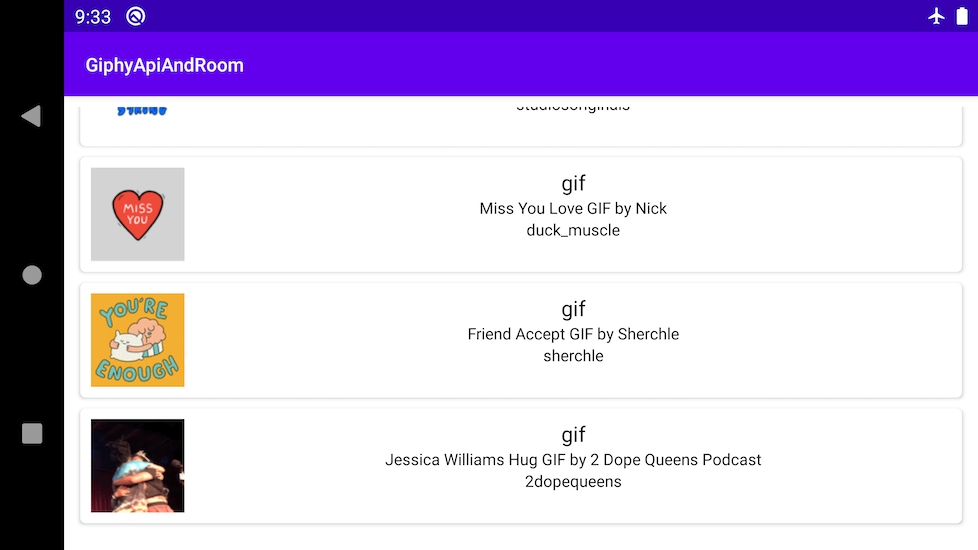
该应用程序将是什么样 (What the app will look like)
The app will contain a list of cards. Each card shows an image, type, username and title. The fetched data will be persisted with Room Persistence Library, so the user can always scroll the list of data even offline.
该应用程序将包含卡片列表。 每张卡都显示一张图片,类型,用户名和标题。 所获取的数据将通过Room Persistence Library保留 ,因此用户即使在脱机状态下也始终可以滚动数据列表。
开始新项目 (Start new project)
Go to Android Studio and create a new Empty Project (Language Kotlin, API 21).
转到Android Studio并创建一个新的Empty Project (语言) Kotlin, API 21)。
Gradle依赖 (Gradle dependencies)
Go to your build.gradle(Module: app) file. At the beginning of the file, you have to enable the Kotlin plugin for the annotation processor. Dagger 2 has for Kotlin a different way to process the annotation than Java. Just paste apply plugin: ‘kotlin-android-extensions’ this plugin below:
转到您的build.gradle(Module:app)文件。 在文件的开头,您必须为注释处理器启用Kotlin插件。 与Java相比, Dagger 2对Kotlin的注释处理方式不同。 只需粘贴以下应用插件:'kotlin-android-extensions'此插件即可:
apply plugin: 'kotlin-kapt'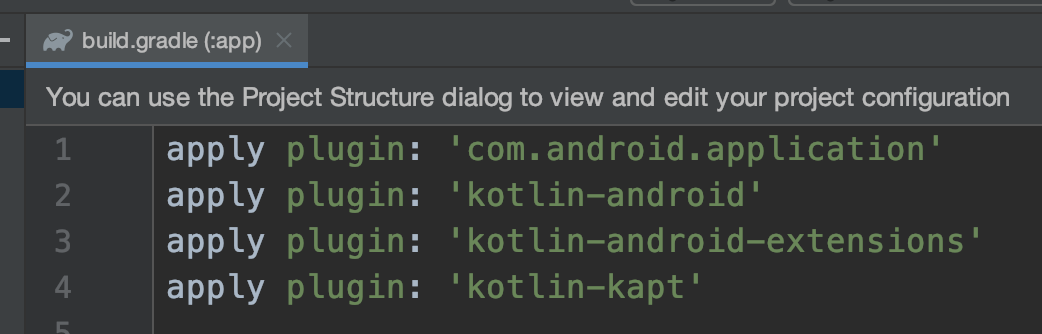
Inside defaultConfig {} add javaCompileOptions {} for Room database. Later when everything is implemented this will create a local file for instance “1.json” a local file like this will hold the database schema.
在defaultConfig {}中,为Room数据库添加javaCompileOptions {} 。 稍后,当一切都实现后,这将为实例“ 1.json”创建一个本地文件,这样的本地文件将保存数据库模式。
javaCompileOptions {
            annotationProcessorOptions {
                arguments = ["room.schemaLocation": "$projectDir/schemas".toString()]
            }
}
Below buildTypes {} add dataBinding {} and set it to true. Otherwise, you can’t use the Android Architecture component Data Binding.
下面buildTypes {}添加数据绑定{}并将其设置为true。 否则,您将无法使用Android Architecture组件Data Binding 。
dataBinding { enabled = true }Below dataBinding {} add compileOptions {} and kotlinOptions{}. Otherwise, you can’t run the app. This is because when using the latest RxJava 2 features like functional programming, older Java versions (before Java 8) can’t handle them.
在dataBinding {}下添加compileOptions {}和kotlinOptions {} 。 否则,您将无法运行该应用程序。 这是因为当使用最新的RxJava 2功能(如函数式编程)时,较旧的Java版本(Java 8之前的版本)无法处理它们。
compileOptions {
    sourceCompatibility JavaVersion.VERSION_1_8
    targetCompatibility JavaVersion.VERSION_1_8}kotlinOptions { jvmTarget = "1.8" }
You will see that buildTypes {}, dataBinding {}, compileOptions {}, kotlinOptions {} are all located inside android {}. Now go to dependencies {} and copy/paste the dependencies I use below:
您会看到buildTypes {},dataBinding {},compileOptions {},kotlinOptions {}都位于android {}内部。 现在转到依赖项{} 并复制/粘贴我在下面使用的依赖项:
dependencies {


    def androidx_version = '1.1.0'
    def retrofit_version = '2.7.2'
    def dagger_version = '2.26'
    def room_version = "2.2.5"
    def first_stable_version = '1.0.0'

    implementation fileTree(dir: 'libs', include: ['*.jar'])
    implementation "org.jetbrains.kotlin:kotlin-stdlib-jdk7:$kotlin_version"
    implementation 'androidx.appcompat:appcompat:1.1.0'
    implementation 'androidx.core:core-ktx:1.3.0'
    implementation 'androidx.constraintlayout:constraintlayout:1.1.3'
    implementation "androidx.recyclerview:recyclerview:$androidx_version"
    implementation "androidx.cardview:cardview:$first_stable_version"
    implementation "androidx.swiperefreshlayout:swiperefreshlayout:$first_stable_version"


    // Android Lifecycle Extensions
    implementation 'androidx.lifecycle:lifecycle-extensions:2.2.0'
    implementation "androidx.activity:activity-ktx:$androidx_version"


    // Glide for Images
    implementation 'com.github.bumptech.glide:glide:4.11.0'


    // Retrofit 2
    implementation "com.squareup.retrofit2:retrofit:$retrofit_version"
    implementation 'com.squareup.retrofit2:converter-moshi:2.9.0'
    implementation "com.squareup.retrofit2:adapter-rxjava2:$retrofit_version"
    implementation 'com.squareup.okhttp3:logging-interceptor:4.4.0'


    // Dagger 2
    implementation "com.google.dagger:dagger:$dagger_version"
    implementation "com.google.dagger:dagger-android-support:$dagger_version"
    kapt "com.google.dagger:dagger-compiler:$dagger_version"
    kapt "com.google.dagger:dagger-android-processor:$dagger_version"


    //RxJava 2
    implementation "io.reactivex.rxjava2:rxjava:2.2.18"
    implementation "io.reactivex.rxjava2:rxandroid:2.1.1"
    implementation "androidx.lifecycle:lifecycle-reactivestreams:2.2.0"


    // Room 2
    implementation "androidx.room:room-runtime:$room_version"
    implementation "androidx.legacy:legacy-support-v4:1.0.0"
    implementation 'androidx.lifecycle:lifecycle-extensions:2.2.0'
    implementation 'androidx.lifecycle:lifecycle-viewmodel-ktx:2.2.0'
    // optional - RxJava support for Room
    implementation "androidx.room:room-rxjava2:$room_version"
    kapt "androidx.room:room-compiler:$room_version"
}
GIPHY API (GIPHY API)
Let’s take a look at the Trending Endpoint. Here, you see that a GET request to /v1/gifs/trending which gives an object that contains an array called data and this array contains several objects. Normally one object contains much more information so I edit one, here is a sample of an edited object:
让我们来看看Trending Endpoint 。 在这里,您看到对/ v1 / gifs / trending的GET请求给出了一个对象,该对象包含一个名为data的数组,并且该数组包含多个对象。 通常,一个对象包含更多信息,因此我将对其进行编辑,这是一个已编辑对象的示例:
{
   "data":[
      {
         "type":"gif",
         "username":"IntoAction",
         "title":"Black Lives Matter March GIF by INTO ACTION",
         "images":{
            "fixed_height_small_still":{
               "height":"100",
               "size":"8021",
               "url":"https://media3.giphy.com/media/mCyMLzBNjTNbvGYLXc/100_s.gif?cid=eb8909a8b256fa0f8d1cb697fed26cb5d22669f1e1df4525&rid=100_s.gif",
               "width":"100"
            }
         }
      }
   ]
}
让我们开始开发。 (Let’s start development.)
Open AndroidManifest.xml and add Internet permissions otherwise, you can’t set a GET request.
打开AndroidManifest.xml并添加Internet权限,否则,您将无法设置GET请求。
<uses-permission android:name="android.permission.INTERNET" />创建模型 (Create the models)
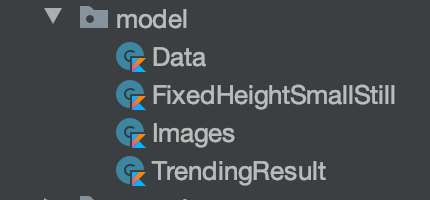
Create a new package and name it model. Copy-paste the JSON object from above. Make a Kotlin data class for the JSON object. I am using an Android Studio plugin called: “JSON To Kotlin Class (JsonToKotlinClass). I named the first class TrendingResult.kt and the rest will be handled by the plugin. Don’t forget to serialize your properties to use camelCase in the project. Here are the four model classes:
创建一个新程序包并将其命名为model 。 从上方复制粘贴JSON对象。 为JSON对象创建Kotlin 数据类 。 我正在使用一个名为``JSON To Kotlin Class(JsonToKotlinClass) ''的Android Studio插件。 我将第一个类命名为TrendingResult.kt ,其余的将由插件处理。 不要忘记序列化您的属性以在项目中使用camelCase。 这是四个模型类:
为API端点创建接口 (Create an interface for the API endpoint)
Create a new package and name it data. Inside data create another package and name it network. Inside the network package create an interface and name it GiphyApi.kt. There will be a GET request made to the endpoint “/v1/gifs/trending”. You want a Flowable of TrendingResult as a return type. Flowable because it adds the option to handle backpressure. When there are too many database updates to handle, only the most recent update will be emitted through our reactive stream.
创建一个新程序包并将其命名为data 。 内部数据创建另一个包并将其命名为network 。 在网络包内创建一个接口,并将其命名为GiphyApi.kt 。 将向端点“ / v1 / gifs / trending”发出GET请求。 您需要将TrendingResult的Flowable作为返回类型。 流动性 因为它增加了处理背压的选项。 当有太多数据库更新无法处理时,仅最新更新将通过我们的响应流发出。
interface GiphyApi {


    @GET("v1/gifs/trending")
    fun getTrending(
        @Query("api_key") apiKey: String,
        @Query("limit") limit: String,
        @Query("rating") rating: String
    ): Flowable<TrendingResult>


}
创建giphy的布局。 (Create the layout for a giphy.)
Go to the folder res → layout create a new layout file there and name it item_giphy.xml. Here you will display image, type, username and title as a CardView. Before make sure your root ViewGroup is <layout></layout> so you can use Data Binding.The tags <layout></layout> will create the class ItemGiphyBinding for us. Later, you can use ItemGiphyBinding class in the ViewHolder to tell the Adapter which properties to bind.
转到文件夹res → 布局,在此处创建一个新的布局文件,并将其命名为item_giphy.xml 。 在这里,您将图像,类型,用户名和标题显示为CardView。 在确保您的根ViewGroup是<layout> </ layout>之前 ,您可以使用数据绑定 。标签<layout> </ layout>将为我们创建类ItemGiphyBinding 。 以后,您可以使用ItemGiphyBinding类 在ViewHolder中告诉适配器要绑定的属性。
<?xml version="1.0" encoding="utf-8"?>
<layout xmlns:android="http://schemas.android.com/apk/res/android">
    <data>
    </data>
    <androidx.constraintlayout.widget.ConstraintLayout
        android:layout_width="match_parent"
        android:layout_height="match_parent">
    </androidx.constraintlayout.widget.ConstraintLayout>
</layout>
Inside <layout></layout> create the tags <data></data> to enable using one of the classes in the layout. Therefore, the tag <variable /> has to be created with a name property type with the location of the class. You can define any name you want with this name. You access the properties of your class defined in type in your layout. In my example, the variable name is data.
在<layout> </ layout>内部创建 标签<data> </ data>以启用使用布局中的类之一。 因此,必须使用名称属性类型以及类的位置来创建标签<variable /> 。 您可以使用该名称定义所需的任何名称。 您可以访问布局中以type定义的类的属性。 在我的示例中,变量名称为data 。
<?xml version="1.0" encoding="utf-8"?>
<layout xmlns:android="http://schemas.android.com/apk/res/android">
    <data>
        <variable
            name="data"
            type="com.example.giphyapiandroom.model.Data" />
    </data>
    <androidx.constraintlayout.widget.ConstraintLayout
        android:layout_width="match_parent"
        android:layout_height="match_parent">
    </androidx.constraintlayout.widget.ConstraintLayout>
</layout>
The important thing is your variable with property access is inside “@{}”. This is one-way data binding.
重要的是,具有属性访问权限的变量位于“ @ {}”内部。 这个 是 单向数据绑定 。
Here is the complete layout for item_giphy.xml:
这是item_giphy.xml的完整布局:
<?xml version="1.0" encoding="utf-8"?>
<layout xmlns:android="http://schemas.android.com/apk/res/android"
    xmlns:app="http://schemas.android.com/apk/res-auto"
    xmlns:tools="http://schemas.android.com/tools">


    <data>


        <variable
            name="data"
            type="com.example.giphyapiandroom.model.Data" />


    </data>


    <androidx.cardview.widget.CardView
        android:id="@+id/trending_card"
        android:layout_width="match_parent"
        android:layout_height="wrap_content"
        android:layout_margin="4dp"
        android:minHeight="?listPreferredItemHeightLarge"
        app:cardCornerRadius="4dp">


        <androidx.constraintlayout.widget.ConstraintLayout
            android:layout_width="match_parent"
            android:layout_height="match_parent">


            <ImageView
                android:id="@+id/trending_image"
                android:layout_width="64dp"
                android:layout_height="64dp"
                android:layout_margin="8dp"
                android:layout_marginEnd="8dp"
                app:imageUrl="@{data.images.fixedHeightSmallStill.url}"
                app:layout_constraintBottom_toBottomOf="parent"
                app:layout_constraintStart_toStartOf="parent"
                app:layout_constraintTop_toTopOf="parent"
                tools:src="@drawable/ic_launcher_background" />


            <TextView
                android:id="@+id/trending_type"
                android:layout_width="wrap_content"
                android:layout_height="wrap_content"
                android:layout_marginStart="8dp"
                android:layout_marginTop="8dp"
                android:layout_marginEnd="8dp"
                android:text="@{data.type}"
                android:textColor="@android:color/black"
                android:textSize="16sp"
                app:layout_constraintEnd_toEndOf="parent"
                app:layout_constraintStart_toEndOf="@id/trending_image"
                app:layout_constraintTop_toTopOf="parent"
                tools:text="Type: GIF" />


            <TextView
                android:id="@+id/trending_title"
                android:layout_width="wrap_content"
                android:layout_height="wrap_content"
                android:layout_marginStart="8dp"
                android:layout_marginEnd="8dp"
                android:maxLines="4"
                android:text="@{data.title}"
                android:textColor="@android:color/black"
                android:textSize="12sp"
                app:layout_constraintEnd_toEndOf="parent"
                app:layout_constraintStart_toEndOf="@id/trending_image"
                app:layout_constraintTop_toBottomOf="@id/trending_type"
                tools:text="Title: Happy Quentin Tarantino" />


            <TextView
                android:id="@+id/trending_username"
                android:layout_width="wrap_content"
                android:layout_height="wrap_content"
                android:layout_marginStart="8dp"
                android:layout_marginEnd="8dp"
                android:maxLines="4"
                android:text="@{data.username}"
                android:textColor="@android:color/black"
                android:textSize="12sp"
                app:layout_constraintEnd_toEndOf="parent"
                app:layout_constraintStart_toEndOf="@id/trending_image"
                app:layout_constraintTop_toBottomOf="@id/trending_title"
                tools:text="Username: oskouioskoui" />


        </androidx.constraintlayout.widget.ConstraintLayout>


    </androidx.cardview.widget.CardView>


</layout>
Take a look at the ImageView with the id: “trending_image” there is the following code line used:
看一下ID为:“ trending_image ”的ImageView ,使用以下代码行:
app:imageUrl="@{data.images.fixedHeightSmallStill.url}"The property imageUrl for app does not exist yet. This is a BindingAdapter and it has to be created. Create a new package and name it internal. Inside internal create a new file call it BindingAdapter.kt. Add the following method inside BindingAdapter.kt:
应用程序的属性imageUrl尚不存在。 这是一个BindingAdapter,必须创建。 创建一个新程序包,并将其命名为internal 。 在内部内部创建一个名为BindingAdapter.kt的新文件。 在BindingAdapter.kt中添加以下方法:
@BindingAdapter("imageUrl")
fun setImageUrl(imageView: ImageView, url: String?) {
    Glide.with(imageView)
        .load(url)
        .centerCrop()
        .into(imageView)
}
The important thing is that you put imageUrl as the value inside @BindingAdapter(“”). Then the reference to the layout item_giphy.xml will work.
重要的是,将imageUrl用作@BindingAdapter(“”)中的值。 然后,对布局item_giphy.xml的引用将起作用。
是时候创建ViewHolder和适配器了 (Time to create the ViewHolder and Adapter)
Create a new package and name it view. Inside view create a new package and name it adapter. Create a new Kotlin File in the package adapter. Name the file TrendingViewHolderAdapter.kt.
创建一个新的程序包并命名为view。 内部视图c创建一个新程序包并将其命名为adapter。 在包适配器中创建一个新的Kotlin文件 。 将文件命名为TrendingViewHolderAdapter.kt 。
从ViewHolder开始 (Start with the ViewHolder)
Create a class named TrendingViewHolder which has the field type ItemGiphyBinding in the constructor. Then let your ViewHolder extend from RecyclerView.ViewHolder. The parent class RecyclerView.ViewHolder expects an argument of the type View. Your field of type ItemGiphyBinding contains a property root of the type View. Every class which is created through Data Binding contains this root property of the type View.
创建一个名为TrendingViewHolder 类在构造函数中的字段类型ItemGiphyBinding。 然后,让您的ViewHolder从RecyclerView.ViewHolder扩展。 父类RecyclerView.ViewHolder需要一个View类型的参数。 您的ItemGiphyBinding类型的字段包含View类型的属性根 。 通过数据绑定创建的每个类都包含View类型的此根属性。
class TrendingViewHolder(
    val itemGiphyBinding: ItemGiphyBinding
) : RecyclerView.ViewHolder(itemGiphyBinding.root)
移至适配器 (Move on to the Adapter)
In the same file where the TrenidngViewHolder was created, create the TrendingAdapter above or below it. Let the TrendingAdapter extend from the RecyclerView.Adapter<TrendingViewHolder>(). The Adapter will bind each item on the CardView from item_giphy.xml. Give TrendingAdapter a class property that is from type ArrayList<Data>. Then start to implement the methods onCreateViewHolder(), getItemCount(), onBindViewHolder().
在其中TrenidngViewHolder创建相同的文件,创建的上方或下方的TrendingAdapter。 让TrendingAdapter从RecyclerView.Adapter <TrendingViewHolder>()扩展。 适配器将从item_giphy.xml绑定CardView上的每个项目。 给TrendingAdapter一个类属性,该属性来自ArrayList <Data>类型。 然后开始实现onCreateViewHolder() , getItemCount() , onBindViewHolder()的方法 。
getItemCount() -> Just returns the size of the list property. So the Adapter knows how many cards to create.
getItemCount()->仅返回列表属性的大小。 因此,适配器知道要创建多少张卡。
override fun getItemCount(): Int = data.sizeonCreateViewHolder() -> Normally you would start with LayoutInflater.from() but now you have to use instead DataBindingUtil.inflate(). As you can see, DataBindingUtil.inflate() takes as first argument LayoutInflater.from()
onCreateViewHolder()->通常,您将从LayoutInflater.from()开始,但现在必须改用DataBindingUtil.inflate()。 如您所见, DataBindingUtil.inflate()将LayoutInflater.from()作为第一个参数。
override fun onCreateViewHolder(parent: ViewGroup, viewType: Int): TrendingViewHolder {
        val itemGiphyBinding: ItemGiphyBinding = DataBindingUtil.inflate(
            LayoutInflater.from(parent.context),
            R.layout.item_giphy,
            parent,
            false
        )
        return TrendingViewHolder(itemGiphyBinding)
}
onBindViewHolder() -> Whenever a CardView (from item_giphy.xml) for the item gets created it will be fetched from the current position of the data list.
onBindViewHolder()->每当为该项目创建CardView(来自item_giphy.xml )时,都会从数据列表的当前位置获取它。
override fun onBindViewHolder(holder: TrendingViewHolder, position: Int) {
    holder.itemGiphyBinding.data = data[position]
}
Okay, you are almost finished with the TrendingAdapter. You need one more method, which avoids duplication of items. It should also add all new items and notifies other components about the changed dataset.
好的,您几乎可以使用TrendingAdapter。 您还需要一种方法,该方法可以避免项目重复。 它还应添加所有新项目,并向其他组件通知已更改的数据集。
fun setUpData(giphies: List<Data>) {
    data.clear()
    data.addAll(giphies)
    notifyDataSetChanged()
}
Okay, that’s it for the first part, here is the next part: Part 2
好吧,这是它的第一部分,这里是下一个部分: 第2部分
Here is the completed project, check out branch part1:
这是已完成的项目,请查看分支part1 :
dagger kotlin


 399
399

 被折叠的 条评论
为什么被折叠?
被折叠的 条评论
为什么被折叠?
 到【灌水乐园】发言


