


android 软键盘动画
New in Android 11 is the ability for apps to create seamless transitions between the on screen keyboard being opened and closed, and it’s all powered by lots of improvements to the WindowInsets APIs in Android 11.
Android 11的新增功能是使应用程序能够在打开和关闭的屏幕键盘之间创建无缝过渡,并且全部由Android 11中 WindowInsets API的许多改进提供支持。
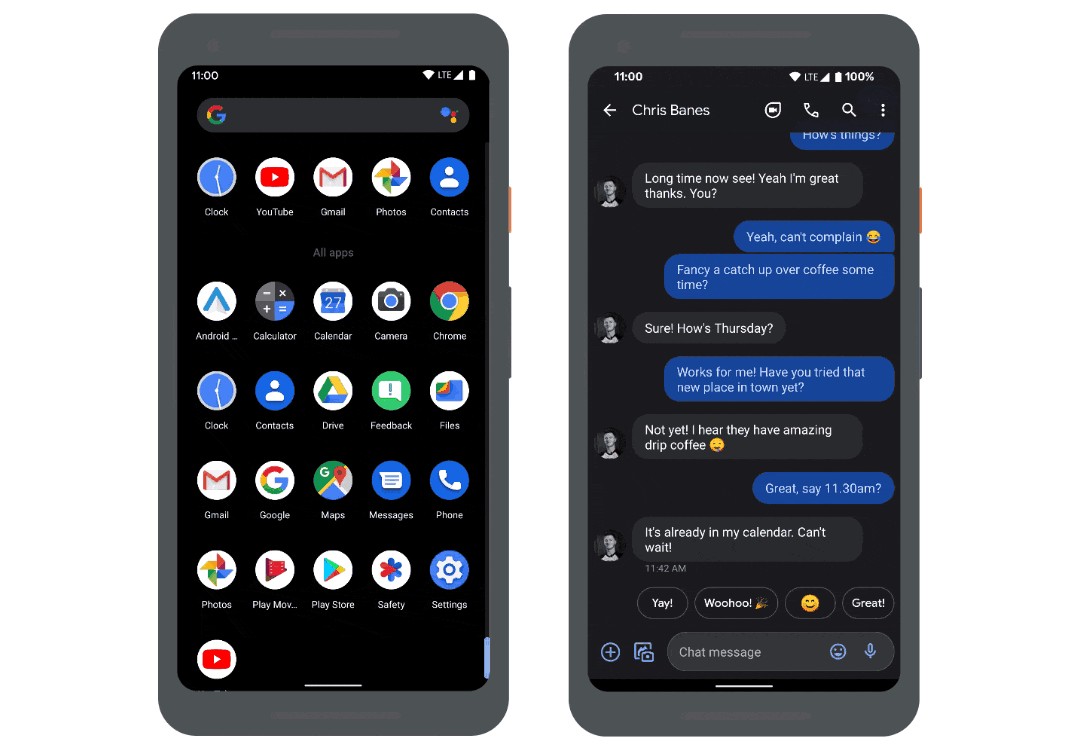
Here you are two examples of it in action on Android 11. It has been integrated into the Google Search app, as well as the Messages app:
这是您在Android 11上使用它的两个示例。它已集成到Google搜索应用程序以及消息应用程序中:
So let’s take a look at how you can add this sort of experience to your apps. There are three steps:
因此,让我们看一下如何将这种体验添加到您的应用程序中。 分三个步骤:
- First, we need to go edge-to-edge. 首先,我们需要边走边走。
- The second step is for apps to start reacting to inset animations. 第二步是让应用开始对插图动画做出React。
- And the third step is by apps taking control of and driving inset animations, if it makes sense for your app. 第三步是让应用控制和驱动插图动画(如果您的应用有意义)。
Each of these steps follow on from each other, so we’ll cover each in separate blog posts. In this first post, we’ll cover going edge-to-edge, and the related API changes in Android 11.
这些步骤中的每个步骤都是相互接续的,因此我们将在单独的博客文章中介绍每个步骤。 在第一篇文章中 ,我们将介绍边缘到边缘的知识,以及Android 11中的相关API更改。
边到边 (Going edge-to-edge)
Last year we introduced the concept of going edge to edge, as a way for apps to make the most of the new gestural navigation in Android 10:
去年,我们引入了边缘到边缘的概念,以使应用程序充分利用Android 10中的新手势导航:
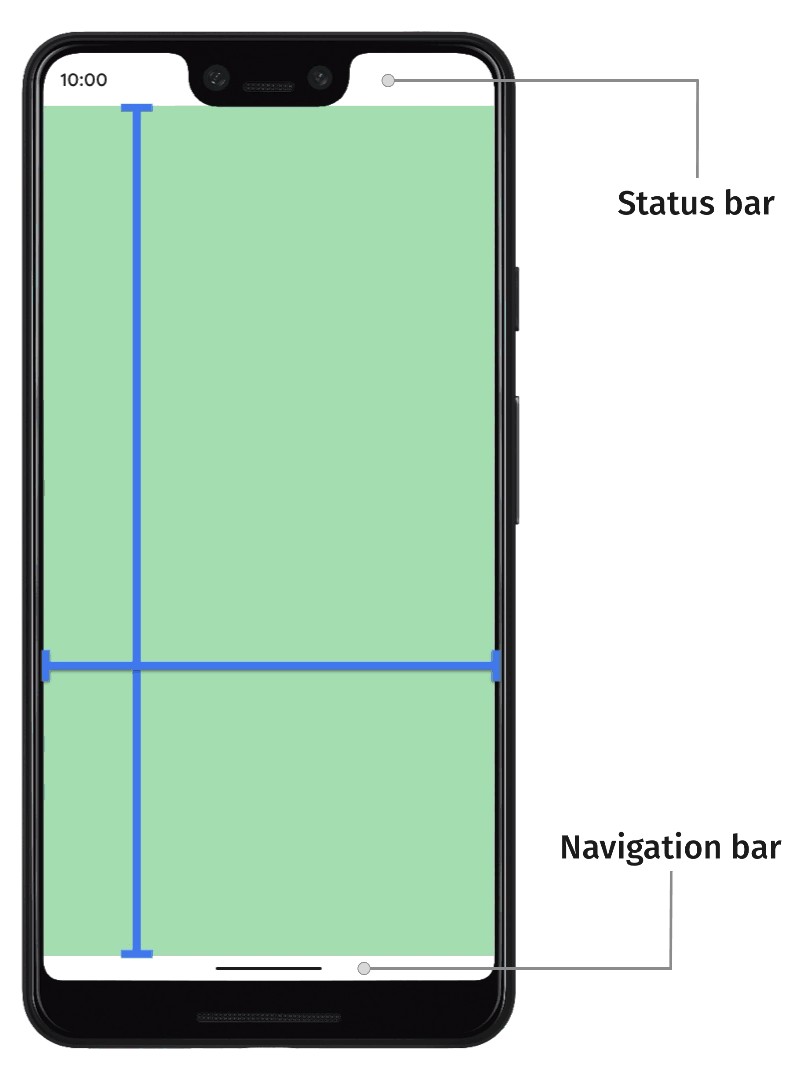
As a quick re-cap, going edge to edge results in your app drawing behind the system bars, like you can see on the left.
快速回顾一下,从边缘到边缘会导致您的应用在系统栏后面绘图,就像您在左侧看到的那样。
To quote myself from last year:
引用去年的内容:
By going edge-to-edge, apps will instead be laid out behind the system bars. This is to allow your app content to shine through to create a more immersive experience for your users.
通过边缘到边缘,应用程序将被布置在系统栏的后面。 这是为了让您的应用程序内容闪闪发光,为用户创造更身临其境的体验。
那么,与键盘到底有什么关系呢? (So what has going edge to edge got to do with the keyboard?)
Well going edge to edge is actually more than just drawing behind the status and navigation bars. It’s apps taking responsibility for handling those pieces of system UI which might overlap with the app.
实际上,边走边走不仅仅是在状态栏和导航栏后面绘制。 应用程序负责处理可能与应用程序重叠的那些系统用户界面。
The two obvious examples being the status bar and navigation bar, which we mentioned earlier. Then we have the on-screen-keyboard, or IME as it is sometimes referred to; it’s just another piece of system UI to be aware of.
前面提到的两个明显的例子是状态栏和导航栏。 然后,我们有了屏幕键盘,有时也称为IME; 这只是需要注意的另一部分系统UI。
应用如何边缘化? (How do apps go edge to edge?)
If we flash back to our guidance from last year, going edge to edge is made up of 3 tasks:
如果我们从去年回顾一下我们的指导,那么不断发展将由以下三个任务组成:
- Change system bar colors 更改系统栏颜色
- Request to be laid out fullscreen 要求全屏显示
- Handle visual conflicts 处理视觉冲突
We’re going to skip the first task, because nothing has changed there since last year. The guidance for steps 2 & 3 has been updated with some changes in Android 11. Let’s take a look.
我们将跳过第一个任务,因为自去年以来,那里没有任何变化。 第2步和第3步的指南已更新,并在Android 11中进行了一些更改。让我们来看一下。
#2:要求全屏显示 (#2: Request to be laid out fullscreen)
For the second step, apps needed to use the systemUiVisibility API with a bunch of flags, to request to be laid out fullscreen:
第二步,应用程序需要使用systemUiVisibility API和一堆标志,以请求全屏显示:
view.systemUiVisibility =
    // Tells the system that the window wishes the content to
    // be laid out at the most extreme scenario. See the docs for
    // more information on the specifics
    View.SYSTEM_UI_FLAG_LAYOUT_STABLE or
    // Tells the system that the window wishes the content to
    // be laid out as if the navigation bar was hidden
    View.SYSTEM_UI_FLAG_LAYOUT_HIDE_NAVIGATION
If you were using this API and have updated your compile SDK version to 30, you’ll have seen that all of these APIs are now deprecated.
如果您正在使用此API并将Compile SDK版本更新为30 ,那么您会发现所有这些API现在都已弃用。
They’ve been replaced with a single function on Window called setDecorFitsSystemWindows():
它们已被Window上的单个函数setDecorFitsSystemWindows()取代:
// Tell the window that we (the app) want to handle/fit any system
// windows (and not the decor)
window.setDecorFitsSystemWindows(false)


// OR you can use WindowCompat from AndroidX v1.5.0-alpha02
WindowCompat.setDecorFitsSystemWindows(window, false)
Instead of the many flags, you now pass in a boolean: false if apps want to handle any system window fitting (and thus go fullscreen).
现在,您传递的不是布尔值,而是布尔值:如果应用程序要处理任何系统窗口大小(从而全屏显示),则返回false 。
We also have a Jetpack version of the function available in WindowCompat, which was released recently in androidx.core v1.5.0-alpha02.
我们还在WindowCompat提供了该功能的Jetpack版本,该功能最近在androidx.core v1.5.0-alpha02 。
So that’s the 2nd step updated.
这是第二步更新。
#3:处理视觉冲突 (#3: Handling visual conflicts)
Now let’s look at the third step: avoiding overlaps with the system UI, which can be summarised as using the window insets to know where to move content to, to avoid conflicts with the system UI. On Android, insets are represented by the WindowInsets class, and WindowInsetsCompat in AndroidX
现在让我们看第三步:避免与系统UI重叠,可以将其概括为使用窗口插图了解将内容移至何处,以避免与系统UI冲突。 在Android上,插图由代表WindowInsets类,并WindowInsetsCompat在AndroidX
If we take a look at WindowInsets before the updates from API 30, the most common inset type to use is the system window insets. These cover the status and navigation bars, and also the keyboard when it is open.
如果在API 30更新之前先看一下WindowInsets ,最常用的插入类型是系统窗口插入。 这些覆盖状态和导航栏,以及打开时的键盘。
To use WindowInsets, you would typically add an OnApplyWindowInsetsListener to a view, and handle any insets which are passed to it:
要使用WindowInsets ,通常会向视图添加一个OnApplyWindowInsetsListener ,并处理传递给它的所有插图:
ViewCompat.setOnApplyWindowInsetsListener(view) { v, insets ->
    v.updatePadding(bottom = insets.systemWindowInsets.bottom)
    // Return the insets so that they keep going down the view hierarchy
    insets
}
Here we’re fetching the system window insets, and then updating the view’s padding to match, which is a very common use case.
在这里,我们获取系统窗口inset ,然后更新视图的填充以使其匹配,这是一个非常常见的用例。
There are a number of other inset types available, including the recently added gesture insets from Android 10:
还有许多其他插入类型可用,包括最近从Android 10添加的手势插入:
ViewCompat.setOnApplyWindowInsetsListener(v) { view, windowInsets ->
    val sysWindow = windowInsets.systemWindowInsets
    val stable = windowInsets.stableInsets
    val systemGestures = windowInsets.systemGestureInsets
    val tappableElement = windowInsets.tappableElementInsets
}
Similar to the systemUiVisibility API, much of the WindowInsets APIs have been deprecated, in favor of new functions to query the insets for different types:
与systemUiVisibility API相似,许多WindowInsets API已被弃用,以便使用新功能来查询不同类型的插图:
getInsets(type: Int)which will return the visible insets for the given types.getInsets(type: Int)将返回给定类型的可见插入物。getInsetsIgnoringVisibility(type: Int)which returns the insets, regardless of whether they’re visible or not.getInsetsIgnoringVisibility(type: Int)不管是否可见,都会返回这些插图。isVisible(type: Int)which returnstrueif the given type is visible.isVisible(type: Int)如果给定类型可见,则返回true。
We just mentioned ‘types’ a lot there. These are defined in the WindowInsets.Type class as functions, each returning an integer flag. You can combine multiple types, using a bitwise OR to query for combined types, which we’ll see in a minute.
我们在那儿经常提到“类型”。 这些在WindowInsets. Type中定义WindowInsets. Type WindowInsets. Type class输入为函数,每个函数返回一个整数标志。 您可以组合多个类型,使用按位OR查询组合的类型,我们将在稍后介绍。
All of these APIs have been backported to WindowInsetsCompat in AndroidX Core, so you can safely use them back to API 14 (see the release notes for more information).
所有这些API都已WindowInsetsCompat移植到WindowInsetsCompat Core中的WindowInsetsCompat ,因此您可以安全地将其重新使用回API 14(有关更多信息,请参见发行说明 )。
So if we go back to our example from before, to update it to the new APIs, they become:
因此,如果我们从以前的示例开始,将其更新为新的API,它们将变为:
ViewCompat.setOnApplyWindowInsetsListener(...) { view, insets ->
-    val sysWindow = insets.systemWindowInsets
+    val sysWindow = insets.getInsets(Type.systemBars() or Type.ime())


-    val stable = insets.stableInsets
+    val stable = insets.getInsetsIgnoringVisibility(Type.systemBars())


-    val systemGestures = insets.systemGestureInsets
+    val systemGestures = insets.getInsets(Type.systemGestures())


-    val tappableElement = insets.tappableElementInsets
+    val tappableElement = insets.getInsets(Type.tappableElement())
}
输入法类型⌨️ (The IME type ⌨️)
Now the keen eyed 👀 among may have been looking at this list of types, and been looking at one type in particular: the IME type.
现在,敏锐的may可能一直在查看此类型列表,尤其是在查看一种类型: IME type 。
Well we can finally answer this StackOverflow question, from over 10 years ago (fashionably late), about how to check the visibility of the keyboard. 🎉
好了,我们终于可以回答10年前(可能是很晚)的StackOverflow问题 ,该问题涉及如何检查键盘的可见性。 🎉
To get the current keyboard visibility, we can fetch the root window insets, and then call the isVisible() function, passing in the IME type.
为了获得当前键盘的可见性,我们可以获取根窗口插图,然后调用isVisible()函数,并传入IME类型。
Similarly if we want to find out the height, we can do that too:
同样,如果我们想找出高度,我们也可以这样做:
val insets = ViewCompat.getRootWindowInsets(view)
val imeVisible = insets.isVisible(Type.ime())
val imeHeight = insets.getInsets(Type.ime()).bottom
If we need to listen to changes to the keyboard, we can use the normal OnApplyWindowInsetsListener, and use the same functions:
如果需要收听键盘的更改,则可以使用普通的OnApplyWindowInsetsListener ,并使用相同的功能:
ViewCompat.setOnApplyWindowInsetsListener(view) { v, insets ->
    val imeVisible = insets.isVisible(Type.ime())
    val imeHeight = insets.getInsets(Type.ime()).bottom
}
隐藏/显示键盘 (Hiding/showing the keyboard)
Since we’re on a roll of answering StackOverflow questions, how about this one from 11 years ago, of how to close the keyboard.
由于我们正在回答StackOverflow问题, 因此 11年前的这个问题如何关闭键盘。
Here we are going to introduce another new API in Android 11, called WindowInsetsController.
在这里,我们将介绍Android 11中的另一个新API,称为WindowInsetsController 。
Apps can get access to a controller from any view, and then show or hide the keyboard by calling either show() or hide(), passing in the IME type:
应用程序可以从任何视图访问控制器,然后通过调用show()或hide() (传入IME类型hide()显示或隐藏键盘:
val controller = view.windowInsetsController


// Show the keyboard (IME)
controller.show(Type.ime())


// Hide the keyboard
controller.hide(Type.ime())
But hiding and showing the keyboard isn’t all that the controller can do…
但是隐藏和显示键盘并不是控制器可以做的全部……
WindowInsetsController (WindowInsetsController)
Earlier we said that some of the View.SYSTEM_UI_* flags have been deprecated in Android 11, replaced with a new API. Well there were a number of other View.SYSTEM_UI flags available, related to changing the system UI appearance or visibility, including:
之前我们说过,某些View.SYSTEM_UI_*标志已在Android 11中弃用,取而代之的是新的API。 好吧,还有许多其他View.SYSTEM_UI标志可用,它们与更改系统UI外观或可见性有关,包括:
View.SYSTEM_UI_FLAG_LAYOUT_HIDE_NAVIGATIONView.SYSTEM_UI_FLAG_LAYOUT_HIDE_NAVIGATIONView.SYSTEM_UI_FLAG_LAYOUT_FULLSCREENView.SYSTEM_UI_FLAG_LAYOUT_FULLSCREENView.SYSTEM_UI_FLAG_LAYOUT_STABLEView.SYSTEM_UI_FLAG_LAYOUT_STABLEView.SYSTEM_UI_FLAG_LOW_PROFILEView.SYSTEM_UI_FLAG_LOW_PROFILEView.SYSTEM_UI_FLAG_FULLSCREENView.SYSTEM_UI_FLAG_FULLSCREENView.SYSTEM_UI_FLAG_HIDE_NAVIGATIONView.SYSTEM_UI_FLAG_HIDE_NAVIGATIONView.SYSTEM_UI_FLAG_IMMERSIVE_STICKYView.SYSTEM_UI_FLAG_IMMERSIVE_STICKYView.SYSTEM_UI_FLAG_IMMERSIVEView.SYSTEM_UI_FLAG_IMMERSIVEView.SYSTEM_UI_FLAG_VISIBLEView.SYSTEM_UI_FLAG_VISIBLEView.SYSTEM_UI_FLAG_LIGHT_STATUS_BARView.SYSTEM_UI_FLAG_LIGHT_STATUS_BARView.SYSTEM_UI_FLAG_LIGHT_NAVIGATION_BARView.SYSTEM_UI_FLAG_LIGHT_NAVIGATION_BAR
Similar to the others, these have also been deprecated too in API 30, replaced with APIs in WindowInsetsController.
与其他类似,它们在API 30中也已被弃用,由WindowInsetsController中的API取代。
Instead of going through the migration for all of these flags, we’ll cover a few common scenarios and see how to update them:
除了介绍所有这些标志的迁移之外,我们还将介绍一些常见的情况,并介绍如何更新它们:
沉浸式模式 (Immersive modes)
Here you can see a drawing app, which hides the System UI to maximise the space available for drawing:
在这里,您可以看到一个绘图应用程序,该应用程序隐藏了系统用户界面以最大化可用于绘图的空间:
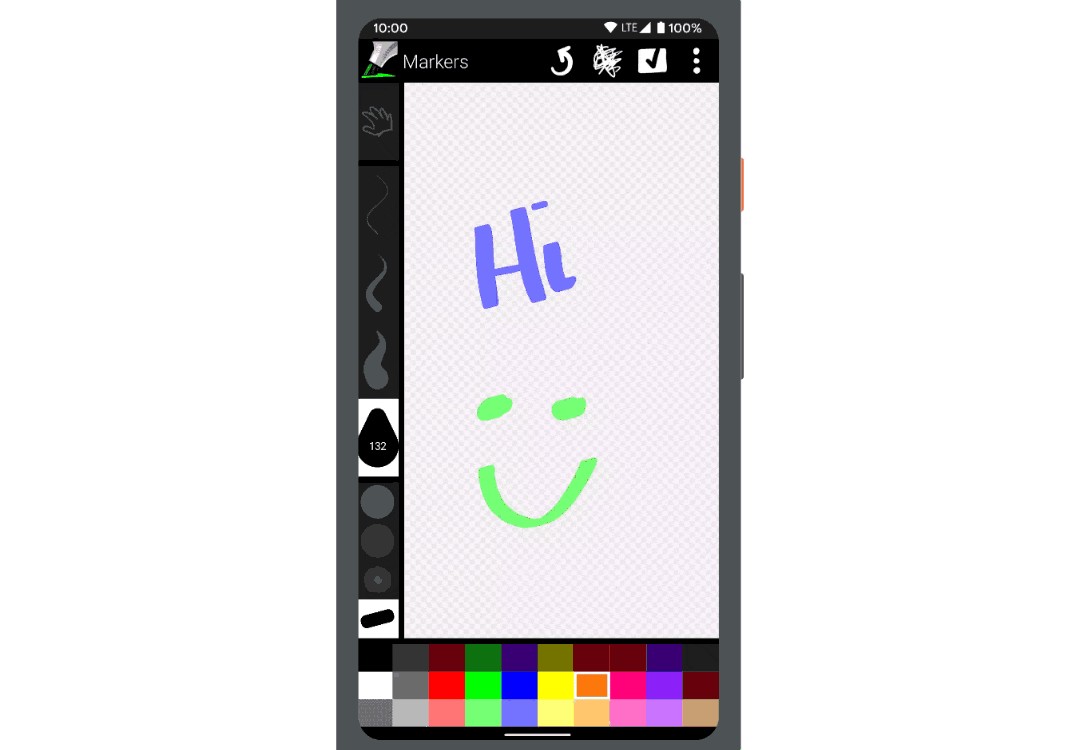
To implement that using WindowInsetsController we use the hide() and show() functions like before, but this time we pass in the system bars type:
为了使用WindowInsetsController来实现这WindowInsetsController我们像以前一样使用hide()和show()函数,但是这次我们传入系统栏类型:
val controller = view.windowInsetsController


// When we want to hide the system bars
controller.hide(Type.systemBars())


// When we want to show the system bars
controller.show(Type.systemBars())
The app also uses immersive mode, allowing the user to swipe the system bars back in once hidden. To implement this using WindowInsetsController we change the hide and show behaviour to BEHAVIOR_SHOW_BARS_BY_SWIPE:
该应用程序还使用沉浸式模式 ,允许用户在隐藏时向后轻扫系统栏。 为了使用WindowInsetsController来实现此WindowInsetsController我们将隐藏和显示行为更改为BEHAVIOR_SHOW_BARS_BY_SWIPE :
val controller = view.windowInsetsController


// Immersive is now...
controller.setSystemBarsBehavior(
    WindowInsetsController.BEHAVIOR_SHOW_BARS_BY_SWIPE
)


// When we want to hide the system bars
controller.hide(Type.systemBars())
Similarly, if you were using sticky immersive mode, this is implemented using the BEHAVIOR_SHOW_TRANSIENT_BARS_BY_SWIPE instead:
同样,如果使用粘性沉浸模式 ,则可以使用BEHAVIOR_SHOW_TRANSIENT_BARS_BY_SWIPE来实现:
val controller = view.windowInsetsController


// Sticky Immersive is now ...
controller.setSystemBarsBehavior(
    BEHAVIOR_SHOW_TRANSIENT_BARS_BY_SWIPE
)


// When we want to hide the system bars
controller.hide(Type.systemBars())
状态栏内容颜色 (Status bar content color)
The next scenario is around the status bar content color. Here you see two apps:
下一种情况是围绕状态栏内容颜色。 在这里您可以看到两个应用程序:

On the left the app has a dark status bar background, with light content like the time and icons. But if we instead want a light status bar background with dark content, like the right, we can use WindowInsetsController too.
该应用程序的左侧有一个深色的状态栏背景,其中包含诸如时间和图标之类的浅色内容。 但是,如果相反,我们想要一个带有深色内容的浅色状态栏背景(如右图),我们也可以使用WindowInsetsController 。
To do that, we can use the setSystemBarsAppearance() function, passing in the APPEARANCE_LIGHT_STATUS_BARS value:
为此,我们可以使用setSystemBarsAppearance()函数,传入APPEARANCE_LIGHT_STATUS_BARS值:
val controller = view.windowInsetsController


// Enable light status bar content
controller.setSystemBarsAppearance(
    APPEARANCE_LIGHT_STATUS_BARS, // value
    APPEARANCE_LIGHT_STATUS_BARS // mask
)
If you instead want to set a dark status bar, by passing in 0 instead to clear the value.
如果您想设置一个黑暗的状态栏,则输入0来清除该值。
Note: you could implement this in your theme instead, by setting the
android:windowLightStatusBarattribute. This might be preferable if you know the value won’t change.注意:您可以通过设置
android:windowLightStatusBar属性来在主题中实现此功能。 如果您知道该值不会更改,则可能更可取。
Similarly, the APPEARANCE_LIGHT_NAVIGATION_BARS flag is available which provides the same functionality for the navigation bars.
同样,可以使用APPEARANCE_LIGHT_NAVIGATION_BARS标志为导航栏提供相同的功能。
AndroidX中的WindowInsetsController? (WindowInsetsController in AndroidX?)
Unfortunately a Jetpack version of this API does not exist yet, but we are working on it. Stay tuned.
不幸的是,该API的Jetpack版本尚不存在,但我们正在努力。 敬请关注。
翻译自: https://medium.com/androiddevelopers/animating-your-keyboard-fb776a8fb66d
android 软键盘动画


 349
349

 被折叠的 条评论
为什么被折叠?
被折叠的 条评论
为什么被折叠?
 到【灌水乐园】发言


