firebase 云推送
历史 (History)
If you are working with Android long enough you could have known about Google Cloud Messaging (GCM), a mobile notification service. It was developed by Google that enables third-party application developers to send notification data or information from servers to applications and web free for charge
如果您使用Android的时间足够长,那么您可能已经了解移动通知服务Google Cloud Messaging(GCM)。 它由Google开发,可让第三方应用程序开发人员免费将通知数据或信息从服务器发送到应用程序和网络,
The GCM service was first announced in June 2012 as a successor to Google’s now-defunct Android Cloud to Device Messaging (C2DM) service, citing improvements to authentication and delivery, new API endpoints, and messaging parameters, and the removal of limitations on API send-rates and message sizes.
GCM服务于2012年6月首次发布,它是Google现已淘汰的Android Cloud to Device Messaging(C2DM)服务的继任者,理由是对身份验证和传递,新API端点和消息传递参数的改进以及对API发送限制的取消-费率和邮件大小。
It has been superseded by Google’s Firebase Cloud Messaging (FCM). On April 10, 2018, Google deprecated GCM. The GCM server and client APIs were removed on May 29, 2019.
它已被Google的Firebase Cloud Messaging (FCM)取代。 Google在2018年4月10日弃用了GCM。 GCM服务器和客户端API已于2019年5月29日删除。
In this article, we’re going to learn what’s FCM, how we can integrate it into the app’s, and sending sample messages through FCM.
在本文中,我们将学习什么是FCM,如何将其集成到应用程序中以及如何通过FCM发送示例消息。
什么是Firebase Cloud Messaging? (What is Firebase Cloud Messaging?)
Firebase Cloud Messaging (FCM) is a cross-platform cloud messaging solution that lets you reliably send messages at no cost. In simple words, we can say that FCM is a highly sophisticated and advanced version of GCM.
Firebase Cloud Messaging(FCM)是一种跨平台的云消息传递解决方案,可让您可靠地免费发送消息。 简而言之,我们可以说FCM是GCM的高度复杂和高级的版本。
FCM provides a reliable and battery-efficient connection between your server and devices that allows you to deliver and receive messages via notifications on iOS, Android, and the web at no cost. It has many interesting features like
FCM在服务器和设备之间提供了可靠且省电的连接,使您可以通过iOS,Android和Web上的通知免费发送和接收消息。 它具有许多有趣的功能,例如
- Advanced message targeting 进阶讯息定位
- Customized notification content 定制的通知内容
- A/B test notifications, etc A / B测试通知等
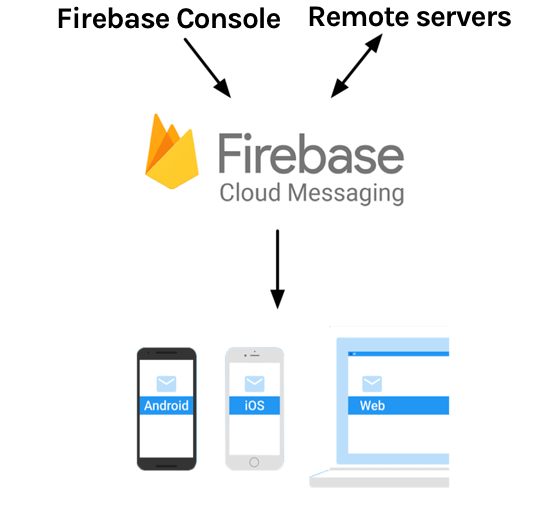
FCM is a powerful and scalable service delivering hundreds of billions of messages per day with 95% of messages being delivered in 250 milliseconds. FCM with zero-cost and unlimited features developers can play around to experiment and analyze things. It’s very easy to integrate. The overall picture of the FCM is as below
FCM是一项功能强大且可扩展的服务,每天可传递数千亿条消息,其中95%的消息在250毫秒内被传递。 具有零成本和无限制功能的FCM开发人员可以进行试验和分析。 集成非常容易。 FCM的总体情况如下

实作 (Implementation)
Let’s break this into a step-by-step procedure for better understanding.
让我们将其分解为逐步的过程,以便更好地理解。
- Register app at Firebase console 在Firebase控制台上注册应用
- Setup the Firebase stuff at the app level 在应用程序级别设置Firebase内容
- Set up the FCM SDK 设置FCM SDK
- Configure the app manifest file 配置应用清单文件
- Access the device registration token 访问设备注册令牌
- Custom notification handling 自定义通知处理
- Sending messages to clients from Firebase console. 从Firebase控制台向客户端发送消息。
Let’s analyze each step mentioned above in detail.
让我们详细分析上面提到的每个步骤。
在Firebase控制台上注册应用 (Register app at Firebase console)
From the Firebase console, open or add your project. Creating a project is simple just click on add project and follow two simple steps like giving a name to the project, enabling disabling analytics, and account selection. Now that we have successfully added our project we would be landed on project overview screen where you can find a section that look’s like below
在Firebase控制台中 ,打开或添加项目。 创建项目很简单,只需单击“添加项目”,然后执行两个简单的步骤,例如为项目命名,启用禁用分析和帐户选择。 现在我们已经成功添加了项目,我们将进入“项目概览”屏幕,您可以在其中找到如下所示的部分

Click on the Android section which is our case, it navigates to Add Firebase to your Android app page that has 4 simple steps, and in step one fill in the field’s displayed in the form like the app package name, app nickname, and click on the register app button.
单击“ Android”部分(本例),它导航到“将Firebase添加到您的Android应用程序页面”中,该页面具有4个简单步骤,并在第一步中填写以应用程序包名称,应用程序昵称之类的形式显示的字段,然后单击注册应用程序按钮。
Then we will be prompted with step two where we need to download the google-services.json and click the next step that displays instructions to follow for app integration and step four is nothing but once you integrated just run the app to verify the integration.
然后,第二步将提示我们,需要下载google-services.json并单击下一步,该下一步显示指示以进行应用程序集成的说明,而第四步仅需集成即可运行应用程序以验证集成。
Now it’s time to dive into code.
现在是时候深入研究代码了。
在应用程序级别设置Firebase内容 (Setup the Firebase stuff at the app level)
Initially paste the google-services.json file at the app directory. To enable Firebase products in our app, we need to add the google-services plugin to our gradle files.
最初将google-services.json文件粘贴到应用程序目录中。 要在我们的应用中启用Firebase产品,我们需要将google-services插件添加到gradle文件中。
In your root-level (project-level) Gradle file (
build.gradle
), add rules to include the Google Services Gradle plugin. Check that you have Google's Maven repository, as well.在您的根级别(项目级别)的Gradle文件(
build.gradle
)中,添加规则以包括Google Services Gradle插件。 检查您是否也拥有Google的Maven存储库。
Project-level build.gradle (<project>/build.gradle
):
项目级build.gradle( <project>/build.gradle
):
// Top-level build file where you can add configuration options common to all sub-projects/modules.
buildscript {
ext.kotlin_version = '1.3.41'
repositories {
google()
jcenter()
}
dependencies {
classpath 'com.android.tools.build:gradle:3.5.0'
classpath "org.jetbrains.kotlin:kotlin-gradle-plugin:$kotlin_version"
classpath "com.google.gms:google-services:4.3.2"
classpath "com.google.firebase:firebase-crashlytics-gradle:2.1.0"
// NOTE: Do not place your application dependencies here; they belong
// in the individual module build.gradle files
}
}
allprojects {
repositories {
google()
jcenter()
maven { url 'https://jitpack.io' }
}
}
task clean(type: Delete) {
delete rootProject.buildDir
}
2. In our module or app-level Gradle file (usually app/build.gradle
), apply the Google Services Gradle plugin by just adding single at the top header part
2.在我们的模块或应用程序级别的Gradle文件(通常为app/build.gradle
)中,只需在顶部标题部分添加单个即可应用Google Services Gradle插件
// Add the following line:apply plugin: 'com.google.gms.google-services'
设置FCM SDK (Set up the FCM SDK)
Add the dependencies at the app-level build.gradle file
在应用程序级别的build.gradle文件中添加依赖项
dependencies {
// ...
// Add the Firebase SDK for Google Analytics implementation 'com.google.firebase:firebase-analytics:17.4.3'
// Add the SDK for Firebase Cloud Messaging implementation 'com.google.firebase:firebase-messaging:20.2.1'
// Make sure that you've added Google's Maven repository to your
// root-level build.gradle file
}
Google Analytics is an optional dependency but it’s good to have that. Once you added the dependency click on sync now to ensure that all dependencies have the necessary versions. If you added Analytics, run your app to send verification to Firebase that you’ve successfully integrated Firebase. Otherwise, you can skip the verification step. Your device logs will display at the Firebase verification that initialization is complete once you run the firebase integrated app on the device.
Google Analytics(分析)是一个可选的依赖项,但最好有这个依赖项。 添加依赖项后,请立即单击同步,以确保所有依赖项都具有必需的版本。 如果您添加了Analytics(分析),请运行您的应用以将已成功集成Firebase的验证发送到Firebase。 否则,您可以跳过验证步骤。 您在设备上运行Firebase集成应用后,设备日志将显示在Firebase验证中,表明初始化已完成。
配置应用清单文件 (Configure the app manifest file)
In the app manifest file, we need to register a service that extends FirebaseMessagingService
for custom handling of incoming notifications.
在应用清单文件中,我们需要注册一个扩展FirebaseMessagingService
的服务,以自定义处理传入通知。
<!--FireBase-->
<service android:name=".FcmMessageService"
android:exported="false">
<intent-filter>
<action android:name="com.google.firebase.MESSAGING_EVENT"/>
</intent-filter>
</service>
<!--FireBase-->
To set default properties like notification icon and color when we don’t handle them explicitly we need to specify below elements in the application component of the manifest file
要在未明确处理通知属性时设置默认属性,例如通知图标和颜色,我们需要在清单文件的应用程序组件中指定以下元素
<!-- Set custom default icon. This is used when no icon is set for incoming notification messages.
See README(https://goo.gl/l4GJaQ) for more. -->
<meta-data
android:name="com.google.firebase.messaging.default_notification_icon"
android:resource="@drawable/ic_stat_ic_notification" />
<!-- Set color used with incoming notification messages. This is used when no color is set for the incoming
notification message. See README(https://goo.gl/6BKBk7) for more. -->
<meta-data
android:name="com.google.firebase.messaging.default_notification_color"
android:resource="@color/colorAccent" />
While specifying the icon in the above step don’t use .svg files if your app supports below Lollipop because it causes crashes in devices with KitKat and below.
在上述步骤中指定图标时,如果您的应用支持Lollipop以下版本,请不要使用.svg文件,因为它会导致KitKat及以下版本的设备崩溃。
访问设备注册令牌 (Access the device registration token)
Registration Token is an address that is used by FCM for delivering the message to a device. When we request a token using FirebaseInstanceId.getInstance().getInstanceId()
it provides current registration token & we can send it to the server where we can save it and use it to send notifications later.
注册令牌是FCM用于将消息传递到设备的地址 。 当我们使用FirebaseInstanceId.getInstance().getInstanceId()
请求令牌时,它将提供当前的注册令牌,我们可以将其发送到服务器,在此我们可以保存它并在以后使用它发送通知。
private fun fetchFCMToken() {
FirebaseInstanceId.getInstance().instanceId
.addOnCompleteListener(OnCompleteListener { task ->
if (!task.isSuccessful) {
FirebaseCrashlytics.getInstance().recordException(Throwable(task.exception))
return@OnCompleteListener
}
// Get new Instance ID token
val token = task.result?.token
sendTokenToServer(token)
})
}
Sending the token alone to the server is not enough, however, we need to monitor the token. This token may get refreshed so we need to have a continuous watch. When the token is refreshed we get a callback in onNewToken method.
仅将令牌发送到服务器是不够的,但是,我们需要监视令牌。 该令牌可能会刷新,因此我们需要进行持续监视。 刷新令牌后,我们将在onNewToken方法中获得一个回调。
override fun onNewToken(token: String) {
Log.d(TAG, "Refreshed token: $token")
// If required send token to your app server.
sendRegistrationToServer(token)
}
自定义通知处理 (Custom notification handling)
Create a class with the name FcmMessageService. This class would be responsible for handling incoming notifications and their redirections. This class would look like something below
创建一个名为FcmMessageService的类。 此类将负责处理传入的通知及其重定向。 这个课看起来像下面的东西
package com.example.viewmodel
import android.app.NotificationChannel
import android.app.NotificationManager
import android.app.PendingIntent
import android.content.Context
import android.content.Intent
import android.media.RingtoneManager
import android.os.Build
import android.os.Bundle
import android.util.Log
import androidx.core.app.NotificationCompat
import com.google.firebase.messaging.FirebaseMessagingService
import com.google.firebase.messaging.RemoteMessage
class FcmMessageService : FirebaseMessagingService() {
override fun onNewToken(token: String) {
Log.d(TAG, "Refreshed token: $token")
// If required send token to your app server.
sendRegistrationToServer(token)
}
/**
* Called when message is received.
*
* @param remoteMessage Object representing the message received from Firebase Cloud Messaging.
*/
override fun onMessageReceived(remoteMessage: RemoteMessage) {
super.onMessageReceived(remoteMessage)
Log.d(TAG, "From: ${remoteMessage.from}")
//Use this condition to validation login
if (checkLoginNeeded()) {
return
} else if (remoteMessage.data.isNotEmpty()){
val extras = Bundle()
for ((key, value) in remoteMessage.data) {
extras.putString(key, value)
}
if(extras.containsKey("message") && !extras.getString("message").isNullOrBlank()) {
sendNotification(extras.getString("message")!!)
}
}
}
/**
* Create and show a simple notification containing the received FCM message.
*
* @param messageBody FCM message body received.
*/
private fun sendNotification(messageBody: String) {
val intent = Intent(this, MainActivity::class.java)
intent.addFlags(Intent.FLAG_ACTIVITY_CLEAR_TOP)
val pendingIntent = PendingIntent.getActivity(this, 0 /* Request code */, intent,
PendingIntent.FLAG_ONE_SHOT)
val defaultSoundUri = RingtoneManager.getDefaultUri(RingtoneManager.TYPE_NOTIFICATION)
var notificationBuilder: NotificationCompat.Builder? = null
val notificationManager = getSystemService(Context.NOTIFICATION_SERVICE) as NotificationManager
if (Build.VERSION.SDK_INT >= Build.VERSION_CODES.O) {
val channel = NotificationChannel(
packageName,
packageName,
NotificationManager.IMPORTANCE_DEFAULT
)
channel.description = packageName
notificationManager.createNotificationChannel(channel)
if (notificationBuilder == null) {
notificationBuilder = NotificationCompat.Builder(application, packageName)
}
} else {
if (notificationBuilder == null) {
notificationBuilder = NotificationCompat.Builder(application,packageName)
}
}
notificationBuilder.setSmallIcon(R.mipmap.ic_launcher)
.setContentTitle(getString(R.string.app_name))
.setContentText(messageBody)
.setAutoCancel(true)
.setSound(defaultSoundUri)
.setContentIntent(pendingIntent)
notificationManager.notify(0 /* ID of notification */, notificationBuilder.build())
}
companion object {
private const val TAG = "FcmMessageService"
}
}
It contains mainly four important sections:
它主要包含四个重要部分:
Create a class FcmMessageService and extend it with FirebaseMessagingService
创建一个FcmMessageService类,并使用FirebaseMessagingService对其进行扩展
onMessageReceived is the method that is called when a message is received. It has one param remoteMessage Object representing the message received from Firebase Cloud Messaging. So, override this method into the class created in the above step
onMessageReceived是消息时调用的方法 收到。 它具有一个参数remoteMessage 对象,代表从Firebase Cloud Messaging接收的消息。 因此,将此方法覆盖到上述步骤中创建的类中
Break the remote message object into Bundle
将远程消息对象拆分为Bundle
if (remoteMessage.data.isNotEmpty()){
val extras = Bundle()
for ((key, value) in remoteMessage.data) {
extras.putString(key, value)
}
if(extras.containsKey("message") && !extras.getString("message").isNullOrBlank()) {
sendNotification(extras.getString("message")!!)
}
}
sendNotification is the method used to generate & handle notifications.
sendNotification是用于生成和处理通知的方法。
As we are done with the complete setup, it’s time now to test the implementation. To test this run the app on a device and move to the next step.
完成完整的设置后,现在该测试实现了。 要对此进行测试,请在设备上运行该应用,然后转到下一步。
从Firebase控制台向客户端发送消息 (Sending messages to clients from Firebase console)
Navigate to Firebase Console then select or open the project which you had created initially then on left-hand side menu under the Grow option click on Cloud Messaging
导航到Firebase控制台,然后选择或打开您最初创建的项目,然后在左侧菜单中的“增长”选项下,单击“云消息”

Next, select the option to send your first message then it displays a form of fields where most of them are optional. On the right-hand side, you will find an option to send test notifications you can use that even.
接下来,选择发送第一条消息的选项,然后显示一种字段形式,其中大多数是可选的。 在右侧,您可以找到一个发送测试通知的选项,甚至可以使用它。

After you are done click on Review and publish your changes Then you will receive a notification inside the app.
完成后,单击“查看”并发布更改,然后您将在应用程序内收到通知。
While filling the form to send data in the final step of additional options add key/value pairs that you can handle in the app as per your requirement.
在其他选项的最后一步中填写表格以发送数据时,添加可以根据需要在应用程序中处理的键/值对。
There are a lot more options at firebase cloud messaging where we can use them to interact with our users depending on different use-cases so please explore more about FCM on firebase docs.
firebase云消息传递中有很多选项,我们可以根据不同的使用情况使用它们与我们的用户进行交互,因此请在firebase docs上探索有关FCM的更多信息。
奖金 (Bonus)
To learn more about Firebase tips & new features, read the following articles
要了解有关Firebase提示和新功能的更多信息,请阅读以下文章
翻译自: https://medium.com/android-dev-hacks/firebase-cloud-messaging-772c9680c97e
firebase 云推送