


自定义标签 css 定义
Chrome Custom Tabs are a beautiful and convenient thing that allow you to bring all the benefits of a high performing internet browser to the confines of your mobile application with no overhead. Rather then send your users to a third party application to view web content, you can have an elegant browser running in your app with only a few lines of code. Check out my other articles on implementing and using these bad boys:
Chrome自定义标签是一种美观,方便的工具,可让您将高性能互联网浏览器的所有优势带到您的移动应用程序范围内,而不会产生任何开销。 与其将用户发送到第三方应用程序以查看Web内容,不如让您的应用程序运行优雅的浏览器,而只需几行代码。 查看我有关实现和使用这些坏男孩的其他文章:
While there is plenty of documentation on customizing the appearance and behavior of the top toolbar in Custom Tabs, the bottom toolbar has been neglected by the internet community. In this article, I’ll attempt to change that.
尽管在“自定义选项卡”中有大量关于自定义顶部工具栏的外观和行为的文档,但Internet社区已忽略了底部工具栏。 在本文中,我将尝试进行更改。
底部工具栏在哪里? (Where is the Bottom Toolbar?)
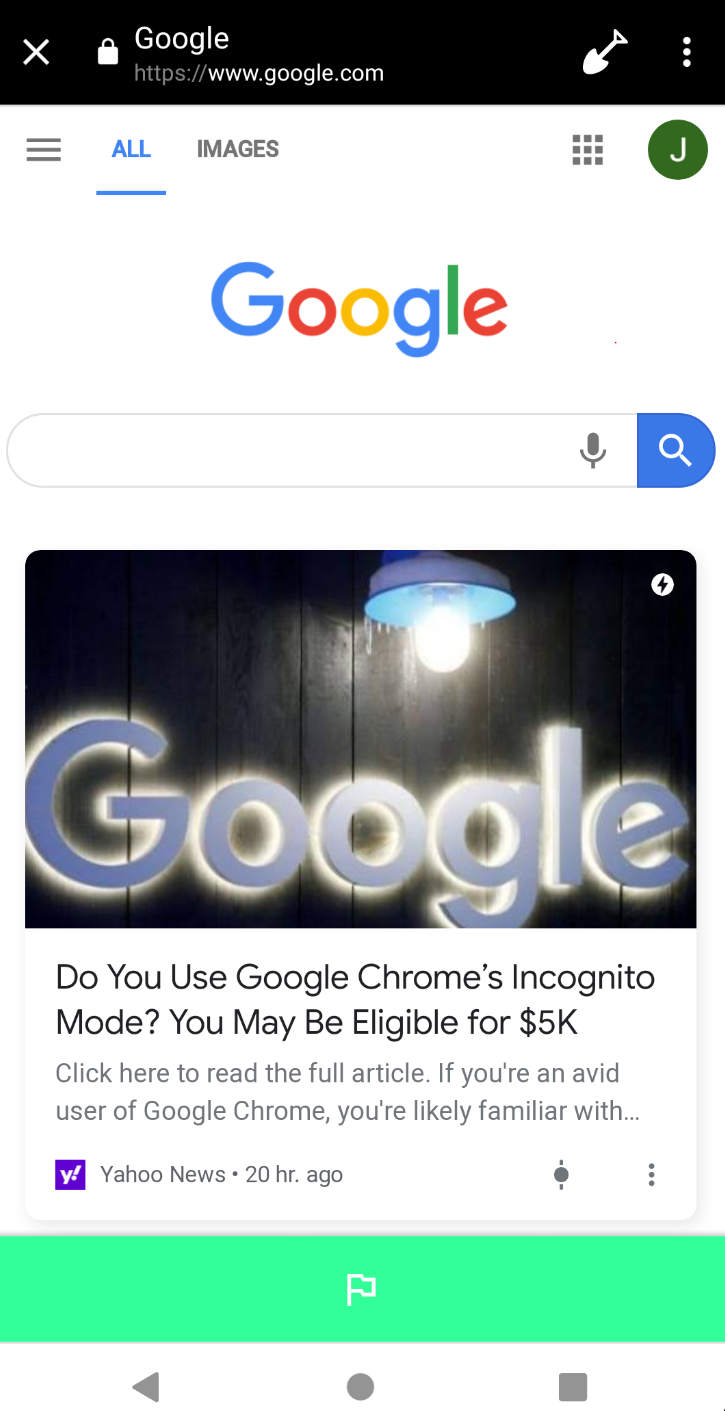
If you launch Custom Tabs without making any changes to its appearance, the only toolbar you’ll see is the top one. If you go one step further and add an action button to the toolbar, you’ll see that action appear in the upper right corner but there still won’t be a bottom toolbar.
如果您启动“自定义标签”而未对其外观进行任何更改,则唯一会看到的工具栏是顶部的工具栏。 如果再进一步一步,然后在工具栏上添加一个动作按钮 ,您会看到该动作出现在右上角,但是仍然不会有一个底部工具栏。
Go ahead, add another action button. Maybe that will overflow into the bottom toolbar and -
继续,添加另一个操作按钮。 也许这会溢出到底部的工具栏中,并且-
WRONG!
错误!
The upper toolbar can only have a single custom action button and adding another will simply overwrite the original. This doesn’t mean you can’t add multiple custom actions to the top part of the Custom Tab interface, though. You are free to add up to five menu items to the the “more” menu using the Builder.addMenuItem() method.
上方的工具栏只能有一个自定义操作按钮,添加另一个按钮只会覆盖原始按钮。 不过,这并不意味着您不能将多个自定义操作添加到“自定义标签”界面的顶部。 您可以使用Builder.addMenuItem()方法随意将最多五个菜单项添加到“更多”菜单 。
旧方法 (The Old Way)
The original way to add actions to the bottom toolbar was to use the Builder.addToolbarItem() method, but this method has since been deprecated. This method takes four arguments:
向底部工具栏添加动作的原始方法是使用Builder.addToolbarItem()方法,但是此方法已被弃用。 此方法有四个参数:
ID: A unique Int identifying this action
ID :标识此操作的唯一Int
Icon: A 24dp x 24dp bitmap that will be displayed on the toolbar
图标 :将在工具栏上显示的24dp x 24dp位图
Description: A String that will be used for accessibility purposes
描述 :将用于可访问性目的的字符串
PendingIntent: A PendingIntent that will be triggered when the action button is pressed
PendingIntent :按下操作按钮时将触发的PendingIntent
A simple implementation would look like this:
一个简单的实现如下所示:
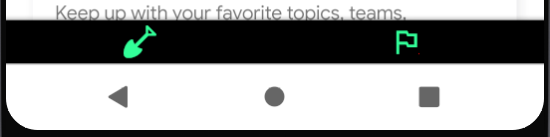
And the result:
结果:
额外细节 (Additional Details)
The bottom toolbar color in Custom Tabs can be set using the Builder.setSecondaryToolbarColor() method
可以使用Builder.setSecondaryToolbarColor()方法设置“定制选项卡”中底部工具栏的颜色。
- Y̶o̶u̶ ̶c̶a̶n̶ ̶a̶d̶d̶ ̶u̶p̶ ̶t̶o̶ ̶5̶ ̶a̶c̶t̶i̶o̶n̶ ̶b̶u̶t̶t̶o̶n̶s̶,̶ ̶w̶h̶i̶c̶h̶ ̶s̶h̶o̶u̶l̶d̶ ̶b̶e̶ ̶p̶l̶e̶n̶t̶y̶ **EDIT** This method will now only support one functional button. You can add more but they will all do the same thing. **EDIT** Y̶o̶u̶̶c̶a̶n̶̶a̶d̶d̶̶u̶p̶̶t̶o̶̶5̶̶a̶c̶t̶i̶o̶n̶̶b̶u̶t̶t̶o̶n̶s̶,̶̶w̶h̶i̶c̶h̶t̶̶s̶h̶o̶u̶l̶d̶EDITEDIT 您可以添加更多,但它们都将执行相同的操作。 **编辑**
- Action buttons will appear in the order that you add them 操作按钮将按照您添加按钮的顺序显示
The bottom toolbar will behave the same as the top toolbar on scroll. You can disable hiding like this:
底部工具栏的行为与滚动时顶部工具栏的行为相同。 您可以像这样禁用隐藏:
customTabsIntent.intent.putExtra(CustomTabsIntent.EXTRA_ENABLE_URLBAR_HIDING, false)新方法 (The New Way)
Yeah, yeah, yeah, I know. As easy as the old method is, we shouldn’t use it because it’s no longer supported. We’ll have to learn something new and more complicated…ugh.
是的,是的,我知道。 与旧方法一样简单,我们不应该使用它,因为它不再受支持。 我们必须学习一些新的和更复杂的东西……嗯。
It’s not all bad, though. Google has an example that we can use to jump start our experimentation and the new method of using RemoteViews has more benefits:
不过,这还不是全部。 Google提供了一个示例 ,我们可以使用它来开始我们的实验,而使用RemoteViews的新方法具有更多好处:
- More control over the appearance of the bottom bar 更好地控制底部栏的外观
- The ability to have unlimited action “buttons”. Every view in your RemoteViews layout can potentially trigger another action 具有无限操作“按钮”的能力。 RemoteViews布局中的每个视图都可能触发其他操作
- Real-time bottom bar updates (change colors and icons to make the interface more intuitive) 实时底部栏更新(更改颜色和图标以使界面更直观)
I won’t lie — the new method is appreciably more complicated and it took me a few hours to work out the kinks in my example. In the end however, the added effort was definitely worth it.
我不会撒谎-新方法显然要复杂得多,在我的示例中,我花了几个小时才能弄清楚这些问题。 最后,付出额外的努力绝对是值得的。
建立 (Setup)
You can check out my original post on Custom Tabs for info on how to get them setup with a navigation callback but for now I’m just going to give you the code.
您可以在“自定义选项卡 ”上查看我的原始帖子,以获取有关如何使用导航回调设置它们的信息,但现在,我仅向您提供代码。
Dependencies
依存关系
implementation ‘androidx.browser:browser:1.2.0’Fragment code
片段代码
BroadcastReceiver
广播接收器
Manifest File
清单文件
<application>
 <receiver
 android:name=”.ui.dig.DigBroadcastReceiver”
 android:enabled=”true” />
</application>
掌握底部工具栏 (Mastering the Bottom Toolbar)
With the above setup in place, you should be all caught up and everything from here on out will be new.
完成上述设置后,您应该全神贯注,从现在开始的所有事情都是新的。
Create the Bottom Toolbar Layout
创建底部工具栏布局
Through the use of RemoteViews, the Bottom Toolbar can look almost anyway you want it to. The limitation is that it only works with a finite number of layouts (LinearLayouts being the one I’ll focus on). You can create any layout you want but mine looks like this:
通过使用RemoteView,“底部工具栏”几乎可以按照您希望的方式显示。 局限性在于它仅适用于有限数量的布局 (LinearLayouts是我将重点关注的布局 )。 您可以创建所需的任何布局,但我的布局如下所示:
<?xml version="1.0" encoding="utf-8"?>
<LinearLayout xmlns:android="http://schemas.android.com/apk/res/android"
    android:layout_width="match_parent"
    android:layout_height="wrap_content"
    android:background="@color/black"
    android:gravity="center"
    android:orientation="horizontal">


    <LinearLayout
        android:id="@+id/dig_layout"
        android:layout_width="match_parent"
        android:layout_height="match_parent"
        android:layout_weight="1"
        android:gravity="center"
        android:orientation="horizontal">


        <android.widget.ImageView
            android:id="@+id/dig_action"
            android:layout_width="24dp"
            android:layout_height="24dp"
            android:layout_margin="4dp"
            android:scaleType="centerCrop"
            android:src="@drawable/ic_shovel"
            android:tint="@color/colorAccent" />
    </LinearLayout>


    <LinearLayout
        android:id="@+id/flag_layout"
        android:layout_width="match_parent"
        android:layout_height="match_parent"
        android:layout_weight="1"
        android:gravity="center"
        android:orientation="horizontal">


        <android.widget.ImageView
            android:id="@+id/flag_action"
            android:layout_width="24dp"
            android:layout_height="24dp"
            android:layout_marginStart="4dp"
            android:layout_marginTop="4dp"
            android:layout_marginEnd="8dp"
            android:layout_marginBottom="4dp"
            android:src="@drawable/flag_action"
            android:tint="@color/colorAccent" />
    </LinearLayout>


</LinearLayout>
Create a Companion Object inside your BroadcastReceiver
在BroadcastReceiver中创建一个伴侣对象
companion object {
            /**
             * Creates a RemoteViews that will be shown as the bottom bar of the custom tab.
             * @return The created RemoteViews instance.
             */
            fun createRemoteViews(
                context: Context,
                digAdded: Boolean,
                flagAdded: Boolean
            ): RemoteViews {
                val remoteViews = RemoteViews(context.packageName, R.layout.dig_bottom_bar)
                val digIcon: Int = if (digAdded) R.drawable.flag_action else R.drawable.dig_action
                remoteViews.setImageViewResource(R.id.dig_action, digIcon)
                val flagIcon: Int = if (flagAdded) R.drawable.dig_action else R.drawable.flag_action
                remoteViews.setImageViewResource(R.id.flag_action, flagIcon)
                return remoteViews
            }


            val clickableIDs = intArrayOf(R.id.dig_layout, R.id.flag_layout)


            /**
             * @return The PendingIntent that will be triggered when the user clicks on the Views listed by
             */


            fun getPendingIntent(context: Context): PendingIntent {
                val digIntent = Intent(context, DigBroadcastReceiver()::class.java)
                return PendingIntent.getBroadcast(context, 0, digIntent, PendingIntent.FLAG_UPDATE_CURRENT)
            }
        }
You can find more background on Companion Objects here, but for now all you need to know is that functions and properties in a companion object are tied to the class and NOT an instance of the object. This means that processes outside of the class can access the things inside the companion object.
您可以在此处找到有关Companion Objects的更多背景,但是现在您只需要知道伴随对象中的函数和属性是与该类相关联的,而不是该对象的实例。 这意味着类外部的进程可以访问伴随对象内部的事物。
This companion object specifically is responsible for creating and “updating” the RemoteViews object that will represent the bottom toolbar. I put “updating” in quotes because it isn’t exactly updating the view as much as it is recreating the view based on different inputs.
该随行对象专门负责创建和“更新”将代表底部工具栏的RemoteViews对象。 我将“更新”用引号引起来,因为它没有完全更新视图,而没有根据不同的输入重新创建视图。
This companion object is also responsible for creating a PendingIntent that will trigger the broadcast. In other words, it has a method that calls it’s parent object.
此伴随对象还负责创建将触发广播的PendingIntent。 换句话说,它有一个调用其父对象的方法。
Create a prepareBottomBar() funtion
创建一个prepareBottomBar()函数
fun prepareBottombar(builder: CustomTabsIntent.Builder) {
    builder.setSecondaryToolbarViews(
        DigBroadcastReceiver.createRemoteViews(main, false, false),
        DigBroadcastReceiver.clickableIDs,
        DigBroadcastReceiver.getPendingIntent(main)
    )
}
The code above should go in the host fragment. This function actually adds the bottom toolbar/RemoteViews to the CustomTabsIntent.Builder. Once it’s created, you should then call it at the end of your onCreate() method.
上面的代码应该放在主机片段中。 此函数实际上将底部工具栏/ RemoteViews添加到CustomTabsIntent.Builder。 创建之后,您应该在onCreate()方法的末尾调用它。
prepareBottomBar(builder)Create a SessionHelper Class
创建一个SessionHelper类
object SessionHelper {
    private var sCurrentSession: WeakReference<CustomTabsSession>? = null


    /**
     * @return The current [CustomTabsSession] object.
     */
    @get:Nullable
    val getCurrentSession: CustomTabsSession?
        get() = if (sCurrentSession == null) null else sCurrentSession!!.get()


    /**
     * Sets the current session to the given one.
     * @param session The current session.
     */
    fun setCurrentSession(session: CustomTabsSession?) {
        if(session != null) {
            sCurrentSession = WeakReference(session)
        }
    }
}
This object helps you keep track of your session so that you can update the bottom bar. The CustomTabsSession class has a setSecondaryToolbarView() method, as well as a couple others (setActionButton and setToolbarItem) so you can make changes on the fly.
此对象可帮助您跟踪会话,以便可以更新底部栏。 CustomTabsSession类具有setSecondaryToolbarView()方法以及其他几个方法(setActionButton和setToolbarItem),因此您可以随时进行更改。
Create a getDigSession() function
创建一个getDigSession()函数
fun getDigSession(): CustomTabsSession? {
    if (client == null) {
        session = null
    } else if (session == null) {
        session = client.newSession(RabbitCallback())
        setCurrentSession(session)
    }
    return session
}
This function creates a new session if we don’t already have one and puts it in the SessionHelper so we can access it later.
如果我们还没有一个新的会话,该函数将创建一个新会话并将其放入SessionHelper中,以便我们以后可以访问它。
Call the getDigSession()
调用getDigSession()
session = getDigSession()When the CustomTabsServiceConnection connects, call the new function to save off the session.
当CustomTabsServiceConnection连接时,调用新函数以保存会话。
Handle the Intent
处理意图
At this point, you’re basically done. All you have to do now is handle the intent that gets sent off when a view in the bottom toolbar is clicked. The intent will automatically contain the clicked view ID in the CustomTabsIntent.EXTRA_REMOTEVIEWS_CLICKED_ID extra. My onReceive() method in my BroadcastReceiver looks something like this.
至此,您已经基本完成。 现在,您要做的就是处理单击底部工具栏中的视图时发送的意图。 该意图将自动在CustomTabsIntent.EXTRA_REMOTEVIEWS_CLICKED_ID中包含点击的视图ID。 我的BroadcastReceiver中的onReceive()方法看起来像这样。
override fun onReceive(context: Context, intent: Intent) {
            val uri: Uri? = intent.data


            // Bottom bar
            val clickedID = intent.extras?.getInt(CustomTabsIntent.EXTRA_REMOTEVIEWS_CLICKED_ID)
            val digLinks = main.tunnelViewModel.digLinks
            val flagLinks = main.tunnelViewModel.flagLinks
            val salientLinks = main.tunnelViewModel.salientLinks
            val link = uri.toString()
            var add = false // Was the link digged or flagged
            var flag = false // Was the link flagged
            var dig = false // Was the link added as a dig


            if (uri != null) {
                if (clickedID == R.id.dig_layout) {
                    main.utilities.genericToast(link)


                    // If we haven't already added this link
                    if (!digLinks.contains(link)) {
                        digLinks.add(link) // Add the flagged link to the dig links list
                        main.tunnelViewModel.digLinks = digLinks
                        main.utilities.genericToast("Link added!", R.color.colorAccent)
                        add = true
                        dig = true
                    } else {
                        digLinks.remove(link)
                        main.tunnelViewModel.digLinks = digLinks
                        main.utilities.genericToast("Link Removed!", R.color.red)
                        add = false
                        dig = false
                    }
                } else if (clickedID == R.id.flag_layout) {
                    if (!flagLinks.contains(link)) {
                        flagLinks.add(link)
                        main.tunnelViewModel.flagLinks = flagLinks
                        main.utilities.genericToast("Link flagged!", R.color.colorAccent)
                        add = true
                        flag = true
                    } else {
                        flagLinks.remove(link)
                        main.tunnelViewModel.flagLinks = flagLinks
                        main.utilities.genericToast("Link unflagged!", R.color.red)
                        add = false
                        flag = false
                    }
                }
                // Update salient links
                if (add && !salientLinks.contains(link)) {
                    salientLinks.add(link)
                }
                if (!add && salientLinks.contains(link)) {
                    salientLinks.remove(link)
                }
                main.tunnelViewModel.salientLinks = salientLinks


            } else {
                Log.d("Broadcast URL", "empty")
            }
            val session: CustomTabsSession = SessionHelper.getCurrentSession ?: return
            session.setSecondaryToolbarViews(
                createRemoteViews(context, dig, flag),
                clickableIDs,
                getPendingIntent(context)
            )


        }
You won’t have all of the same variables as me but the main point is that you can extract the clicked view ID and take different actions based on what was clicked. Make sure that all views you want to be clickable are included in the clickableIDs property of the companion object you created! At the end of the onReceive() method, you should reset the toolbar views using the session from the session helper if you want to make updates to the view.
您将不会拥有与我相同的所有变量,但要点是,您可以提取单击的视图ID,并根据单击的内容采取不同的操作。 确保您要单击的所有视图都包含在您创建的伴随对象的clickableIDs属性中 ! 在onReceive()方法末尾,如果要更新视图,则应使用会话帮助器中的会话来重置工具栏视图。
结论 (In Conclusion)
I know it looks like a lot but if you practice setting it up and customizing it a few times you’ll have it down pat. The RemoteViews method of implementing the bottom toolbar gives the developer a lot more flexibility over their interface so it’s worth the extra lines of code.
我知道它看起来很多,但是如果您练习设置和自定义它几次,就会被淘汰。 实现底部工具栏的RemoteViews方法为开发人员提供了更大的界面灵活性,因此值得多花一些代码。
I’ll be adding additional information to this post as I discover it but otherwise happy coding!
当我发现它时,我将在此帖子中添加其他信息,但否则会高兴!
And check out my app-in-progress Rabbit Hole on Google Play!
并在Google Play上查看我正在进行的应用“ 兔子洞 ”!
翻译自: https://medium.com/swlh/a-custom-tabs-side-story-35f7b04bc259
自定义标签 css 定义


 217
217


 被折叠的 条评论
为什么被折叠?
被折叠的 条评论
为什么被折叠?
 到【灌水乐园】发言


