


One of the key parts of the modern single page application (SPA) is routing; determining what should show when a user visits a certain page in the application.
路由是现代单页应用程序(SPA)的关键部分之一。 确定当用户访问应用程序中的特定页面时应显示什么。
Single page applications are what their name suggests, just a single page that actually looks and feels like multiple pages due to being built up of various components that render like separate pages. The routing in these single page applications is the process and declaration of what specific components or pages the application should render based on the URL, or route.
单页的应用程序是什么顾名思义,只是一个单一的页面,实际上看起来像和多页的感觉,由于正在修建用于呈现像单独的页面各种组件组成。 这些单页应用程序中的路由是基于URL或route的应用程序应呈现哪些特定组件或页面的过程和声明。
Routing is a great way to ensure that your application remains clean, scalable and maintainable. In addition to this, it provides us with the ability to navigate through the application without the need to refresh the page, and therefore removes the “blank page flash” that we get when we move from page to page as the screen refreshes; ultimately offering an enhanced user experience as the application feels smoother, faster and more pleasant to use.
路由是确保您的应用程序保持干净,可伸缩和可维护的好方法。 除此之外,它还提供了浏览应用程序的能力,而无需刷新页面,因此消除了在屏幕刷新时从一个页面移到另一个页面时获得的“空白页面闪烁”。 最终提供增强的用户体验,因为应用程序使用起来感觉更流畅,更快,更愉快。
In this tutorial I’ll be introducing the basics to routing in React.js, and how we can implement React Router to render specific components when we’re on a specific route in the application.
在本教程中,我将介绍React.js中路由的基础知识,以及如何实现React Router。 当我们在应用程序中的特定路径上时呈现特定的组件。
安装与设置 (Installation & Setup)
We’ll be using create-react-app to create our project, so go ahead and install create-react-app globally.
我们将使用create-react-app创建我们的项目,因此请继续在全球范围内安装create-react-app。
If you’re using NPM:
如果您使用的是NPM:
npm install -g create-react-appOr if you’re using yarn:
或者,如果您使用的是毛线:
yarn add react-router-domThen go ahead and run create-react-app, with the name of your project:
然后继续运行带有项目名称的create-react-app :
npx create-react-app react-routing-demoThen navigate into the application’s directory:
然后导航到应用程序的目录:
cd react-routing-demoThen we’ll need to install React Router for Web Applications:
然后,我们需要为Web应用程序安装React Router :
npm install react-router-domNote: the alternative to installing React Router for Web Applications here would be react-router-native, which would be for React Native applications.
注意:在此处为Web应用程序安装React Router的替代方法是react-router-native ,即 用于React Native应用程序。
我们要建造什么? (What are we going to build?)
What we’re going to be doing for this demo is creating a simple 4 page application (which is actually a SINGLE page application?!) that we can navigate around, the 4 pages will be:
我们将为此演示做的是创建一个简单的4页应用程序(实际上是单页应用程序!! ),我们可以在其中浏览,这4页将是:
Homepage (/)
主页(/)
Feed Page (/feed)
供稿页(/供稿)
Profile Page (/profile)
个人资料页面(/个人资料)
Profile Detail Page (/profile/:username)
个人资料详细信息页面(/个人资料/:用户名)
Each page will just be a simple React component that shows the title of the page, i.e “Feed Page!”, to prove that we’re rendering different components based on the route.
每个页面将只是一个显示页面标题的简单React组件,即“ Feed Page!”,以证明我们根据路线渲染了不同的组件。
In addition to this, the Profile Detail Page will show the username we entered in the URL, so for example if I navigate to /profile/andrew I would expect to see “Profile Page for andrew!”. I’ve included this in our tutorial as it will show us how to pull specific parameters from the URL as well as shed some light on a common issue people encounter when using React Router: partial matching (more on why we’re doing this later).
除此之外,“个人资料详细信息页面”还将显示我们在URL中输入的用户名,因此例如,如果我导航到/ profile / andrew,我希望看到“ Andrew的个人资料页面!”。 。 我已将其包含在我们的教程中,因为它将向我们展示如何从URL中提取特定参数,以及向人们展示人们在使用React Router时遇到的一个常见问题:部分匹配(更多有关我们稍后为什么要这样做的信息) )。
Then finally within the application we will add links that can take us to each of the pages, these links will remain static, regardless of what route we’re on (similar to a navigation bar in a typical web application).
然后,最后在应用程序中,我们将添加可以带我们进入每个页面的链接,这些链接将保持静态,而不管我们走的是哪种路线(类似于典型的Web应用程序中的导航栏)。
You’ll see the key benefit of React Router here, where the URL is kept up to date as we navigate around the application; ultimately preserving the browser history which in turns enabled the back button functions as expected.
您将在此处看到React Router的主要好处,即在我们浏览应用程序时URL保持最新。 最终保留了浏览器的历史记录,这反过来又使后退按钮发挥了预期的作用。
创建我们的组件 (Creating our Components)
First we’ll go ahead and create the 4 components that we’re going to show on each page, in a real-world scenario these may actually be called views or pages, which in turn would contain components inside them. But for the purpose of this tutorial we’ll just show the components.
首先,我们将继续创建要在每个页面上显示的4个组件,在实际场景中,这些组件实际上可以称为视图或页面,而这些视图或页面又将在其中包含组件。 但出于本教程的目的,我们将仅显示组件。
The first step is create a /components folder inside the /src folder that create-react-app has made for us.
第一步是在/ src文件夹中创建一个/ components文件夹 create-react-app为我们带来了成功。
Then inside the /components folder we’ll create our first component, the feed page. So create a Feed.js file with the following in:
然后,在/ components文件夹中,我们将创建第一个组件,即feed页面。 因此,使用以下内容创建一个Feed.js文件:
And then similarly for the ProfilePage component create a ProfilePage.js file in the same /components folder too:
然后类似地为ProfilePage组件创建一个ProfilePage.js文件 在相同的/ components文件夹中:
Next, we’ll create our Profile Detail Page:
接下来,我们将创建“个人资料详细信息”页面:
You’ll see in this component here that we’ve got some additional code compared to the other components:
您将在此组件中看到,与其他组件相比,我们还有一些其他代码:
const { username } = useParams();We’ve got this line in as we want to use the parameters of the URL to retrieve the username of the user whose profile we’re viewing when we’re on our route /profile/:username, i.e /profile/dan should pull the username “dan” from the URL and show “Profile Page for dan!”.
我们有作为,我们要使用的URL的参数检索其个人资料,我们正在查看当我们在我们的路线/资料/用户的用户名这一行:用户名,即/型材/担应该拉URL中的用户名“ dan”,并显示“ dan!的个人资料页面”。
This line uses object destructuring (possibly my FAVOURITE addition from ES6!) to pull the username variable from the URL. You’ll also notice that we’ve imported the useParams() method from react-router so we can access it. This gives us the username variable to use in our component.
该行使用对象解构(可能是我从ES6中添加的最爱!)从URL中提取用户名变量。 您还将注意到,我们已经从react-router导入了useParams()方法,因此我们可以对其进行访问。 这为我们提供了要在组件中使用的用户名变量。
Finally, create a HomePage.js component with the following:
最后,使用以下命令创建一个HomePage.js组件:
Now we’ve got our components that we want to conditionally render based on the route.
现在,我们有了要根据路线有条件渲染的组件。
创建我们的交换机和路由 (Creating our Switch & Routes)
Next, what we want to do is import React Router into our App.js file, so add the following to the top of the App.js file.
接下来,我们要做的是将React Router导入到我们的App.js文件中,因此将以下内容添加到App.js文件的顶部。
import {
  BrowserRouter as Router,
  Switch,
  Route,
  Link
} from "react-router-dom";
You’ll note that in the React Router API the router is actually called BrowserRouter, but you may prefer to use the “as” keyword to create an alias called Router (which is much more clear and apparent as to what it does).
您会注意到,在React Router API中,该路由器实际上称为BrowserRouter ,但是您可能更喜欢使用“ as”关键字来创建一个称为Router的别名(它的作用更加清楚明了)。
Next, we want to be setting up our main App component to handle the conditional Switching of the components around, based on our route, or URL. So for this we use React Router’s <Switch></Switch> component, which will allow us to conditionally render certain components based upon our route. The Switch works by going through all its children and rendering the first Route whose path matches the current URL of the application.
接下来,我们要设置我们的主要App组件,以根据我们的路线或URL处理这些组件的有条件切换。 因此,为此,我们使用React Router的<Switch> </ Switch>组件,这将使我们能够根据路线有条件地渲染某些组件。 交换机通过遍历其所有子级并呈现其路径与应用程序的当前URL匹配的第一个Route来工作。
First, import your HomePage, ProfilePage, ProfileDetailPage and FeedPage components that we created into the top of the App.js file:
首先,将您创建的HomePage , ProfilePage,ProfileDetailPage和FeedPage组件导入App.js文件的顶部:
import { HomePage } from './components/FeedPage';
import { ProfilePage } from './components/ProfilePage';
import { ProfileDetailPage } from './components/ProfileDetailPage';
import { FeedPage } from './components/FeedPage';
Next delete everything inside the default App function that create-react-app makes us (typically the React logo and some text), and then add the <Router></Router> tag and <Switch></Switch> tags as follows:
接下来,删除create-react-app让我们使用的默认App函数中的所有内容(通常是React徽标和一些文本),然后添加<Router> </ Router>标记和<Switch> </ Switch>标记,如下所示:
This essentially specifies that we’ve got a Router in our application, and it means that we’ve also got our Switch set up ready to add in our Route conditionals.
这实际上表明我们在应用程序中有一个路由器,这意味着我们还准备好设置交换机以添加到我们的Route条件中。
To add conditional routes based on the URL into the Switch, we use React Router’s <Route></Route> tag in the following way:
要将基于URL的条件路由添加到Switch中,我们通过以下方式使用React Router的<Route> </ Route>标记:
<Route path="/my-path" component={MyComponent} />So to explain the above, we specify our URL that we want to match (in this case /my-path), and then we specify what component we want to show when the user is on that URL by passing in the desired component as a prop (in this case MyComponent).
所以要解释一下上面,我们指定的网址,我们要匹配(在这种情况下,/我的路径),然后我们指定什么成分,我们要显示当用户访问的URL通过传递所需的组件作为prop(在本例中为MyComponent) 。
So let’s add in all of our <Route></Route> tags for our HomePage, ProfilePage, ProfileDetailPage and FeedPage components:
因此,让我们为HomePage,ProfilePage,ProfileDetailPage和FeedPage组件添加所有<Route> </ Route>标记:
You’ll notice that in the above Routes, there are two routes that have the parameter exact added. Earlier I mentioned partial matching, and that it’s an important concept to understand in React Routing as it can result in issues where incorrect components are rendered for a given route.
您会注意到,在上述Routes中,有两个路由的参数精确添加。 之前我提到了部分匹配,这是在React Routing中理解的重要概念,因为它可能会导致给定路线呈现不正确组件的问题。
When React Router looks to match the route to correctly show the correct component in the Switch, it does partial matching and returns the first match it finds.
当React Router希望匹配路由以正确显示Switch中的正确组件时,它将进行部分匹配并返回找到的第一个匹配项。
Partial matching is exactly what it sounds like. As the URL /profile partially matches /profile/:username (as both include “/profile” in the URL) and /profile is BEFORE /profile/:username in the Switch (and the Switch always renders the FIRST match it encounters), if you navigated to /profile/:username it would incorrectly return the /profile route again. Adding the exact parameter disables this partial matching for the route its added to in order to make sure that it only returns the route if the path EXACTLY matches to current URL, in essence partial matching becomes exact matching.
完全匹配就是听起来的样子。 由于/ profile的URL部分匹配/ profile /:username (因为URL中都包含“ / profile” ) 和/ profile在Switch中/ profile /:username之前(并且Switch总是呈现它遇到的第一个匹配项),如果您导航到/ profile /:username 会错误地再次返回/配置文件路由。 添加精确参数将禁用对其添加到的路由的部分匹配,以确保仅在路径与当前URL完全匹配时才返回该路由,实质上,部分匹配成为精确匹配。
In our example, we’ve added exact to the homepage route as its route is “/” and all other routes in our application partially match “/” as they all begin with “/”. We’ve also added it to our /profile route as /profile partially matches /profile/:username.
在我们的示例中,我们为主页路由添加了精确的名称,因为它的路由是“ /”,而我们应用程序中的所有其他路由都部分匹配“ /”,因为它们都以“ /”开头。 我们还将它添加到了/ profile路由中,因为/ profile与/ profile /:username部分匹配。
To build on this with more example, the below URLs all partially match /feed:
为了以更多示例为基础,以下URL全部与/ feed部分匹配:
- /feed /饲料
- /feed/create/ feed /创建
- /feed/share/提要/分享
- /feed/share/article/ Feed /分享/文章
- /feed/share/article/2/ feed / share / article / 2
- /feed/share/:category/video/56 / feed / share /:category / video / 56
Unless we added exact ofcourse!
除非我们添加确切的课程!
添加我们的链接 (Adding our Links)
So now that we’ve got our conditionals set up to render the specific components that we want to show on certain routes, we need to actually add links that navigate around the application (and therefore change the route).
因此,现在我们已经设置了条件,以呈现要在某些路线上显示的特定组件,我们实际上需要添加在应用程序中导航的链接(并因此更改路线)。
For this we use React Router’s <Link></Link> tag:
为此,我们使用React Router的<Link> </ Link>标签:
<Link to="/my-path">To My Path!</Link>The above just adds link that takes us to the /my-path page. The use of the <Link></Link> tag acts as an anchor tag (<a></a>) but without the page refresh you get with anchor tags.
上面只是添加了将我们带到/ my-path页面的链接。 使用<Link> </ Link>标记用作锚定标记( <a> </a>),但是如果没有刷新页面,您将获得锚定标记。
So in the App.js file we need to add a <Link></Link> for all of our pages, making sure that they all appear inside of our Router tag:
因此,在App.js文件中,我们需要为所有页面添加<Link> </ Link> ,确保它们都出现在Router标记内:
For the purpose of this tutorial we’ve just hardcoded the username for the ProfileDetailPage to “andrew”.
就本教程而言,我们已经将ProfileDetailPage的用户名硬编码为“ andrew”。
So finally, your App.js should look like this:
所以最后,您的App.js应该如下所示:
Here we’ve got our main application, with a Router, which contains a series of Link that change the Route in our application. Then we’ve got a Switch, which tells React Router which components to show on which route.
在这里,我们有了我们的主要应用程序,即带有Router的Router ,其中包含一系列更改应用程序中Route的Link 。 然后,我们有了一个Switch ,它告诉React Router在哪个路由上显示哪些组件。
We’ve also used the exact parameters on a couple of our routes to disable the partial matching which would result in the application showing the incorrect components for the Homepage and ProfileDetailPage routes.
我们还在几个路由上使用了确切的参数来禁用部分匹配,这将导致应用程序显示Homepage和ProfileDetailPage路由的错误组件。
结果 (Result)
So now start up your application and head to the port on your localhost where the React application is running:
因此,现在启动您的应用程序并转到运行React应用程序的本地主机上的端口:
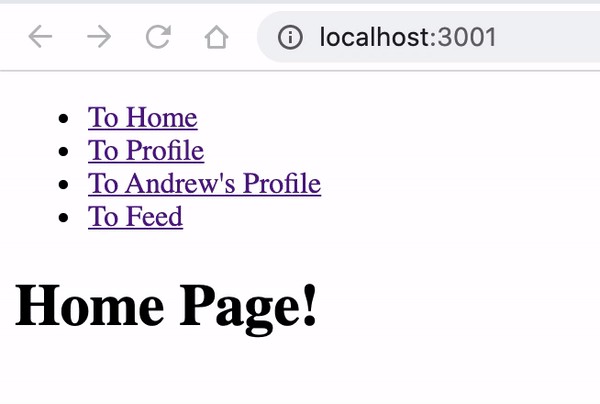
npm run startOnce it’s loaded up, you’ll initially see the following, as we’re on the homepage route (/):
加载完成后,您将首先看到以下内容,就像我们在首页路线(/)上一样:
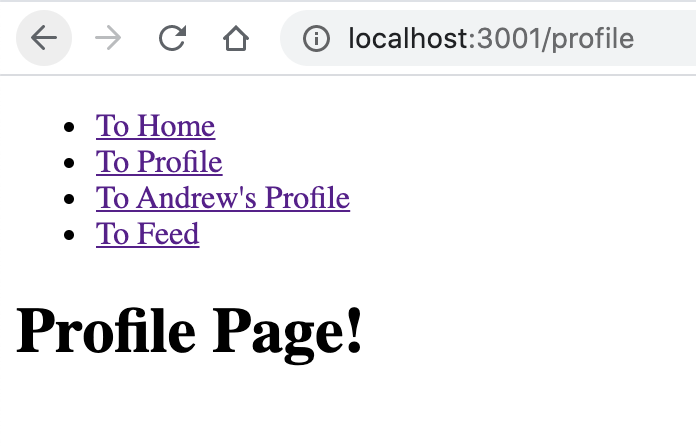
Then if you click the Profile link to take us to /profile we’ll see the URL change and we’ll also see our ProfilePage component displaying the “Profile Page!” text that we we added:
然后,如果您单击“个人资料”链接转到/ profile,我们将看到URL更改,并且还将看到我们的ProfilePage组件显示“个人资料页面!” 我们添加的文本:
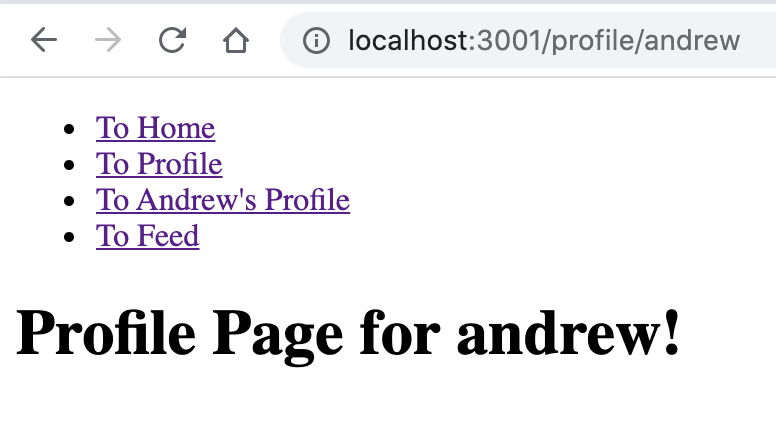
And when we visit “Andrew’s Profile”, it successfully pulls the username I added in our Link (/profile/andrew) and shows it:
当我们访问“ Andrew的个人资料”时,它成功提取了我在链接(/ profile / andrew)中添加的用户名,并显示了该用户名:
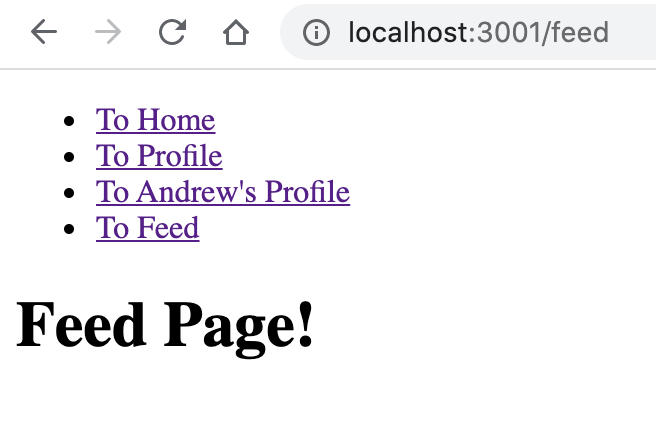
And the same for the FeedPage component we added in the Switch conditional for when the URL matches /feed.
对于URL与/ feed匹配的条件,我们在Switch中添加的FeedPage组件也是如此。
Here you’ll see that navigating through the links, and thus changing the URL is rendering the different page components as we specified in the Switch component in our main App component.
在这里,您将看到浏览链接并更改URL会呈现不同的页面组件,就像我们在主App组件的Switch组件中指定的那样。
We’ll also see that the navigation links remain in every view, this is because they are outside of the <Switch></Switch> tags, so therefore will render on every view, regardless of the result of the conditionals.
我们还将看到导航链接仍保留在每个视图中,这是因为它们位于<Switch> </ Switch>标记之外,因此将在每个视图上呈现,而不考虑条件查询的结果。
Overall, this is essentially a very simple way that we can implement routing into our React applications, it offers an enhanced way of introducing navigation into our single page applications without the need for page refreshes whilst simultaneously allowing us to keep our applications scalable and maintainable.
总的来说,这本质上是我们可以在React应用程序中实现路由的一种非常简单的方法,它提供了一种将导航引入单页应用程序的增强方法,而无需刷新页面,同时使我们能够保持应用程序的可伸缩性和可维护性。
For reference, the full code can be found on GitHub here, and if you want to see more of my content and work you can view my portfolio here.
作为参考,完整的代码可以在GitHub上找到,如果您想查看我的更多内容和工作,可以在这里查看我的投资组合。
Extra Tasks:
额外任务:
Try to implement a 404 page that shows when there are NO successful route matches.
尝试实现一个404页面,该页面显示何时没有成功的路线匹配。
Try to implement additional parameters into the routes, so for for example /profile/:username/settings/:settingType
尝试在路由中实现其他参数,例如/ profile /:username / settings /:settingType
Implement the useHistory() hook to access the history instance, use it to print out the history as the user navigates through the application.
实现useHistory()挂钩以访问历史记录实例,并在用户浏览应用程序时使用它来打印历史记录。
翻译自: https://medium.com/@andrew.smith_84400/simple-react-js-routing-for-beginners-ca3d9e113f1a


 892
892


 被折叠的 条评论
为什么被折叠?
被折叠的 条评论
为什么被折叠?
 到【灌水乐园】发言


