


npm 包 github
Ever had an NPM package that never get’s updated even though you make changes from time to time. I do! It’s time to make my life just slightly easier and automate the publish / update step with Github Actions.
曾经有一个NPM软件包,即使您不时进行更改,也永远不会更新。 我做! 是时候让我的生活稍微轻松一点,并使用Github Actions自动化发布/更新步骤了。
Since the release of GitHub Actions several people I know have been raving about how good they are, so In an attempt to learn a little bit, and solve a problem I have, I thought I could try it out 🤓
自从GitHub Actions发布以来,我认识的几个人一直在狂热地评价他们的出色表现,因此为了尝试一点点学习并解决我遇到的问题,我想我可以尝试一下🤓
Oh and here’s the official GitHub Actions docs: [GH Actions Docs]
哦,这是官方的GitHub Actions文档: [GH Actions Docs]
目标 (Goal)
It’s important to know what you want to do, before starting configuring (or.. doing anything, really!). For me it’s going to be something quite simple, but very useful.
在开始配置(或做任何事情,真的!)之前,了解您想做什么很重要。 对我来说,这将非常简单,但却非常有用。
This is my starting point and what I want to achieve:
这是我的出发点,也是我要实现的目标:
I have an open source package which is published to NPM
我有一个发布到NPM的开源软件包
→
→
NPM: react-native-value-picker
→
→
When I publish a new release on Github I want to update / re-publish this package to NPM, so my updates go live.
当我在Github上发布新版本时,我想将此包更新/重新发布到NPM,因此我的更新可以上线。
To do this manually we need to login in and publish/re-publish through the NPM CLI, something like this:
要手动执行此操作,我们需要登录并通过NPM CLI进行发布/重新发布,如下所示:
# Authenticating with npm
$ npm login# Publish the package
$ npm publish
I know, I know, it’s not a massive amount of work to do those two steps each time I want to push out an update to the package, but we are learning something here as well 🚀
我知道,我知道,每次我想对程序包进行更新时,执行这两个步骤都不会花费很多工作,但是我们也在这里学习到一些东西🚀
Prior to GitHub Actions in order to automate this task, I would have needed to involve a third party CI/CD solution, and on top, it’s free.
在执行GitHub Actions之前,为了使此任务自动化,我将需要使用第三方CI / CD解决方案,并且最重要的是,它是免费的。
So let’s get started with the config.
因此,让我们开始使用配置。
准备我们的仓库 (Preparing our repo)
The execution chains or jobs which we want to run inside of our GitHub Actions are called workflows.
我们希望在GitHub Actions中运行的执行链或作业称为工作流。
So GitHub will look inside .github/workflows for workflows / execution chains so let’s make a .github folder inside of our root, this folder is commonly used if there are special configurations to the repository, like code owners. Further we need to make a folder inside our .github folder called workflows.
因此,GitHub将在.github / workflows内部查找工作流/执行链,因此让我们在根目录中创建一个.github文件夹,如果该存储库有特殊配置(例如代码所有者),则通常使用此文件夹。 此外,我们需要在.github文件夹中创建一个名为工作流程的文件夹。
TLDR: When all is done you’ll have a a root/.github/workflows folder.
TLDR:完成所有操作后,您将拥有一个root / .github / workflows文件夹。
Like most CI/CD solutions GitHub Actions workflows are configured using a .yml file, and we need to put that that file into the workflow folder we created above. I named my yml-file npm-publish.yml and here’s a badly made folder-tree to make it more clear.
像大多数CI / CD解决方案一样, GitHub Actions工作流是使用.yml文件配置的,我们需要将该文件放入上面创建的工作流文件夹中。 我将我的yml文件命名为npm-publish.yml ,这是一个做得不好的文件夹树,这使得它变得更加清晰。
--> root
   |--> .github
      |--> workflows
         |--> npm-publish.yml // contains our workflow.
   |--> rest of app
配置我们的工作流程 (Configuring our workflow)
So inside of our `npm-publish.yml` we are good to go configuring our workflow. I’ll post the finished thing first and then I’ll go through it step by step what it does.
因此,在我们的`npm-publish.yml`内部,我们很高兴开始配置工作流程。 我将首先发布完成的内容,然后逐步进行操作。
name: Npm Publishon:
 release:
 types: [published]jobs:
  build:
   runs-on: ubuntu-latest
    steps:
      — uses: actions/checkout@v2
      — uses: actions/setup-node@v1
        with:
          node-version: 12
          registry-url: https://registry.npmjs.org/
      — run: yarn install
      — run: npm publish — access public
        env:
         NODE_AUTH_TOKEN: ${{secrets.NPM_AUTH_TOKEN}}
Let’s break it down
让我们分解一下
name: Npm PublishGives the workflow a name, at the very top we give the encompassing workflow a name that makes sense to us, you are free to name it anything you’d like :)
给工作流起一个名字,在最顶层我们给周围的工作流起一个对我们有意义的名字,您可以随意命名它:)
on:
 release:
 types: [published]
The “on”-keyword tells GitHub when the workflow shall run, in this case I specify that I want it to run when there is a new release, and more specifically I want it when the release type is published. This is important and required because releases could also be updated or deleted. This makes sure that we run on release publish only.
“ on”关键字告诉GitHub工作流何时运行,在这种情况下,我指定我希望它在新版本发布时运行,更具体地说,我希望在发布版本发布时运行。 这很重要并且是必需的,因为发行版也可以被更新或删除。 这确保了我们仅在发行版上运行。
jobs:
  build:
    runs-on: ubuntu-latest.
The “jobs”-keyword tells our CI the different jobs / tasks we want to execute.
“职位”关键字告诉我们的CI我们要执行的不同职位/任务。
In this case I want to build the project on the latest version of Ubuntu, so that is specified as ubuntu-latest.
在这种情况下,我想在最新版本的Ubuntu上构建项目,因此将其指定为ubuntu-latest 。
Further we need to define the steps within our job:
此外,我们需要定义工作中的步骤:
steps:
  — uses: actions/checkout@v2
  — uses: actions/setup-node@v1
   with:
     node-version: 12
     registry-url: https://registry.npmjs.org/
  — run: yarn install
  — run: npm publish — access public
Inside of our job we are now defining the steps, We already defined the operating system of our virtual machine, so we are at the same stage as when we run the project locally on our computer.
在我们的工作中,我们现在正在定义步骤,我们已经定义了虚拟机的操作系统,因此与在计算机上本地运行项目时处于同一阶段。
Well, in plain English, what do we do locally when we run a project like this?
那么,用简单的英语来说,当我们运行这样的项目时,我们在本地做什么?
Normally it would look something like this in our terminal:
通常在我们的终端中看起来像这样:
a) Clone our project
a)克隆我们的项目
$ git clone git:repo-addressb) Install all packages / dependencies
b)安装所有软件包/依赖项
$ yarn installc) Do the publishing steps
c)执行发布步骤
$ npm login
$ npm Publish
Locally we already have our development environment set up with node, yarn and other things we need installed. But because we are essentially creating a new computer on Githubs servers running Ubuntu we need to be more specific, and say what tools we need to run the steps, and that’s what we are doing in the configuration file:
在本地,我们已经设置了开发环境,其中安装了节点,yarn和其他需要安装的东西。 但是,因为我们实际上是在运行Ubuntu的Githubs服务器上创建一台新计算机,所以我们需要更加具体,并说出需要哪些工具来运行这些步骤,而这就是我们在配置文件中正在做的事情:
Clone the repo.
克隆仓库。
- uses: actions/checkout@v2Install node on a known working version, Specify what package registry we want to use.
在已知的工作版本上安装节点,指定我们要使用的程序包注册表。
— uses: actions/setup-node@v1
  with:
    node-version: 12
    registry-url: https://registry.npmjs.org/
Install dependencies
安装依赖
- run: yarn installPublish to NPM
发布到NPM
- run: npm publish — access publicFurther since there is no human sitting and looking at the script to authenticate us by passing in username and password, we need to pass a pre-authenticated token to our node environment
此外,由于无需人工坐下来,而是通过传递用户名和密码来查看脚本来对我们进行身份验证,因此我们需要将预先身份验证的令牌传递给我们的节点环境
env:
  NODE_AUTH_TOKEN: ${{secrets.NPM_AUTH_TOKEN}}
🎉 And that’s our new Github Action workflow configuration all done 🎉
🎉这就是我们新的Github Action工作流程配置全部完成🎉
Hold on! you might say, what about that NPM Auth token thingy?
坚持,稍等! 您可能会说,那NPM Auth令牌又如何呢?
Let’s get that configured next.
接下来让我们进行配置。
配置身份验证令牌 (Configuring Auth tokens)
As I described earlier we need a pre-authenticated token to pass into our node environment. This is the way we authenticate towards NPM, and it’s not very complicated to setup.
如前所述,我们需要一个预先认证的令牌才能传递到我们的节点环境中。 这是我们向NPM进行身份验证的方式,并且设置起来并不十分复杂。
Never put your token into the configuration file, it should be kept private
切勿将令牌放入配置文件中,应将其保密
Note: I presume you have an account on npmjs.org if you are interested in following along.
注意:如果您有兴趣继续学习,我假设您在npmjs.org上拥有一个帐户。
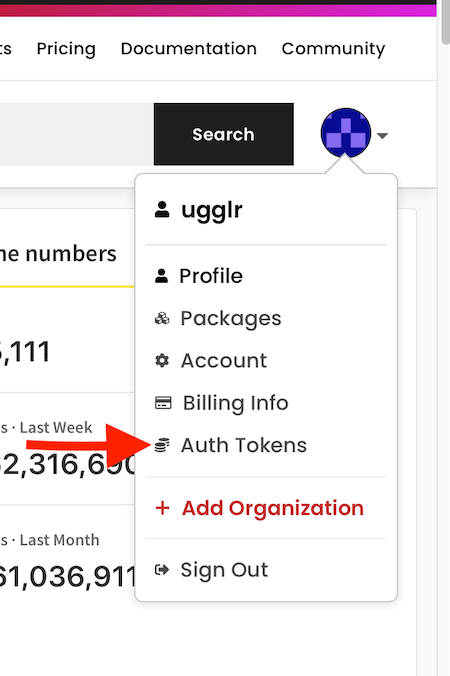
Head on over to your account in npm and in the quick account menu press Auth Tokens
在npm转到您的帐户,然后在快速帐户菜单中按Auth Tokens
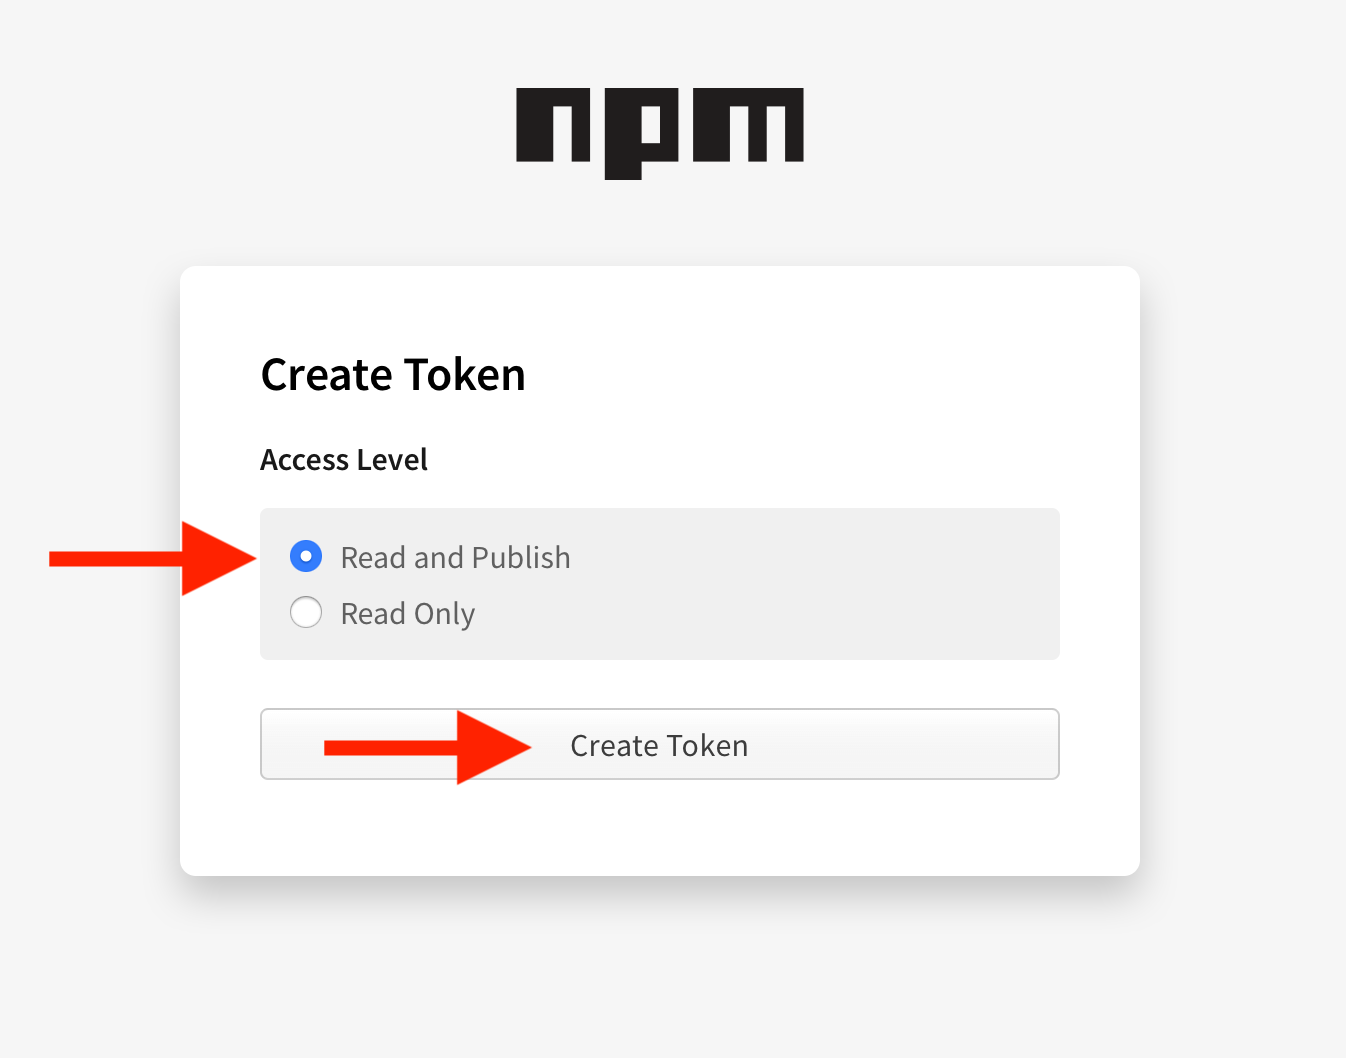
Inside the Auth Token page you’ll want to create a new Token.
在“验证令牌”页面内,您将要创建一个新令牌。

You will then be prompted if you want to grant the token read and publish or just read, for the purpose in this case we need to have publishing rights, so read and publish it is.
然后,系统将提示您是否要授予令牌读取和发布或刚刚读取的权限,在这种情况下,我们需要具有发布权,因此读取和发布的权限是。
After the token has been created copy it, and make sure you can keep it with you for a little while until we add it into our repository secrets.
创建令牌后,请对其进行复制,并确保可以将其保留一段时间,直到我们将其添加到存储库秘密中为止。
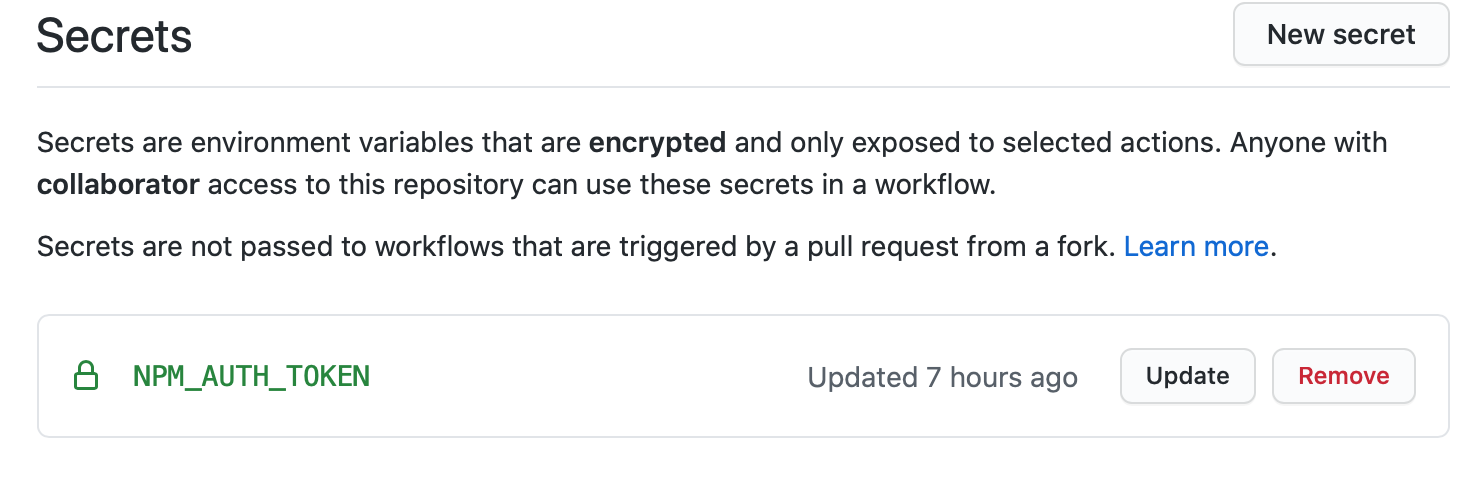
将NPM令牌添加到我们的存储库 (Adding NPM token to our repository)
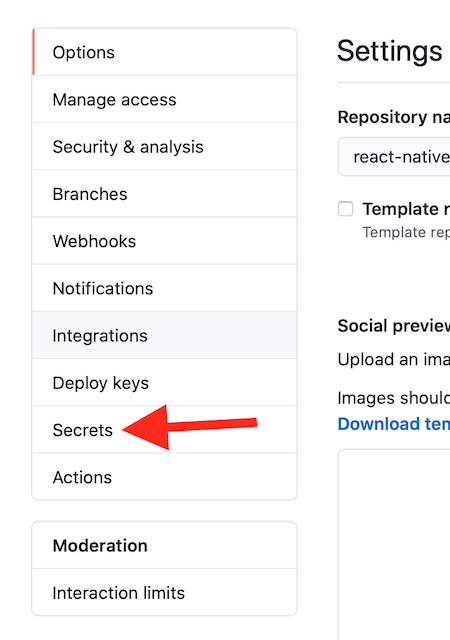
Head over to your GitHub repository where your package exists and go to the settings page.
转到您的软件包所在的GitHub存储库,然后转到设置页面。

Inside of settings head on over to the secrets sub-page.
在设置内部,进入“机密”子页面。
Click Create a new Secret
单击创建一个新的秘密
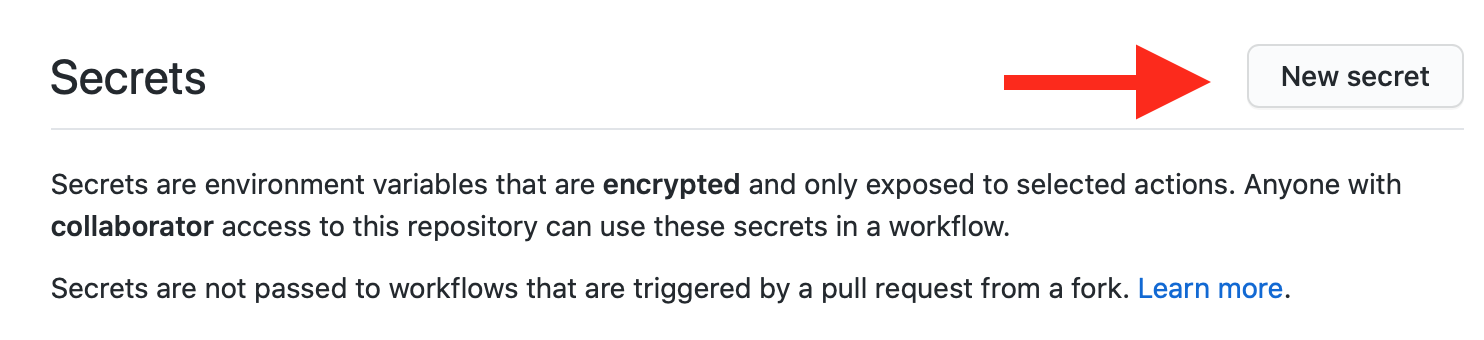
And in here you’ll want to match the name of the token with what we wrote in our action configuration file.
在这里,您需要将令牌的名称与我们在操作配置文件中编写的内容进行匹配。
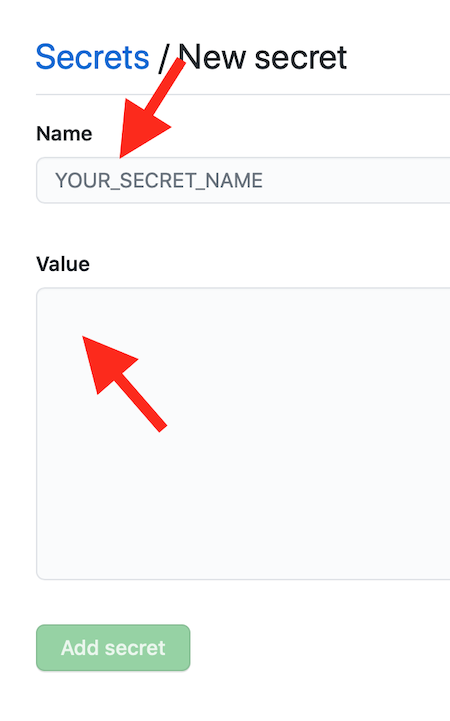
In our case we named our secret variable reference NPM_AUTH_TOKEN and then you’ll want to paste the token you got from NPM in the value field.
在我们的案例中,我们将秘密变量引用命名为NPM_AUTH_TOKEN ,然后您将需要将从NPM获得的令牌粘贴到value字段中。
When everything is well and done we will have it added.
当一切都做好后,我们将添加它。
🚀 That’s all we need for configuration, commit it, merge into master and let’s try it out to see if it works. ⛹️♀️
configuration这就是我们配置所需的全部内容,提交它,合并到master中,让我们尝试一下是否可行。 ⛹️♀️
测试出来 (Testing it out)
So, to test our newly created workflow we need to make a new release (published), since that what we configured it to trigger on.
因此,为了测试我们新创建的工作流程,我们需要发布一个新版本(已发布),因为我们将其配置为触发该版本。
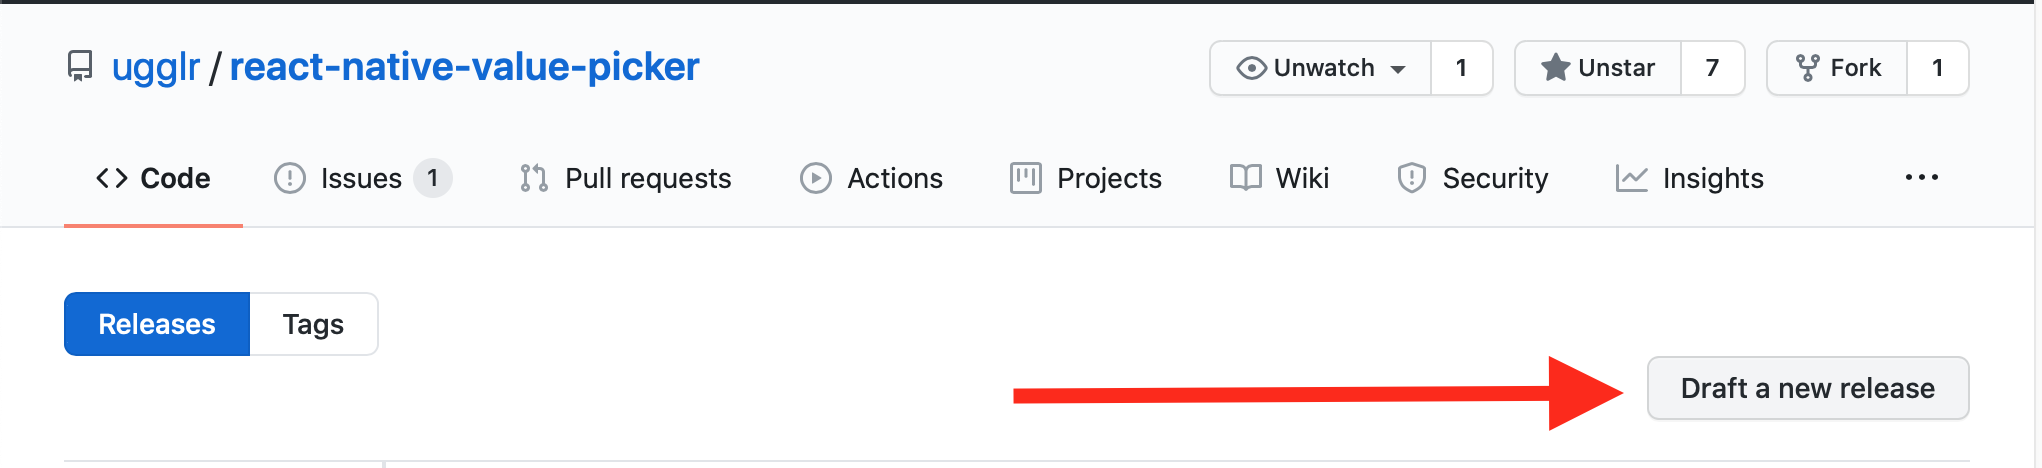
It does not really matter what you tag you choose for the release, but make sure the that the pre-release checkbox is not checked. Also, if you have a package from before, remember to bump the version in package.json, NPM requires us to update the version when we publish new changes.
您为发布选择的标签并不重要,但是请确保未选中发布前复选框。 另外,如果您以前有软件包,请记住在package.json中更改版本,NPM要求我们在发布新更改时更新版本。
When the release is done let’s head on over to our repository’s action tab and see if we have something running!
发布完成后,让我们转到存储库的“操作”选项卡,看看我们是否正在运行某些内容!
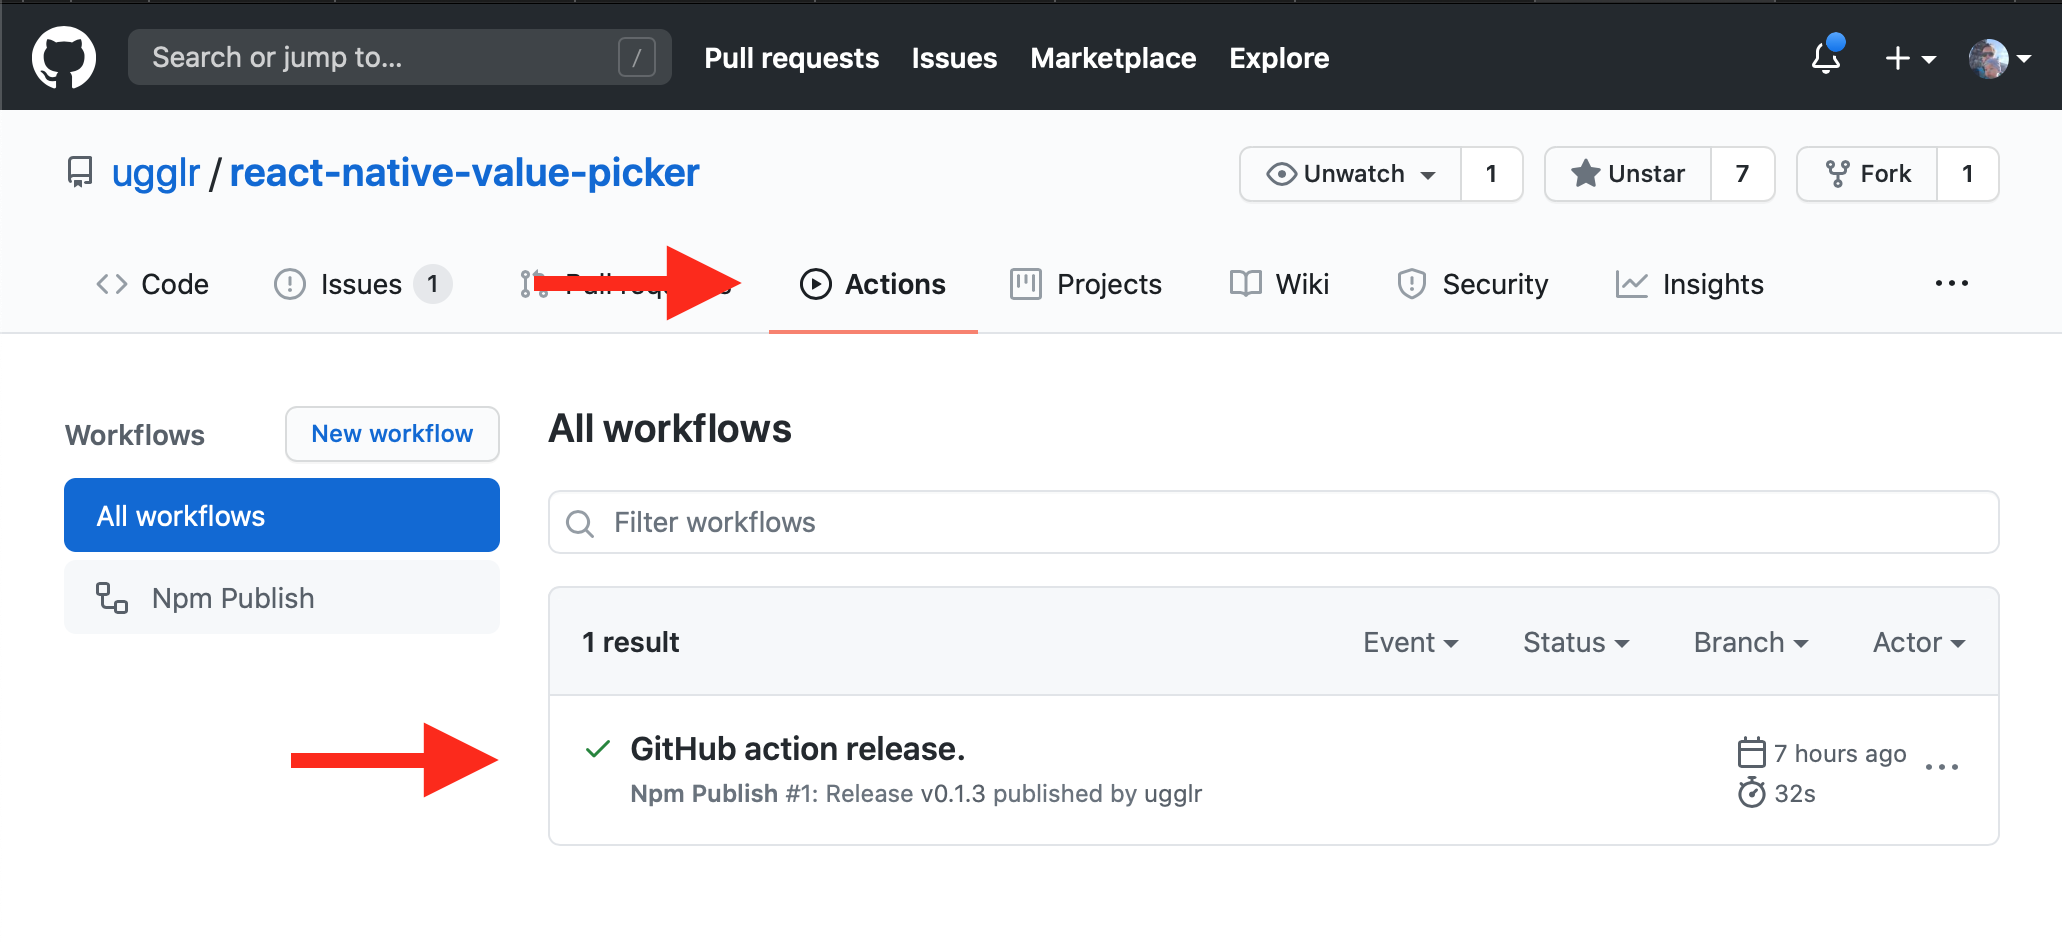
🎉 There we go — mic drop 🎤
🎉我们去了–麦克风drop
If you would like to visit the repo I’ve been working in it’s available right here: [Github] ugglr/react-native-value-picker 👈
如果您想访问我正在使用的仓库,可以在这里找到: [Github] ugglr / react-native-value- picker👈
The package is available through NPM: [NPM] react-native-value-picker 👈
该软件包可通过NPM获得: [NPM] react-native-value- picker👈
Thanks for reading!
谢谢阅读!
npm 包 github


 291
291


 被折叠的 条评论
为什么被折叠?
被折叠的 条评论
为什么被折叠?
 到【灌水乐园】发言


