


webpack 示例
This article will cover all main ideas behind the webpack — module bundler. You will know how to configure webpack, add assets, add css files, bundle your js file, starting a server, prod and dev build and more…
本文将介绍webpack(模块捆绑器)背后的所有主要思想。 您将知道如何配置Webpack,添加资产,添加CSS文件,捆绑您的js文件,启动服务器,产品和开发版本以及更多…
本文涵盖的主题: (What topics this article covers:)
- 1. Simplest project and Webpack installation; 1.最简单的项目和Webpack安装;
- 2. Configuration file; 2.配置文件;
- 3. Regenerate bundle on file save; 3.在文件保存时重新生成捆绑包;
- 4. Using webpack-dev-server; 4.使用webpack-dev-server;
- 5. Multiple files in the bundle; 5.捆绑中有多个文件;
- 6. Using Loaders 6.使用装载机
- 7. Production vs. Development builds 7.生产与开发之间的关系
- 8. Adding HTML file into the build 8.将HTML文件添加到构建中
- 9. Adding CSS into the build 9.将CSS添加到构建中
- 9.1 Adding CSS to J.S. bundle 9.1将CSS添加到JS捆绑包
- 9.2 Adding CSS as a separate bundle 9.2将CSS作为单独的捆绑包添加
- 10. Adding assets to the build 10.向构建中添加资产
1.最简单的项目和Webpack安装 (1. Simplest project and Webpack installation)
I think you probably know how to start a npm project with dependencies, but still, if you don't, no worries, just run those commands inside your project's folder, and after that, you are ready to go 😉
我认为您可能知道如何使用依赖项启动npm项目,但是,如果不这样做,不用担心,只需在项目文件夹中运行这些命令,然后就可以开始了。
npm init
npm install webpack webpack-cli --save-dev
After that, we will need to add index.html file with the simple script.js file:
之后,我们需要使用简单的script.js文件添加index.html文件:

As you probably noticed, we specified the wrong src path to our script file (we don’t have any dist folder in our project), but you will understand "Why" in a moment.
您可能已经注意到,我们为脚本文件指定了错误的 src路径(我们的项目中没有dist文件夹),但是稍后您将理解“为什么”。
What will happen if we will run npx webpack ./script in simplest-example folder without any webpack configuration?
如果在没有任何webpack配置的情况下在simplest-example文件夹中运行npx webpack ./script会发生什么情况?
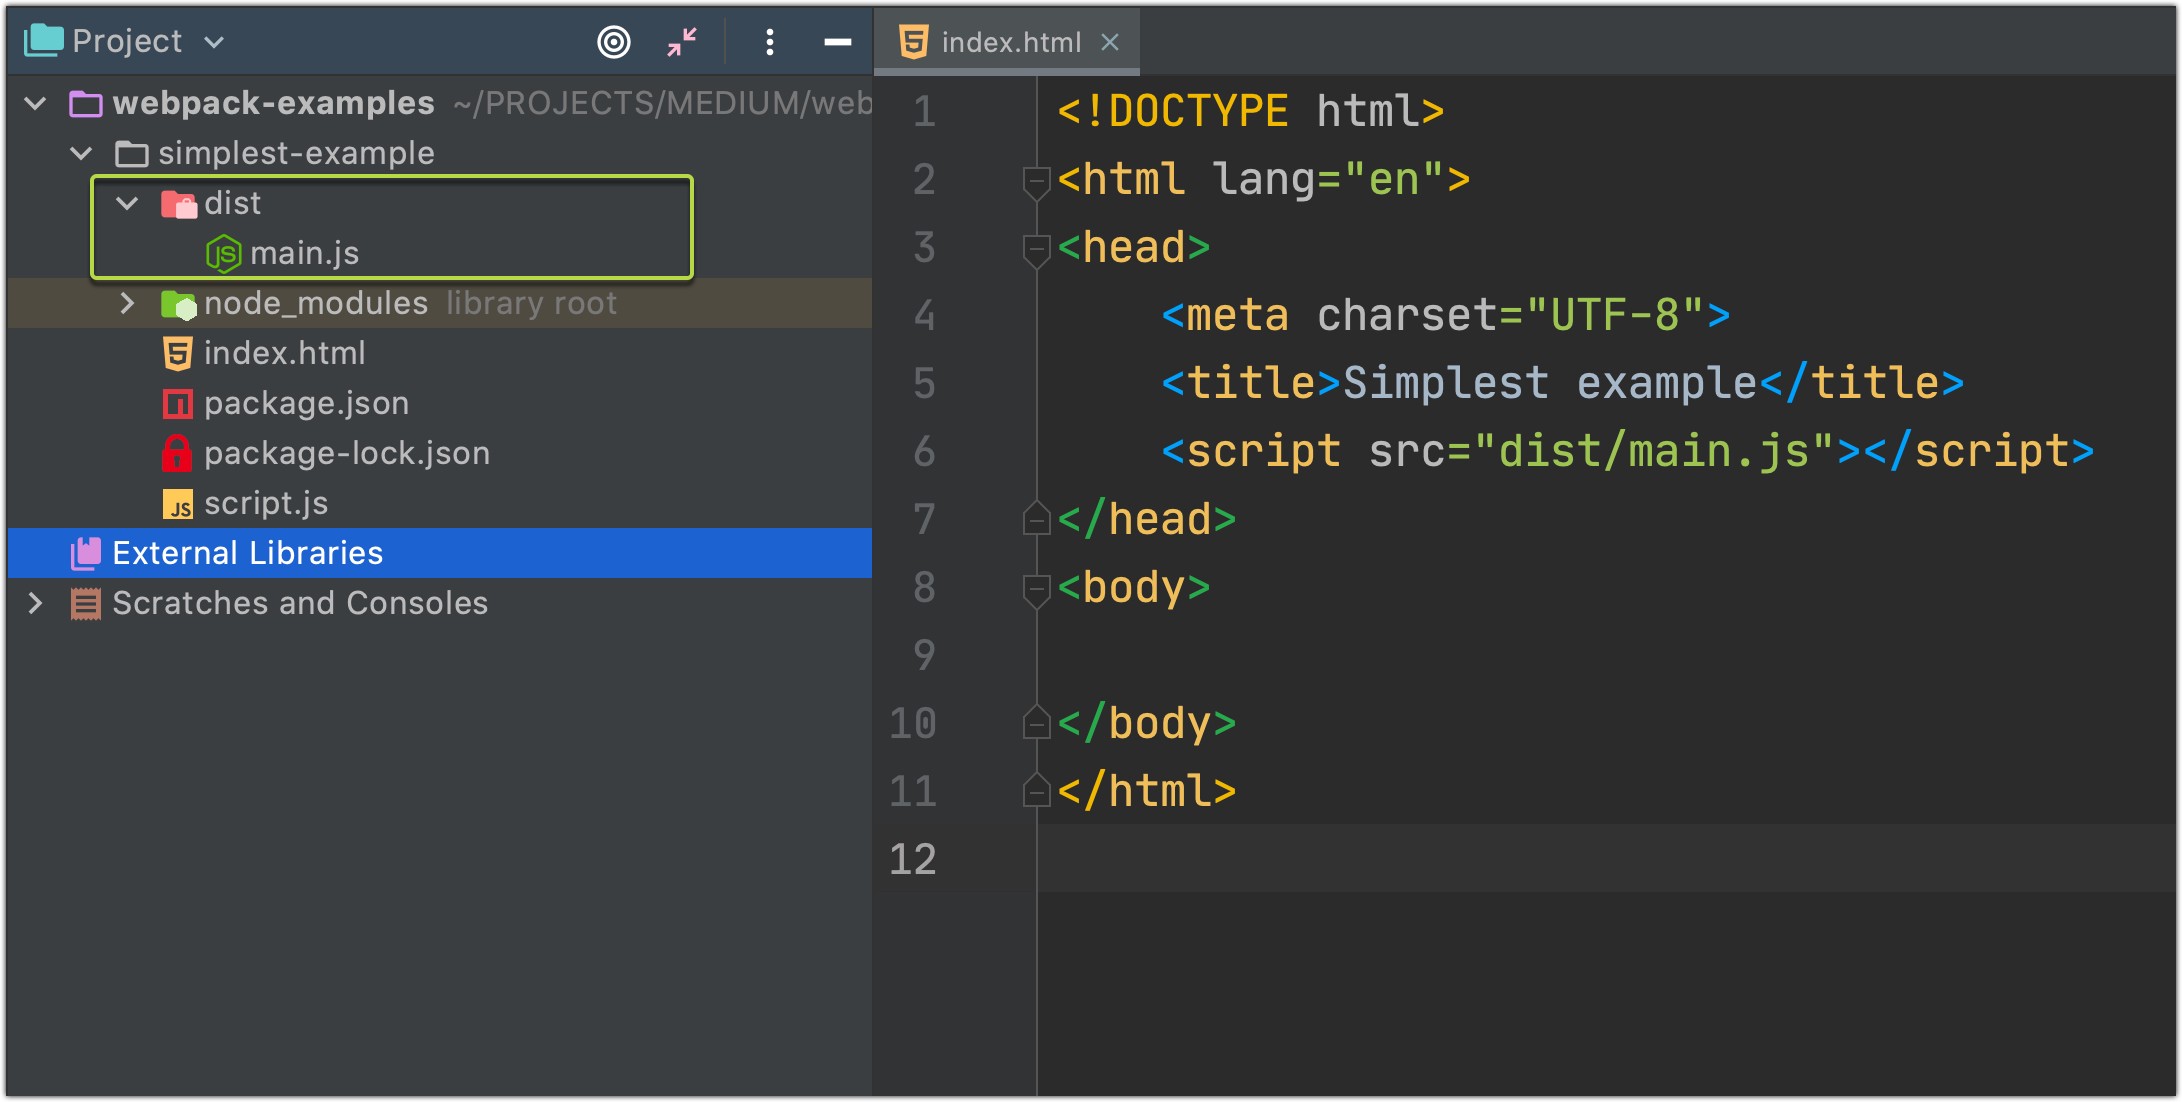
Yep, dist folder will be created with a new main.js file in it. Let's see what exactly webpack generated for us:
是的,将使用新的main.js文件创建dist文件夹。 让我们看看究竟webpack为我们生成了什么:
Hm, as you can see webpack will not be very useful for a small project like this one, but when your project will grow more and more when you will add additional npm packages, css/sass files, images, documents, etc. webpack will be very useful for creating a bundle file with all needed data for your application to work.
嗯,如您所见, webpack对于像这样的小型项目不是很有用,但是当您的项目将越来越多时 ,您将添加其他npm packages , css / sass文件, images , documents等。对于创建包含所有需要的数据以使应用程序正常工作的捆绑文件非常有用。
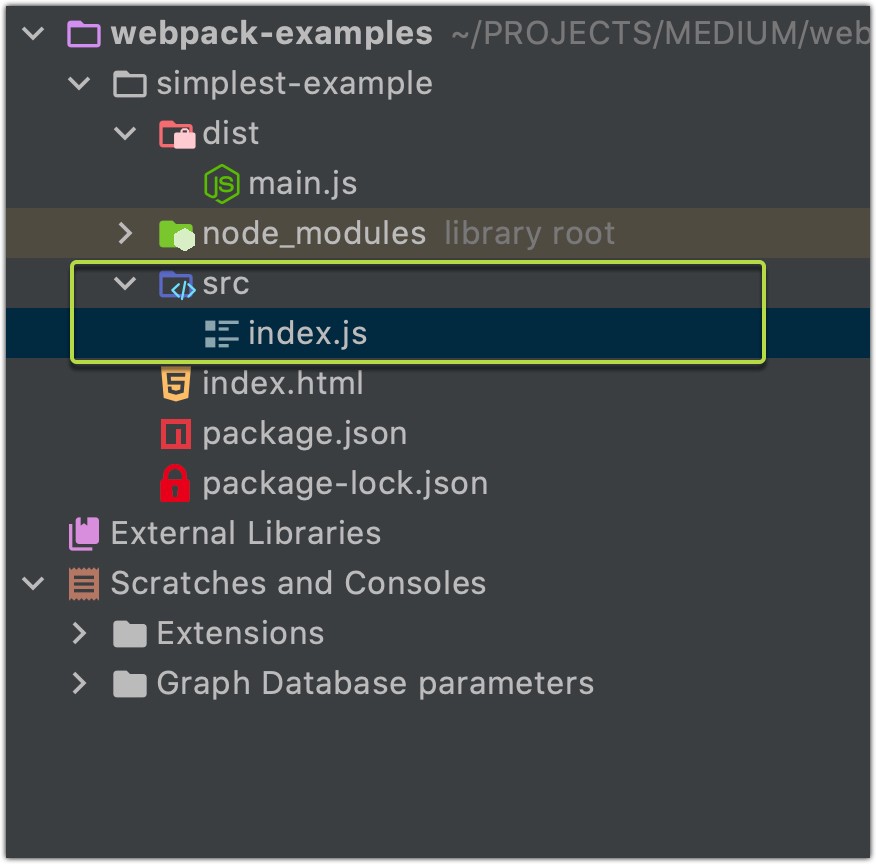
P.S. If you will place your script file inside the
/srcfolder and rename scripts file toindex.js-> you could runnpx webpackcommand without specifying file path. The result would be exactly the same as the previous one:/dist/main.jsPS如果将脚本文件放在
/src文件夹中并将脚本文件重命名为index.js>,则可以运行npx webpack命令,而无需指定文件路径。 结果将与上一个完全相同:/dist/main.js
Now, let’s run our app and see what will happen:
现在,让我们运行我们的应用程序,看看会发生什么:
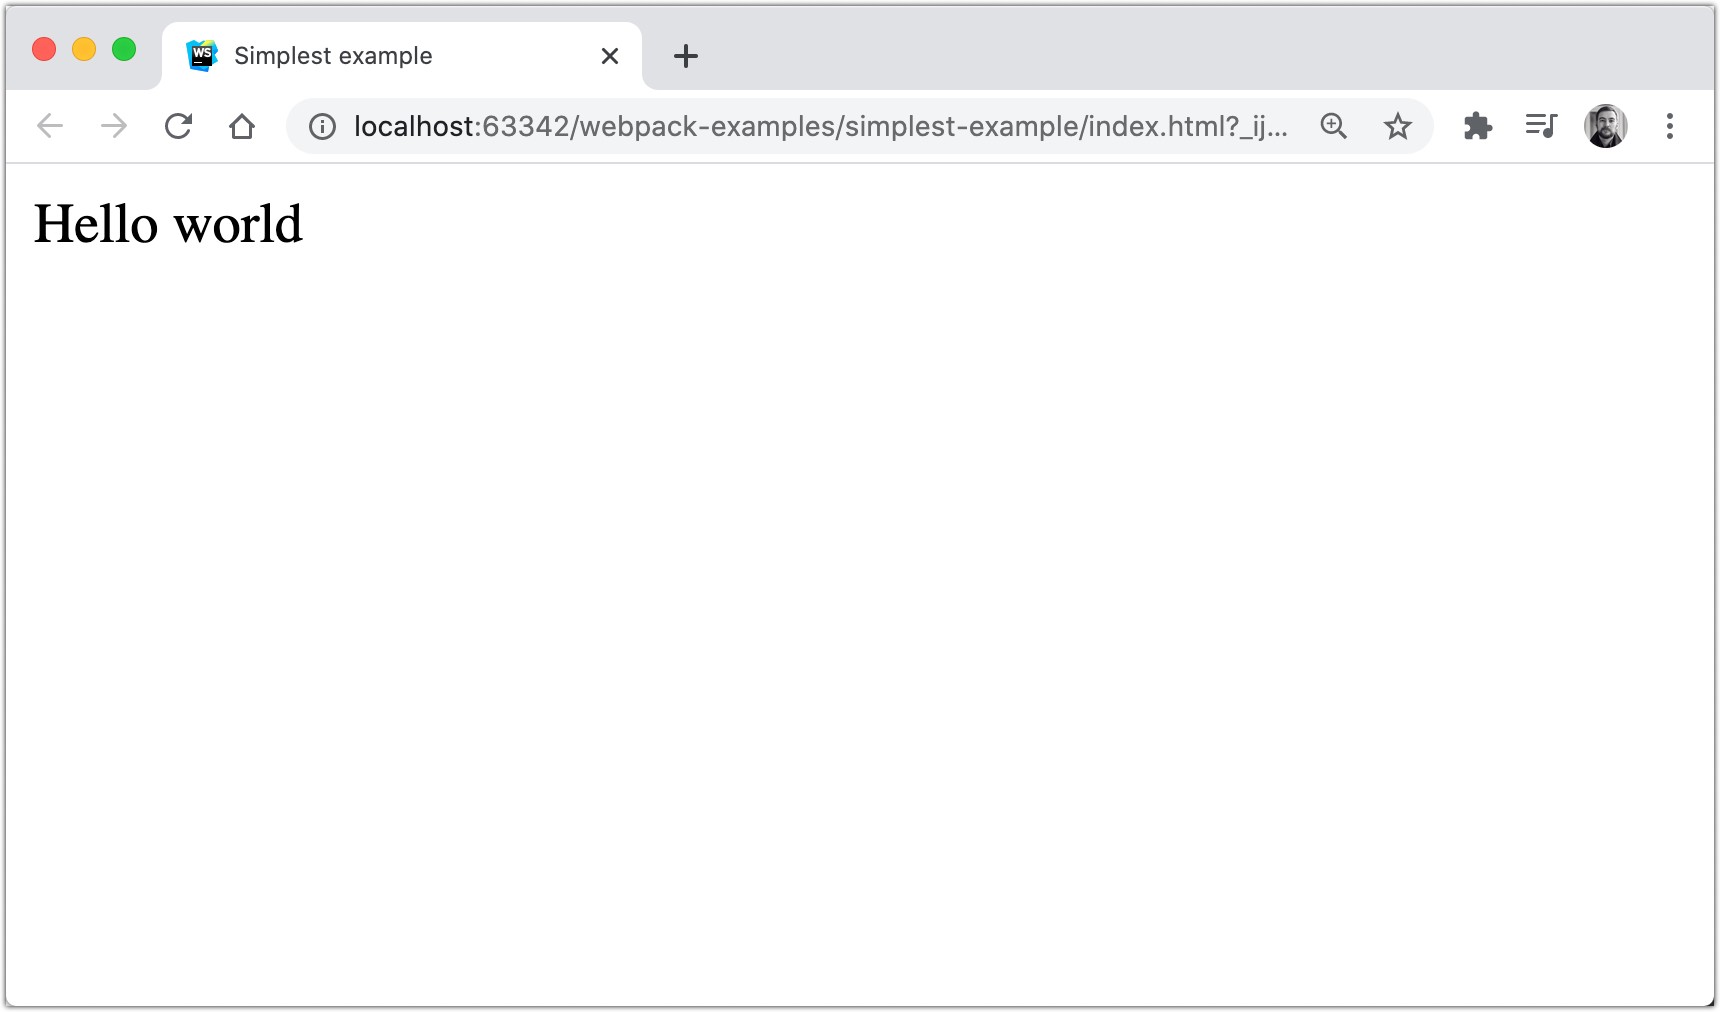
Because I using a Webstorm IDE,
index.htmlfile is running on IDE server (because of that you are seeinglocalhost:63342on a screenshot), but you can just open html files simply by open them using any browser.因为我使用的是Webstorm IDE,所以
index.html文件在IDE服务器上运行(因为在屏幕截图上看到的是localhost:63342),但是您可以通过使用任何浏览器打开html文件来打开它们。
Great! Now, let’s add some complexity and make some very cool stuff.
大! 现在,让我们增加一些复杂性并制作一些非常酷的东西。
2.配置文件 (2. Configuration file)
Probably, it’s not a very convenient way to specify what we want from a webpack using command line props. For making our life easier we can create a config file in which we can define what webpack should do with all app’s data.
可能,这不是使用命令行道具从webpack中指定我们想要的内容的便捷方法。 为了使我们的生活更轻松,我们可以创建一个配置文件,在其中可以定义webpack应该对所有应用程序数据执行的操作。
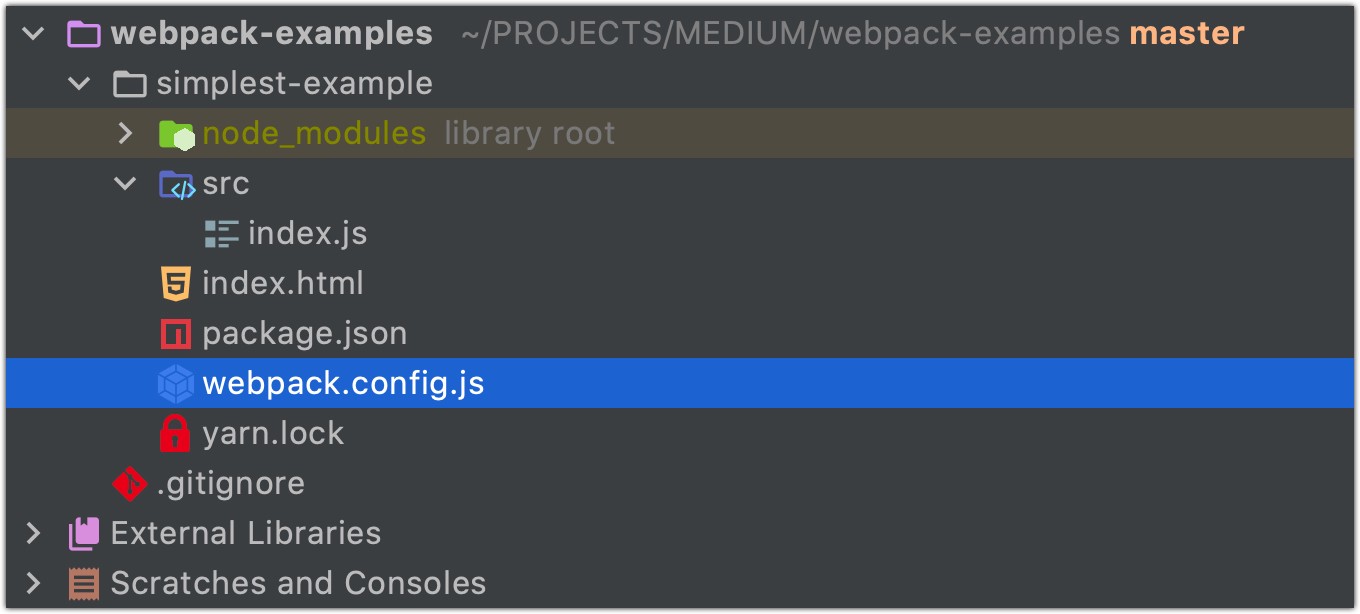
So let’s create a config file webpack.config.js :
因此,让我们创建一个配置文件webpack.config.js :
And what will happen if we will run npx webpack after adding this config? Precisely the same as without it.
如果添加此配置后运行npx webpack会发生什么? 就像没有它一样。
The
pathmodule (Node.js core, no 3rd-party libraries required) provides utilities for working with file and directory paths. For the better understanding of path results, let’s console log thepath.resolve(__dirname, 'dist')value:
path模块(Node.js核心,无需第三方库)提供了用于处理文件和目录路径的实用程序。 为了更好地理解路径结果,让我们在控制台上记录path.resolve(__dirname, 'dist')值:
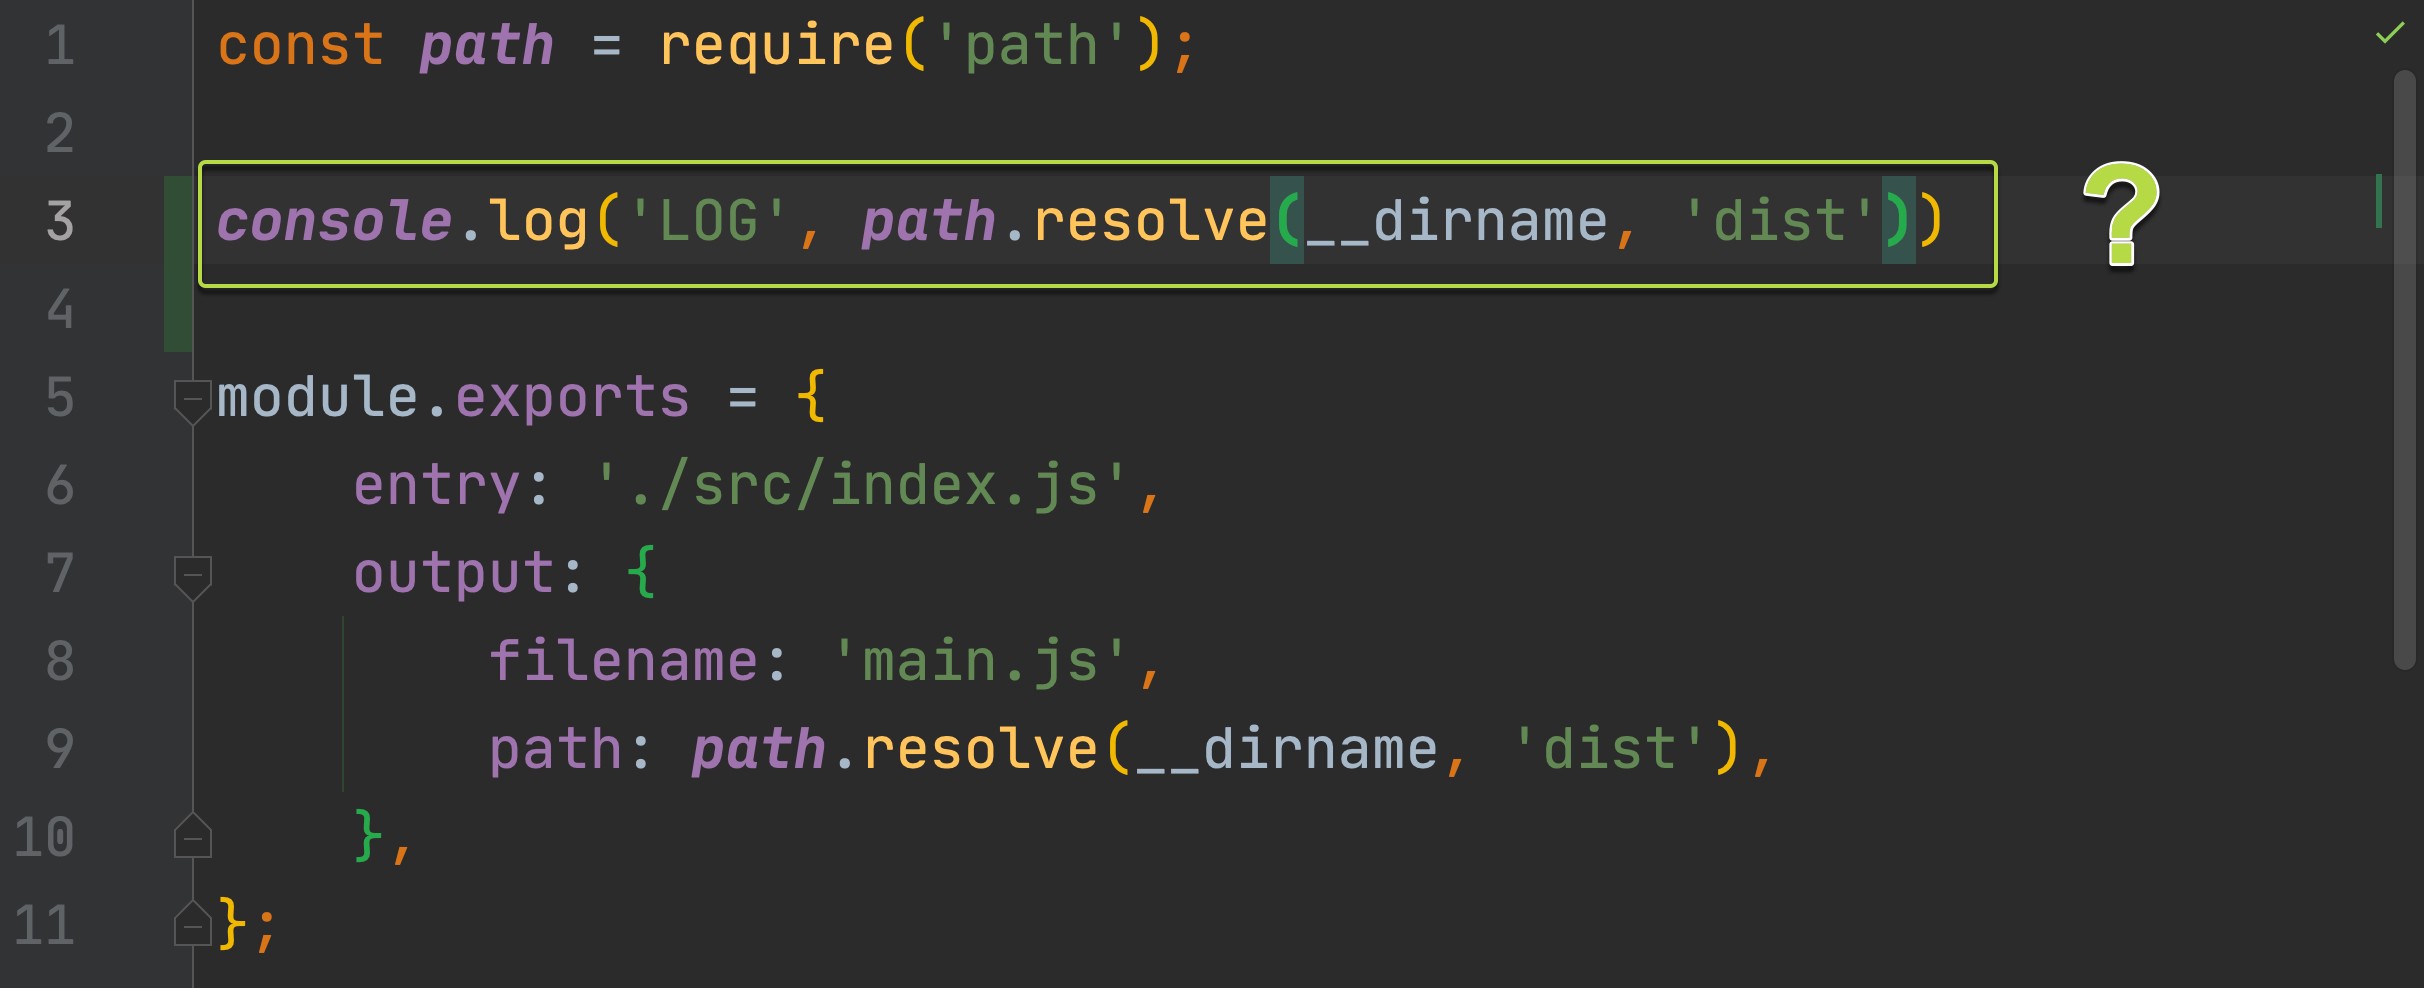
> LOG /Users/artem.diashkin/PROJECTS/MEDIUM/webpack-examples/simplest-example/dist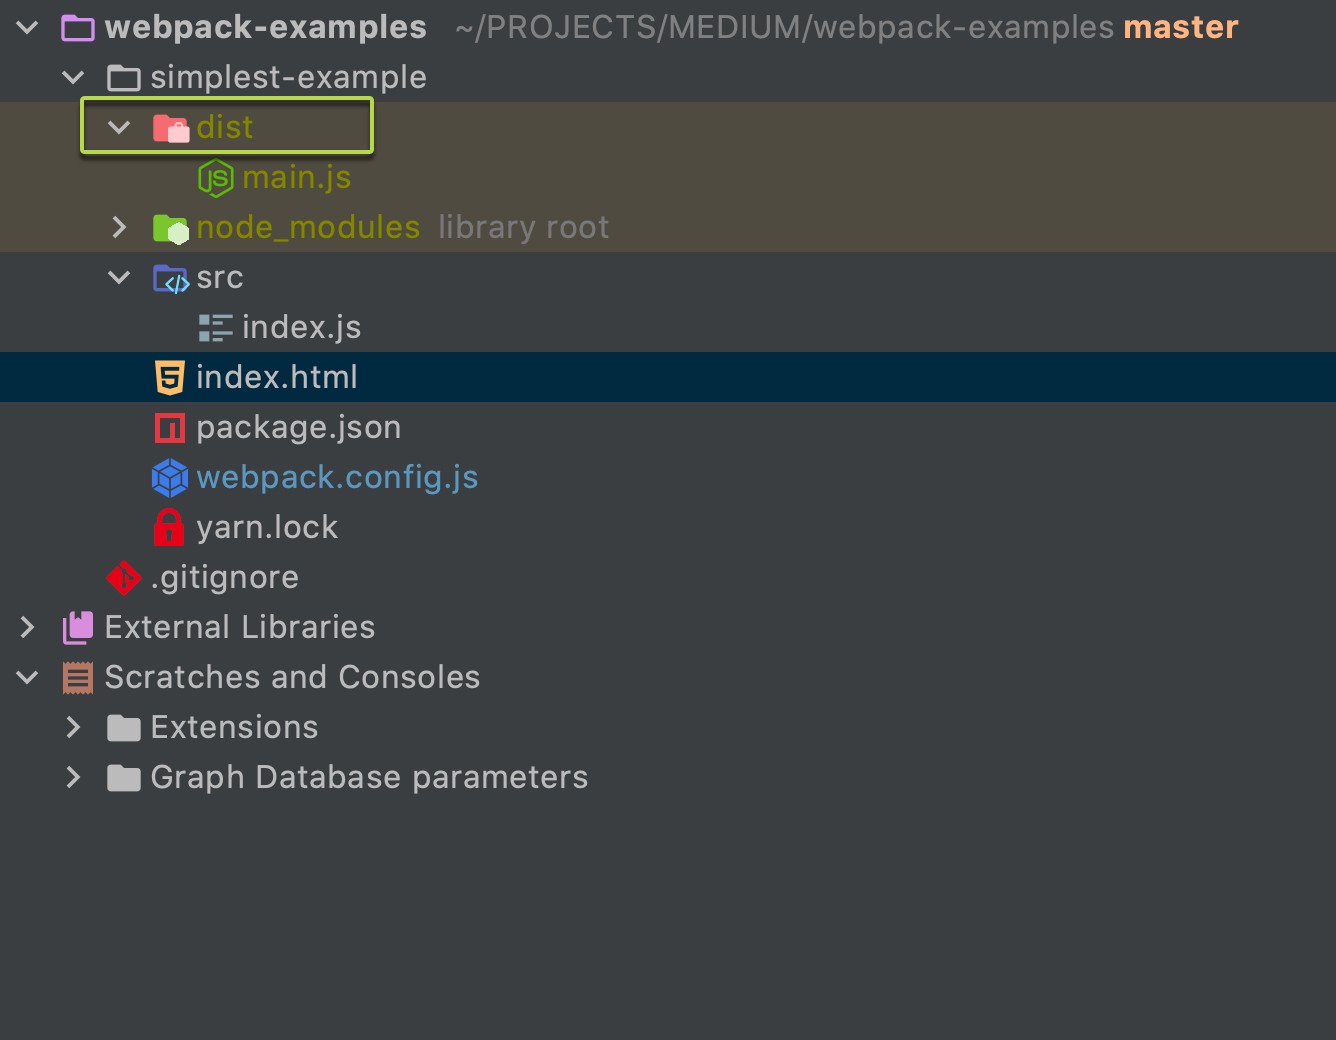
So let’s change a few config values and see what will change for the webpack results? After that, I think, you will get the main idea of that config properties…
因此,让我们更改一些配置值,看看Webpack结果会发生什么变化? 在那之后,我想,您将获得该配置属性的主要思想……
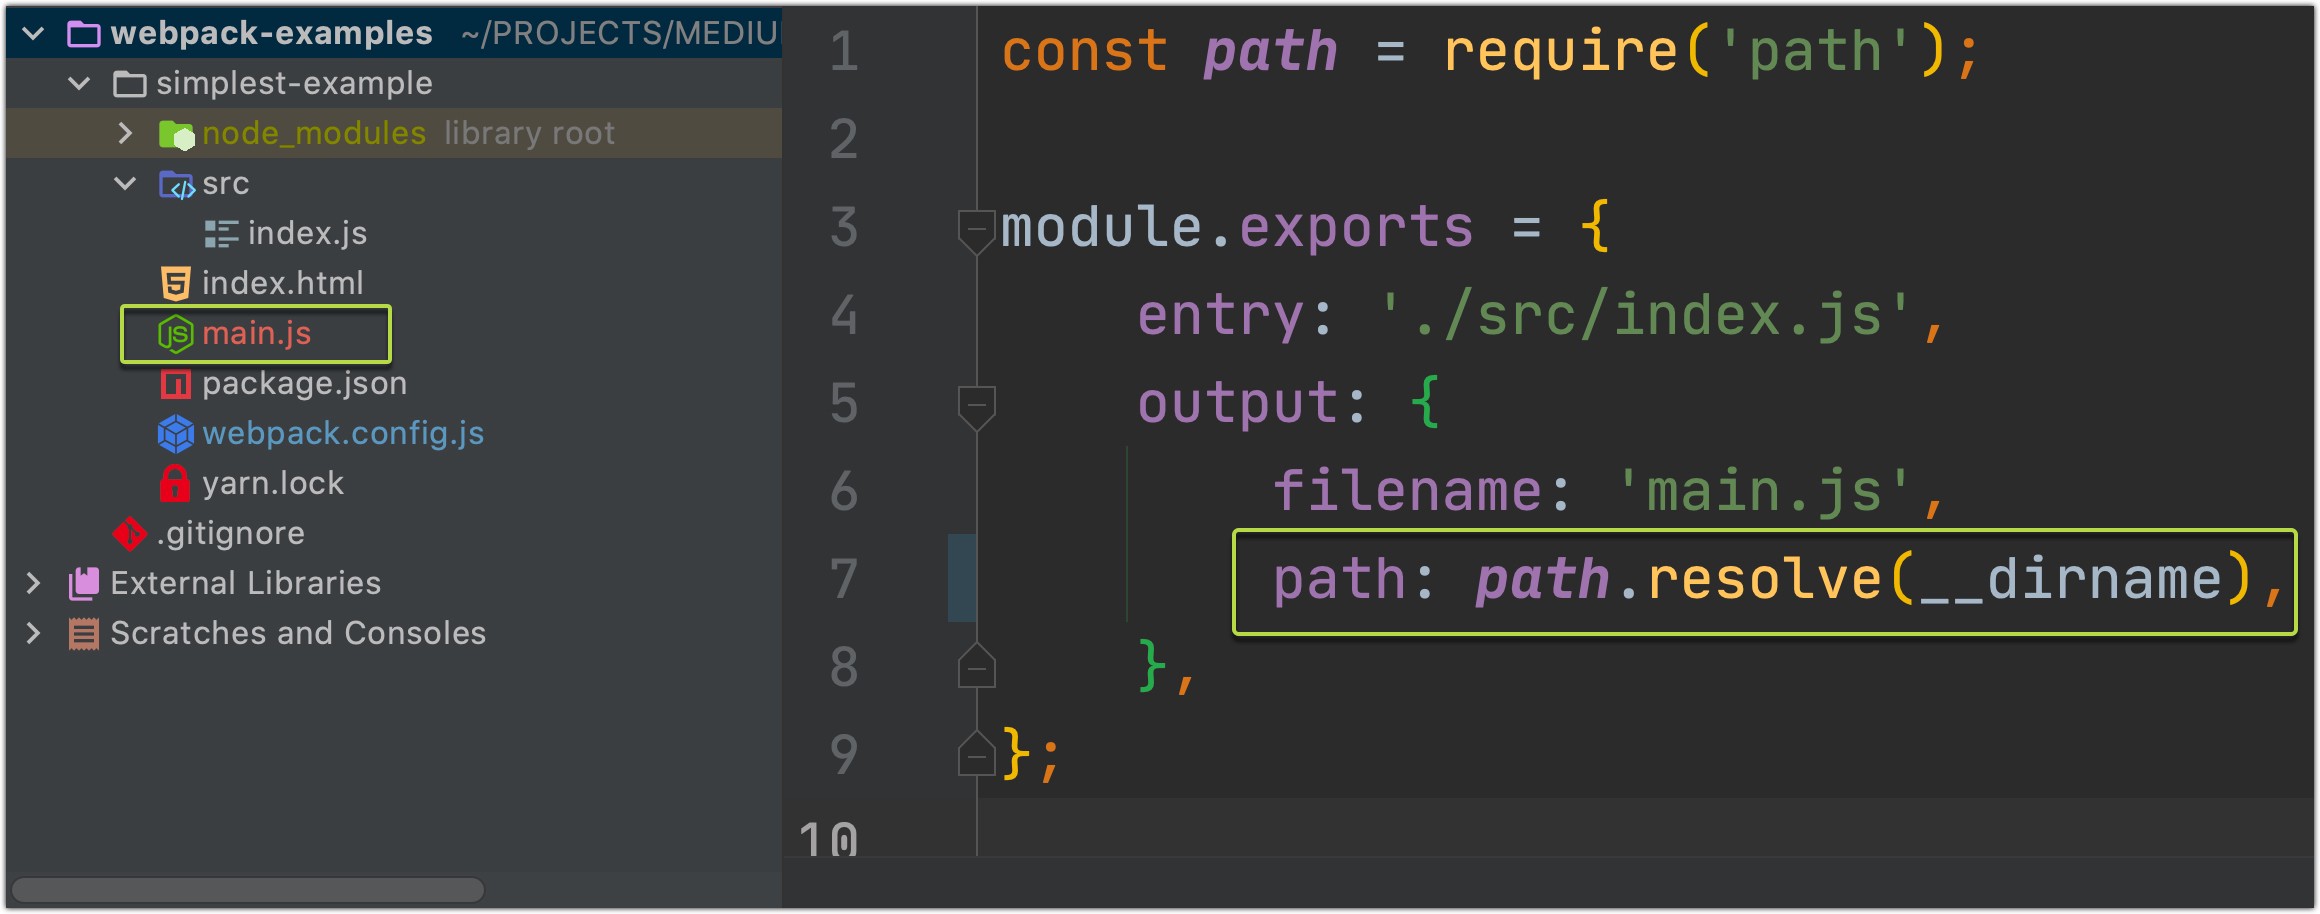
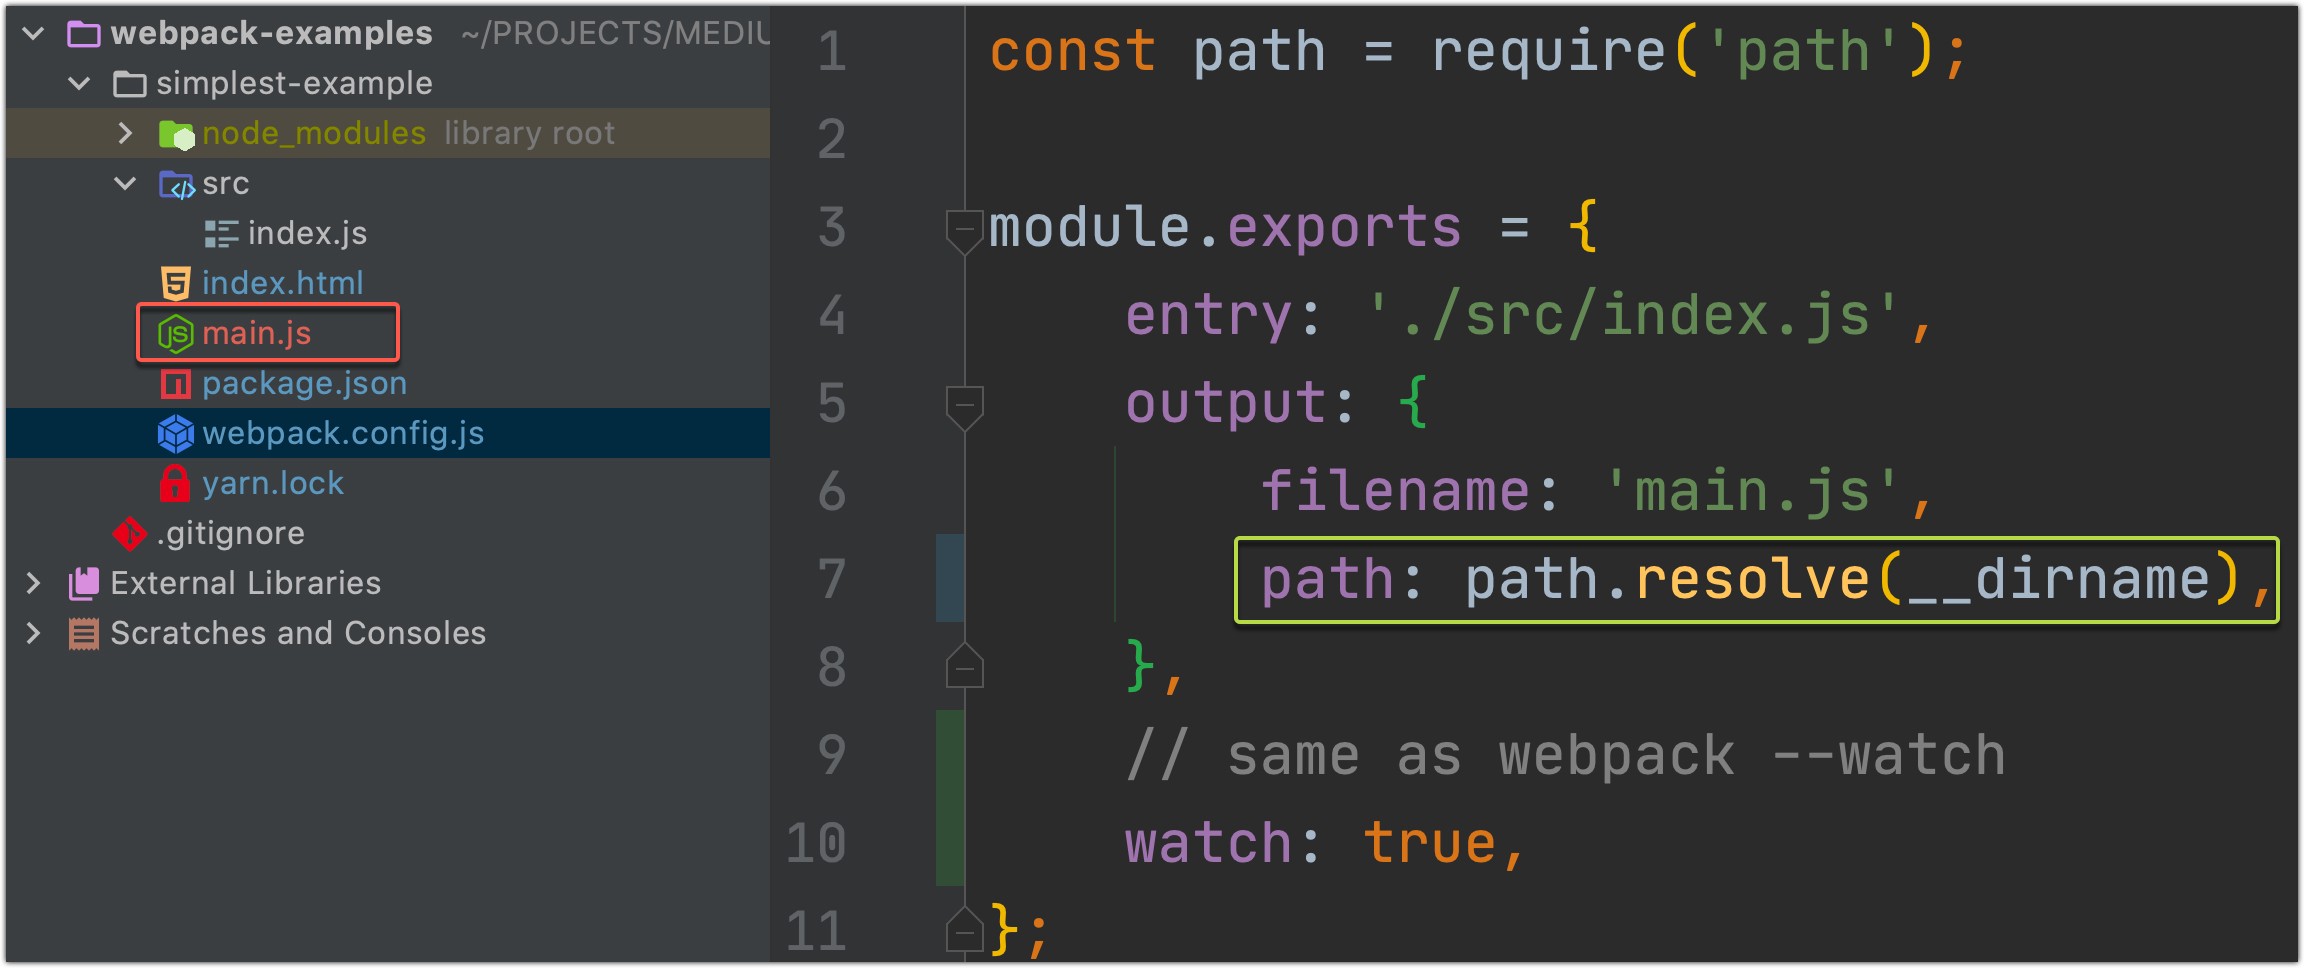
Make app’s bundle file inside the root folder of the app (
/simplest-example, in our case):在应用程序的根 文件夹 (在本例中为
/simplest-example)中创建应用程序的捆绑文件:
2. Make app’s bundle file inside a custom folder of the app:
2.将应用程序的捆绑文件放在应用程序的自定义文件夹中:
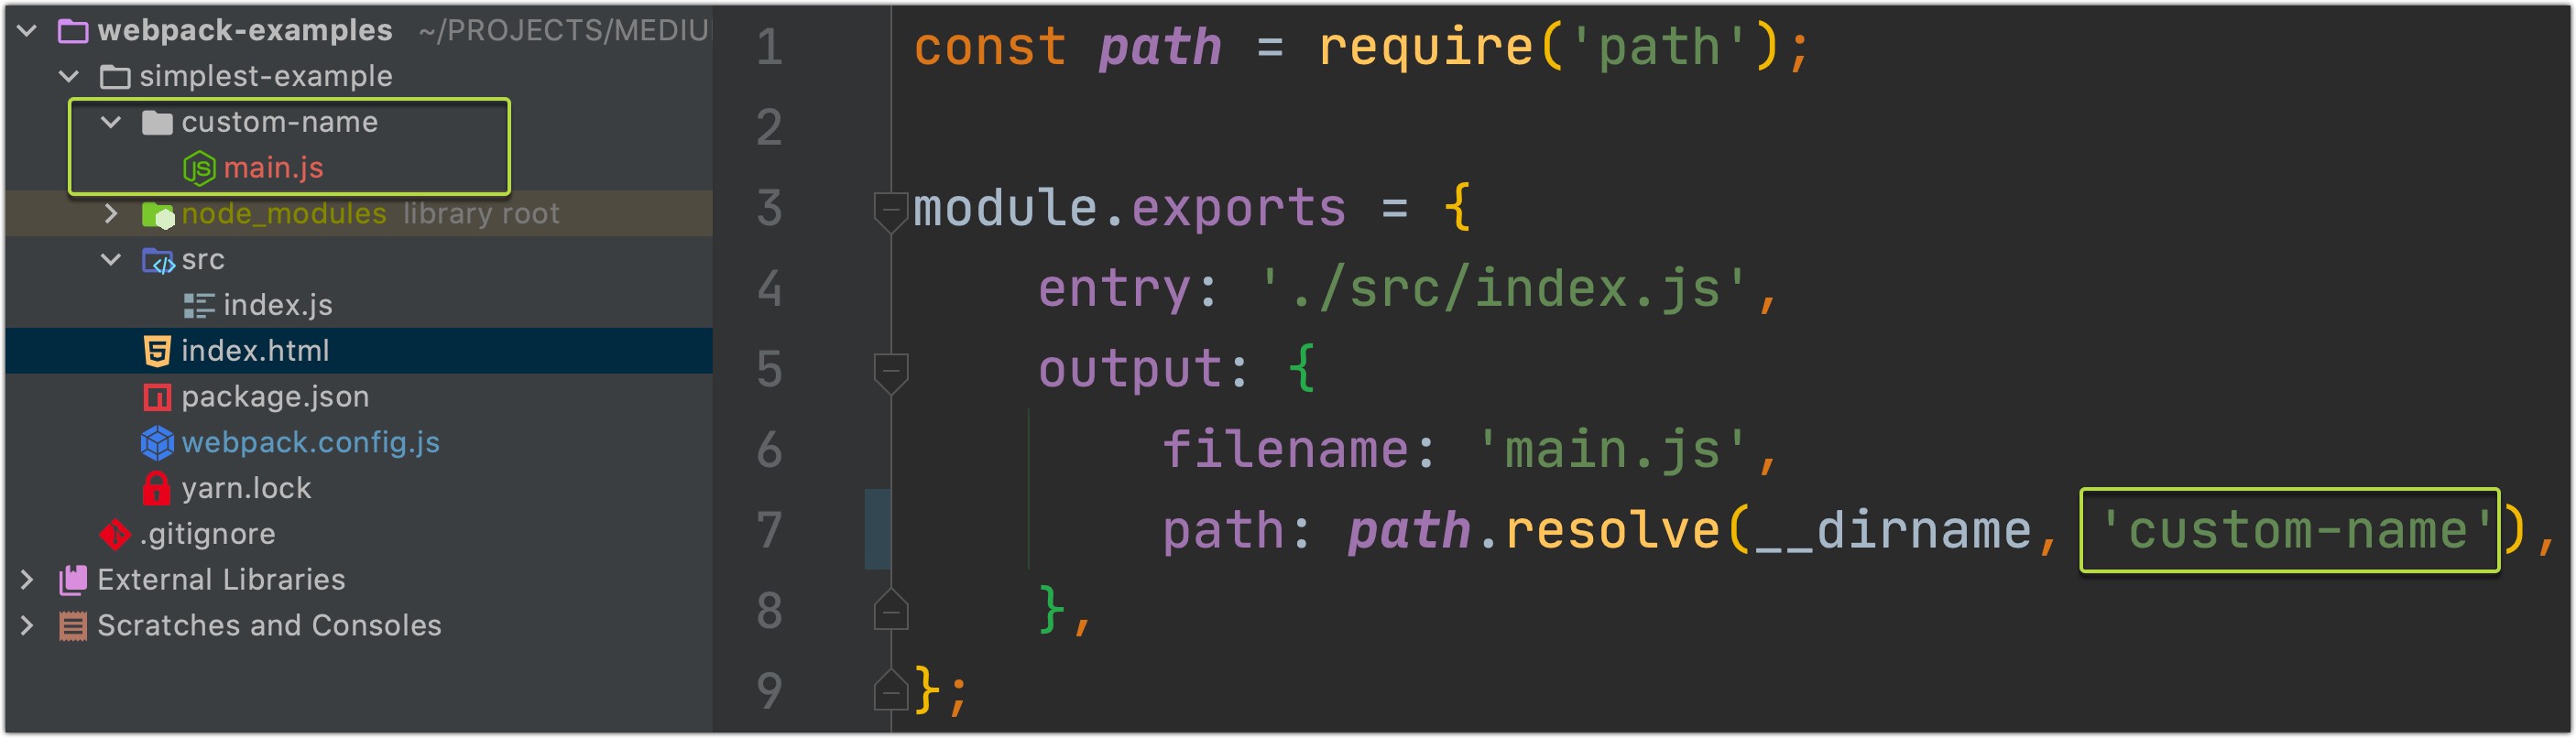
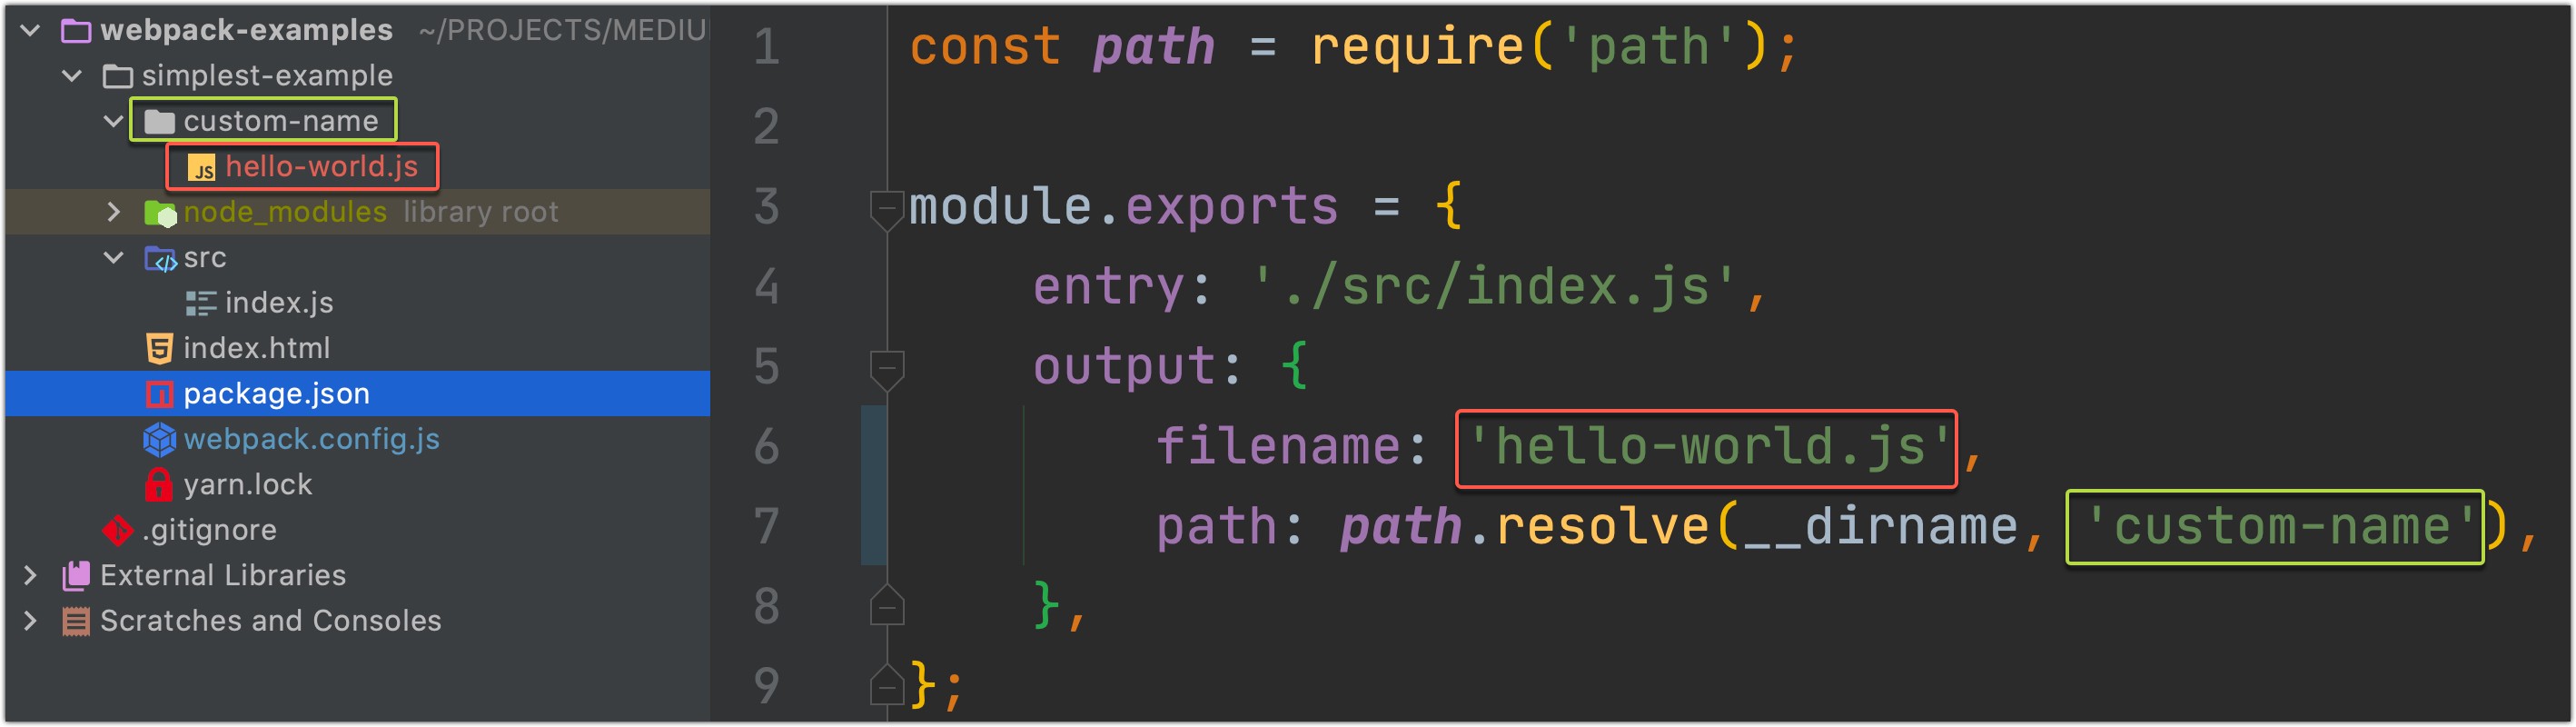
3. Make app’s bundle file inside a customly named file:
3.将应用程序的捆绑文件放在自定义文件中 :
I think now you have an excellent understanding of those properties.
我认为您现在对这些属性有了很好的了解。
3.在文件保存时重新生成捆绑包 (3. Regenerate bundle on file save)
If you will add --watch flag to the npx webpack command, webpack will automatically regenerate your bundle file each time you will change and save your code:
如果将--watch标志添加到npx webpack命令,则每次更改并保存代码后, webpack都会自动重新生成捆绑文件:
And you can achieve the same result if you will and watch: true to the webpack.config.js file:
如果您愿意并且watch : true webpack.config.js文件为watch : true ,则可以实现相同的结果:
4.使用webpack-dev-server (4. Using webpack-dev-server)
We can run our app using webpack-dev-server and configure it using webpack.config.js file:
我们可以使用webpack-dev-server运行我们的应用程序,并使用webpack.config.js文件对其进行配置:
First, we need to add webpack-dev-server to our dev npm dependencies :
首先,我们需要将webpack-dev-server添加到我们的dev npm依赖项中:
npm install --save-dev webpack-dev-serverNext, run npx webpack with this configuration, so that our bundle was placed inside or root folder:
接下来,使用此配置运行npx webpack ,以便将我们的捆绑包放置在内部或根文件夹中:
After installing webpack-dev-server you can run:
安装webpack-dev-server您可以运行:
npx webpack-dev-serverBut I will add a script to the package.json file:
但是我将脚本添加到package.json文件:
"scripts": {
...
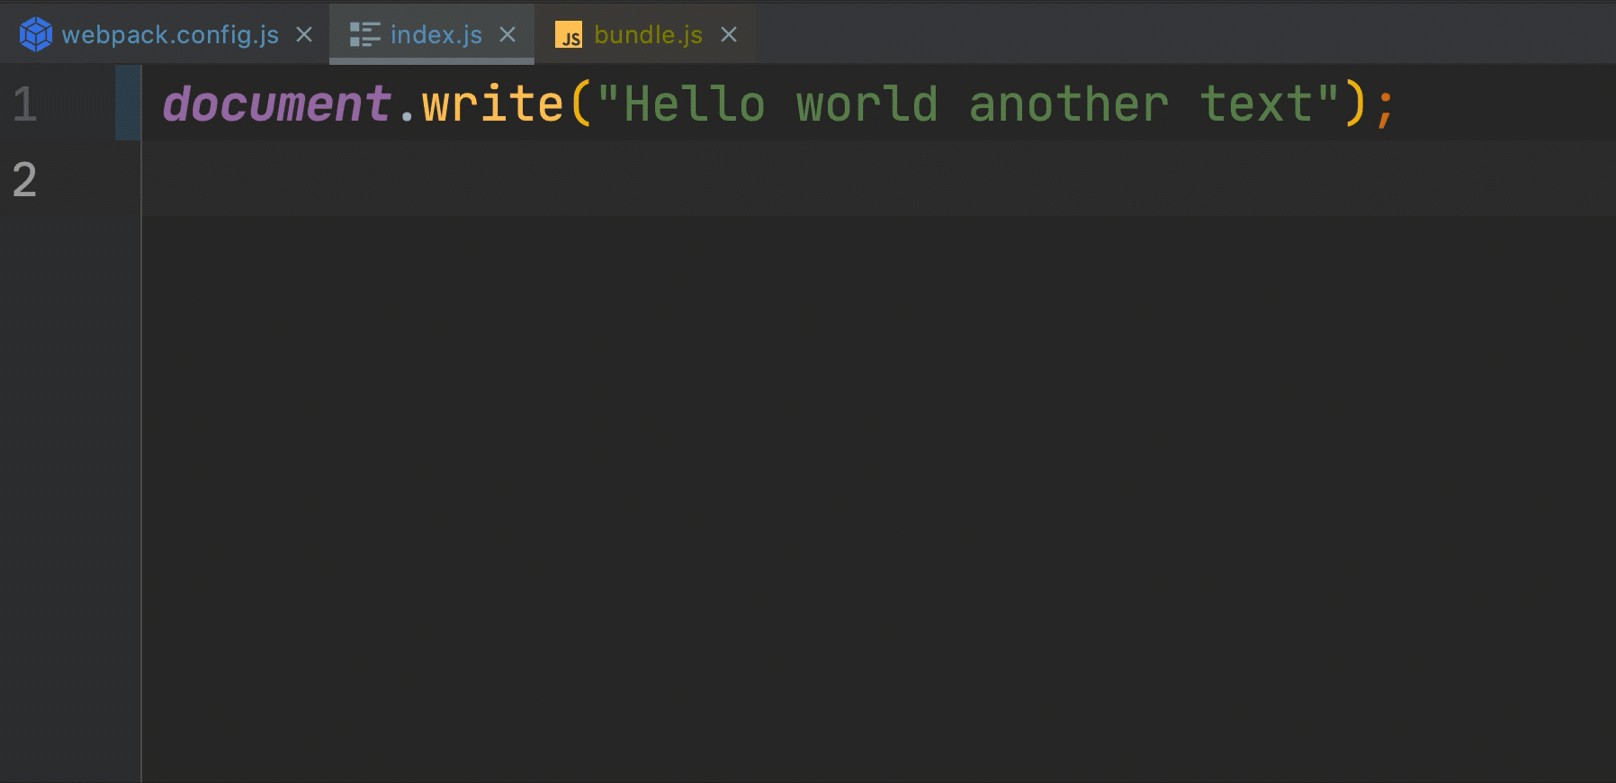
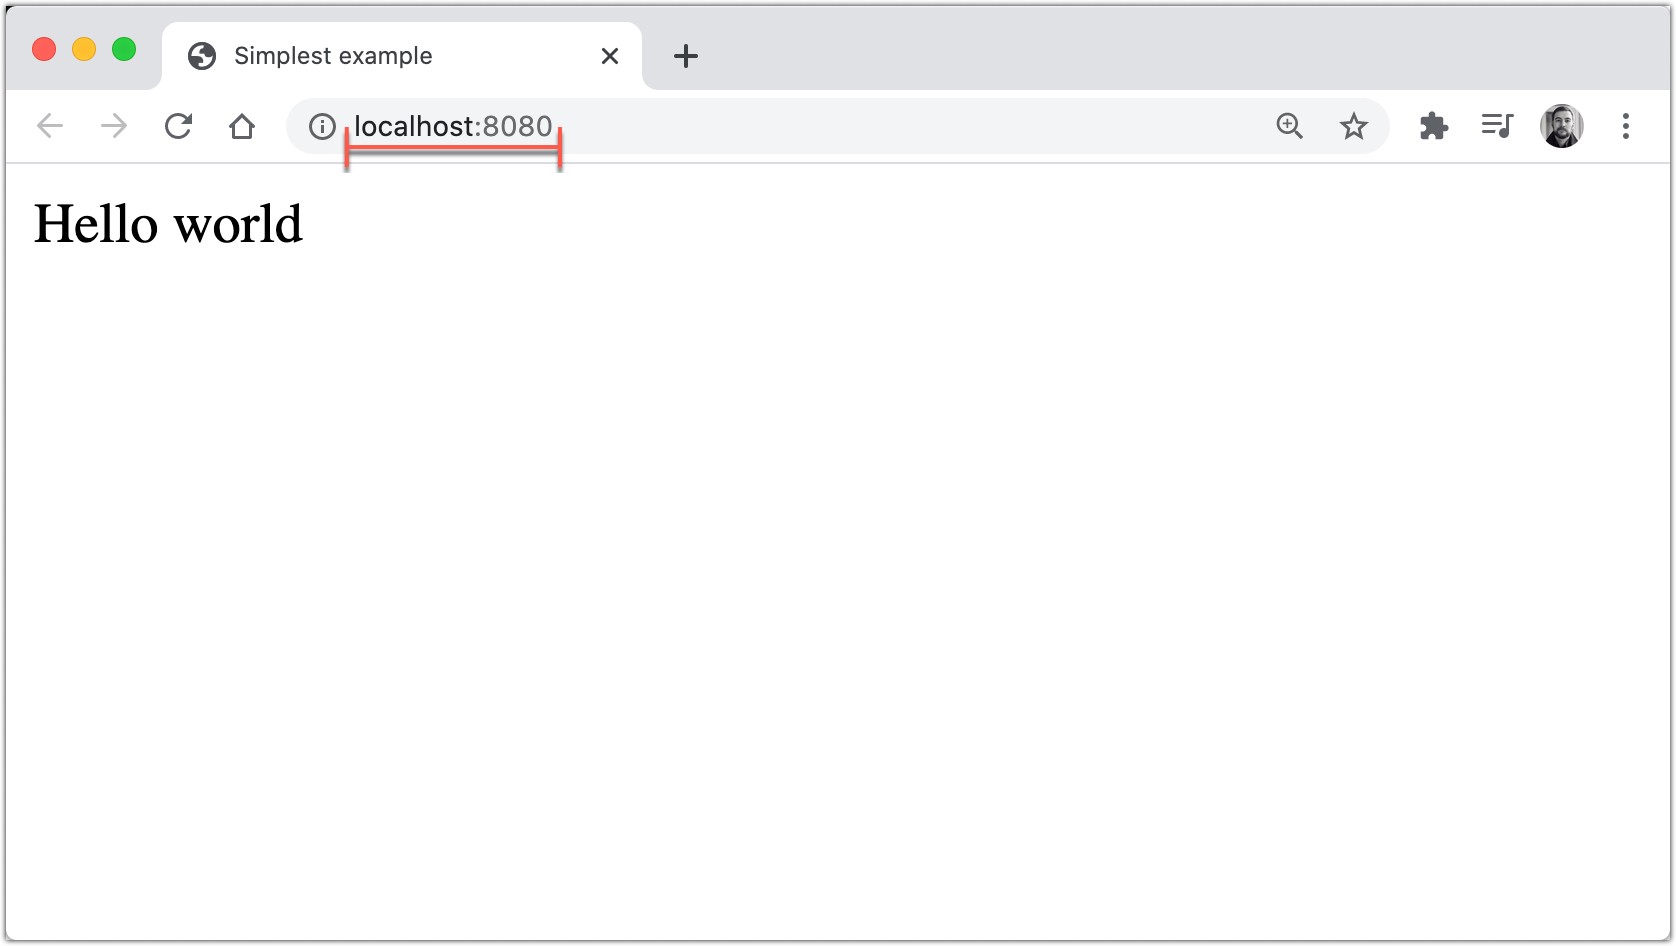
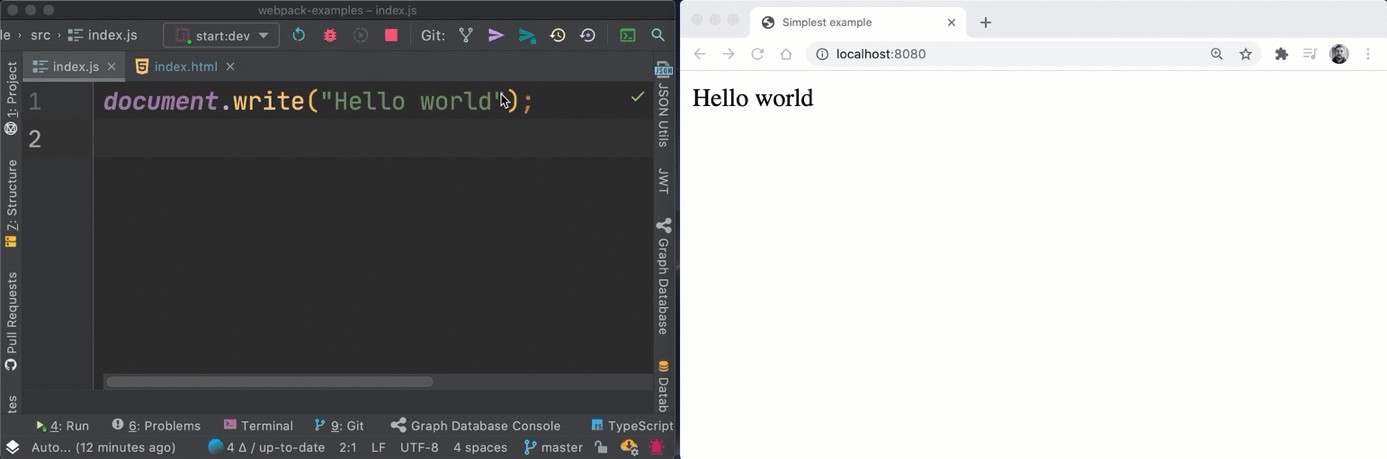
"start:dev": "webpack-dev-server"},After running that script yarn start:dev your server will start running at http://localhost:8080/ (by default). And after changing and saving your file, webpack-dev-server will automatically redeploy new version:
运行该脚本yarn start:dev您的服务器将在http://localhost:8080/开始运行(默认情况下)。 更改并保存文件后, webpack-dev-server将自动 重新部署新版本:
If you want to customize your server — you take a look at the official documentation about this.
如果要自定义服务器,请查看有关此内容的官方文档 。
5.捆绑中的多个文件 (5. Multiple files in the bundle)
Let’s add new J.S. files, but… One of them will be imported into the index.js file, but the other file will not. What webpack will do with them?
让我们添加新的JS文件,但是…其中一个将导入到index.js文件中,而另一个文件则不会。 什么webpack将对他们起作用 ?
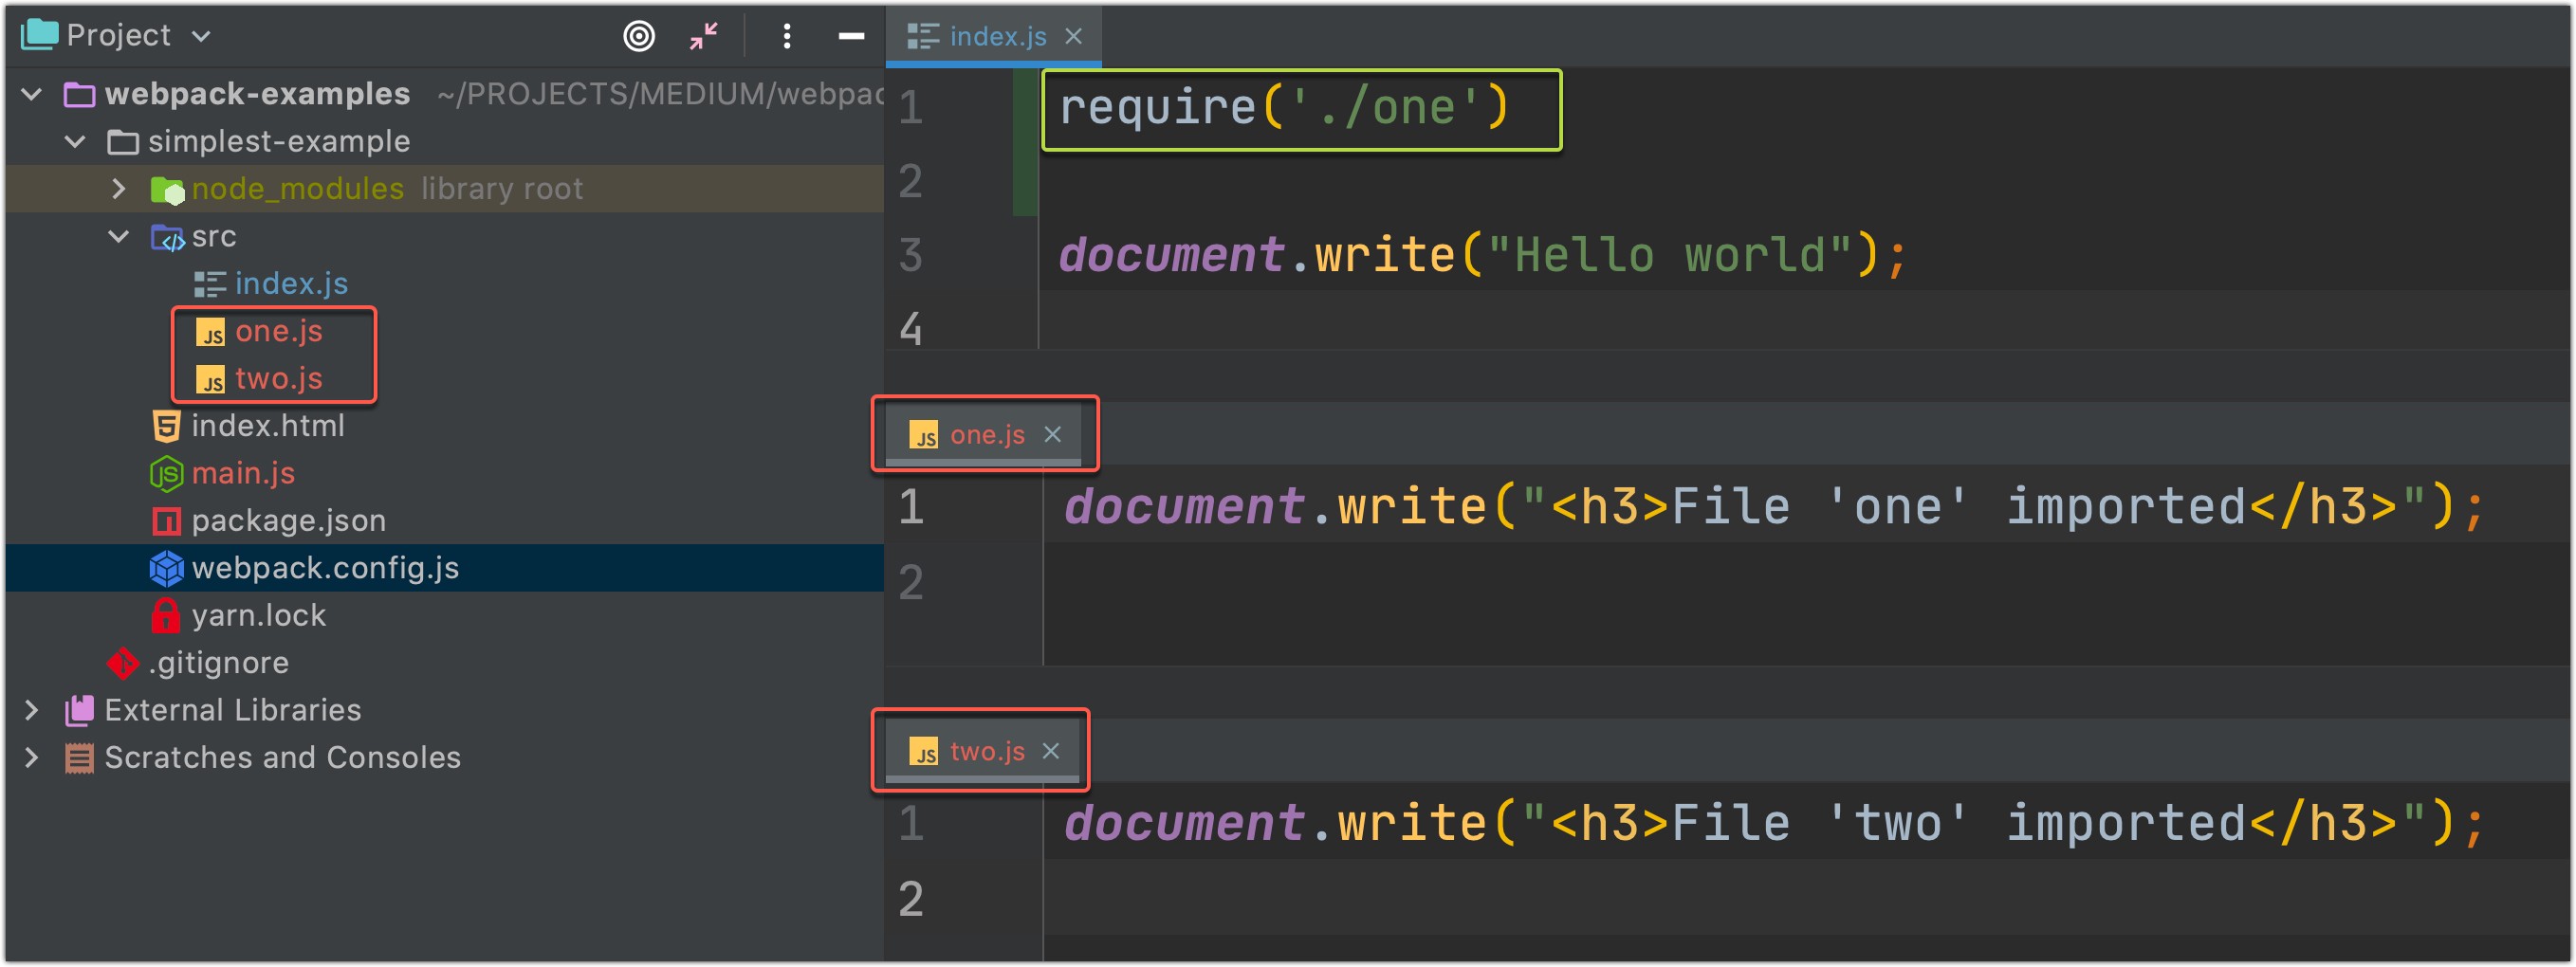
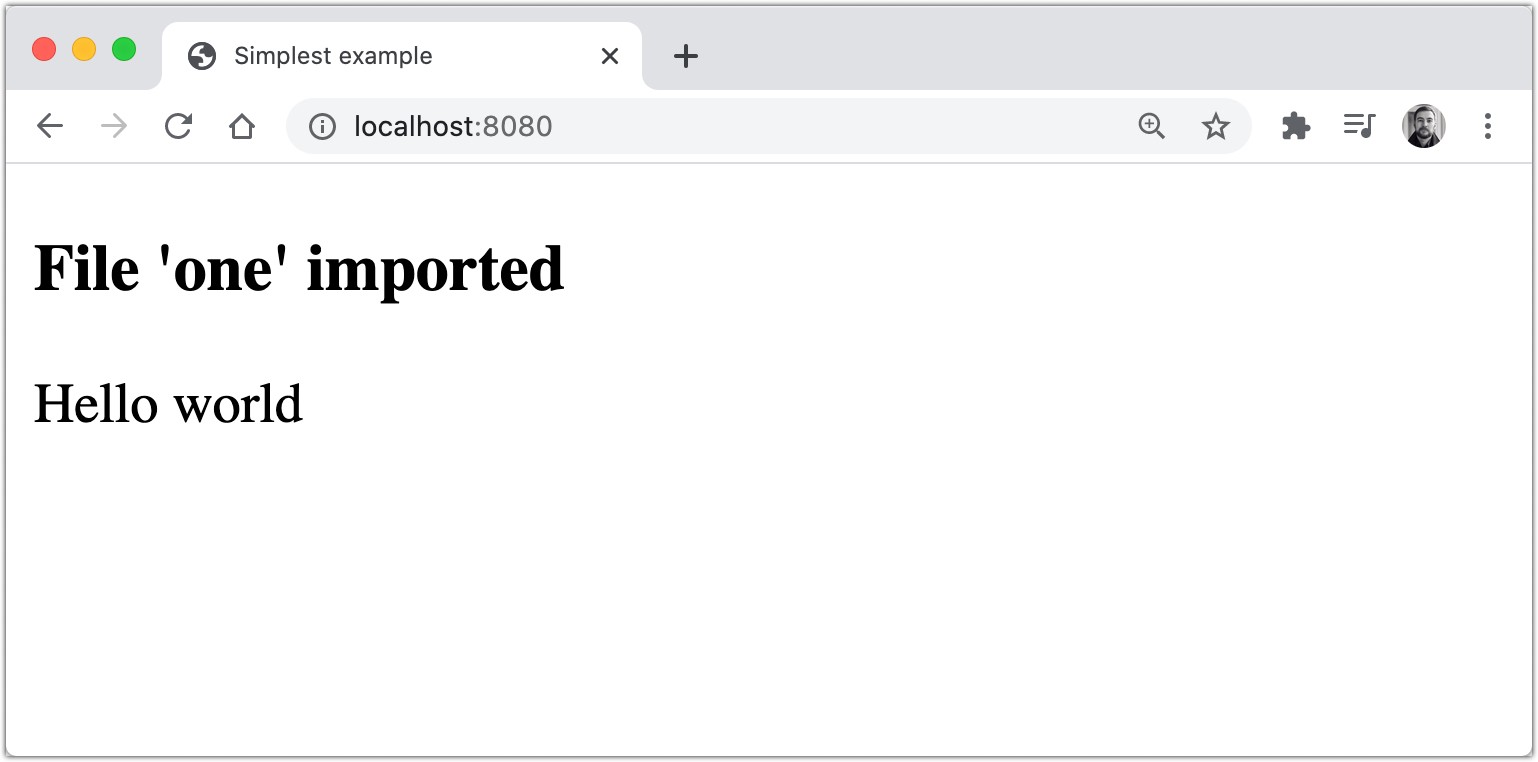
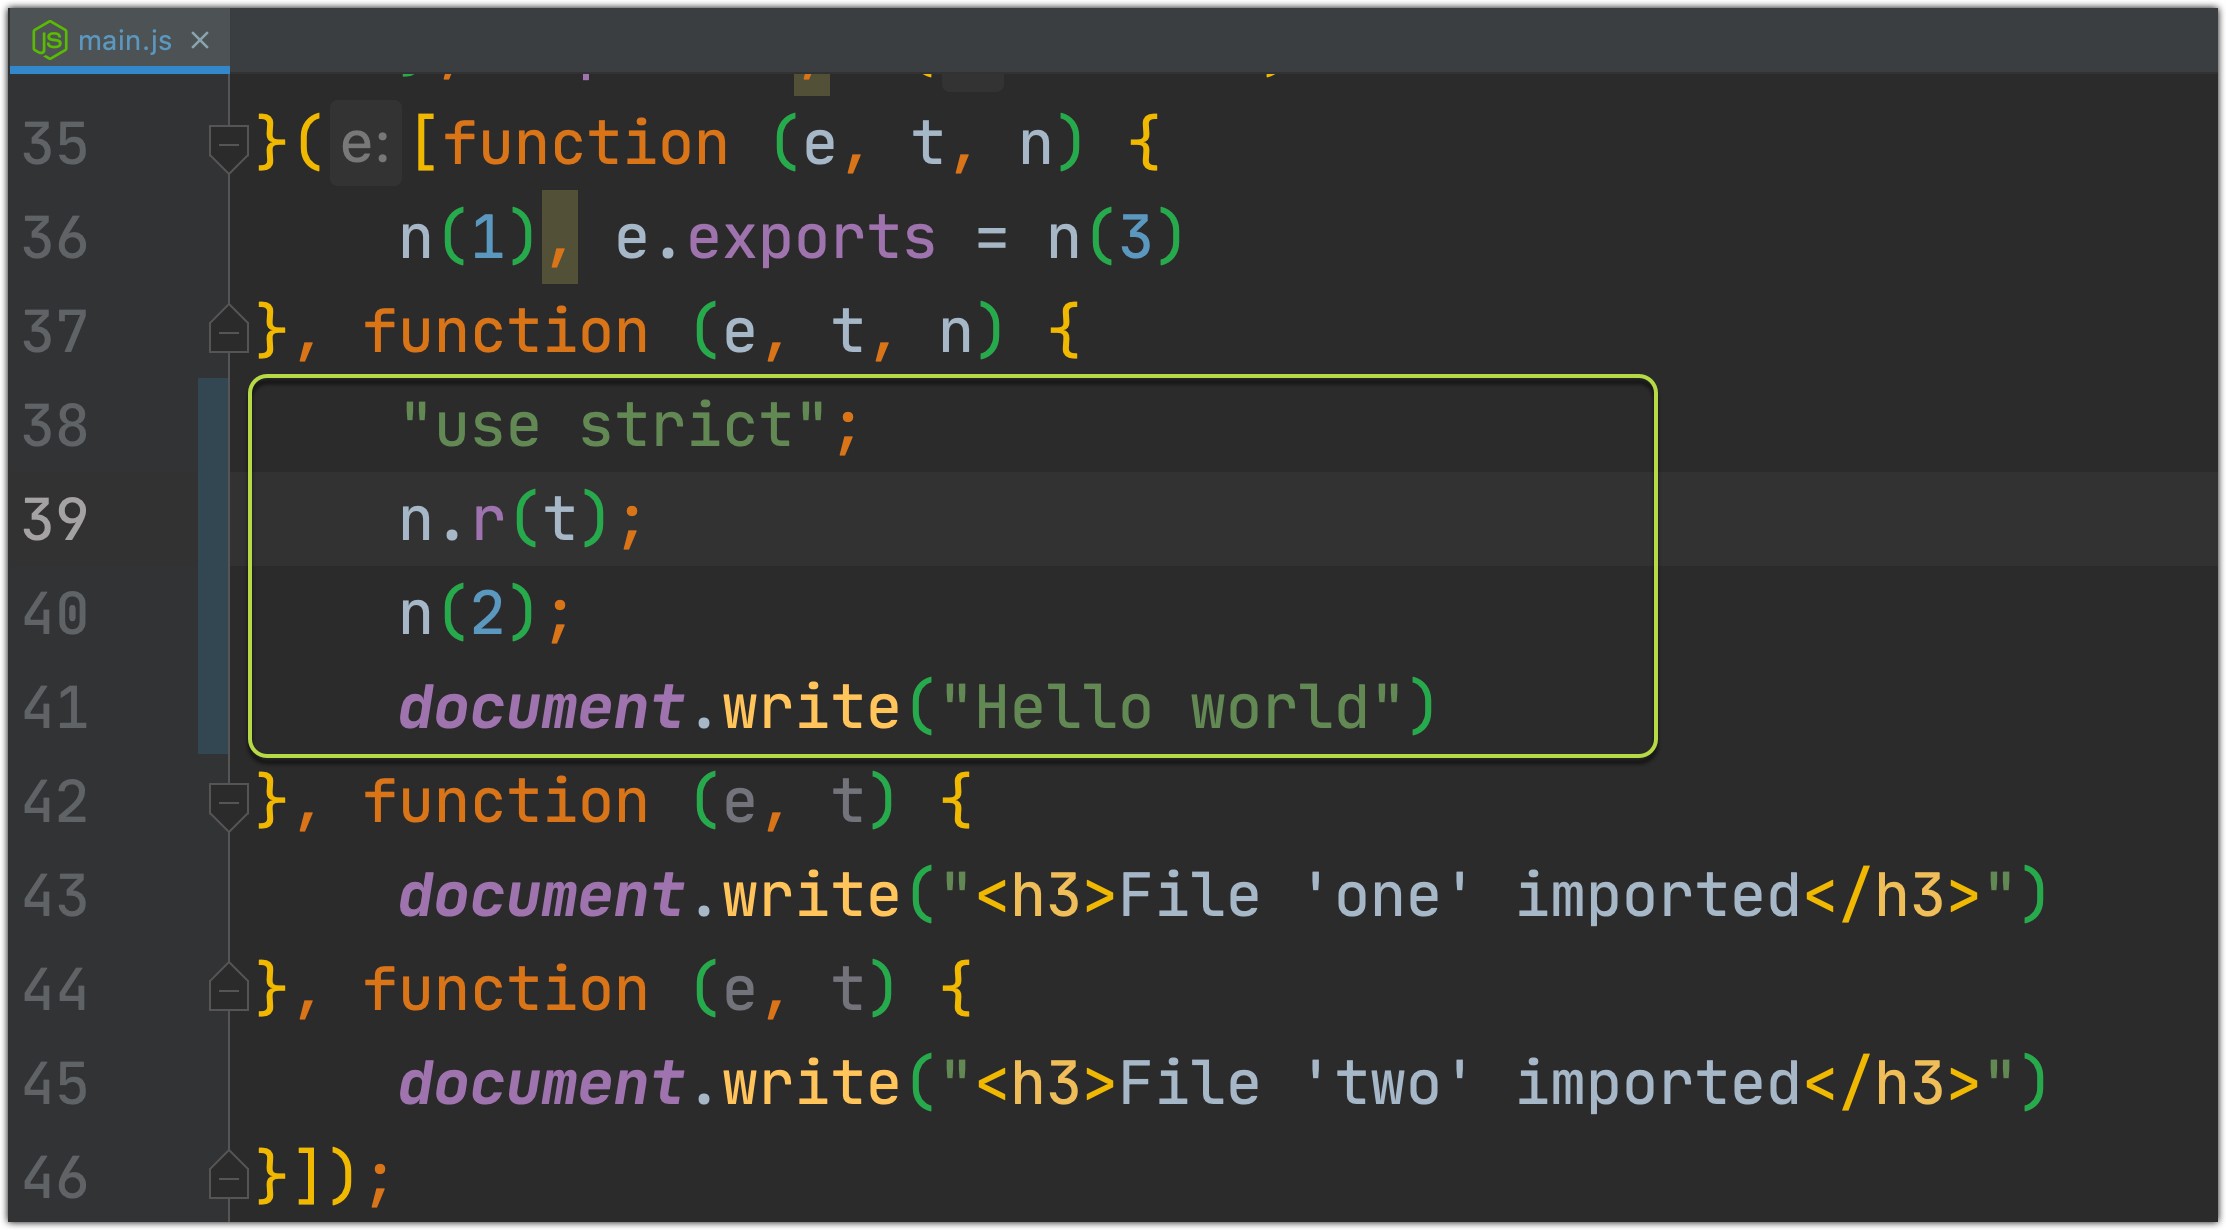
Let’s see on a new updated main.js file and our server build:
让我们看一个新的更新的main.js文件和我们的服务器构建:
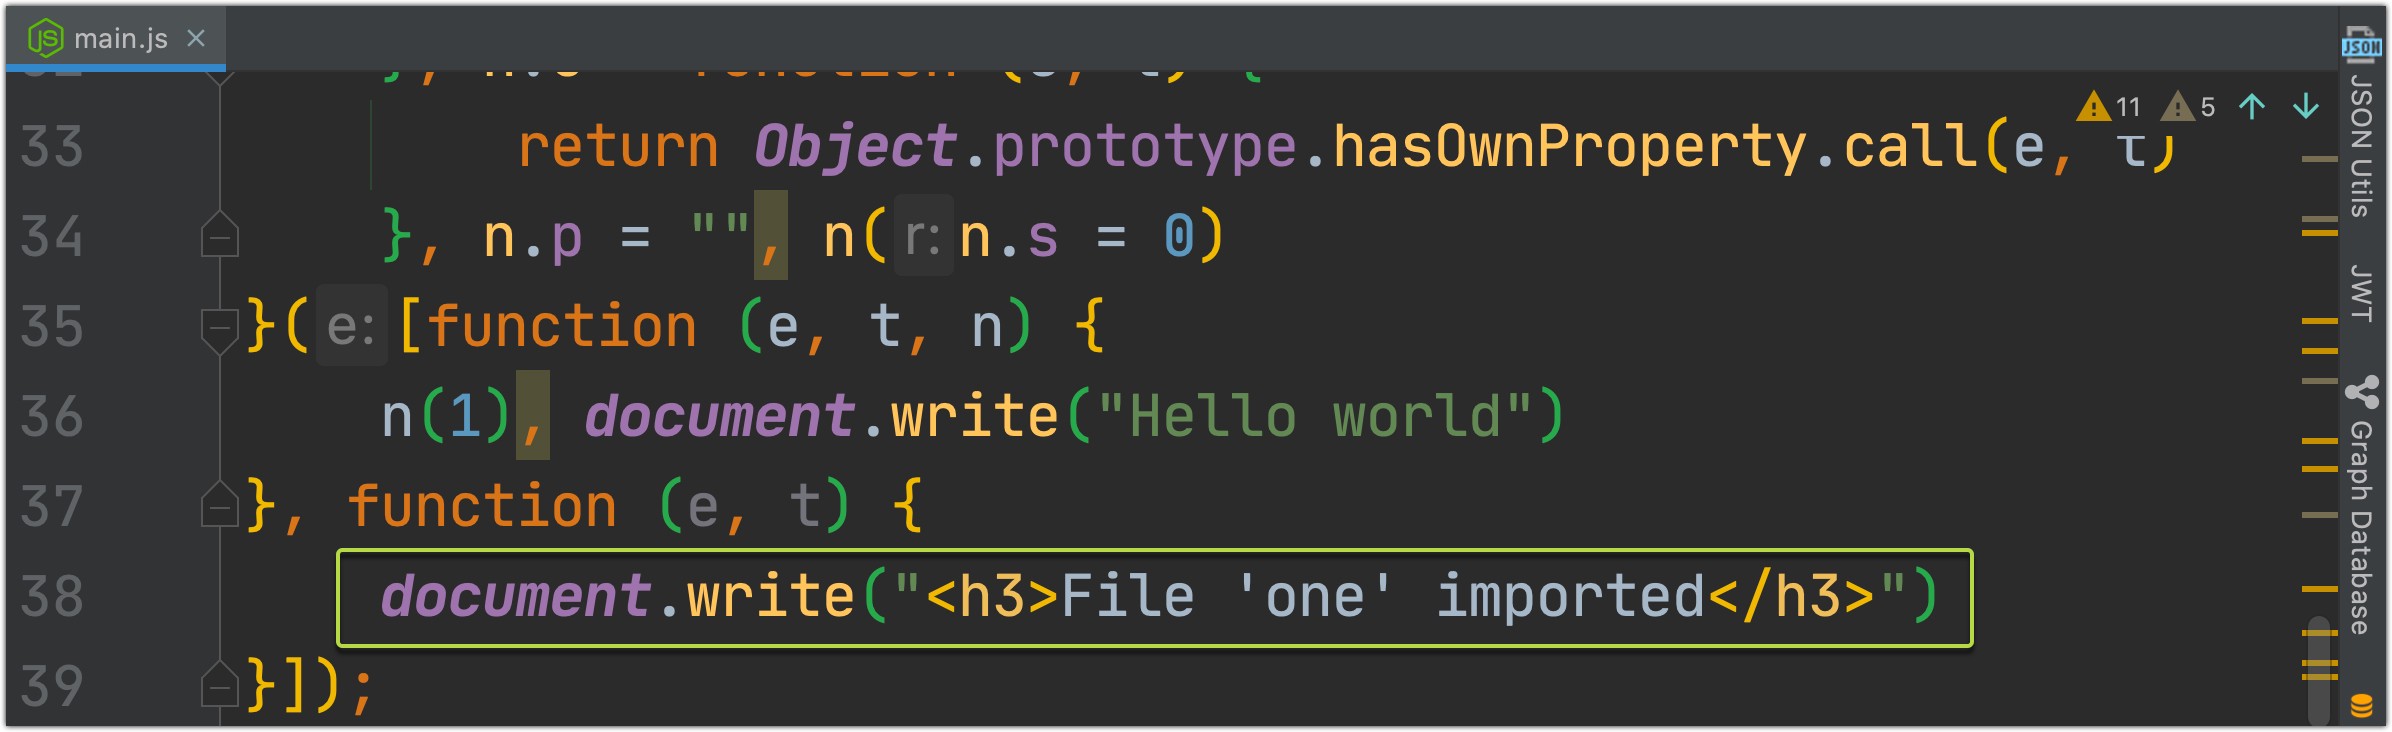

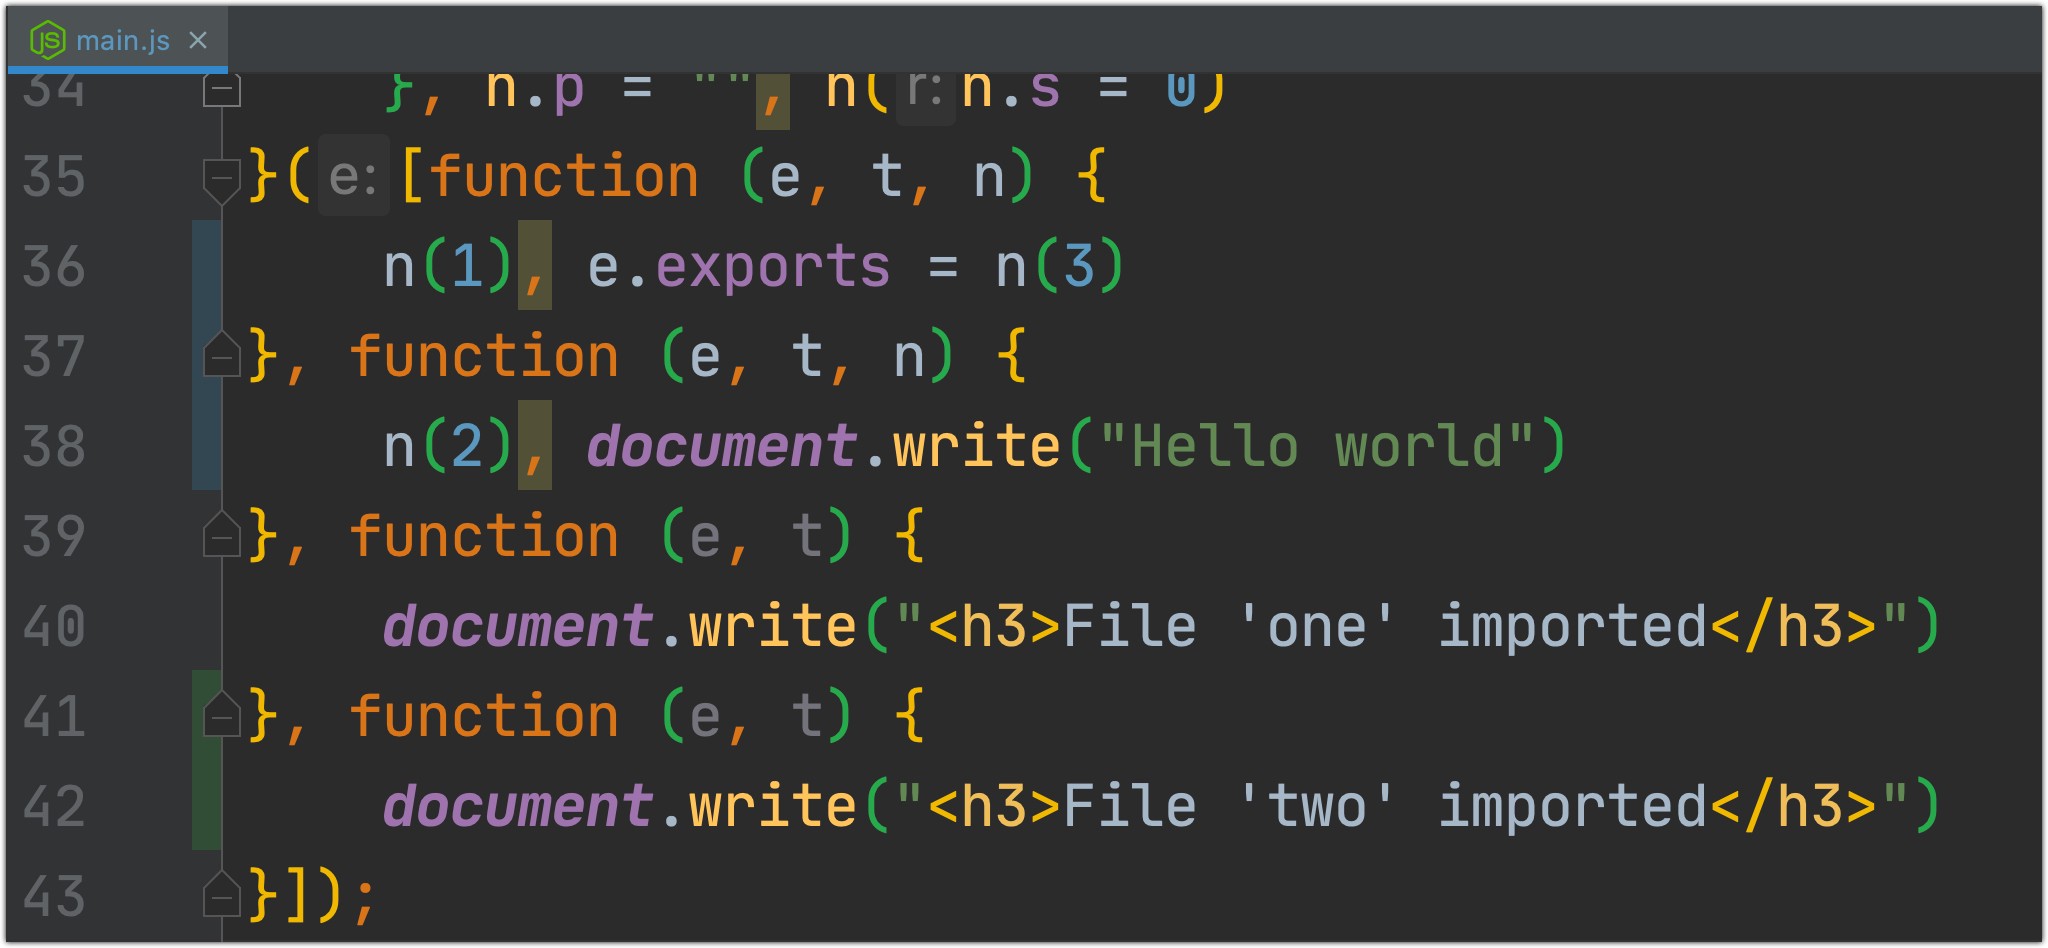
As you noticed, two.js file wasn't added to the bundle because it is not used in our application (no imports in index.js). But what can we do, what configs should we change, so that two.js file was included in the bundle?
正如您所注意到的,没有将two.js文件添加到该捆绑包中,因为该文件未在我们的应用程序中使用( index.js没有导入)。 但是我们该怎么办,我们应该更改哪些配置,以便将two.js文件包含在捆绑包中?
Let’s take a look at what was generated:
让我们看看产生了什么:
Nice job, guys! Now you know about the core features of the webpack. But those core features by themselves are not so useful as they can be. Next, we will be talking about features, that you can add, additionally to the core.
干得好,伙计们! 现在,您了解了Webpack的核心功能。 但是这些核心功能本身并没有那么有用。 接下来,我们将讨论可以添加到核心的功能。
6.使用装载机 (6. Using Loaders)
Loaders are additional features that you add to the webpack, without them, by default, webpack only knows how to handle js files with js requier imports.
加载程序是您添加到webpack的其他功能,默认情况下,没有它们, webpack只会知道如何使用js requier导入来处理js文件。
在我们的应用程序中使用ES6 (Using ES6 in our application)
As you remember, we were using require notation when we imported one.js file.
您还记得,导入one.js文件时,我们使用的是require符号。

We can use babel for star using new J.S. features like import. We need to add these packages to our dev dependencies at first place:
我们可以使用import等新的JS功能,将babel用作星标。 首先,我们需要将这些包添加到我们的开发依赖项中:
npm install -D babel-loader @babel/core @babel/preset-envNext, we need to add a babel config file .babelrc in the root of your project with this configuration ( Link to the official @babel/preset-env docs):
接下来,我们需要使用此配置在项目的根目录中添加babel配置文件.babelrc ( 链接到官方@babel/preset-env docs):
And after adding additional configuration to our webpack.config.js file about babel module…
在将其他配置添加到有关babel模块的webpack.config.js文件中之后…
… we can use ES6 import format in our J.S. files and webpack will handle the rest automatically:
…我们可以在我们的JS文件中使用ES6 import格式,而webpack将自动处理其余的内容:

And the result would be the same:
结果将是相同的:
P.S. There will be only few changes in our bundle file:
附注:我们的捆绑包文件中只有几处更改:
We will discuss how to handle html, css, images in the next chapters, (8.Adding HTML file into the build, for example)
在下一章中,我们将讨论如何处理html , css , images ( 8.Adding HTML file into the build ,将8.Adding HTML file into the build )
7.生产与开发之间的关系 (7. Production vs Development builds)
Writing separate webpack configurations for each environment is a recommendation from the official docs of webpack, so we will do that.
来自webpack官方文档的 建议是为每种环境编写单独的webpack配置,因此我们将这样做。
“Common” config file should be “used” in dev and prod config files, because they will share that common config (so we don't need to copy-paste config props). For this we will need to use webpack-merge npm package:
“公共”配置文件应在dev和prod配置文件中“使用”,因为它们将共享该公共配置(因此我们无需复制粘贴配置道具)。 为此,我们将需要使用webpack-merge npm软件包:
npm install --save-dev webpack-merge// or
yarn add webpack-merge -D
After installing that package we can create webpack.common.js , webpack.dev.js and webpack.prod.js config files:
安装该软件包后,我们可以创建webpack.common.js , webpack.dev.js和webpack.prod.js配置文件:
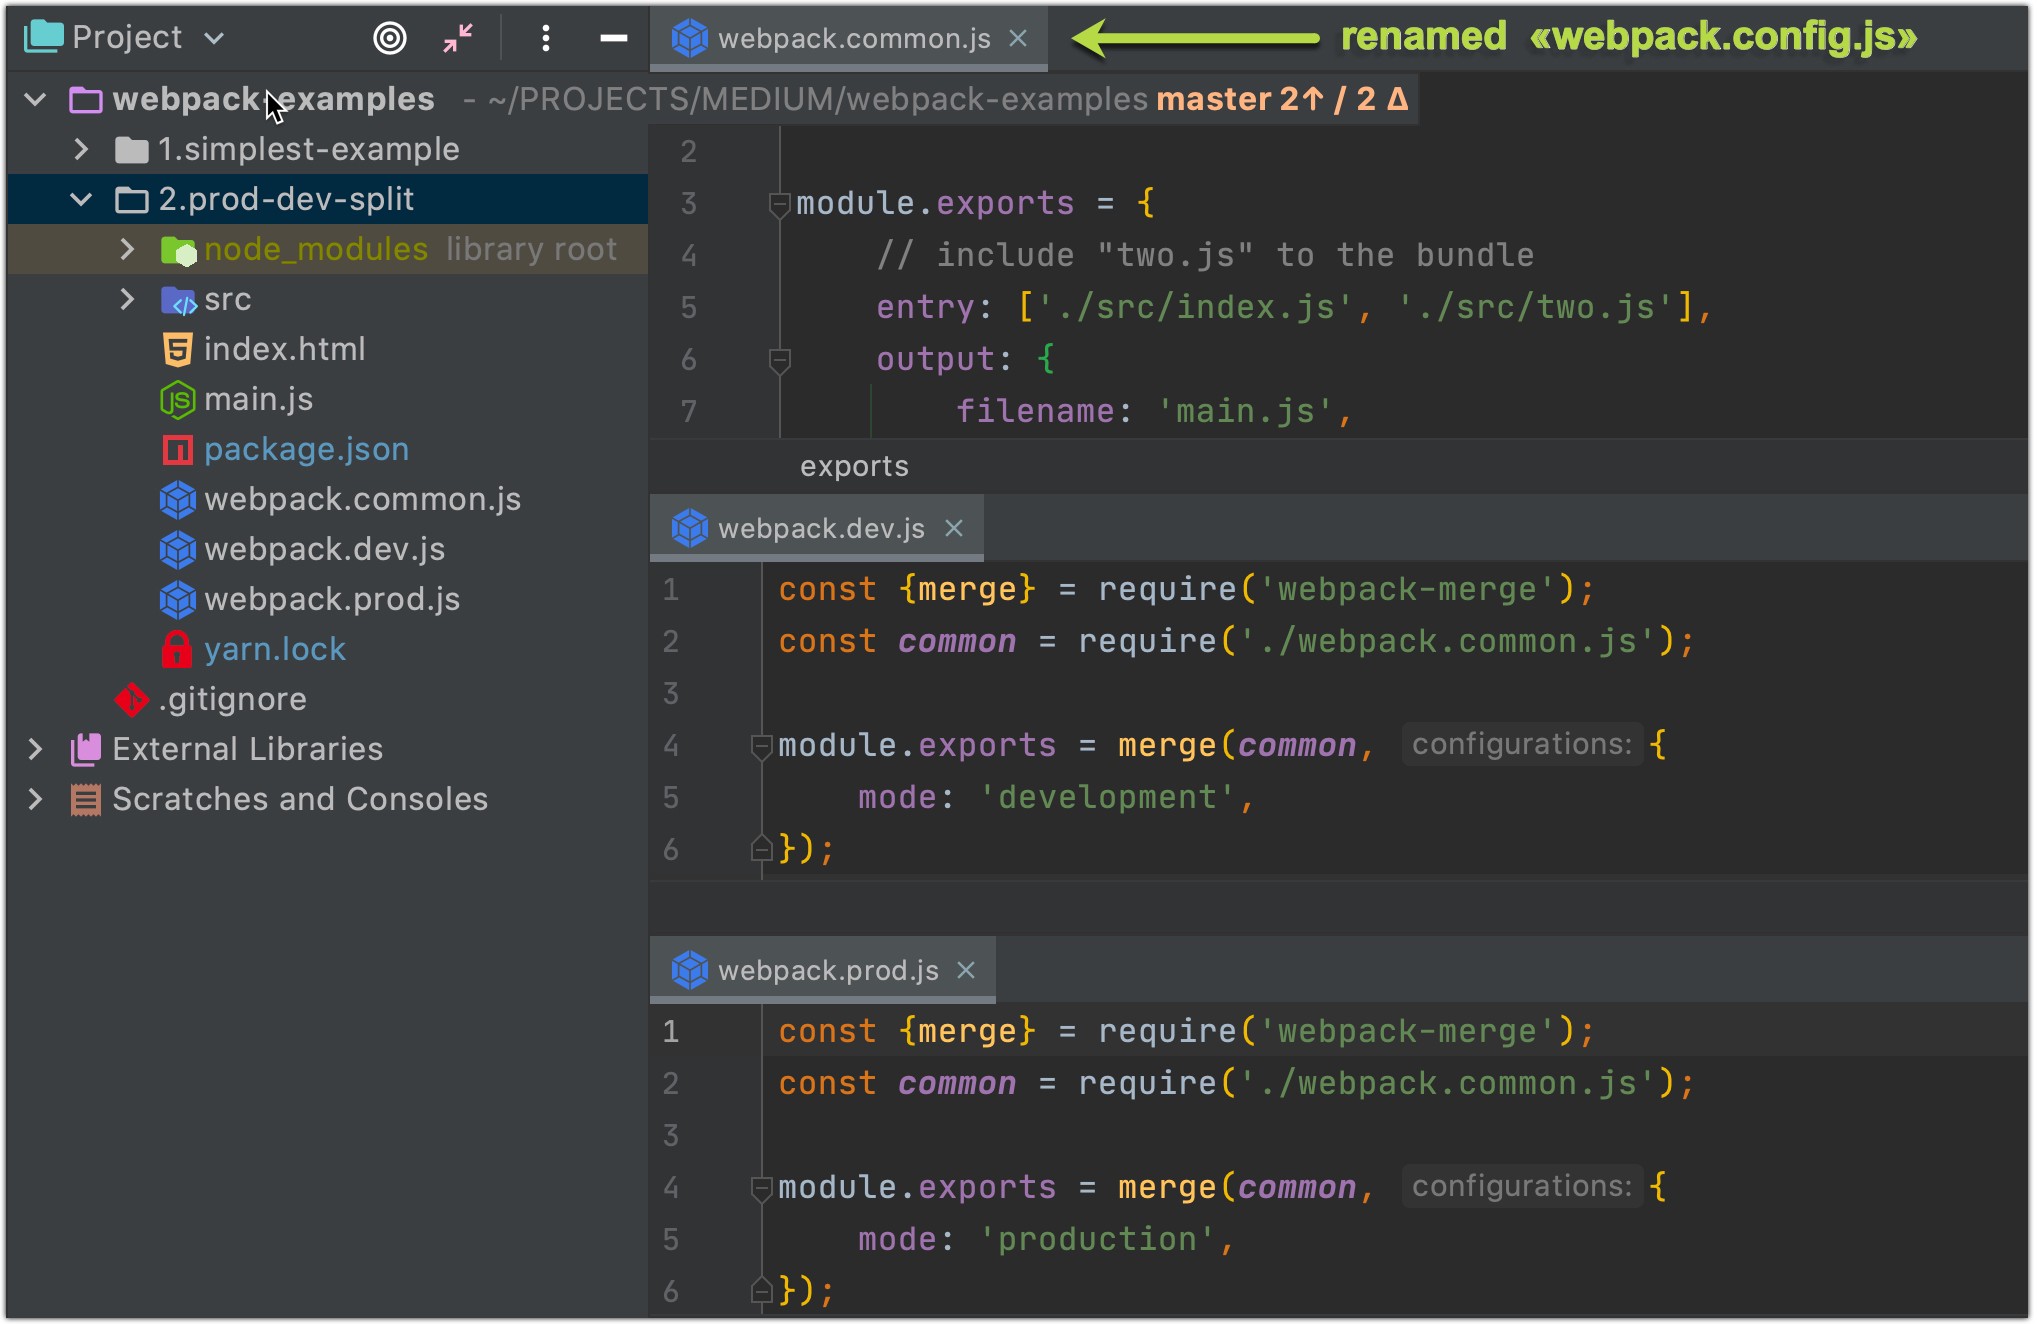
webpack.common.jsis exactly the same as described in Chapter 6
webpack.common.js与第6章中所述完全相同
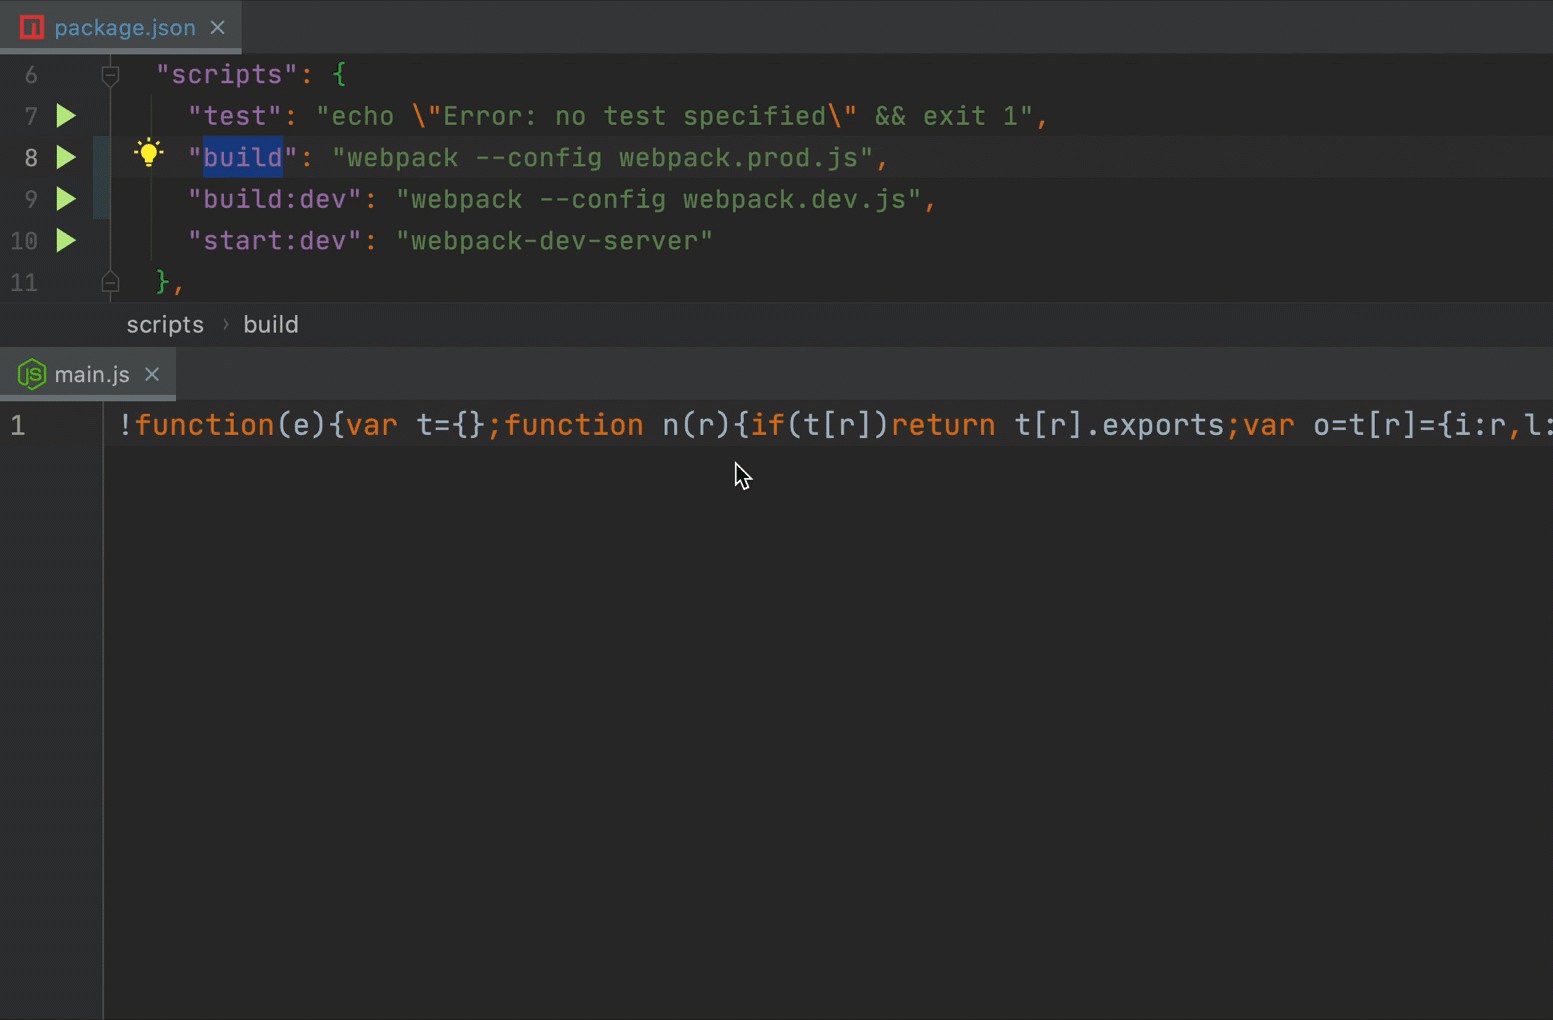
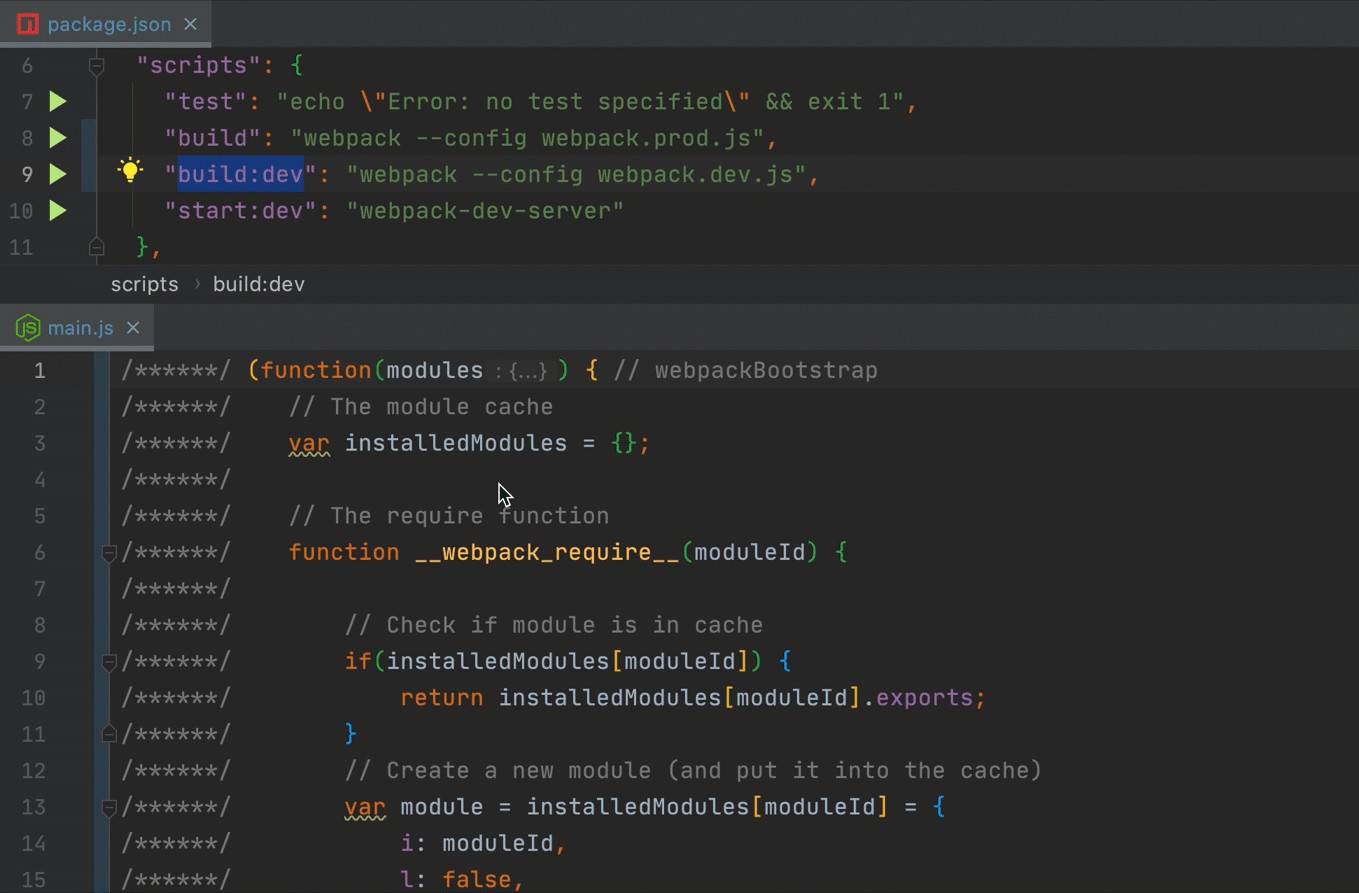
After adding build and build:dev scripts to our package.json file…
在将build和build:dev脚本添加到我们的package.json文件之后……
"scripts": {
  ...
  "build": "webpack --config webpack.prod.js",
  "build:dev": "webpack --config webpack.dev.js",},
… we will run them and see on results:
…我们将运行它们并查看结果:
产品(纱线运行版本) (Prod (yarn run build))
webpack v4+ will minify your code by default in “production mode”.
默认情况下,webpack v4 +将在“生产模式”下最小化您的代码。
开发人员(纱线执行build:dev) (Dev (yarn run build:dev))
Now you can easily add any new functionality to prod or dev webpack configuration files separately.
现在,您可以轻松地将任何新功能分别添加到prod或dev webpack配置文件中。

!!
webpack-dev-serverwill look for thewebpack.config.jsfile, he doesn't know anything about yourdevorprodconfigs. Let’s see on a few examples:!!
webpack-dev-server将查找webpack.config.js文件,他对您的dev或prod配置一无所知。 让我们看几个例子:

Currently, we have two config files in our project webpack.common.js and webpack.config.js . Let's start webpack-dev-server by running this command:
当前,我们的项目webpack.common.js和webpack.config.js有两个配置文件。 让我们通过运行以下命令来启动webpack-dev-server :
npx webpack-dev-server
As you can see our server started on port 8081 defined in webpack.config.js file.
如您所见,我们的服务器从webpack.config.js文件中定义的端口8081启动。
For specifying another config file that our server should use before start:
要指定服务器在开始之前应使用的另一个配置文件:
npx webpack-dev-server --config webpack.common.js
Now our server started on port 9000, nice.
现在我们的服务器在端口9000上启动,很好。
8. Adding HTML file into the build (8. Adding HTML file into the build)
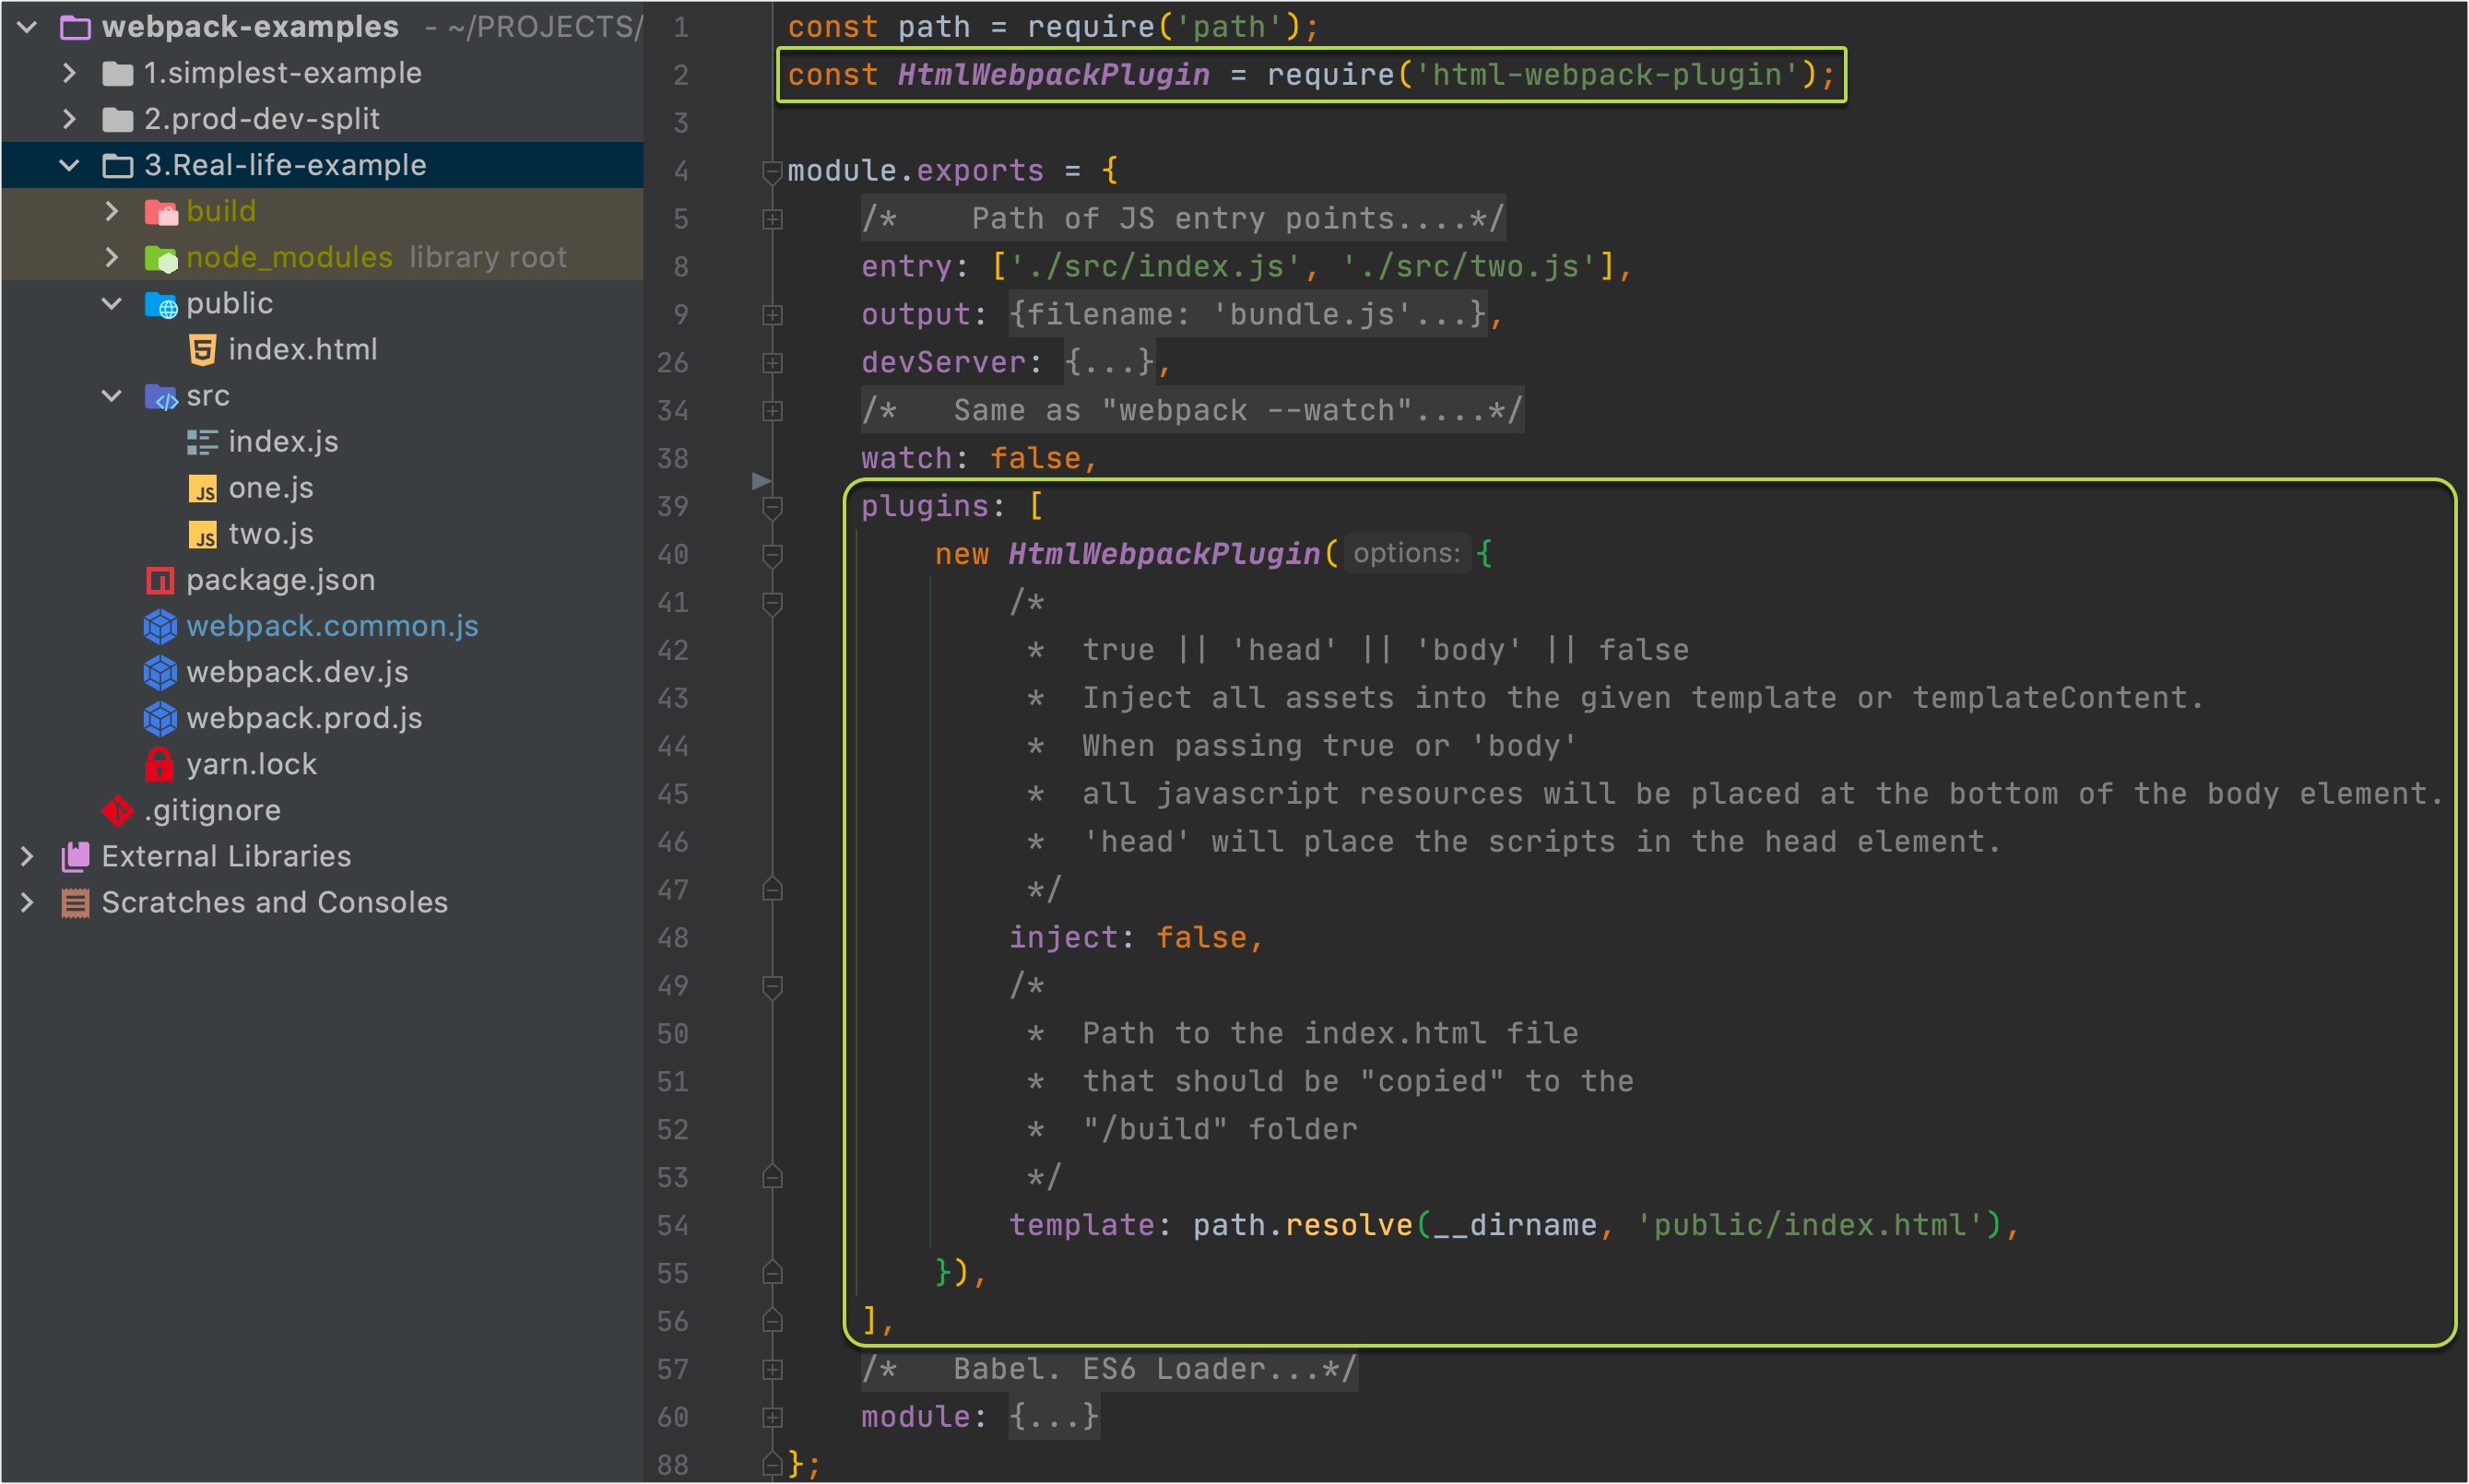
Currently, we have index.html file in a /public folder. How can we move it to /build folder during webpack build? For this task, we will need html-webpack-plugin :
当前,我们在/public文件夹中有index.html文件。 在webpack构建期间如何将其移动到/build文件夹? 对于此任务,我们将需要html-webpack-plugin :
npm install --save-dev html-webpack-plugin
yarn add html-webpack-plugin -D
After that, we will need to add some configuration props to our webpack.common.js file:
之后,我们将需要在webpack.common.js文件中添加一些配置道具:
Let’s see on a result:
让我们看一下结果:
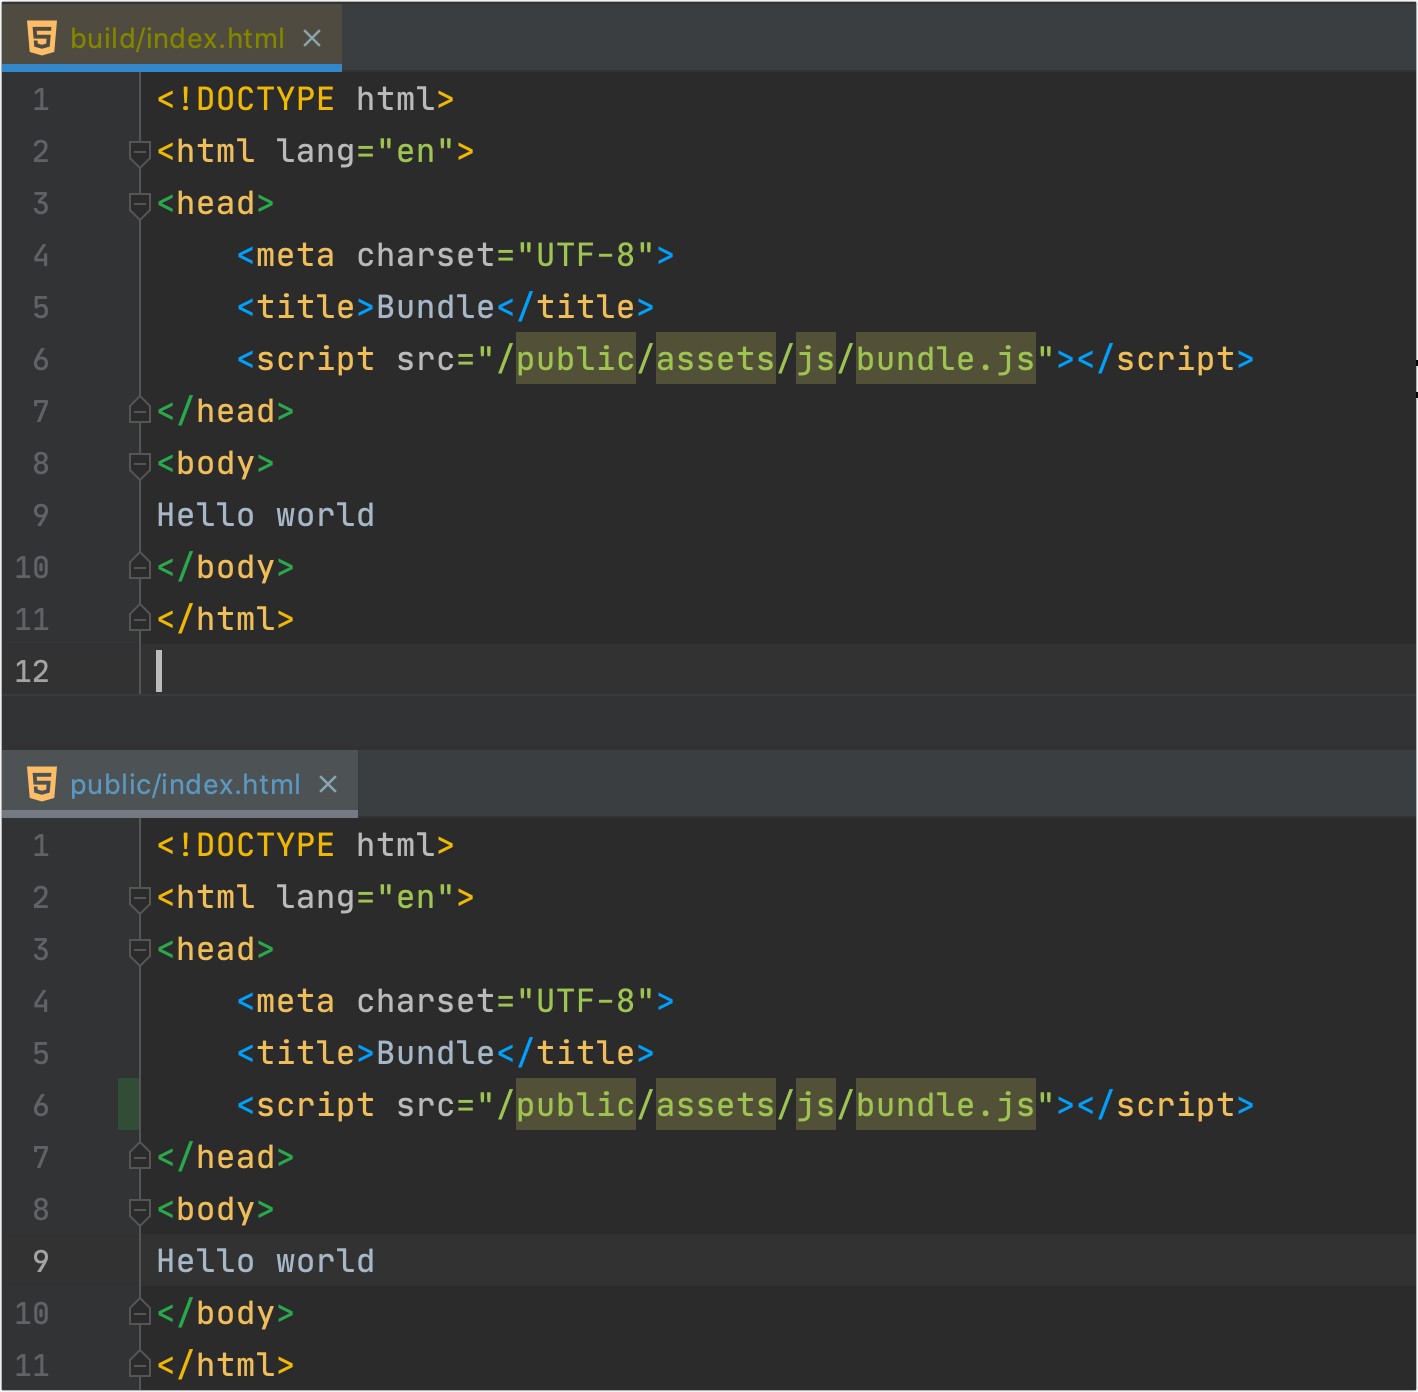
As you can see index.html in a /build folder, is the same copy of index.html in /public folder. But what will happen if we set inject:true. Let's see:
正如你所看到index.html在/build文件夹,是同一副本index.html在/public文件夹中。 但是,如果我们设置inject:true将会发生什么。 让我们来看看:
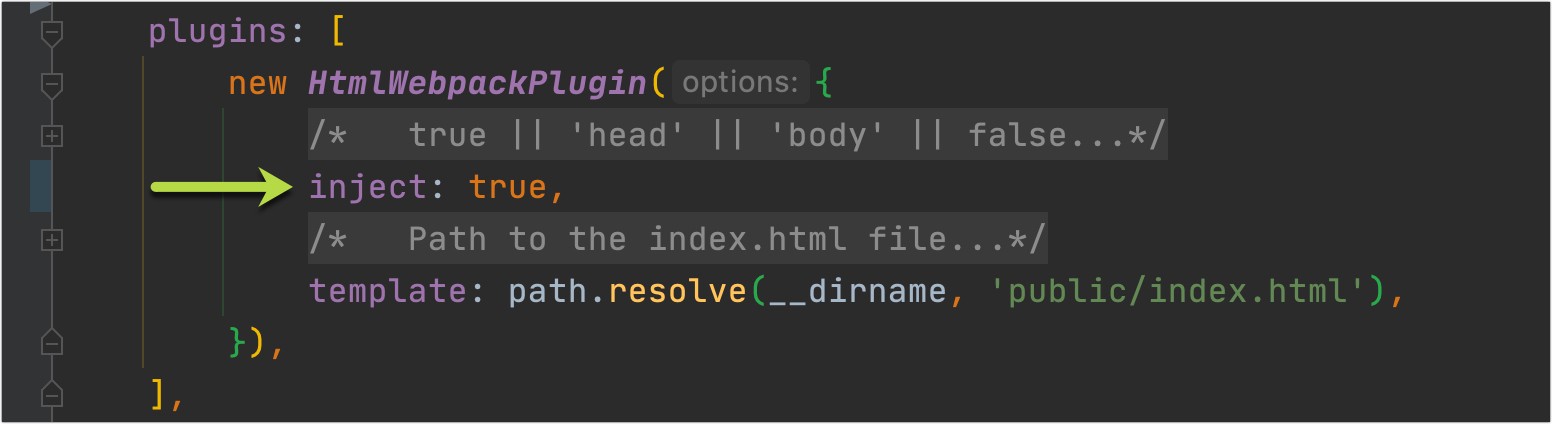
Run npx webpack — config webpack.dev.js :
运行npx webpack — config webpack.dev.js :

As you can see, inject:true property will add path to our bundle.js file into our "template" — index.html file. Path that is injected -> is a combination of output.publicPath and output.filename props in our webpack.commom.js config file.
如您所见, inject:true属性会将我们bundle.js文件的路径添加到我们的“模板”(即index.html文件)中。 注入的路径->是webpack.commom.js配置文件中output.publicPath和output.filename道具的组合。

9.将CSS添加到构建中 (9. Adding CSS into the build)
Ok, now we would like to import a handy reset CSS file to our index.html so that at the beginning all our styles were the same for all browsers (as you know each browser uses their own default styles).
好的,现在我们想将一个方便重置的 CSS文件导入到我们的index.html以便在开始时所有浏览器的所有样式都相同(您知道每个浏览器都使用自己的默认样式)。
9.1将CSS添加到JS捆绑包 (9.1 Adding CSS to J.S. bundle)
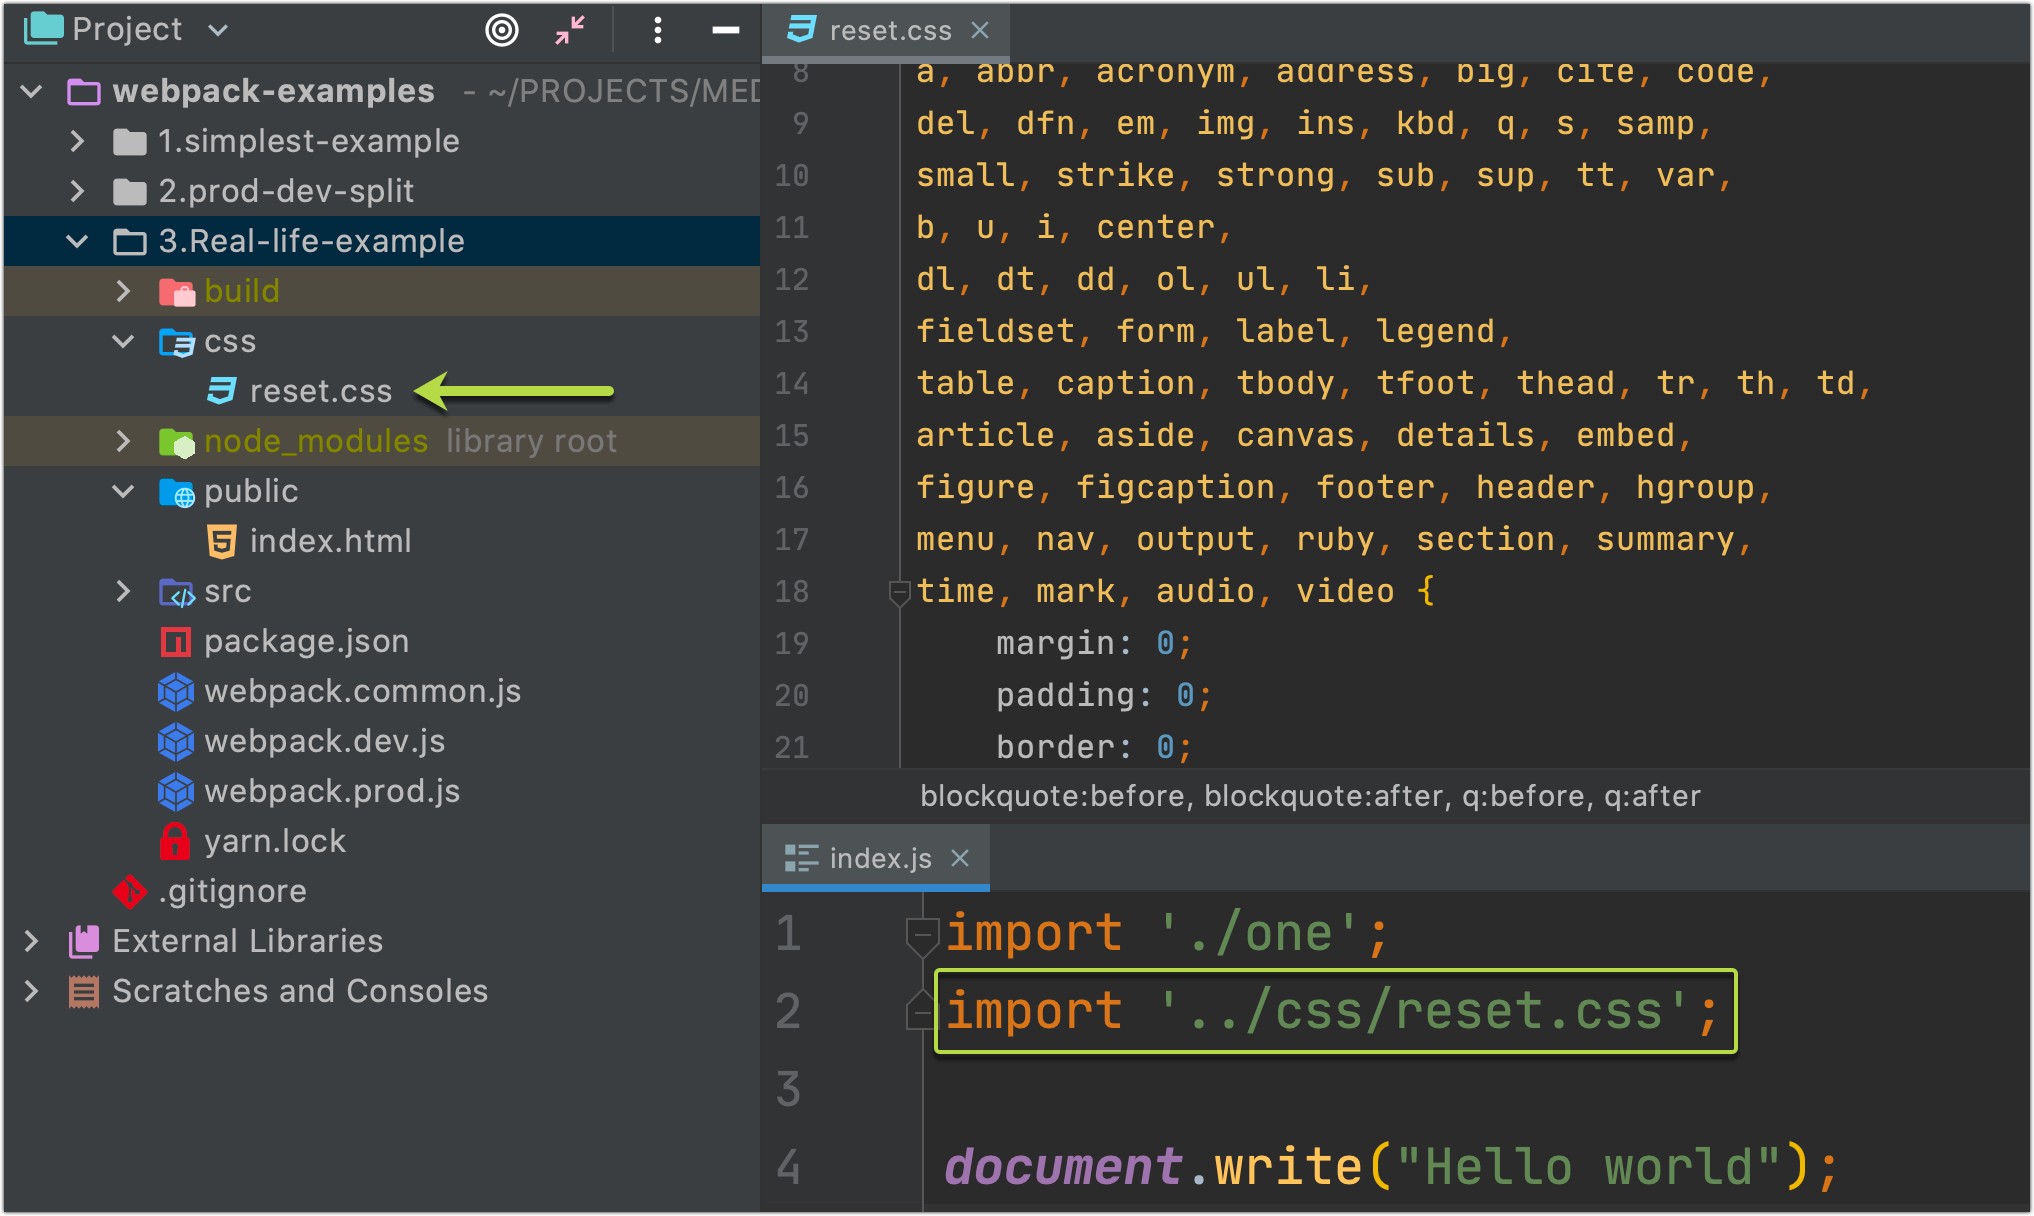
We have added these reset styles to our project, imported it, but…
我们已经将这些重置样式添加到我们的项目中,并将其导入,但是…

… webpack doesn’t know how to handle CSS files. For that case, we would need to add css-loader and style-loader:
…webpack不知道如何处理CSS文件。 对于这种情况,我们需要添加css-loader和style-loader :
npm install --save-dev css-loader style-loader
// or
yarn add css-loader style-loader -D
After that, we should add new configuration to webpack.common.js file:
之后,我们应该向webpack.common.js文件添加新配置:
Now, let’s run a new build npx webpack — config webpack.dev.js and see at the results:
现在,让我们运行一个新的构建npx webpack — config webpack.dev.js并查看结果:

As you can see all our styles (margins, paddings, etc) were deleted. And what is we will add our own styles?
如您所见,我们所有的样式(边距,填充等)均已删除。 我们将添加自己的样式吗?
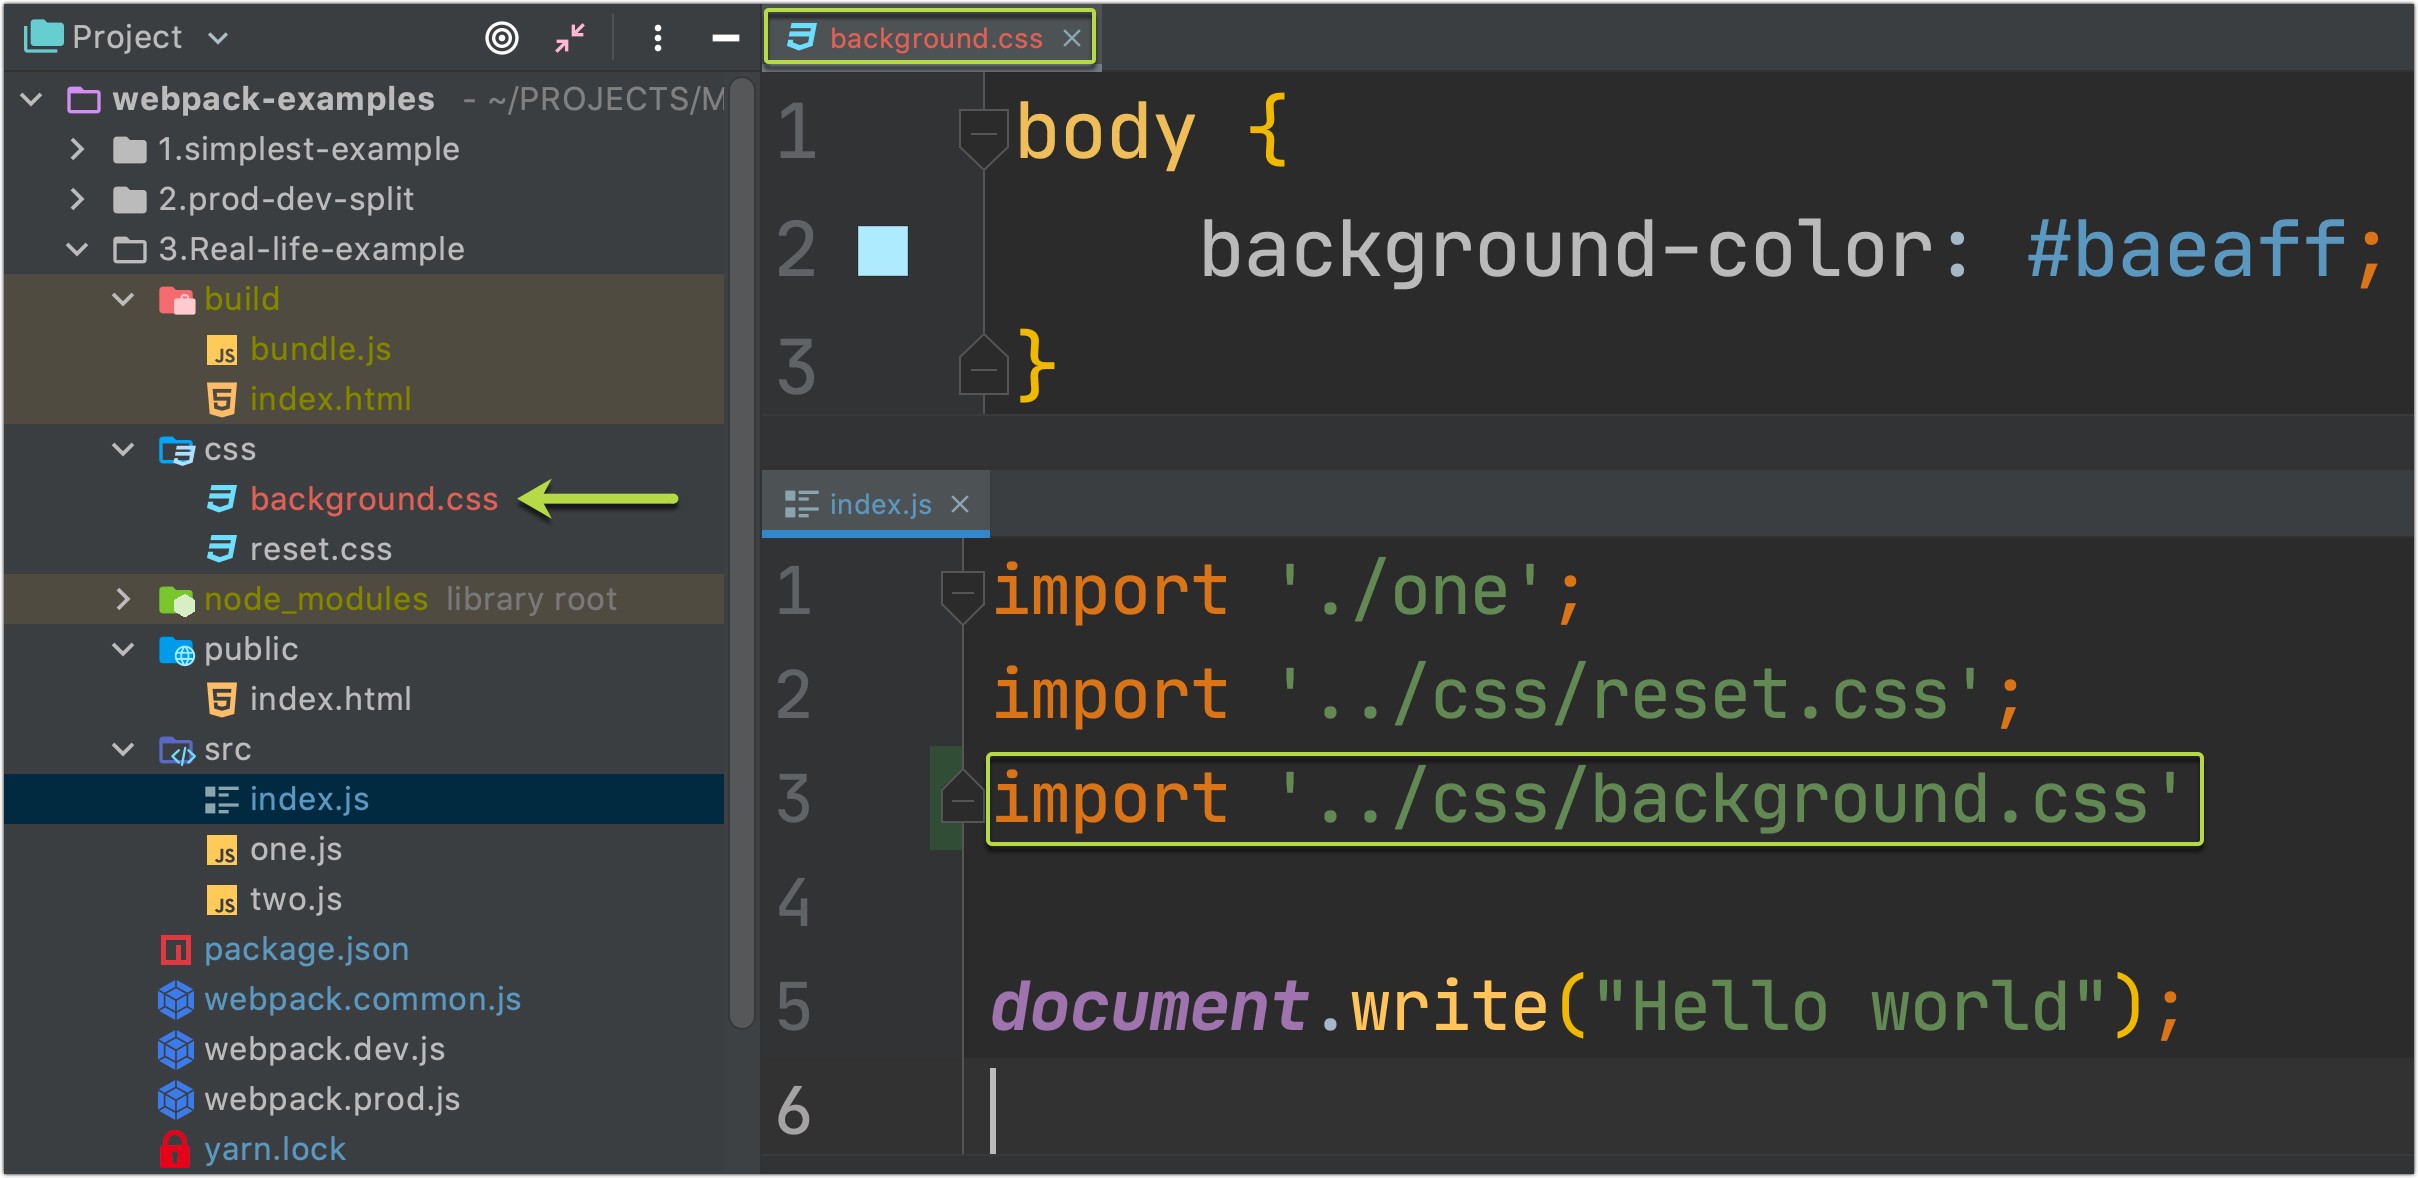
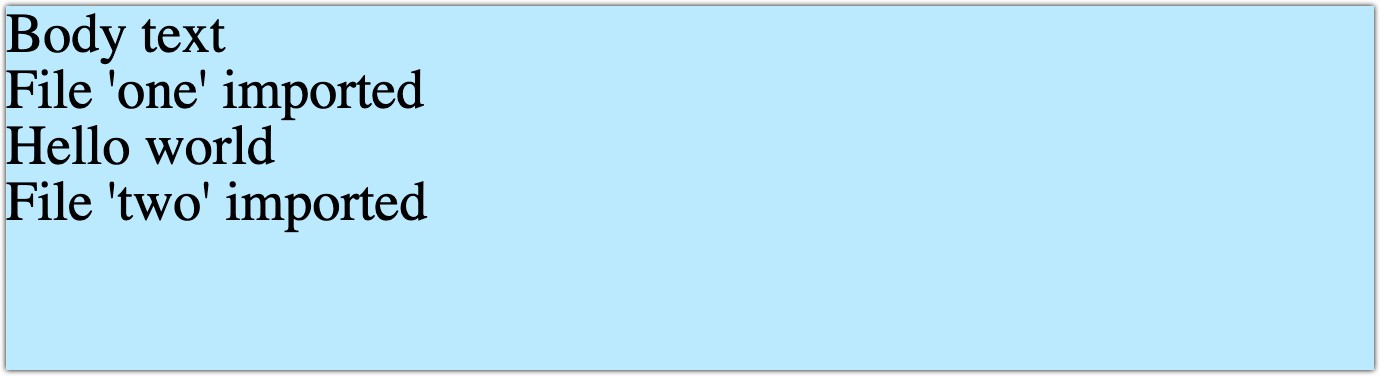
Very well, everything works as expected! 😉
很好,一切正常。 😉
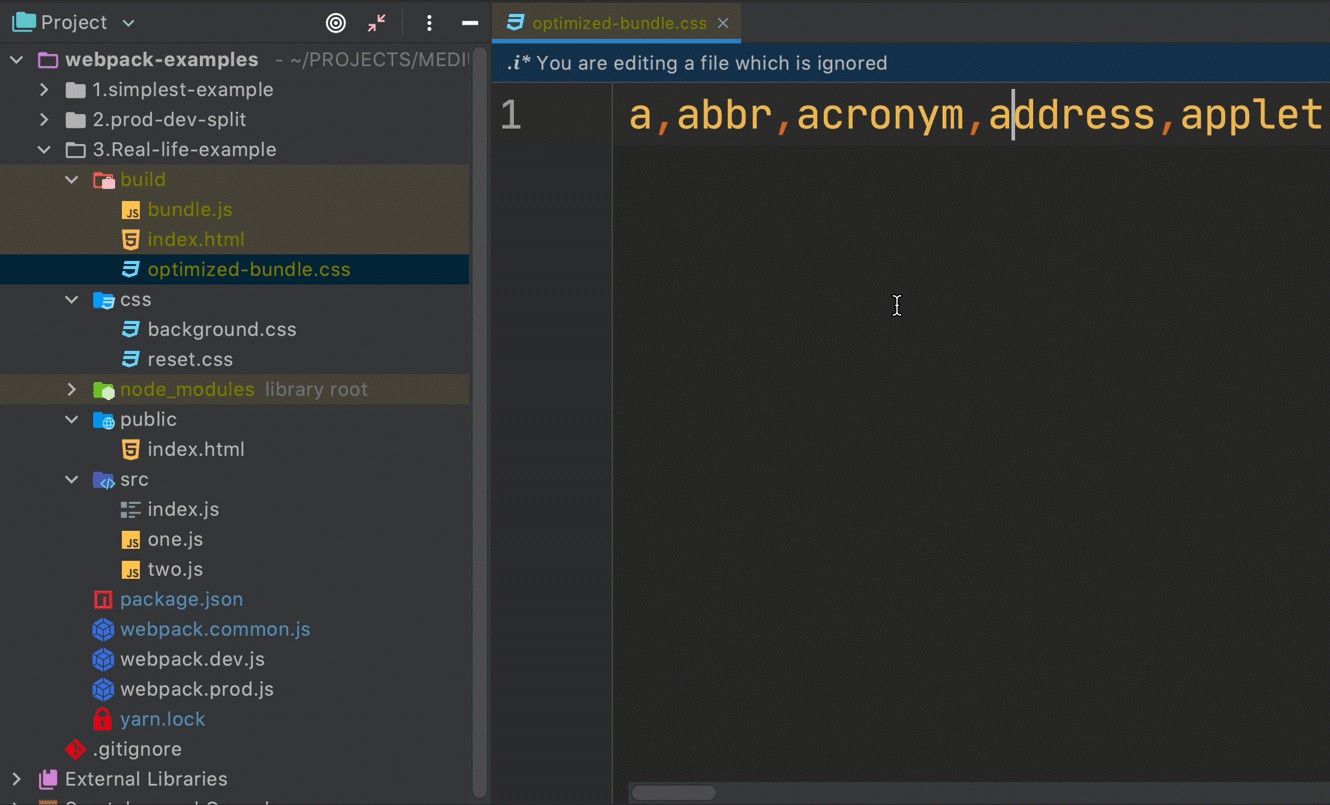
9.2将CSS作为单独的捆绑包添加 (9.2 Adding CSS as a separate bundle)
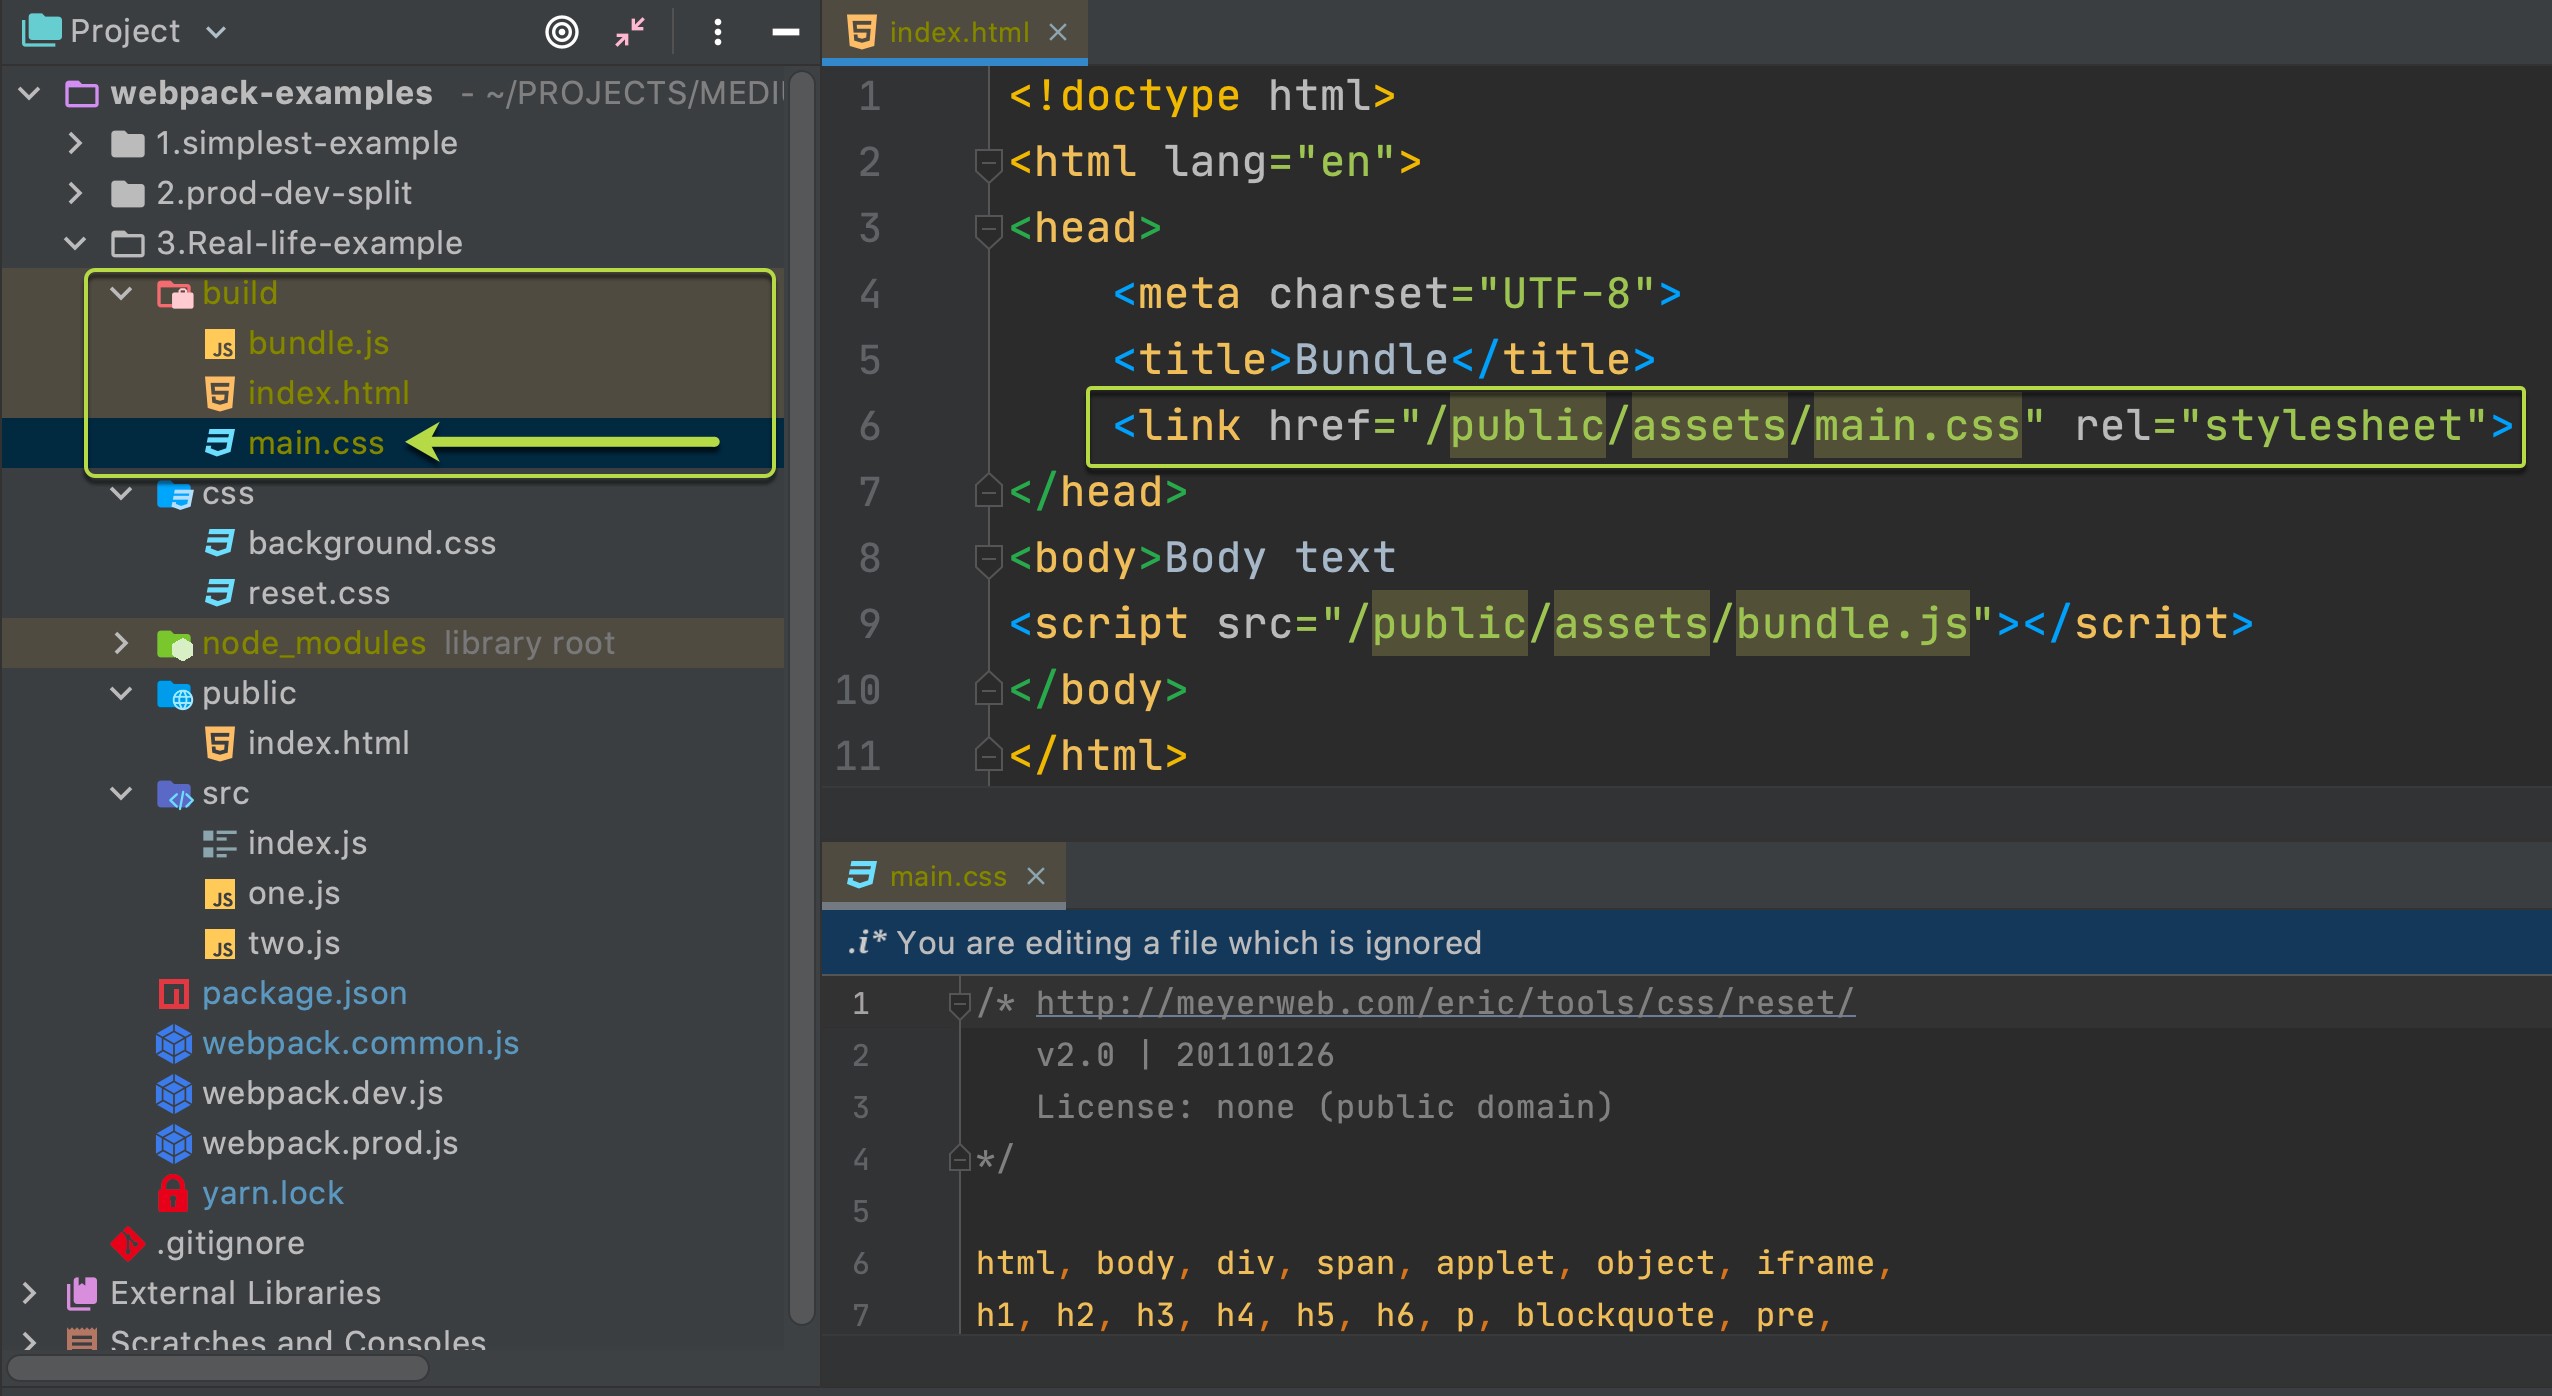
But what if we don’t want that, and we would like to have a separate CSS file in our build folder?
但是,如果我们不想要那样,并且希望在构建文件夹中有一个单独CSS文件,该怎么办?
In that case, we will use mini-css-extract-plugin plugin with previously added css-loader:
在这种情况下,我们将使用mini-css-extract-plugin插件和先前添加的css-loader :
npm install --save-dev mini-css-extract-plugin
// oryarn add mini-css-extract-plugin -D
After adding this package to your project we will change our webpack config file:
将这个包添加到您的项目后,我们将更改我们的webpack配置文件:
Rerun npx webpack — config webpack.prod.js :
重新运行npx webpack — config webpack.prod.js :
Even if you will run webpack in production mode — CSS file will not be minified.
即使您将在生产模式下运行webpack,CSS文件也不会缩小。
And our final touch would be CSS file minimizing.
最后,我们将最小化CSS文件。
First, we will add optimize-css-assets-webpack-plugin package to your dev dependencies :
首先,我们将optimize-css-assets-webpack-plugin包添加到您的开发依赖项中:
npm install --save-dev optimize-css-assets-webpack-plugin
// or
yarn add optimize-css-assets-webpack-plugin -D
Next, we need to modify webpack config file:
接下来,我们需要修改webpack配置文件:
Rerun npx webpack — config webpack.prod.js :
重新运行npx webpack — config webpack.prod.js :
Great! Nice job 👍
大! 干得好👍
Everything works as expected. Now you know both ways of adding CSS styles to your webpack build 👨🎓.
一切正常。 现在,您已经知道了将CSS样式添加到Webpack构建中的两种方法。
10.向构建中添加资产 (10. Adding assets to the build)
For adding files to our /build folder we would need to add file-loader package to our project's dev dependencies :
要将文件添加到我们的/ build文件夹中,我们需要将file-loader包添加到我们项目的dev依赖项中:
npm install --save-dev file-loader
// or
yarn add file-loader -D
And after that, we will need to add a new configuration object to module.rules webpack config:
然后,我们需要向module.rules webpack config添加一个新的配置对象:
For testingfile-loader functionality, we need to add an image to our projects and import it to the index.html page, let's do that:
为了测试file-loader功能,我们需要将图像添加到我们的项目中并将其导入到index.html页面,让我们这样做:

addImage.js file code:
addImage.js文件代码:
Rerun npx webpack — config webpack.prod.js and let's look at the results:
重新运行npx webpack — config webpack.prod.js ,让我们看一下结果:
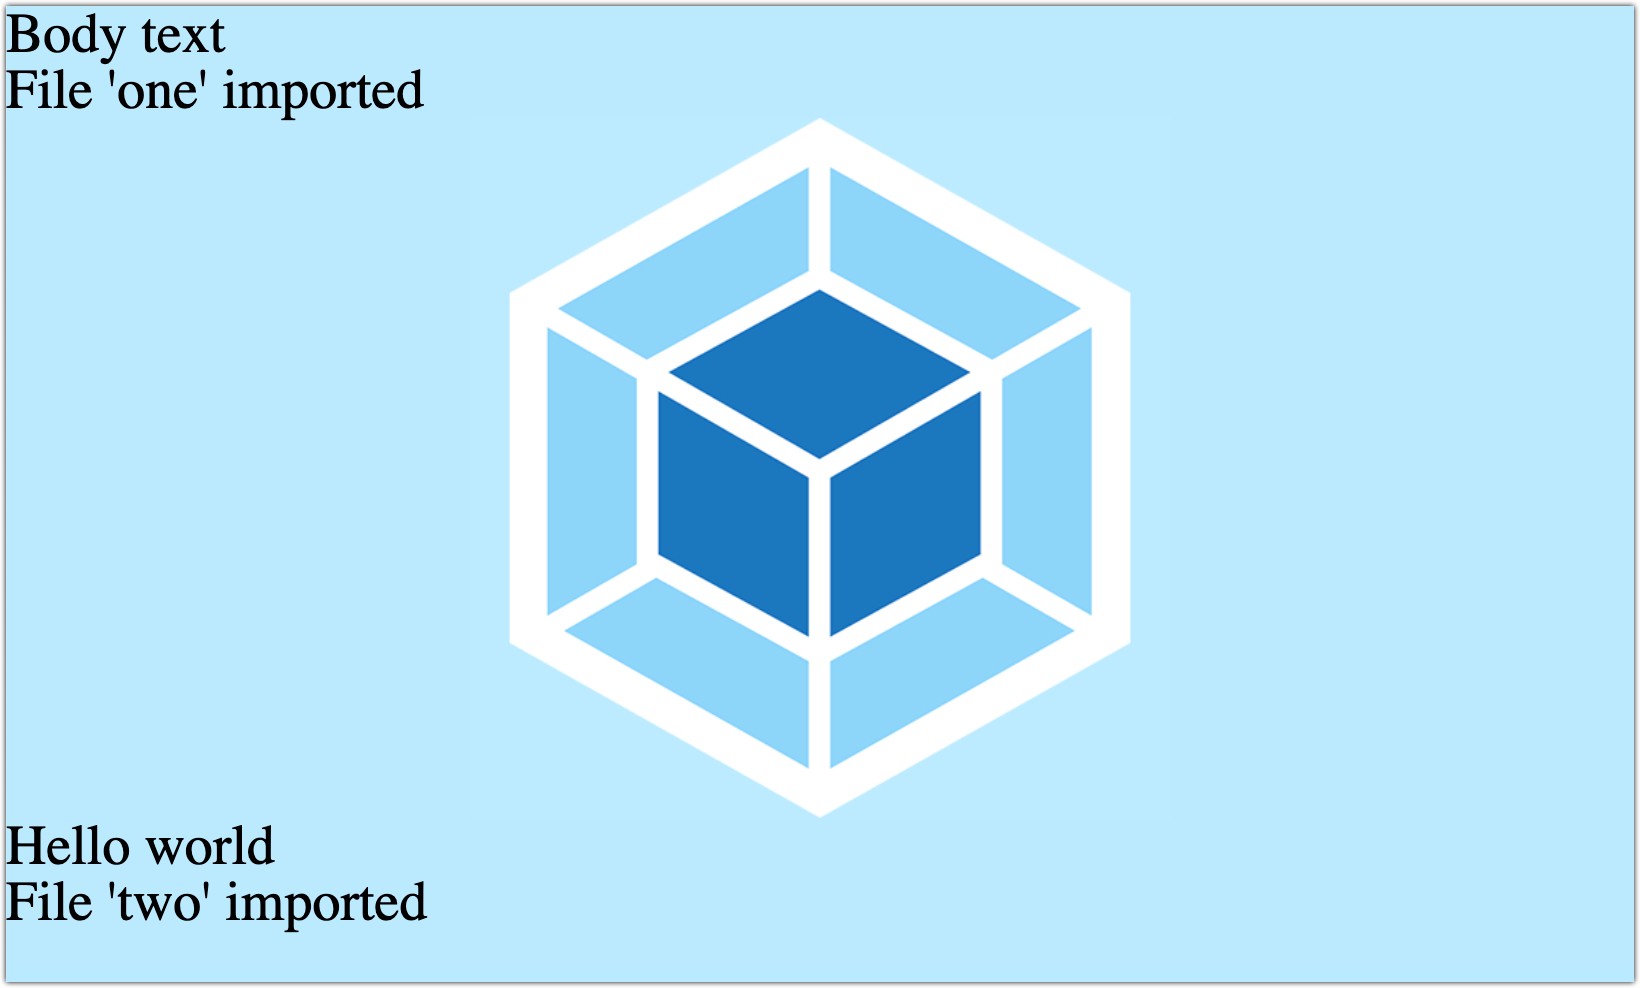
Very nice.
非常好。
Now you have all the main information you need for understanding how webpack works. 🤝
现在,您已经掌握了了解webpack如何工作所需的所有主要信息。 🤝
P.S. If you are a React.js developer, you should be familiar with the eject script (if you are working with a React.js project that was created using create-react-app script):
PS:如果您是React.js开发人员,那么您应该熟悉eject脚本(如果您正在使用使用create-react-app脚本create-react-app的React.js项目):
"scripts": {
  ...
  "eject": "react-scripts eject"
},
If you will run it, you will see the whole webpack.config.js file that is used. Or you can just see this GitHub Gist that I created for you after "eject". 😉
如果要运行它,您将看到使用的整个webpack.config.js文件。 或者,您可以仅在“弹出”之后看到我为您创建的此GitHub Gist 。 😉
Link to Github repo with all code that was used in this article.
翻译自: https://medium.com/swlh/webpack-v4-in-examples-all-you-need-to-know-73831915b314
webpack 示例


 344
344

 被折叠的 条评论
为什么被折叠?
被折叠的 条评论
为什么被折叠?
 到【灌水乐园】发言


