


Content Projection is a way to insert a shadow DOM inside your Angular component. But unfortunately, we don’t see a dynamic <ng-content> available anywhere. This article is a walk-through to how to create a dynamic content projection solution using already available packages viz. Angular Elements and NgZone, and use it intuitively in your application.
内容投影是一种在Angular组件内插入阴影DOM的方法。 但不幸的是,我们在任何地方都看不到动态的<ng-content>。 本文是如何使用现有的程序包viz创建动态内容投影解决方案的演练。 Angular Elements和NgZone ,并在您的应用程序中直观地使用它。
Using Angular Elements, you can create Angular components which can be used inside or outside of the Angular application. But its better use, is inside the Angular application, to create a native web component. We can send these components to a child component gracefully sanitizing it.
使用 Angular Elements,您可以创建可在Angular应用程序内部或外部使用的Angular组件。 但是,更好的用法是在Angular应用程序内部,以创建本机Web组件。 我们可以将这些组件发送给子组件,以对其进行适当的清理。
To have a better understanding of how this works, let us setup an Angular project. You can download the example application source code from here:
为了更好地了解其工作原理,让我们设置一个Angular项目。 您可以从此处下载示例应用程序源代码:
Lets start with the prerequisites needed for the angular elements to work. Along with rxjs package, remember to have a rxjs-compat dependency in your package.json, in order to your Angular elements package to work properly.
让我们从工作角度元素所需的先决条件开始。 与rxjs包一起,请记住在package.json中具有rxjs-compat依赖项,以便Angular elements包能够正常工作。

In this paradigm, we have created a simple component, lets call it Messenger. It will only accept a input parameter called message. Now lets call it in the traditional way in our app.component.html like below:
在此范例中,我们创建了一个简单的组件,将其称为Messenger 。 它只会接受一个称为message的输入参数。 现在,在我们的app.component.html中以传统方式调用它,如下所示:

And it outputs the string that is assigned to it. Now lets see how to convert this component into a native web component. But before that let’s see how a normal native web element can be called. The setTimeout is used to simulate a synchronous behavior.
然后输出分配给它的字符串。 现在让我们看看如何将该组件转换为本地Web组件。 但是在此之前,让我们看看如何调用普通的本机Web元素。 setTimeout用于模拟同步行为。
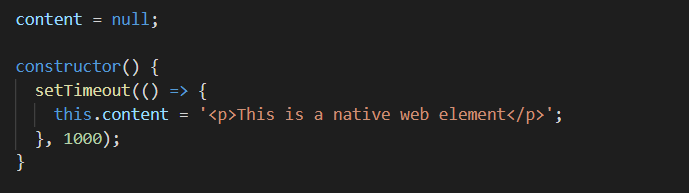

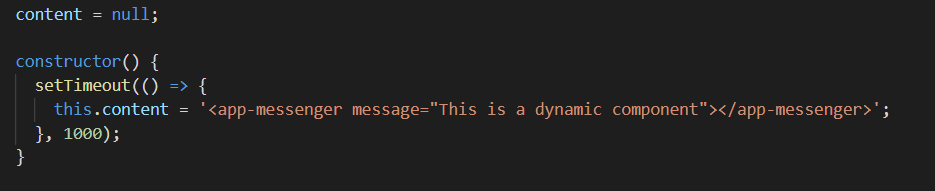
And that does it! You can see the output “This is a native web element”. But similarly when we integrate our component in the content it gives us following console warning.
做到了! 您可以看到输出“ This is a native web element”。 但是类似地,当我们将组件集成到内容中时,它会向您发出以下控制台警告。

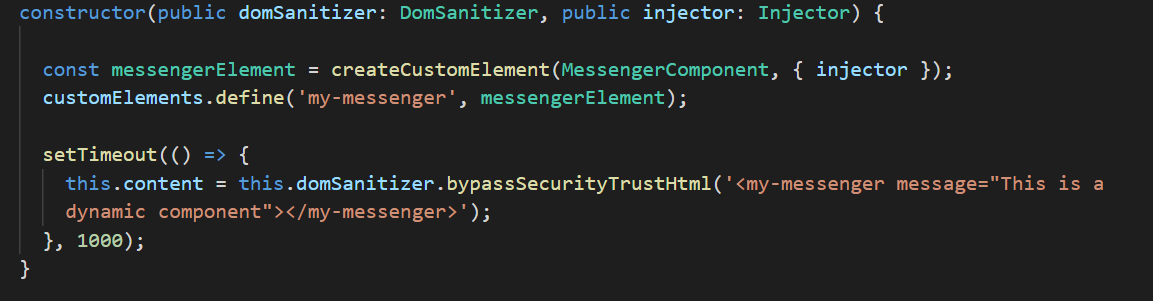
Okay, lets sanitize it then! we use DomSanitizer from @angular/platform-browser. Sanitizing is needed in order to tell html that we trust this particular piece of code.
好吧,那就消毒吧! 我们使用@ angular / platform-browser中的 DomSanitizer。 为了告诉html我们相信这部分特定代码,需要进行消毒。

Well, the console warning goes away, but we still see nothing! The reason is that it gets rendered as html code but it is not recognized as html element. Angular does not consider this after our application is loaded because the compilation of templates and the part where it understands your component is done by then. Hence we see a blank page. And Angular Elements fixes this very problem. It allows us to take our angular component and put it into a virtually encapsulated self bootstrapping html element.
好了,控制台警告消失了,但是我们仍然看不到任何东西! 原因是它被呈现为html代码,但未被识别为html元素。 加载我们的应用程序后,Angular不会考虑这一点,因为模板的编译以及可理解组件的部分将在那时完成。 因此,我们看到一个空白页。 和角元素 解决了这个问题。 它使我们能够获取角度分量并将其放入虚拟封装的自引导html元素中。
Let’s go ahead and install @angular/elements. In order to create a new native web element. We import createCustomElement from @angular/elements as below:
让我们继续安装@ angular / elements 。 为了创建一个新的本地Web元素。 我们从@ angular / elements导入createCustomElement , 如下所示:

This method takes two inputs, the reference of the component of which we need to create native element of and the injector, which we import from @angular/core . Furthermore, we define a new element with the first parameter as the new name of our native element ‘my-messenger’ (doesn’t have to be same your components selector, but can be) and second parameter as our referenced messengerElement. Now we have our native element ready, we can use it as below:
此方法需要两个输入,我们需要创建其本机元素的组件的引用,以及从@ angular / core导入的注入器。 此外,我们定义了一个新元素,其中第一个参数作为本机元素“ my-messenger”的新名称(不必与组件选择器相同,但可以是),第二个参数作为引用的messengerElement。 现在我们已经准备好本机元素,可以按以下方式使用它:
and voila! we see the output :
和瞧! 我们看到输出:

奖励:NgZone (Bonus: NgZone)
what role does NgZone play in this? Let’s understand.
NgZone在其中扮演什么角色? 让我们来了解。
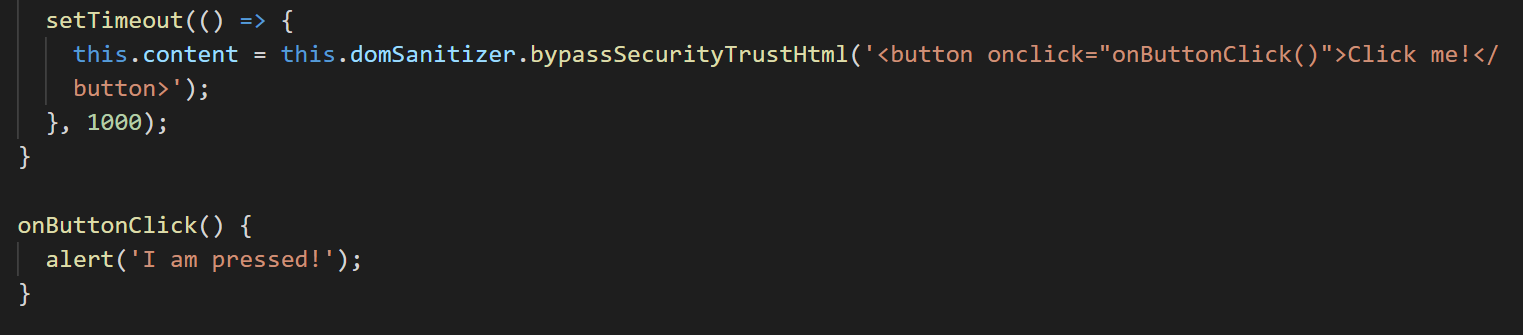
Let’s Suppose that we have a use case to use a native element in our component. In this example, we have a button which has click event and we need to pass it as a sanitized element. But it has some drawbacks as it is a native element.
假设我们有一个用例,可以在组件中使用本机元素。 在此示例中,我们有一个具有click事件的按钮,我们需要将其作为经过清理的元素传递。 但是它有一些缺点,因为它是本机元素。
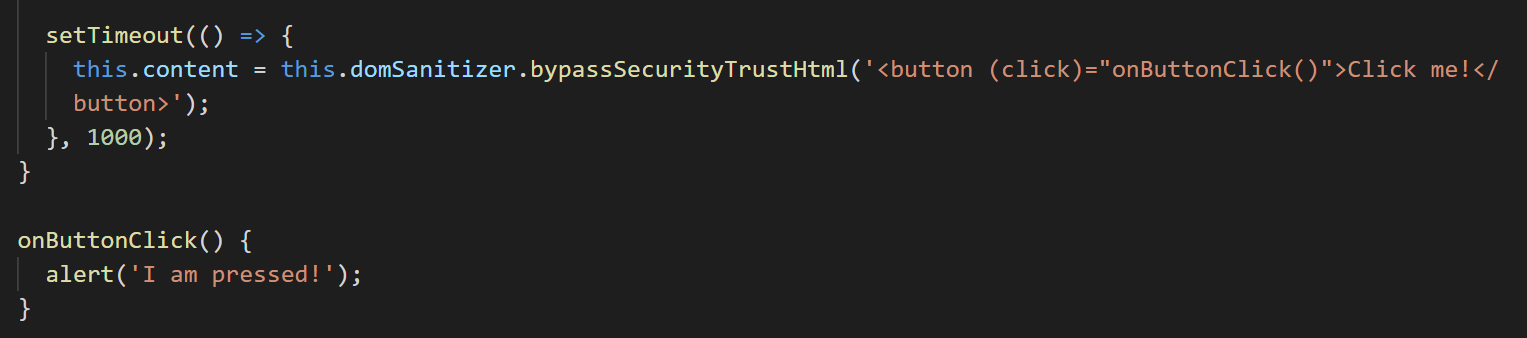
Here, you may notice that we are using (click) event from Angular. Although, we see a button on the screen but it has no effect even when we click it. The click event is not triggered because we are trying to trigger an angular event from a native element. Okay! then lets go ahead and change the angular event to a normal native button onclick.
在这里,您可能会注意到我们正在使用Angular中的(单击)事件。 虽然,我们在屏幕上看到一个按钮,但是即使单击它也无效。 由于我们正在尝试从本机元素触发角度事件,因此未触发click事件。 好的! 然后继续操作,并将角度事件更改为普通的本地onclick按钮。
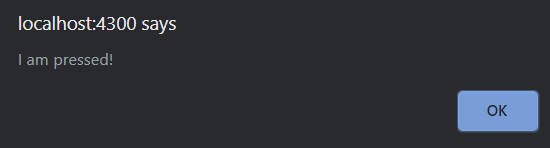
But now we have an error saying, it does not recognize the method. So workaround for this is defining a key in the Window Object and then it can call the angular method as shown below:
但是现在我们有一个错误的说法,它无法识别该方法。 因此,解决方法是在Window对象中定义一个键,然后它可以调用angular方法,如下所示:

And that does the trick! You can see that the alert shows up!
这就是把戏! 您可以看到警报出现了!
Again, it only shows the alert. But what we are doing is just calling an angular method inside a non-angular element. Hence, it won’t work as expected. So we can now introduce NgZone, in order to counter these problems. It will call this method as angular method running from outside of the application.
同样,它仅显示警报。 但是我们正在做的只是在非角度元素内调用角度方法。 因此,它将无法按预期工作。 因此,我们现在可以引入NgZone ,以解决这些问题。 它将将此方法称为从应用程序外部运行的角度方法。
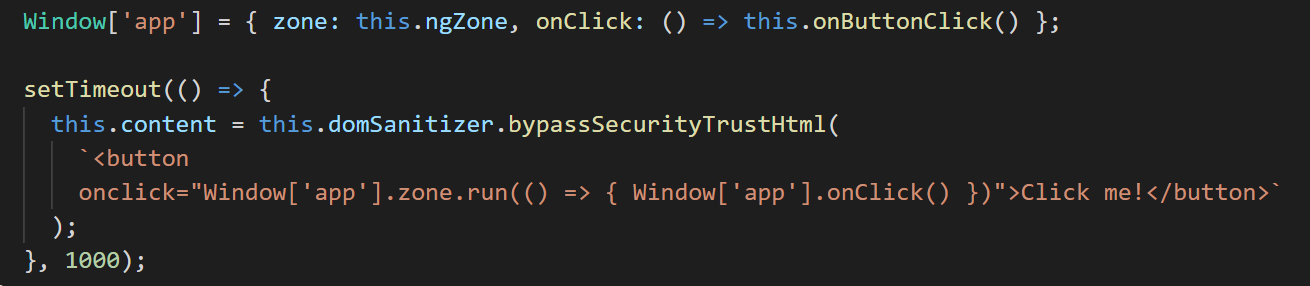
Again, this will do the same thing but now this is simulating an angular method.
同样,这将执行相同的操作,但是现在这是在模拟角度方法。
That’s all Folks!
那就是所有的人!
翻译自: https://medium.com/swlh/angular-elements-and-ngzone-dynamic-content-projection-solution-6056dbe4fa84


 1433
1433


 被折叠的 条评论
为什么被折叠?
被折叠的 条评论
为什么被折叠?
 到【灌水乐园】发言


