


vue tdd
Disclaimer: I assume you have some knowledge in unit testing with Vue.js, and what is TDD in general. I will go straight to the point without telling you what each function do. If you don’t have this knowledge, you can go to https://vue-test-utils.vuejs.org/ to learn more about it.
免责声明:我假设您具有使用Vue.js进行单元测试的知识,以及什么是TDD。 在不告诉您每个函数做什么的情况下,我将直奔主题。 如果您不具备此知识,则可以访问https://vue-test-utils.vuejs.org/了解更多信息。
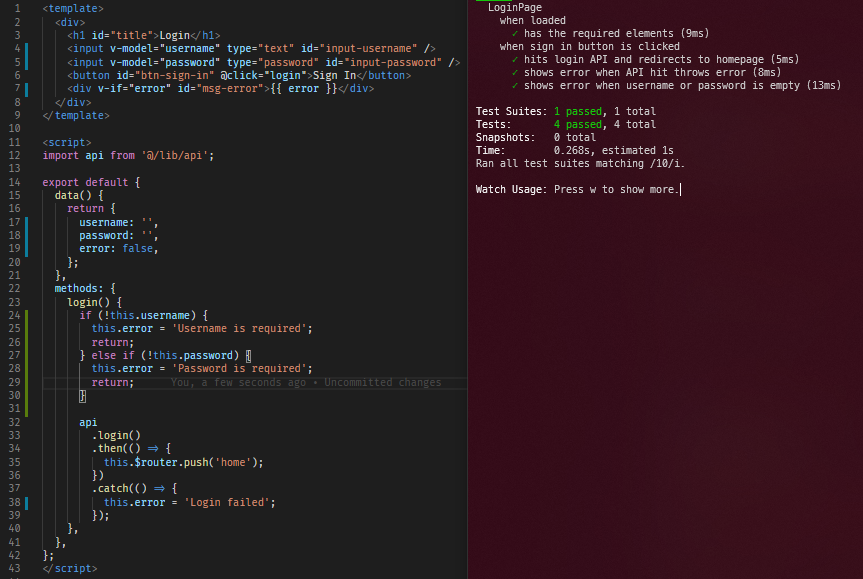
In this part, I will show you a step-by-step guide to do TDD with Vue.js on a simple login page. A very simple login page consists of text input for username, text input for the password, and a submit button. Here is an example:
在这一部分中,我将在一个简单的登录页面上向您展示使用Vue.js进行TDD的分步指南。 一个非常简单的登录页面包括用于用户名的文本输入,用于密码的文本输入和提交按钮。 这是一个例子:
Forget what you’ve learned, because TDD will introduce a new mindset, a conflicting one. Please bear with me, because I’ve had a lot of questions when learning TDD too.
忘记您所学的内容,因为TDD会引入一种新的思维方式,这是一种相互矛盾的思维方式。 请多多包涵,因为在学习TDD时我也有很多问题。
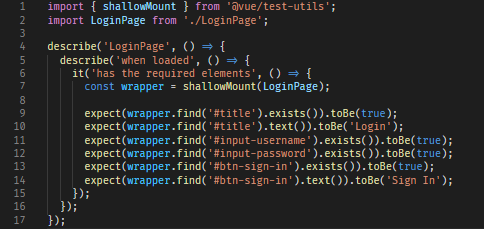
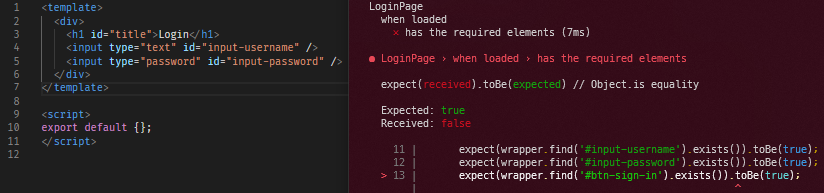
The first step in TDD is to create a failing test case. It’s okay for it to fail, as long as it contains what you really need for your component. Create a test file LoginPage.spec.js and the first test case. We will check the required elements upon loaded. It checks whether the elements is there or not and also check some labeling. You don’t need to do any refactoring in this step, since it will be done later.
TDD的第一步是创建一个失败的测试用例。 只要它包含您的组件真正需要的功能,它就可以失败。 创建一个测试文件LoginPage.spec.js和第一个测试用例。 我们将在加载后检查所需的元素。 它检查元素是否存在,并检查一些标签。 您无需在此步骤中进行任何重构,因为它将在以后进行。
Tip: use
describe()to group your test cases. So you or other people can grasp what your component can do by looking at the test results.提示:使用
describe()对测试用例进行分组。 因此,您或其他人可以通过查看测试结果来掌握组件的功能。Tip: on most cases, you only need
shallowMount()instead ofmount(). You want to isolate the test as much as possible to make it easier to test.提示:在大多数情况下,只需要
shallowMount()而不是mount()。 您想要尽可能地隔离测试以使其更容易测试。
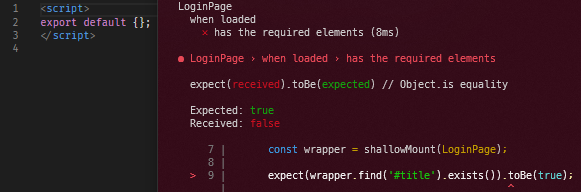
If you run npx jest LoginPage this test will fail and shows something likeCannot find module ‘./LoginPage’ from ‘LoginPage.spec.js’
如果您运行npx jest LoginPage此测试将失败,并显示类似“ Cannot find module './LoginPage' from 'LoginPage.spec.js'
Tip: use
npx jest LoginPage --watchto make your life easier. The--watchflag will watch for file changes, and rerun the test automatically.提示:使用
npx jest LoginPage --watch使您的生活更轻松。--watch标志将监视文件更改,并自动重新运行测试。
The next step is to make it green. However, please remember, in TDD you have to do minimum implementation to make it green, don’t add any other code. So, create a LoginPage.vue file with minimum implementation and rerun the test.
下一步是使其绿色。 但是,请记住,在TDD中,您必须进行最少的实现以使其绿色 , 而不添加任何其他代码 。 因此,使用最少的实现创建一个LoginPage.vue文件,然后重新运行测试。
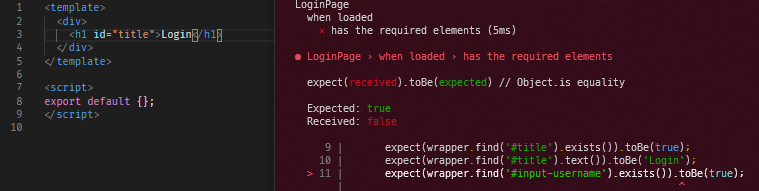
It fails because there is no element with #title. So we need to add the title element. See what happens to the test result.
它失败,因为#title没有元素。 因此,我们需要添加title元素。 查看测试结果如何。

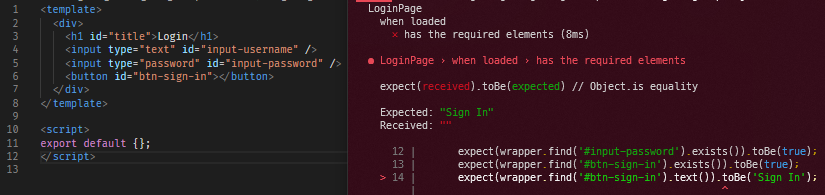
Now add a little code to the implementation to make it green. Remember, don’t refactor at this point.
现在,向实现中添加一些代码以使其绿色。 请记住,此时不要重构。
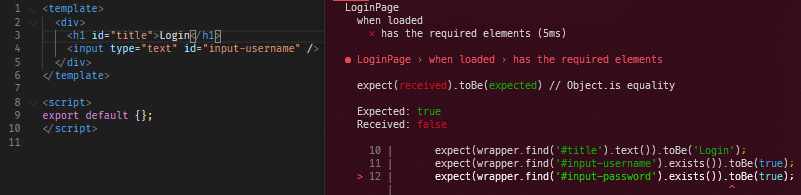
By this point, I assume you have some ideas of how this works. For the next few steps, I will show the implementation and the test result in a series to make this tutorial simpler.
至此,我假设您对这是如何工作有一些想法。 在接下来的几个步骤中,我将通过一系列示例展示实现和测试结果,以简化本教程。
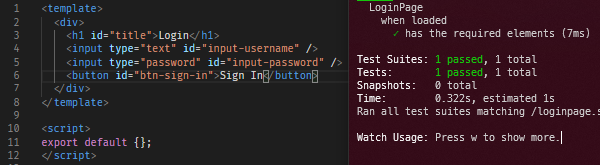
Now the test has passed (green), we can continue to the next step: refactor. Take a look at your code, both the test and the implementation. Is there anything that appears more than once? Or is there anything to simplify? Do refactor on those code, but do not over-refactor it. Refactor as needed.
现在测试已通过(绿色),我们可以继续下一步:重构。 看一下您的代码,包括测试和实现。 是否有不止一次出现的东西? 还是有什么要简化的? 重构这些代码,但不要过度重构。 根据需要进行重构。
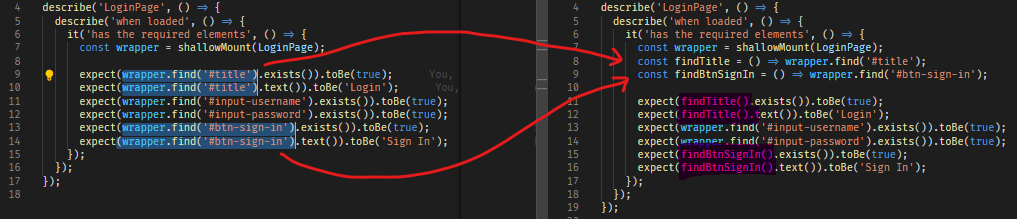
Tip: don’t forget to retest after you refactor.
提示:重构后不要忘记重新测试。
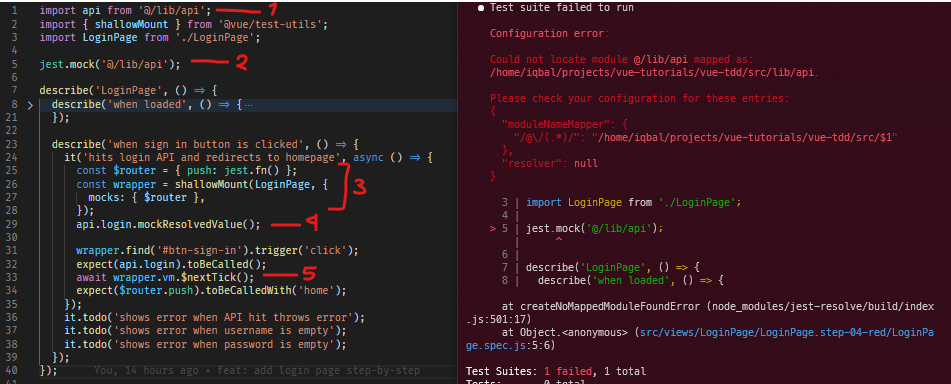
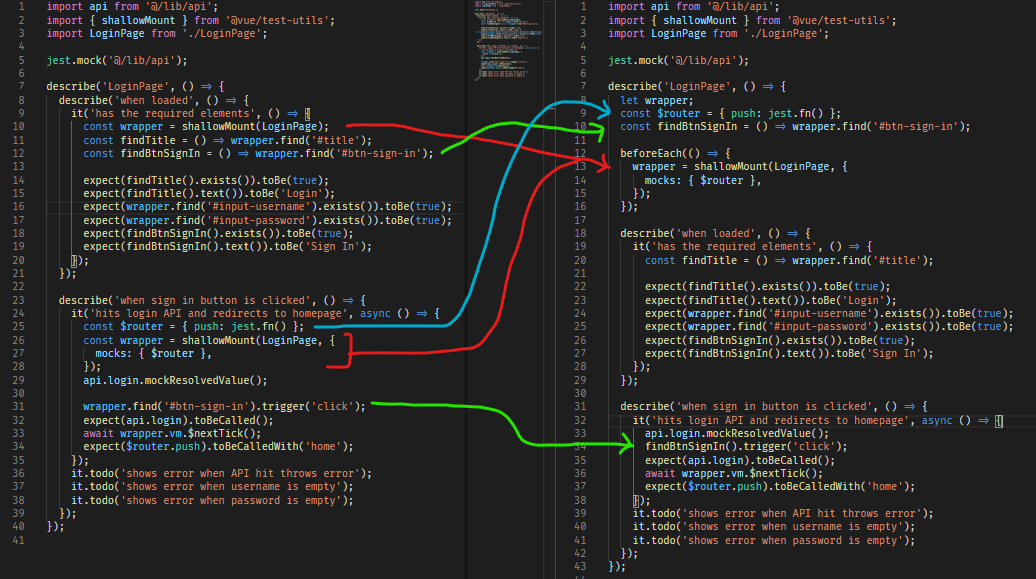
Now we can add a new test case. This time we will check for the submit button behavior. The submit button will hit try to call the login API and redirect you to homepage when clicked. However it will try to validate the username and password first. In this section, we will learn how to mock external library and the router.
现在我们可以添加一个新的测试用例。 这次,我们将检查提交按钮的行为。 提交按钮将点击尝试调用登录API,并在单击后将您重定向到主页。 但是,它将首先尝试验证用户名和密码。 在本节中,我们将学习如何模拟外部库和路由器。
First create test case, however this time, some test cases. Most of the time you know what your component will do, so by leveraging it.todo() , you can list your component specification and structure your test files.
首先创建测试用例,但是这次创建一些测试用例。 大多数时候,您都知道组件将要执行的操作,因此,利用it.todo() ,您可以列出组件规格并构造测试文件。
Tip: It’s better to organize your test with positive test cases (normal, success flow) first, then the negative cases (failing flow), and edge cases.
提示:最好先组织积极的测试用例(正常,成功流程),然后再组织消极的案例(失败流程)和边缘案例。
Tip: Test the expected behavior, not the method. Ask yourself: what is the outcome of an action in the UI.
提示:测试预期的行为,而不是方法。 问问自己:UI中某个动作的结果是什么。
Tip: In most cases, these are the entry point of things you should test: UI actions (
v-on), emitted values, component life cycles (created,mounted, etc), store state changes, props changes. Avoid test usingwrapper.vm.*unless necessary.提示:在大多数情况下,这些是您应该测试的事情的切入点:UI动作(
v-on),发射值,组件生命周期(created,mounted等),存储状态更改,道具更改。 除非必要,否则避免使用wrapper.vm.*测试。Tip: In most cases, these are the behavior you should expect: UI changes (including sub-component attribute changes), library function calls, emitted values, store mutations and actions, route changes.
提示:在大多数情况下,这是您应该期望的行为:UI更改(包括子组件属性更改),库函数调用,发出的值,存储突变和操作,路线更改。
Let’s take a look at the test file first.
首先让我们看一下测试文件。
Import API library
导入API库
I use
我用
Jest’s module name mapper for this shortcut.
Mock the API library
模拟API库
You can use
您可以使用
jest.mock()to the implementation. If you use this, then ALL members of@/lib/apiwill be doubled (mocked) even in the implementation. This is very useful if you want to mock external libraries.jest.mock()实现。 如果使用此选项,那么即使在实现中,@/lib/api所有成员也会加倍(模拟)。 如果要模拟外部库,这非常有用。Mock
$routerimplementation模拟
$router实现As I said earlier, you want to isolate the test, and that is including the router, vuex, store, sub component, other libraries, etc. It’s a different story if you want to do E2E or integration tests.
就像我之前说的,您想隔离测试,其中包括路由器,vuex,存储,子组件,其他库等。如果要进行端到端或集成测试,那就完全不同了。
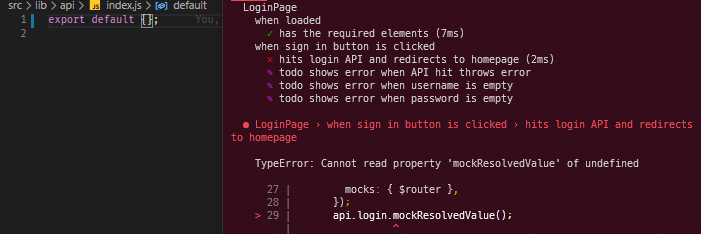
Mock implemenatation of
api.login()functionapi.login()函数的模拟实现Since we mocked the
由于我们嘲笑了
@/lib/apiearlier, every member of it becomes ajest.fn()instance (a synchronous function). We also know that API call is handled asynchronously. So, let’s mock it to return a resolved promise.@/lib/api之前,它的每个成员都成为一个jest.fn()实例(一个同步函数)。 我们还知道API调用是异步处理的。 因此,让我们对其进行模拟以返回已解决的承诺。- Wait for promise to be resolved 等待诺言解决
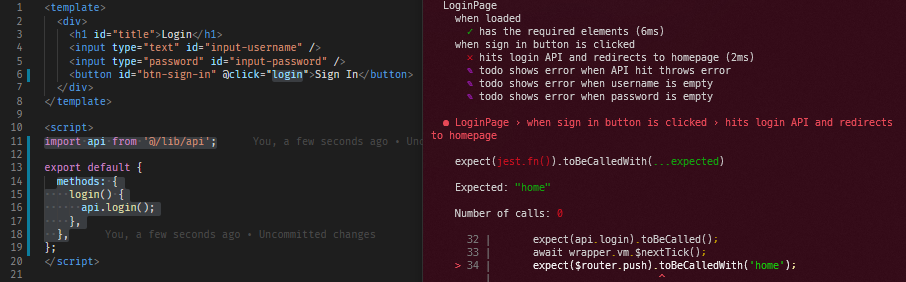
Now let’s create the implementation. Remember: As minimum as possible.
现在让我们创建实现。 切记: 尽可能少。

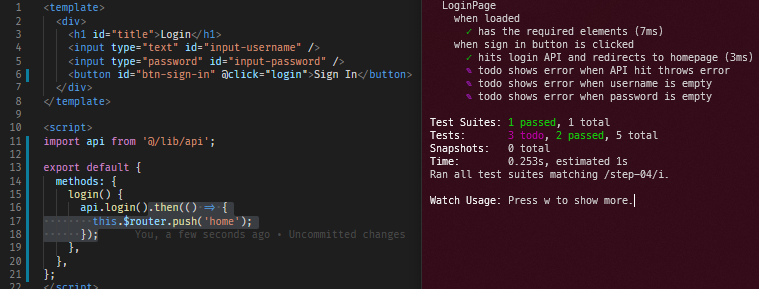
Now, let’s refactor. The code will look more organized, and we didn’t repeat anything. Be careful not to over-refactor.
现在,让我们重构。 该代码看起来更有条理,我们没有重复任何内容。 注意不要过度重构 。
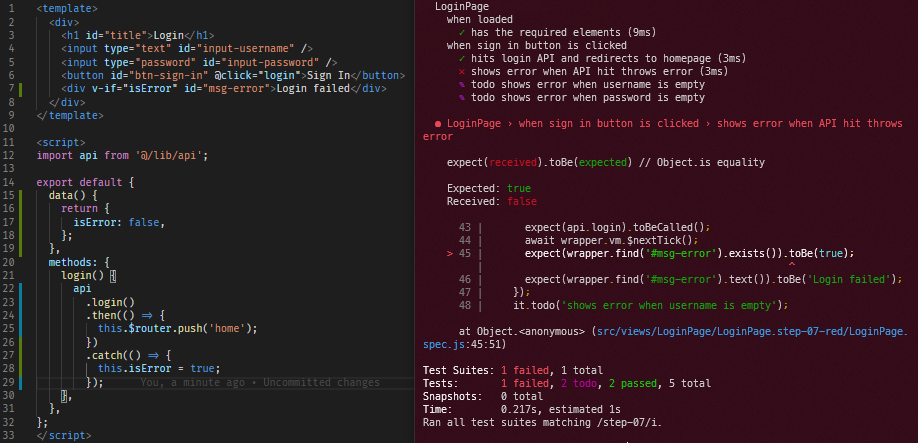
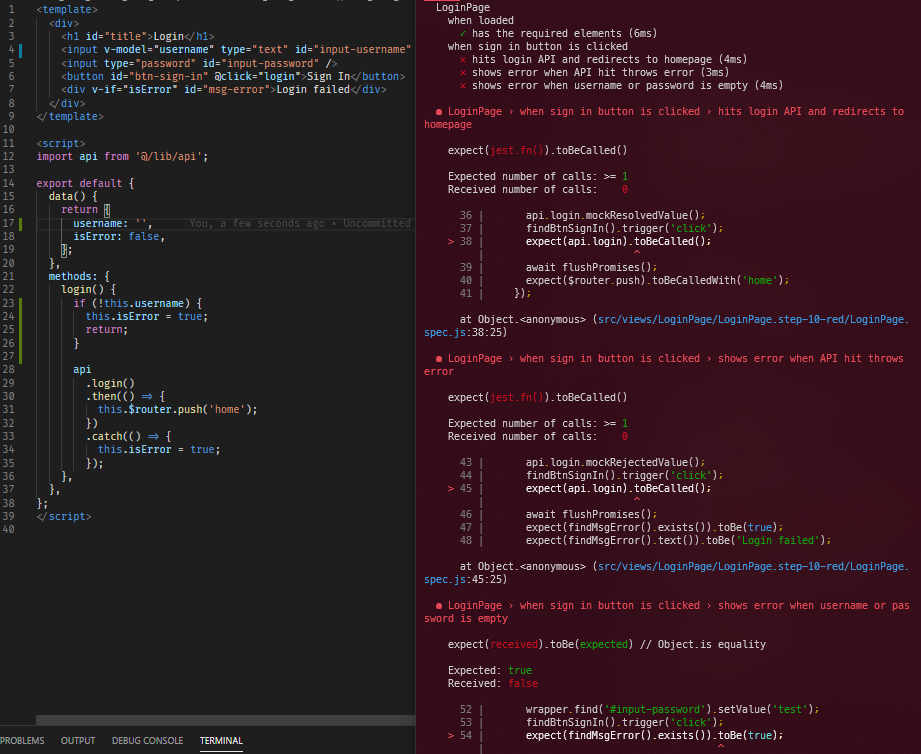
Onward to the next test case. We will test for case when login API sends error that makes the login failed. Write the test case when api.login() promise is rejected an error message is shown, but the error message is not shown when this component is loaded.
转到下一个测试用例。 我们将测试登录API发送错误导致登录失败的情况。 当api.login()承诺被拒绝时,编写测试用例, api.login()一条错误消息,但加载此组件时不显示错误消息。
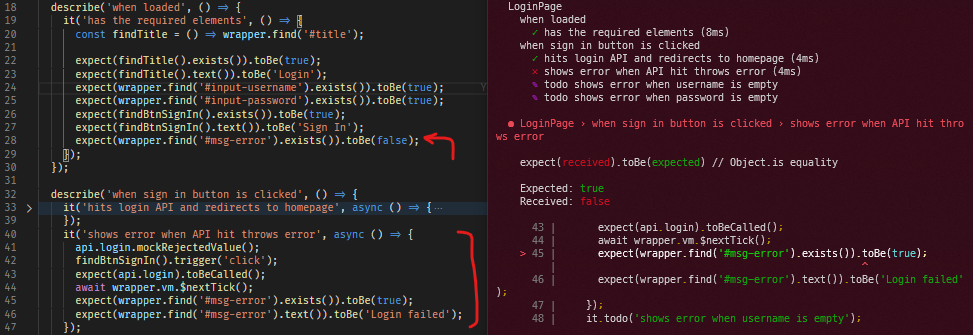
Next, create the implementation. Remember, only code what you need to make this test green.
接下来,创建实现。 请记住,只编写使该测试变为绿色所需的代码。
What?! We got 2 errors? No need to panic, this is expected since we add a test case in the another it(). This is a common occurrence in TDD. We just have to make it green.
什么?! 我们有2个错误? 无需担心,这是预料之中的,因为我们在另一个it()添加了一个测试用例。 这在TDD中很常见。 我们只需要使其绿色即可。
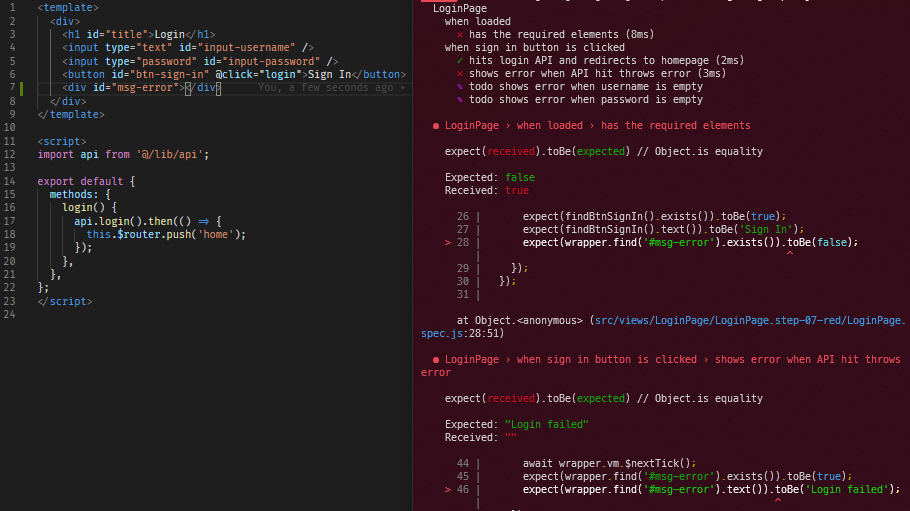
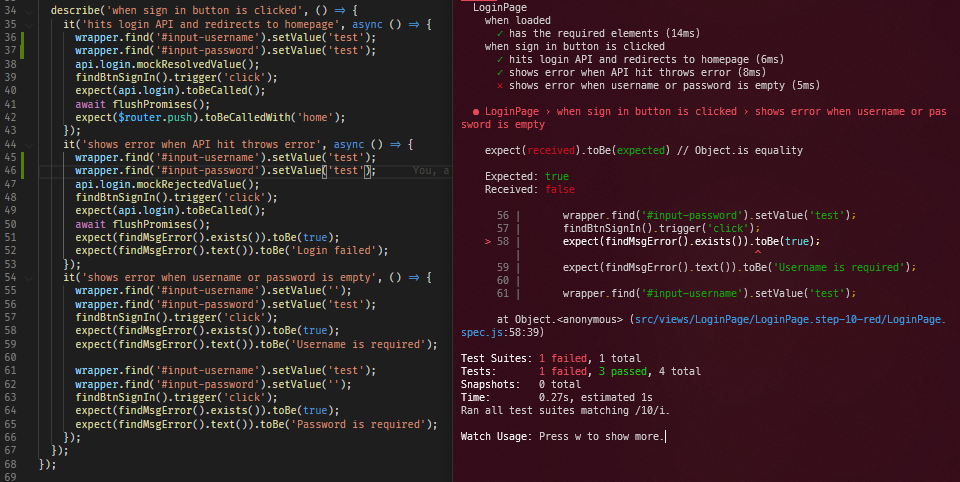
Wait, the previous error strikes again. Did I do something wrong?Nope, quite the opposite, you do the right thing to code only what you need to make the test green. Let’s solve this.
等待,先前的错误再次发生。 我做错什么了吗? 不,相反,您做对了事, 只编写使测试变成绿色所需的代码 。 让我们解决这个问题。
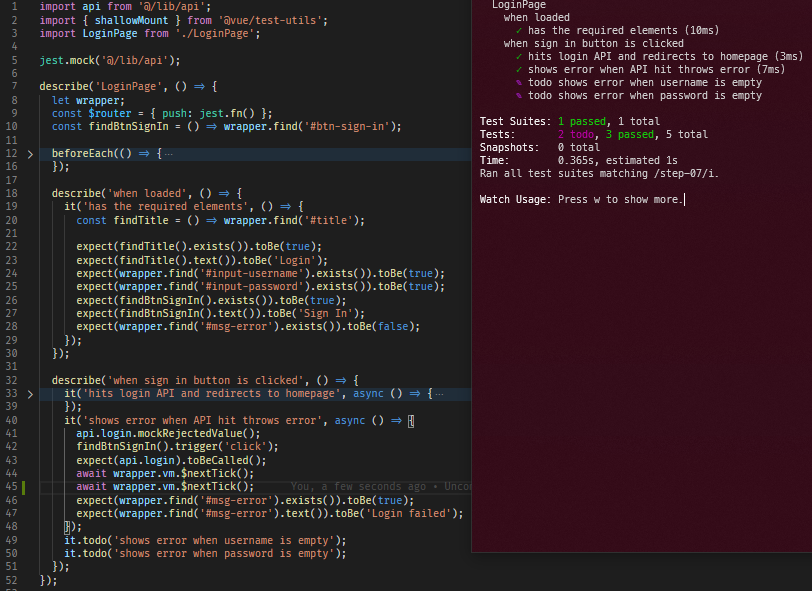
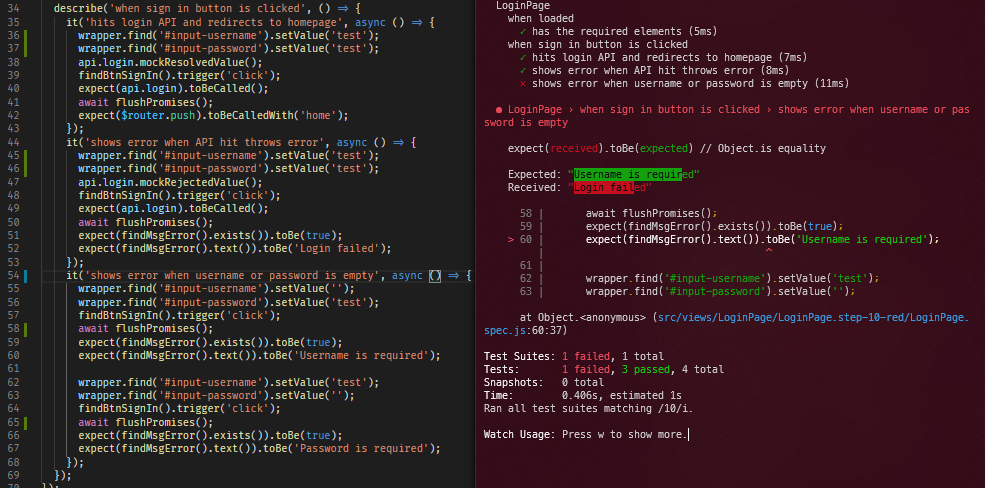
Wait, the code seems to be right, but the error persists? What’s wrong?Take a look at the test code. We use wrapper.vm.$nextTick() to wait for api.login()promise to be rejected. However, we set the this.isError to true , and this action will trigger UI change and UI change is considered a promise. so we need to add 1 more wrapper.vm.$nextTick() to wait for UI change to finish.
等待,代码似乎正确,但是错误仍然存在吗? 怎么了? 看一下测试代码。 我们使用wrapper.vm.$nextTick()等待api.login()承诺被拒绝。 但是,我们将this.isError设置为true ,并且此操作将触发UI更改,并且UI更改被视为一个承诺。 因此,我们需要再添加1 wrapper.vm.$nextTick()以等待UI更改完成。
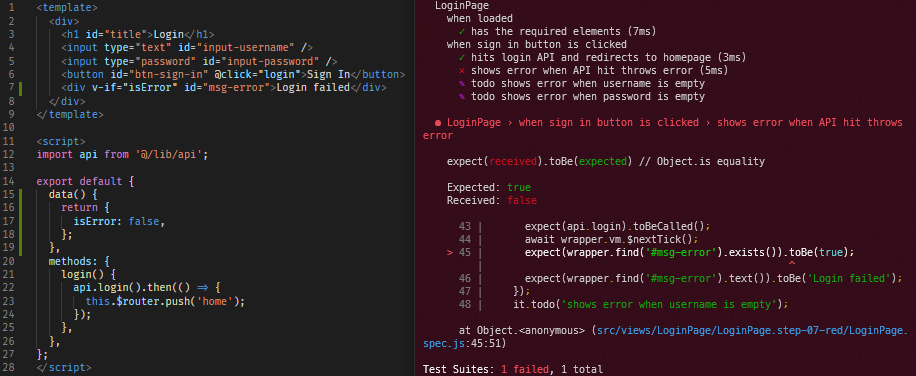
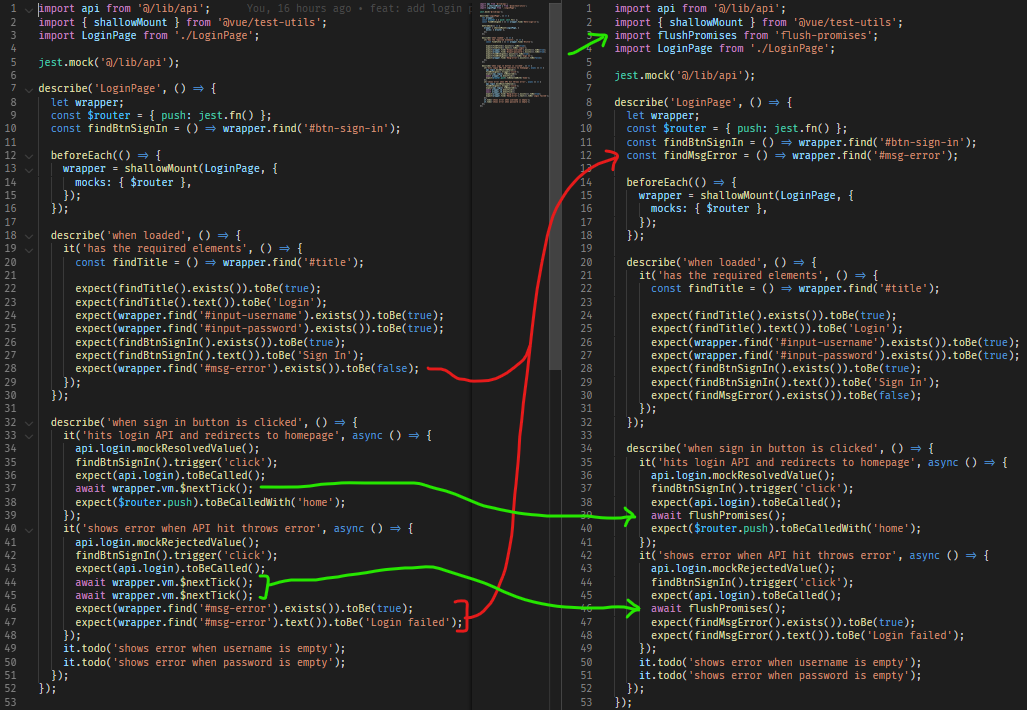
Ok, it’s green. We can refactor it then. Instead of calling multiple wrapper.vm.$nextTick() it’s better to install flush-promises library to ease these kinds of promise waiting.
好的,是绿色的。 然后我们可以对其进行重构。 与其调用多个wrapper.vm.$nextTick() ,不如安装flush-promises库以减轻此类的wrapper.vm.$nextTick()等待。
Okay, for the last 2 test case, we can merge them because they similar to each other.
好的,对于最后两个测试用例,我们可以将它们合并,因为它们彼此相似。
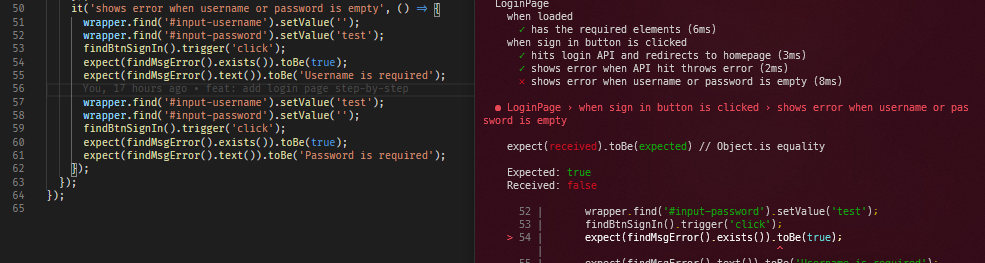
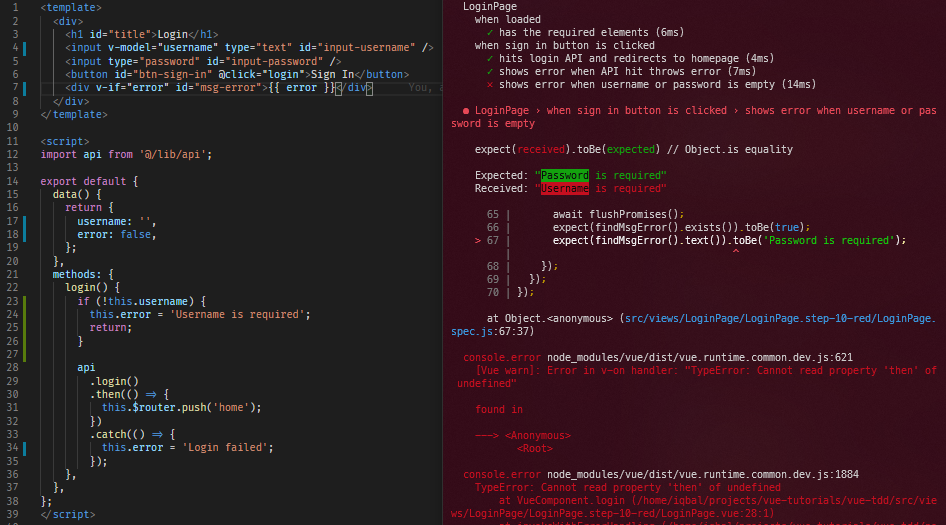
The test result produces errors because we introduce something that wasn’t handled before. We just need to handle this in the test case.
测试结果产生错误,因为我们引入了以前未处理的内容。 我们只需要在测试用例中处理即可。
All green, let’s refactor.
全部绿色,让我们重构。

So, what’s next? We have learned how to mock $router and external library, do TDD, and refactor as needed. However to make this code production ready we need to do something. Remember the API call? We still have not passed anything to the function. And also, we haven’t painted the template with CSS. It is up to you to continue since adding CSS won’t break any of the tests.
下一个是什么? 我们已经学习了如何模拟$router和外部库,执行TDD以及根据需要进行重构。 但是,要准备好此代码生产,我们需要做一些事情。 还记得API调用吗? 我们仍然没有传递任何东西给函数。 而且,我们还没有使用CSS 绘制模板。 由您决定是否继续,因为添加CSS不会破坏任何测试。
Personally I like to add CSS as the last step because I have to run the server. I hope this tutorial will do you some help. Please let me know if something I can fix or help. Thank you for reading.
我个人喜欢在最后一步添加CSS,因为我必须运行服务器。 希望本教程对您有所帮助。 请让我知道是否可以解决或帮助。 感谢您的阅读。
进一步阅读 (Further Reading)
This is a very good tutorial for learning the TDD concept and Golang:
这是学习TDD概念和Golang的很好的教程:
All of the code in this tutorial can be accessed in:
可以通过以下方式访问本教程中的所有代码:
翻译自: https://medium.com/swlh/tdd-with-vue-js-part-1-simple-page-4b3c4a0816ee
vue tdd


 被折叠的 条评论
为什么被折叠?
被折叠的 条评论
为什么被折叠?
 到【灌水乐园】发言


