


Vim简介 (Introduction to Vim)
When I first was interested in using Vim with React Native, I wasn’t sure how to get started. Sure, I can download Vim and start using the basic commands, but what about linter, color scheme, and any other tool that makes Vim an ideal editor?
当我最初对将Vim与React Native一起使用感兴趣时,我不确定如何入门。 当然,我可以下载Vim并开始使用基本命令,但是棉绒,配色方案以及其他使Vim成为理想编辑器的工具又如何呢?
That’s where this guide comes in. It helps you configure Vim for React Native by helping you:
这就是该指南的源头。它通过帮助您帮助您为React Native配置Vim:
- Create a repository to allow sharing of configuration files on different machines 创建一个存储库以允许在不同机器上共享配置文件
- Decide whether to use Mac OS Terminal or iTerm 决定使用Mac OS Terminal还是iTerm
- Configure Vim for React Native 为React Native配置Vim
Let’s start by understanding what dotfiles are.
让我们通过了解点文件是什么开始。
点文件 (Dotfiles)
什么是点文件? (What are Dotfiles?)
Dotfiles are hidden files that are used for different things, such as preserving the state of a utility or user preferences.
点文件是用于不同用途的隐藏文件,例如保留实用程序的状态或用户首选项。
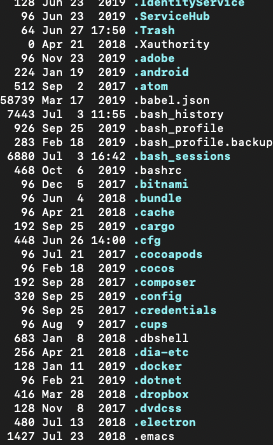
If you go and do a ls -al in your home directory, you may see a huge list of hidden files.
如果您在主目录中执行ls -al ,则可能会看到大量的隐藏文件。
在GitHub上存储点文件 (Storing dotfiles on GitHub)
GitHub is a repository system that works on any platform, and it’s useful in sharing files between multiple systems. This is one of the reasons why it’s great to store your dotfiles on it. You can share your Vim configuration files between different computers and have the same setup.
GitHub是可在任何平台上运行的存储库系统,在多个系统之间共享文件时非常有用。 这就是为什么在上面存储dotfile很棒的原因之一。 您可以在不同的计算机之间共享Vim配置文件,并具有相同的设置。
An alternative solution would be using a USB stick, but I feel it’s less reliable than using GitHub. You can overwrite files accidentally and have no history to revert to if a mistake ever happens. On the other hand, GitHub allows you to push updates and to do merges and everything you need, directly from the command line.
另一种解决方案是使用USB记忆棒,但我觉得它不如使用GitHub可靠。 您可能会意外覆盖文件,并且一旦发生错误就没有历史可恢复。 另一方面,GitHub允许您直接从命令行推送更新,进行合并以及所需的一切。
入门 (Getting started)
I was having a conversation with some colleagues of mine last year, and, coming from native iOS development, I didn’t even realize it was a thing to store dotfiles on GitHub. It’s a great way to make sure your environment is the same on different machines.
去年,我与我的一些同事进行了交谈,并且来自本地iOS开发,我什至没有意识到将点文件存储在GitHub上是一件事情。 这是确保您的环境在不同计算机上相同的好方法。
During my search, I found a tutorial that goes through the steps. It explains in detail how to set up your own Git repository. I’ll give you a basic rundown of the commands, but if you want a more in-depth explanation, I would suggest checking out the tutorial.
在搜索过程中,我找到了完成这些步骤的教程 。 它详细说明了如何设置自己的Git存储库。 我将基本介绍这些命令,但是如果您需要更深入的说明,建议您阅读本教程。
Make sure to mkdir .cfg in your home directory.
确保在主目录中为mkdir .cfg 。
git init — bare $HOME/.cfg
alias config=’/usr/bin/git — git-dir=$HOME/.cfg/ — work-tree=$HOME’
config config — local status.showUntrackedFiles no
echo “alias config=’/usr/bin/git — git-dir=$HOME/.cfg/ — work-tree=$HOME’” >> $HOME/.bashrc
Here are a few examples on how to use the config alias you’ve just created:
以下是一些有关如何使用刚刚创建的配置别名的示例:
 config status
 config add .vimrc
 config commit -m “Add vimrc”
 config add .bashrc
 config commit -m “Add bashrc”
 config push
用另一台计算机访问您的配置文件 (Accessing your config files with a different computer)
If you want to access your dot config file repository from another computer, here are the steps to do so:
如果要从另一台计算机访问您的点配置文件存储库,请按照以下步骤操作:
Make sure to mkdir .cfg in your home directory.
确保在主目录中为mkdir .cfg 。
alias config=’/usr/bin/git — git-dir=$HOME/.cfg/ — work-tree=$HOME’
echo “.cfg” >> .gitignore
git clone — bare <git-repo-url> $HOME/.cfg
config checkout
That’s the basics of setting up your repo and access on different devices. Next up is trying to decide which terminal to use on your Mac OS.
这是在不同设备上设置存储库和访问权限的基础。 下一步是尝试确定要在Mac OS上使用哪个终端。
使用哪个终端应用 (Which Terminal App to Use)
Mac OS终端与iTerm (Mac OS terminal vs. iTerm)
Terminal.app might be your go-to for entering commands in the command-line, but it has limited features. Even though it may lack in features, it’s been said that it has better performance than iTerm.
Terminal.app可能是您在命令行中输入命令的首选,但功能有限。 尽管可能缺少功能,但据说它比iTerm具有更好的性能 。
Note: If you’re looking to add panes to Terminal.app, I recommend looking into tmux.
注意:如果要向Terminal.app添加窗格,建议您查看tmux 。
iTerm, on the other hand, is rich in features. Some of my favorite features that iTerm has are listed below:
另一方面, iTerm具有丰富的功能。 下面列出了iTerm我最喜欢的一些功能:
- Split panes 分割窗格
- 24bit color support 24位色彩支持
- Customization 客制化
- Expose tab 公开标签
iTerm has split panes built in, so there’s no need to set up tmux. It has an autocomplete feature that remembers past commands that you’ve executed. It’s a complete set up right out of the box.
iTerm具有内置的拆分窗格,因此无需设置tmux。 它具有自动完成功能,可以记住您过去执行的命令。 开箱即用,是完整的设置。
If you haven’t used tmux before and are new to Vim, I would consider using iTerm so you can focus more on Vim.
如果您以前从未使用过tmux并且是Vim的新手,我会考虑使用iTerm,以便您可以将更多精力放在Vim上。
配置Vim (Configuring Vim)
安装 (Installation)
Now we are getting down to the good stuff, installing Vim on your Mac.
现在,我们开始研究好东西,在Mac上安装Vim。
First off, you need to have Homebrew installed on your system.
首先,您需要在系统上安装Homebrew 。
These are the magic keystrokes:
这些是神奇的按键:
brew install vim
brew install vim
After installation is complete, we have to configure Vim.
安装完成后,我们必须配置Vim。
基本插件 (Essential plugins)
Here is a list of plugins that are great for React Native:
以下是最适合React Native的插件列表:
Plug — for managing plugins
插件 —用于管理插件
Auto Pairs — Insert or delete brackets, prens, quotes in pairs
YAJS — Yet Another Javascript Syntax
YAJS —另一个Java语法
NERDTree — File navigation
NERDTree —文件导航
FZF — Fuzzy search
FZF —模糊搜索
Oceanic Next — color scheme
Oceanic Next —配色方案
Vim-jsx-pretty — React syntax highlighting and indenting
Vim-jsx-pretty — React语法高亮和缩进
Ale — Linting and fixing
淡啤酒 -整理和固定
插头快速入门指南 (Quick-start guide for Plug)
Download plug.vim and put it in the ~/.vim/autoload directory.
下载plug.vim并将其放在~/.vim/autoload目录中。
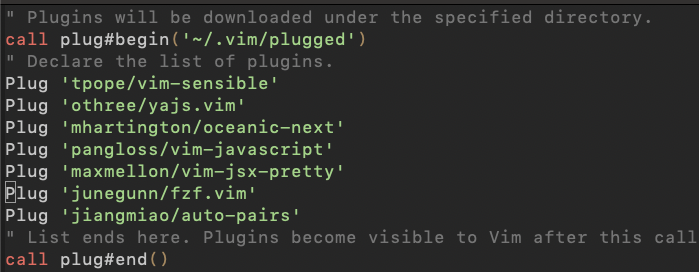
Add plugins to .vimrc:
将插件添加到.vimrc :
Open the
~/.vimrcfile and add these lines to the top.打开
~/.vimrc文件,并将这些行添加到顶部。Write
plug#begin(‘~/.vim/plugged’).写出
plug#begin('~/.vim/plugged')。- List the plugins you want underneath it using the “Plug” keyword. 使用“ Plug”关键字在其下方列出您想要的插件。
Call plug#end().Call plug#end()。
5. Then use the command:so .vimrc to reload the file.
5.然后使用命令:so .vimrc重新加载文件。
6. Finally, type the command :PlugInstall to install your newly added plugins.
6.最后,键入命令:PlugInstall以安装新添加的插件。
格式化 (Formatting)
Formatting is important for the readability of code. I’ve used Prettier previously, and it kind of stuck with me.
格式化对于代码的可读性很重要。 我以前使用过Prettier ,但有点卡住了我。
npm install -g prettier
npm install -g prettier
Below the call plug#end() line, I added these formatters:
在调用plug#end()行的下方,我添加了以下格式化程序:
au FileType javascript setlocal formatprg=prettier
au FileType javascript.jsx setlocal formatprg=prettier
au FileType typescript setlocal formatprg=prettier\ — parser\ typescript
Now in order to use Prettier, you have to use these key commands:
现在,要使用“更漂亮”,您必须使用以下关键命令:
gqis quite handy as it can be combined with the text objectsgq非常方便,因为它可以与文本对象结合使用gqgqformat current linegqgq格式当前行gqipformat paragraphgqip格式段落gggqGformat the whole filegggqG格式化整个文件
林亭 (Linting)
A linter comes in handy for analyzing source code. A linter can search for typos, code smells, and if code complies with a certain style.
lint可以方便地分析源代码。 短绒棉可以搜索拼写错误,代码气味以及代码是否符合特定样式。
Just below the formatters, I have these lines of code:
在格式化程序的下面,我有以下几行代码:
let g:ale_linters = { ‘javascript’: [‘eslint’] }
let g:ale_fixers = { ‘javascript’: [‘eslint’], ‘typescript’: [‘prettier’, ‘tslint’], ‘scss’: [‘prettier’], ‘html’: [‘prettier’], ‘reason’: [‘refmt’] }
结论 (Conclusion)
This is just a quick-start guide to setting up Vim and having it play nicely with React Native. There are a lot of other plugins out there, so once you’re comfortable with a basic setup, I’d suggest exploring a little further.
这只是设置Vim并使其在React Native中很好地发挥作用的快速入门指南。 还有很多其他插件,因此一旦您对基本设置感到满意,我建议您进一步研究。
翻译自: https://medium.com/better-programming/using-vim-with-react-native-2020-77deb4e44348


 575
575


 被折叠的 条评论
为什么被折叠?
被折叠的 条评论
为什么被折叠?
 到【灌水乐园】发言


