


com.auth0.jwt
JSON Web Token (JWT) is a compact and URL-safe string, which represents claims in a specific format that is defined by the industry-standard RFC 7519. JWT is a standard method to transmit claims securely between two parties. People typically use JWTs as identity proof in web applications and mobile apps.
JSON Web令牌(JWT)是紧凑且URL安全的字符串,它表示由行业标准RFC 7519定义的特定格式的声明。 JWT是在两方之间安全地传输声明的标准方法。 人们通常将JWT用作Web应用程序和移动应用程序中的身份证明。
There are many articles talking about JWT, and I think JWT is really being hyped. As a responsible writer, I would strongly encourage you to thoroughly consider whether you should use JWT at all. The following articles are worth reading in order to make an educated and unbiased decision.
有很多关于JWT的文章,我认为JWT确实被炒作了。 作为负责任的作家,我强烈建议您彻底考虑是否应该使用JWT 。 以下文章值得一读,以便做出有教养且公正的决定。
Stop using JWT for sessions and Why your solution doesn’t work
Why JWTs suck as session tokens and JWTs Suck (YouTube link)
- and many others 还有很多
If you decide to continue reading this article, then I assume you have some reasons to use JWTs in your application.
如果您决定继续阅读本文,那么我认为您出于某些原因在应用程序中使用JWT。
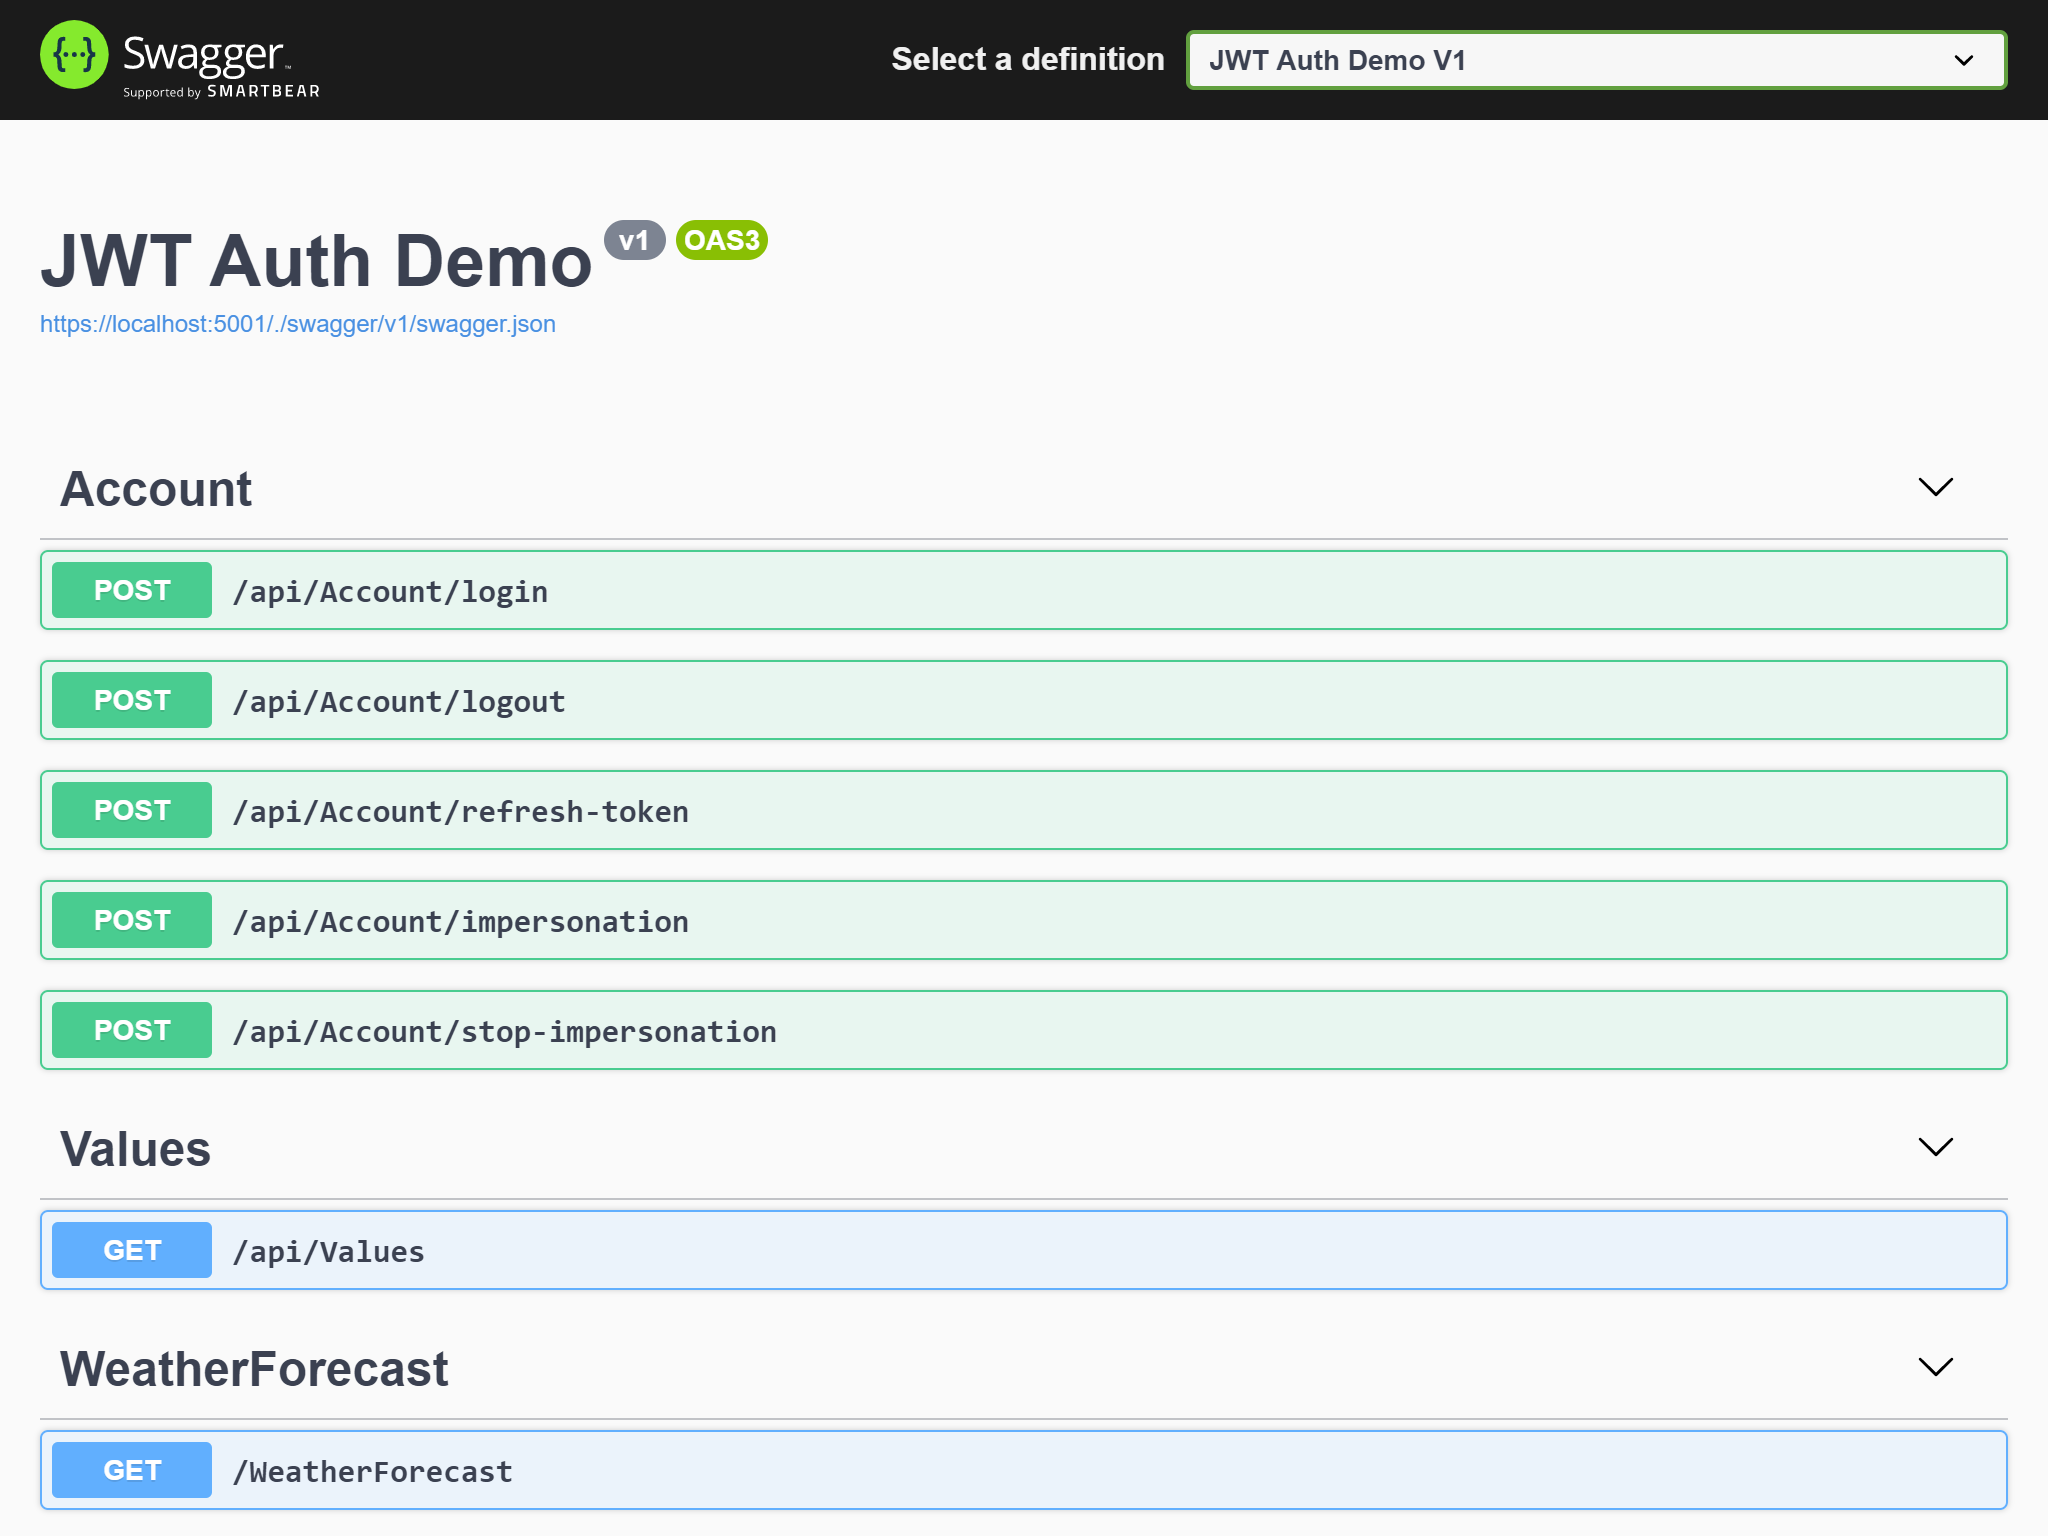
In this article, I will show you how to implement an ASP.NET Core web API application using JWT authentication and authorization. This web API application implements processes such as login, logout, refresh token, impersonation, and so on. The following screenshot shows the API endpoints that we are going to walk through in this article.
在本文中,我将向您展示如何使用JWT身份验证和授权来实现ASP.NET Core Web API应用程序。 该Web API应用程序实现了诸如登录,注销,刷新令牌,模拟等过程。 以下屏幕快照显示了我们将在本文中介绍的API端点。
I separate my solution into two parts: a front-end app in Angular and a back-end app in ASP.NET Core. You can find the complete solution in my GitHub repository. Both the front-end and back-end applications support Docker, and you can also run them simultaneously in Linux containers using Docker Compose.
我将解决方案分为两部分:Angular中的前端应用程序和ASP.NET Core中的后端应用程序。 您可以在我的GitHub存储库中找到完整的解决方案。 前端和后端应用程序都支持Docker,您也可以使用Docker Compose在Linux容器中同时运行它们。
In this article, we will focus on the back-end solution, which includes two projects: JwtAuthDemo and JwtAuthDemo.IntegrationTests. The integration testing project covers all regular JWT processes in the web API project.
在本文中,我们将重点关注后端解决方案,该解决方案包括两个项目: JwtAuthDemo和JwtAuthDemo.IntegrationTests 。 集成测试项目涵盖了Web API项目中的所有常规JWT流程。
人们通常如何使用JWT (How Do People Usually Use JWT)
Developers are opinionated, web and mobile native apps are different, and the business scenarios are distinct, so we see a variety of approaches of using JWT. But the most common JWT flow works as follows:
开发人员认为,Web和移动本机应用程序是不同的,并且业务场景是不同的,因此我们看到了使用JWT的多种方法。 但是最常见的JWT流程如下:
- A user sends credentials to the website to login. 用户将凭据发送到网站以进行登录。
- The website back-end validates the credentials, declares proper claims, then generates a JWT and returns it to the user. 网站后端验证凭据,声明适当的声明,然后生成JWT并将其返回给用户。
- The user holds the JWT until it expires, and sends the JWT to the website in subsequent requests. 用户持有JWT直到过期,然后在后续请求中将JWT发送到网站。
- The website validates the JWT and decides if the resource is accessible, then processes the request accordingly. 该网站验证JWT并确定资源是否可访问,然后相应地处理请求。
From the flow, we know that the security of the JWT is vital, so people usually recommend sending JWTs over HTTPS, and JWT access tokens should be short-lived and should not contain sensitive data.
从该流程中,我们知道JWT的安全性至关重要,因此人们通常建议通过HTTPS发送JWT,并且JWT访问令牌应该是短命的,并且不应包含敏感数据。
For simplicity, I omitted the refresh token process in the flow above. Usually, a random string, refresh token, is generated along with the JWT access token in step 2. When the JWT access token is about to expire, the client sends the refresh token to the server-side to get a new JWT access token. It is recommended that the system should return a new refresh token together with the new access token. Therefore, the application no longer has a long-lived refresh token. This technique is known as Refresh Token Rotation.
为简单起见,我在上面的流程中省略了刷新令牌过程。 通常,在步骤2中会生成一个随机字符串,刷新令牌和JWT访问令牌。当JWT访问令牌即将到期时,客户端会将刷新令牌发送到服务器端以获取新的JWT访问令牌。 建议系统应返回新的刷新令牌以及新的访问令牌。 因此,该应用程序不再具有寿命长的刷新令牌。 此技术称为“ 刷新令牌循环” 。
Note that the best practices always evolve as time goes and as technologies advance.
请注意,最佳实践总是随着时间和技术的发展而发展。
For demo purposes, we create an ASP.NET Core web API project JwtAuthDemo and an MS Test project JwtAuthDemo.IntegrationTests. We will first configure JWT authentication for our web API project. Then we will implement the login, logout, and refresh token processes.
为了演示,我们创建一个ASP.NET Core Web API项目JwtAuthDemo和一个MS Test项目JwtAuthDemo.IntegrationTests 。 我们将首先为我们的Web API项目配置JWT身份验证。 然后,我们将实现登录,注销和刷新令牌过程。
JWT认证配置 (JWT Authentication Configuration)
We normally want to customize and secure the JWT access tokens generated by our applications. A set of common configurations is defined in the following JwtTokenConfig class.
我们通常希望自定义和保护由我们的应用程序生成的JWT访问令牌。 在以下JwtTokenConfig类中定义了一组通用配置。
The property Secret is a string that needs to be kept in a secure place, for example, the app pool user’s environment variables, or a cloud secret store or key vault. The AccessTokenExpiration and RefreshTokenExpiration are two integers representing the total lifetimes of the tokens since they were generated. The times are in minutes based on the implementation of this demo project. For simplicity purposes, we will store the parameters in the appsettings.json file. Then we are ready to pass the values into the JWT Bearer configurations.
属性Secret是一个字符串,需要保存在安全的地方,例如,应用程序池用户的环境变量或云密钥存储或密钥库。 AccessTokenExpiration和RefreshTokenExpiration是两个整数,代表令牌自生成以来的总生存期。 时间以分钟为单位,具体取决于该演示项目的实施情况。 为简单起见,我们将参数存储在appsettings.json文件中。 然后,我们准备将这些值传递到JWT Bearer配置中。
The good news is that authenticating with JWT tokens is straightforward, and the Microsoft.AspNetCore.Authentication.JwtBearer NuGet package does most of the work for us. After we have installed the latest version of this NuGet package, we have two choices to configure JWT authentication: (1) use the app.UseJwtBearerAuthentication() middleware in the Startup.Configure method; (2) call the services.AddJwtBearer() method to register the JWT authentication scheme in the Startup.ConfigureServices method.
好消息是,使用JWT令牌进行身份验证非常简单, Microsoft.AspNetCore.Authentication.JwtBearer NuGet包为我们完成了大部分工作。 在安装了此NuGet软件包的最新版本之后,我们有两个选择来配置JWT身份验证:(1)在Startup.Configure方法中使用app.UseJwtBearerAuthentication()中间件; (2)调用services.AddJwtBearer()方法以在Startup.ConfigureServices方法中注册JWT身份验证方案。
Here, we will configure the JWT Bearer authentication via the second approach. The following code snippet shows an example ConfigureServices method.
在这里,我们将通过第二种方法配置JWT承载身份验证。 以下代码片段显示了一个示例ConfigureServices方法。
In the code above, lines 2 and 3 read our settings and register the JwtTokenConfig as a Singleton in the Dependency Injection (DI) container.
在上面的代码中,第2行和第3行读取了我们的设置,并将JwtTokenConfig注册为Dependency Injection(DI)容器中的Singleton。
Lines 5 to 8 set the default to authenticate and challenge schemes to Bearer in this application. Lines 9 to 24 configure the JWT Bearer token, especially the token validation parameters. I would like to point out the following attributes.
第5到8 Bearer此应用程序中将默认值设置为对Bearer进行身份验证和质询。 第9至24行配置了JWT Bearer令牌,尤其是令牌验证参数。 我想指出以下属性。
RequireHttpsMetadata: the default value istrue, which means that the authentication requires HTTPS for the metadata address or authority.RequireHttpsMetadata:默认值为true,这意味着身份验证需要HTTPS作为元数据地址或权限。SaveToken: the default value istrue, which saves the JWT access token in the currentHttpContext, so that we can retrieve it using the methodawait HttpContext.GetTokenAsync(“Bearer”, “access_token”)or something similar. If we want to set theSaveTokento befalse, then we can save the JWT access token in claims, and then retrieve its value using the method:User.FindFirst("access_token")?.Value.SaveToken:默认值为true,它将JWT访问令牌保存在当前HttpContext,以便我们可以使用await HttpContext.GetTokenAsync(“Bearer”, “access_token”)或类似方法来检索它。 如果要将SaveToken设置为false,则可以在声明中保存JWT访问令牌,然后使用以下方法检索其值:User.FindFirst("access_token")?.Value。TokenValidationParameters: this object sets the parameters used to validate identity tokens. The meaning for each property is self-explanatory. One thing I want to mention is theClockSkewproperty. I set its value to be one minute, which gives an allowance time for the token expiration validation. I have an integration test for this property, and you can play with it.TokenValidationParameters:此对象设置用于验证身份令牌的参数。 每个属性的含义都是不言而喻的。 我想提到的一件事是ClockSkew属性。 我将其值设置为一分钟,这为令牌过期验证留出了时间。 我对此属性进行了集成测试,您可以使用它。
Then we move on and add the app.UseAuthentication() method in the Startup.Configure method like below.
然后,我们继续在下面的Startup.Configure方法中添加app.UseAuthentication()方法。
The Authentication middleware, line 5, is critical to make the registered authentication schemes (JWT Bearer, in this case) work. On the other hand, the Authorization middleware, line 6, is critical to make the registered authorization mechanisms work. In this project, we use the default role-based authorization. Both lines 5 and 6 are needed so that we can use the [Authorize] attribute over controllers and action methods. In addition, please note that the order of the middleware is important.
Authentication中间件,第5行,对于使已注册的身份验证方案(在这种情况下为JWT Bearer)起作用至关重要。 另一方面, Authorization中间件第6行对于使已注册的授权机制起作用至关重要。 在此项目中,我们使用默认的基于角色的授权。 第5行和第6行都是必需的,以便我们可以在控制器和操作方法上使用[Authorize]属性。 另外,请注意中间件的顺序很重要。
Alright, with the groundwork being laid, I can’t wait to show you the token generation and login process.
好了,奠定基础之后,我迫不及待地向您展示令牌的生成和登录过程。
令牌生成和登录 (Token Generation and Login)
We will create a JwtAuthManager class to put together all utilities related to the JWT access tokens and refresh tokens. The following code snippet shows an example implementation.
我们将创建一个JwtAuthManager类,以将与JWT访问令牌和刷新令牌相关的所有实用程序放在一起。 以下代码段显示了示例实现。
In the JwtAuthManager class, we save a dictionary _usersRefreshTokens as a cache for refresh tokens. Alternatively, we can save the refresh tokens in a database or a distributed cache storage. Keeping a copy of refresh tokens on the server-side allows the system to validate the refresh tokens and look up metadata about user sessions.
在JwtAuthManager类中,我们将字典_usersRefreshTokens保存为刷新令牌的缓存。 或者,我们可以将刷新令牌保存在数据库或分布式缓存存储中。 在服务器端保留刷新令牌的副本使系统可以验证刷新令牌并查找有关用户会话的元数据。
The GenerateTokens method creates a JWT access token and a refresh token. We pass the user claims into the payload in the JWT access token and set proper values for JWT token validation parameters. The refresh token is simply a random string, but we also enrich the RefreshToken object with an expiration time and username. We can further attach other metadata to the RefreshToken objects, for example, client IP, user agent, device ID, and so on, so that we can identify and monitor user sessions, and detect fraudulent tokens.
GenerateTokens方法创建一个JWT访问令牌和一个刷新令牌。 我们将用户声明传递到JWT访问令牌中的有效负载中,并为JWT令牌验证参数设置适当的值。 刷新令牌只是一个随机字符串,但是我们还用到期时间和用户名丰富了RefreshToken对象。 我们可以进一步将其他元数据附加到RefreshToken对象,例如,客户端IP,用户代理,设备ID等,以便我们可以标识和监视用户会话,并检测欺诈性令牌。
Caveat: Notice lines 17 and 20 will prevent the token from being lengthy when the token is refreshed multiple times. The reason why the JWT token gets longer is that the aud claim is an array and keeps appending new values to it. For sure, there are other ways to keep the aud claim clean.
注意事项:注意:第17和20行将在多次刷新令牌时防止令牌过长。 JWT令牌变得更长的原因是, aud声明是一个数组,并不断向其添加新值。 当然,还有其他方法可以使aud声明保持清晰。
Since the JwtAuthManager class doesn’t have Scoped or Transient dependencies, we can register it as a Singleton in the DI container. Then we can inject the JwtAuthManager to the AccountController, which performs the Login action. The following code snippet shows the AccountController and the Login action method.
由于JwtAuthManager类没有Scoped或Transient依赖项,因此我们可以将其注册为DI容器中的Singleton。 然后,我们可以将JwtAuthManager注入到AccountController ,该JwtAuthManager执行Login操作。 以下代码片段显示了AccountController和Login操作方法。
In the code above, we first validate the login credentials in lines 26 to 29 using a UserService. Then we generate claims in lines 31 to 36. Line 38 calls the GenerateTokens method in the JwtAuthManager class to get the access token and refresh token. Finally, the Login method returns an object with the tokens to the client-side.
在上面的代码中,我们首先使用UserService验证第26至29行中的登录凭据。 然后,在第31至36行中生成声明。第38 JwtAuthManager类中调用GenerateTokens方法以获取访问令牌和刷新令牌。 最后, Login方法将带有令牌的对象返回到客户端。
登出 (Logout)
After the JWT tokens are sent back to the client, they are stored on the client-side. When the client wants to logout, we can remove the token by deleting the tokens in cookie or localStorage. However, a user may still be able to hold the access token. Usually, the risk is low because the access token will be expired after a small time frame. If you still want to invalidate the JWT access token on the server-side, then you can read more in this StackOverflow discussion and this GitHub issue, which suggests a block-list strategy.
将JWT令牌发送回客户端后,它们存储在客户端。 当客户想要注销时,我们可以通过删除cookie或localStorage中的令牌来删除令牌。 但是,用户仍然可以保留访问令牌。 通常,风险很小,因为访问令牌将在较短的时间范围后过期。 如果您仍然想在服务器端使JWT访问令牌无效,那么可以在StackOverflow讨论和GitHub问题中阅读更多内容 ,这建议了阻止列表策略。
In this project, we will leave the access token alone, but we will invalidate the refresh token on the server-side. In the AccountController, we add the Logout method as follows.
在此项目中,我们将不理会访问令牌,但将使服务器端的刷新令牌无效。 在AccountController ,我们如下添加Logout方法。
In this Logout method, we first get the current username (or we can get the user ID to identify the user if we save the ID in claims). Based on the username, we can remove the user’s refresh token so that the user won’t be able to refresh his/her session until a fresh login.
在此Logout方法中,我们首先获取当前用户名(或者,如果我们将ID保存在声明中,则可以获取用户ID来标识用户)。 根据用户名,我们可以删除用户的刷新令牌,以便用户只有在重新登录后才能刷新其会话。
Note that removing refresh tokens based on a username is not ideal because it will log out all sessions for this user even if the user is using two browsers, or one in Desktop and one in Mobile. Therefore, to improve the user experience, we should only remove a specific token (for example, based on user-agent and client IP), which can be identified in the request body or headers.
请注意,基于用户名删除刷新令牌不是理想的,因为即使用户使用的是两种浏览器,或者使用桌面浏览器和移动浏览器,浏览器也会注销该用户的所有会话。 因此,为了改善用户体验,我们只应删除可以在请求正文或标头中标识的特定令牌(例如,基于用户代理和客户端IP)。
刷新JWT访问令牌 (Refresh the JWT Access Token)
Some mobile apps only need to login once, so refreshing the JWT access tokens is not that significant. But for most web apps, refreshing access tokens is mandatory. The client usually triggers the refresh token action when the access token is about to expire. When that happens, the client sends a RefreshToken to the API endpoint. The following code snippet shows an example API action method in the AccountController class.
某些移动应用程序只需登录一次,因此刷新JWT访问令牌并不重要。 但是对于大多数Web应用程序,必须刷新访问令牌。 当访问令牌即将到期时,客户端通常会触发刷新令牌操作。 发生这种情况时,客户端会将RefreshToken发送到API端点。 以下代码段显示了AccountController类中的示例API操作方法。
In the code above, the original access token is also validated to make sure the refresh token and the access token are paired. The API response body contains a similar object (lines 18–24) to the Login method result so that the claims and tokens are properly restored. If any exception happens during the refresh process, then the API will return an Unauthorized HTTP status code (lines 26–29), so that the client-side can redirect the user to the login page.
在上面的代码中,还对原始访问令牌进行了验证,以确保刷新令牌和访问令牌配对。 API响应主体包含与Login方法结果类似的对象(第18-24行),以便正确还原声明和令牌。 如果刷新过程中发生任何异常,则API将返回Unauthorized HTTP状态代码(第26–29行),以便客户端可以将用户重定向到登录页面。
Line 16 is the place where the magic happens. The implementation of the Refresh method is shown below.
第16行是发生魔术的地方。 Refresh方法的实现如下所示。
In the code above, we first decode the JWT access token to confirm that we get an authentic identity. The parameters in the DecodeJwtToken method should match the TokenValidationParameters in the Startup.cs file. I also have included several integration tests for SecurityTokenExpiredException, SecurityTokenInvalidSignatureException, and SecurityTokenException, so that we can understand the token validation better.
在上面的代码中,我们首先解码JWT访问令牌以确认我们获得了真实的身份。 在参数DecodeJwtToken方法应符合TokenValidationParameters在Startup.cs文件。 我还包括针对SecurityTokenExpiredException , SecurityTokenInvalidSignatureException和SecurityTokenException几个集成测试,以便我们可以更好地理解令牌验证。
Another reason why we need to decode the original JWT access token is that we need to recover all claims in the original token. Then we can generate a new access token with a proper payload.
我们需要解码原始JWT访问令牌的另一个原因是,我们需要恢复原始令牌中的所有声明。 然后,我们可以生成一个具有适当有效负载的新访问令牌。
刷新令牌管理 (Refresh Tokens Management)
Since we adopt the Refresh Token Rotation technique, the server may need to retain numerous refresh tokens and their metadata. In my demo solution, I have implemented a background job (code not shown here), which runs every minute to remove expired refresh tokens in memory. You can visit my GitHub repository (link) for more details.
由于我们采用了“刷新令牌轮换”技术,因此服务器可能需要保留许多刷新令牌及其元数据。 在演示解决方案中,我实现了一个后台作业(代码未在此处显示),该作业每分钟运行一次,以删除内存中过期的刷新令牌。 您可以访问我的GitHub存储库( 链接 )以了解更多详细信息。
It is worth considering something similar if you save the refresh tokens in a database or in a distributed cache, in order to improve the lookup efficiency.
如果您将刷新令牌保存在数据库或分布式缓存中,以提高查找效率,则值得考虑采取类似的措施。
假冒 (Impersonation)
Sometimes we want to impersonate a particular user for testing or debugging purposes. In my demo solution, I have implemented the impersonation and stop-impersonation APIs. The main trick is to keep track of the original user’s claims. Of course, some front-end work is needed to make the impersonation process fully functional.
有时我们为了模拟或调试目的而要冒充特定用户。 在我的演示解决方案中,我实现了impersonation和stop-impersonation API。 主要技巧是跟踪原始用户的声明。 当然,需要一些前端工作才能使模拟过程充分发挥作用。
整合测试 (Integration Testing)
Integration testing in ASP.NET Core is not complicated. We first create a Test Host, then we will have a Test HttpClient and the ServiceProvider at hand. Thus, we can add the Bearer token to HTTP headers, and send HTTP requests to our API endpoints. Finally, we can verify the response codes and content.
ASP.NET Core中的集成测试并不复杂。 我们首先创建一个Test Host ,然后将有一个Test HttpClient和ServiceProvider 。 因此,我们可以将Bearer令牌添加到HTTP标头,并将HTTP请求发送到我们的API端点。 最后,我们可以验证响应代码和内容。
There are several integration tests related to the time elapses, for example, token expiration. The beauty of these tests is that they don’t need to borrow any mock times, which is thanks to the DateTime.Now parameter in token related methods in the JwtAuthManager class. I encourage you to read my other article, DateTime.Now Should Be a Parameter.
有几种与时间相关的集成测试,例如令牌到期。 这些测试的JwtAuthManager在于它们不需要借用任何模拟时间,这要归功于JwtAuthManager类中与令牌相关的方法中的DateTime.Now参数。 我鼓励您阅读我的另一篇文章DateTime.Now应该是Parameter 。
HTTPS和Dockerization (HTTPS and Dockerization)
As mentioned above, JWT tokens should be transmitted over HTTPS. In the development mode, we should have set up a developer’s SSL certificate for localhost by ASP.NET Core, so that we can launch the application using an HTTPS address.
如上所述,JWT令牌应通过HTTPS传输。 在开发模式下,我们应该通过ASP.NET Core为本地主机设置开发人员的SSL证书,以便我们可以使用HTTPS地址启动应用程序。
When we dockerize an ASP.NET Core web app, we need to map our certificate’s private key to the Docker container. You can read more from my other article, Hosting an ASP.NET Core App on Docker with HTTPS, for more details. In my GitHub repository, I have included a pfx file and we should be able to launch the app via Docker Compose easily.
当我们对ASP.NET Core Web应用进行docker化时,我们需要将证书的私钥映射到Docker容器。 您可以从我的其他文章“ 使用HTTPS在Docker上托管ASP.NET Core应用程序”中阅读更多内容,以了解更多详细信息。 在我的GitHub存储库中,我包含了一个pfx文件,我们应该能够通过Docker Compose轻松启动该应用程序。
结论 (Conclusion)
That’s all for today. Again, the full solution is in my GitHub repository. Hope it helps. Please share your thoughts in the comment section or in my GitHub repository. If you are interested in the corresponding Angular app, you can read my next article: JWT Authentication in Angular.
今天就这些。 同样,完整的解决方案在我的GitHub存储库中 。 希望能帮助到你。 请在评论部分或我的GitHub存储库中分享您的想法。 如果您对相应的Angular应用感兴趣,可以阅读我的下一篇文章: Angular中的JWT身份验证 。
Thanks for reading.
谢谢阅读。
翻译自: https://codeburst.io/jwt-auth-in-asp-net-core-148fb72bed03
com.auth0.jwt


 被折叠的 条评论
为什么被折叠?
被折叠的 条评论
为什么被折叠?
 到【灌水乐园】发言


