


With the evolution of Electron, it has become simpler than ever to create amazing cross-platform desktop applications with just preexisting HTML, CSS and JavaScript knowledge. However, like every other JavaScript frameworks, it also has its learning curve. But, if you have a hands on experience with React, you can start making desktop applications, just the way you make web applications with it. In this article, I will walk you through the steps to be followed to build native apps with Electron and React. I will try to keep this simple as well as detailed enough, so that you can follow along.
随着发展电子 ,它变得比以往创建只有预先存在HTML,CSS和JavaScript知识惊人的跨平台桌面应用程序更为简单。 但是,像其他所有JavaScript框架一样,它也有其学习曲线。 但是,如果您有使用React的实际经验,就可以开始制作桌面应用程序,就像使用它来制作Web应用程序一样。 在本文中,我将引导您完成使用Electron和React构建本机应用程序所遵循的步骤。 我会尽量保持简单和详细,以便您可以继续学习。
First off, we will need a node environment. So if you don’t have Node.js already installed, you can go ahead, click on the link below and install the compatible version.
首先,我们将需要一个节点环境。 因此,如果尚未安装Node.js ,则可以继续,单击下面的链接并安装兼容版本。
Once it is installed, just make yourself double sure. Open any CLI and type node -v && npm -v and check the versions of node and npm. I am using windows 10 and sometimes in it, you can get a path error on the execution of above commands. If you get the error, don’t worry, you just have to add the npm/bin folder to your path variable. Read more on the same.
安装完成后,请确保自己再次确定。 打开任何CLI,然后键入node -v && npm -v并检查node和npm的版本。 我正在使用Windows 10,有时在其中使用Windows 10时,执行上述命令时会出现路径错误。 如果收到错误,请放心,只需将npm / bin文件夹添加到path变量即可。 阅读更多内容。
We will start by creating a react application, and then make some changes on it to configure it with Electron BrowserWindow.
我们将首先创建一个react应用程序,然后对其进行一些更改以使用Electron BrowserWindow对其进行配置。
I will be using create-react-app to make my react application. Create React App is an officially supported way to create single-page React applications. It offers a modern build setup with no configuration. Read more on this if you are not familiar.
我将使用create-react-app来创建我的react应用程序。 创建React App是创建单页React应用程序的官方支持方式。 它提供了无需配置的现代化构建设置。 如果您不熟悉,请阅读有关此内容的更多信息 。
I will be installing my dependencies with Node Package Manager(npm). You can also use Yarn for it.
我将使用Node Package Manager(npm)安装我的依赖项。 您也可以使用Yarn 为了它。
Now, lets start making our react application by typing npx create-react-app app-name. In my case, I will name my application electron-react-material-demo. You can also do that and follow along.
现在,让我们通过输入npx create-react-app app-name开始制作我们的react应用程序。 就我而言,我将其应用程序命名为“电子React材料演示”。 您也可以这样做并继续。
npx create-react-app electron-react-material-demo
npx创建React应用电子React材料演示
Type the above command in your CLI and wait for the magic to be done.
在CLI中键入上述命令,然后等待魔术完成。
After you get your happy hacking! message, that is, after all your dependencies are installed, open the folder with your favorite I.D.E. . Mine is Visual Studio Code because of its dope integrated terminal feature and support for multiple terminals. I use the Git Bash. You can also use the same to follow along.
获得快乐的黑客攻击后! 消息,即在安装所有依赖项之后,使用您喜欢的IDE打开文件夹。 Mine之所以是Visual Studio Code,是因为它具有涂料集成终端功能,并且支持多个终端。 我使用Git Bash 。 您也可以使用相同的方法。
Click on the explorer menu or press ctrl+B and look at the folder structure. Your folder structure would be somewhat like :
单击资源管理器菜单或按ctrl + B并查看文件夹结构。 您的文件夹结构将类似于:
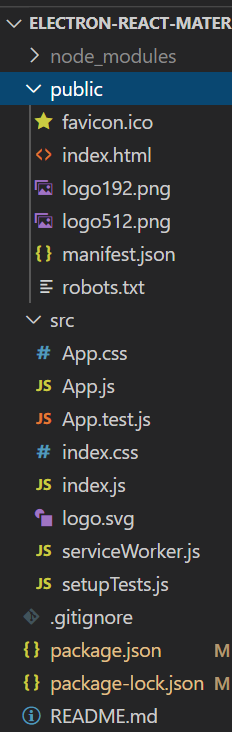
To be honest, create-react-app generates a lot of boilerplate code which we won’t be using to keep things simple. For example, we won’t be doing any unit testing. So we can go ahead and delete App.css (we will be making our own custom style with material-ui), App.test.js, serviceWorker.js, and setupTests.js . After that, the folder structure will be much more cleaner.
老实说,create-react-app会生成很多样板代码,我们不会使用它们来简化事情。 例如,我们将不进行任何单元测试。 因此,我们可以继续删除App.css(我们将使用material-ui制作自定义样式),App.test.js,serviceWorker.js和setupTests.js。 之后,文件夹结构将更加整洁。
Okay! Our setup is ready. Now let’s make a list of the steps to be followed to actually make our amazing Pokédex ready. Boy oh boy, will this be a sweet adventure!
好的! 我们的设置已经准备就绪。 现在,让我们列出一些步骤,以实际使我们的神奇宝可梦做好准备。 男孩,男孩,这将是一次甜蜜的冒险!
Step 1. Install the required dependencies.
步骤1.安装所需的依赖项。
step 2. Make a file in public folder and name it electron.js.
第2步: 公共文件夹中的文件 并将其命名为electron.js。
Step 3. Make some changes to the package.json.
步骤3.对package.json进行一些更改。
Step 4. Start the application in development mode.
步骤4.以开发模式启动应用程序。
Step 5. Working with React and Material-ui to build our responsive Pokédex application User Interface.
步骤5.与React和Material-ui一起构建我们的响应式Pokédex应用程序用户界面。
Step 6. Build the application to generate distribution ready folders for Mac Os, Windows or Linux.
步骤6.构建应用程序以生成适用于Mac OS,Windows或Linux的分发就绪文件夹。
步骤1.安装所需的依赖项。 (Step 1. Install the required dependencies.)
We will be using the following dependencies -
我们将使用以下依赖项-
开发依赖项: (Dev Dependencies:)
Concurrently : Run multiple commands concurrently. Read more.
并发:并发运行多个命令。 阅读更多。
Electron : The Electron framework lets you write cross-platform desktop applications using JavaScript, HTML and CSS. It is based on Node.js and Chromium. Read more.
Electron: Electron框架使您可以使用JavaScript,HTML和CSS编写跨平台的桌面应用程序。 它基于Node.js和Chromium。 阅读更多。
Electron-builder : A complete solution to package and build a ready for distribution Electron, Proton Native app for macOS, Windows and Linux with “auto update” support out of the box. Read more.
Electron-builder:完整的解决方案,用于打包和构建可分发的macon,Windows和Linux版Electron,Proton Native应用程序,开箱即用。 阅读更多。
Wait-on : wait-on is a cross-platform command line utility which will wait for files, ports, sockets, and http(s) resources to become available (or not available using reverse mode). Functionality is also available via a Node.js API. Cross-platform — runs everywhere Node.js runs (linux, unix, mac OS X, windows). Read more.
Wait-on: wait-on是跨平台的命令行实用程序,它将等待文件,端口,套接字和http(s)资源变为可用(或在反向模式下不可用)。 也可以通过Node.js API获得功能。 跨平台-运行Node.js的所有地方(Linux,Unix,Mac OS X,Windows)。 阅读更多。
These will be our dev dependencies. Type the below command in the terminal to install the dependencies.
这些将是我们的开发依赖项。 在终端中键入以下命令以安装依赖项。
现在,让我们添加一些其他必需的依赖项。 (Now let’s add some other required dependencies.)
Cross-env : Run scripts that set and use environment variables across platforms. Read more.
Cross-env:运行跨平台设置和使用环境变量的脚本。 阅读更多。
electron-is-dev : Useful for enabling debug features only during development. Read more.
electronic-is-dev:仅在开发期间用于启用调试功能很有用。 阅读更多。
Type the below command in the terminal to install the aforementioned dependencies.
在终端中键入以下命令以安装上述依赖项。
第2步。在公用文件夹中创建一个文件,并将其命名为electron.js。 (step 2. Make a file in public folder and name it electron.js .)
Copy the above code and paste it in public/electron.js.
复制上面的代码并将其粘贴到public / electron.js中。
第3步。对package.json进行一些更改。 (Step 3. Make some changes to the package.json.)
Go to package.json and delete everything written in it.
转到package.json并删除其中写入的所有内容。
Copy the above code and paste in package.json.
复制上面的代码并粘贴到package.json中。
步骤4.以开发模式启动应用程序。 (Step 4. Start the application in development mode.)
There are basically three sub-steps to be followed in this step —
此步骤中基本上要遵循三个子步骤-
Step I : Make some changes in src/index.js
步骤1:在src / index.js中进行一些更改
Delete everything in src/index.js.
删除src / index.js中的所有内容。
Copy the above code and paste in src/index.js.
复制上面的代码并粘贴到src / index.js中。
Step II : Change the src/App.js
第二步:更改src / App.js
Delete everything in src/App.js.
删除src / App.js中的所有内容。
Copy the above code and paste it in src/App.js. For now, let’s keep it simple. We will make our proper App.js in the subsequent steps.
复制上面的代码并将其粘贴到src / App.js中。 现在,让我们保持简单。 在接下来的步骤中,我们将制作适当的App.js。
Step III : Start the Electron application.
第三步:启动电子应用程序。
Believe it or not, we have configured our React app to run on electron BrowserWindow. Type the below command in the terminal and see the magic for yourself.
信不信由你,我们将React应用程序配置为在电子BrowserWindow上运行。 在终端中输入以下命令,亲自体验魔术。
npm run start
npm运行开始
There you go, our not so Pokédex app is ready and running. Well, don’t worry! Now that all the setup and configurations are done, we can start with our Pokédex app.
到此为止,我们并非如此,Pokédex应用程序已准备就绪且无法运行。 好吧,别担心! 现在,所有设置和配置都已完成,我们可以从Pokédex应用程序开始。
步骤5.与React和Material-ui一起构建我们的响应式Pokédex应用程序用户界面。 (Step 5. Working with React and Material-ui to build our responsive Pokédex application User Interface.)
In this step, we will also follow some sub-steps and make it super-easy.
在这一步中,我们还将遵循一些子步骤,使其变得非常简单。
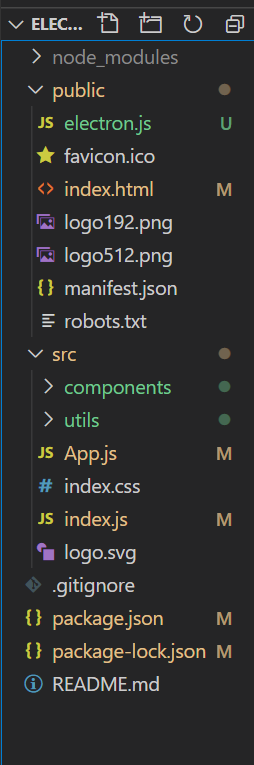
Step I : Adding components and utils folders to /src.
步骤一:将组件和utils文件夹添加到/ src。
We will start by adding components and utils folders to /src. Our folder structure will look like this now:
我们将从将组件和utils文件夹添加到/ src开始。 我们的文件夹结构现在看起来像这样:
Step II : Install some more dependencies.
第二步:安装更多的依赖项。
Enters Material-UI, which hands down is the best CSS framework for react. We will need its core and icons module. We will use PokéAPI which provides already designed RESTful APIs containing information of almost all the Pokémons that ever existed. We will fetch data from those APIs using a very popular library called Axios. To sum up, we will need the following dependencies:
输入Material-UI ,它是最好CSSReact框架。 我们将需要其核心和图标模块。 我们将使用PokéAPI 它提供了已经设计好的RESTful API,其中包含几乎所有已存在的神奇宝贝的信息。 我们将使用非常流行的Axios库从这些API中获取数据。 综上所述,我们将需要以下依赖项:
@material-ui/core : React components for faster and easier web development. Read more.
@ material-ui / core:使用 React组件可以更快,更轻松地进行Web开发。 阅读更多 。
@material-ui/icons : This package provides the Google Material icons packaged as a set of React components. Read more.
@ material-ui / icons:该软件包提供了打包为一组React组件的Google Material图标。 阅读更多。
Axios : Promise based HTTP client for the browser and node.js. Read more.
Axios:针对浏览器和node.js的基于Promise的HTTP客户端。 阅读更多。
Type the below command in the terminal to install the above dependencies.
在终端中键入以下命令以安装上述依赖项。
Step III : Making some changes to src/index.js.
第三步:对src / index.js进行一些更改。
In order to use routing in our application, we will have to install yet another dependency — react-router-dom. Install it by typing the below command in the terminal.
为了在我们的应用程序中使用路由,我们将必须安装另一个依赖项-react-router-dom。 通过在终端中键入以下命令进行安装。
We will make some changes in our current src/index.js. We will import HashRouter from react-router-dom and wrap it around our App component. I am using HashRouter since we are in a file-based environment and BrowserRouter is used in a request-based-environment. Read more on this.
我们将在当前的src / index.js中进行一些更改。 我们将从react-router-dom导入HashRouter并将其包装在我们的App组件中。 我正在使用HashRouter,因为我们处于基于文件的环境中,而BrowserRouter则用于基于请求的环境中。 了解更多。
Edit your src/index.js as per the above code.
根据以上代码编辑src / index.js 。
Step IV : Rewriting our src/App.js.
步骤IV:重写我们的src / App.js。
Before actually starting the work with src/App.js and declaring the routes, let’s make some files in components and utils folder which we have created earlier.
在实际开始使用src / App.js并声明路由之前,让我们在我们之前创建的component和utils文件夹中创建一些文件。
We will create two files in components — Pokedex.jsx and Pokemon.jsx and one file in utils — constants.js. Lets write some gibberish into them. Actually lets stick to something meaningful.
我们将在组件中创建两个文件-Pokedex.jsx和Pokemon.jsx,并在utils中创建一个文件-constants.js 。 让我们给它们写一些乱码。 实际上让我们坚持有意义的事情。
Copy the above code and paste it in src/components/Pokedex.jsx.
复制上面的代码并将其粘贴到src / components / Pokedex.jsx中。
Copy the above code and paste it in src/components/Pokemon.jsx.
复制上面的代码并将其粘贴到src / components / Pokemon.jsx中。
Now in src/utils/constants.js, we will write a tiny logic to capitalize first character of a Pokemon name. For example, charizard will become Charizard. I will make use of classic JavaScript Slice function. You can device your own logic, or stick to mine.
现在在src / utils / constants.js中,我们将编写一个小逻辑以大写神奇宝贝名称的第一个字符。 例如,charizard将成为Charizard。 我将使用经典JavaScript Slice函数。 您可以运用自己的逻辑,也可以坚持下去。
Copy the above code and paste it in src/utils/constants.js.
复制上面的代码并将其粘贴到src / utils / constants.js中。
Now that all our files are ready, lets dive into our App.js and route declarations.
现在我们所有的文件都准备好了,让我们深入研究App.js和路由声明。
We will import Route and Switch from ‘react-router-dom’. Inside our <Switch></Switch>, we will declare our <Routes>. For our Pokedex.jsx page, we will have a route to ‘/’ , so that, it will be our home page. For our Pokemon.jsx page, we will have a route to ‘/:pokemonId’. Don’t worry, we will see in a moment, why I have taken the route for Pokemon.jsx page as a {match.params}. Delete whatever we wrote in src/App.js. Copy the above code and paste it in it.
我们将从“ react-router-dom”导入路由和交换机。 在我们的<Switch> </ Switch>中 ,我们将声明我们的<Routes>。 对于我们的Pokedex.jsx页面,我们将有一个到'/'的路由,因此它将成为我们的主页。 对于我们的Pokemon.jsx页面,我们将有一个到'/:pokemonId'的路由。 不用担心,我们稍后会看到为什么我将Pokemon.jsx页面的路由选择为{ match.params }。 删除我们在src / App.js中编写的内容。 复制上面的代码并将其粘贴到其中。
Step V : Making our Pokedex page work.
第五步:使我们的Pokedex页面正常工作。
In Pokedex.jsx, we will basically have to fetch the Pokemon data from PokéAPI URL using axios , and destructure results from response.data. We will then run a loop on all the elements of the results array and return an object having fields as {id : index + 1, name : EachItemFromResults.name, sprite :`https://raw.githubusercontent.com/PokeAPI/sprites/master/sprites/pokemon/back/${index+1}.png`}(see the code for more clarity). These filtered data will be will be set to pokemonData variable in the state. The axios fetch will be inside a useEffect hook whose second parameter is an empty array, indicating the fetch will take place just after the component gets mounted for the first time.
在Pokedex.jsx中,我们基本上必须使用axios从PokéAPIURL中获取Pokemon数据,并从response.data解构结果。 然后,我们将在结果数组的所有元素上运行循环,并返回一个字段为{id:index + 1,name:EachItemFromResults.name,sprite:`https://raw.githubusercontent.com/PokeAPI/sprites的对象/ master / sprites / pokemon / back / $ {index + 1} .png`}(有关更多信息,请参见代码)。 这些过滤的数据将被设置为pokemonData变量的状态。 axios提取将在useEffect挂钩内,该挂钩的第二个参数为空数组,指示提取将在组件首次安装后进行。
The pokemonData is used to create a card for each of its element with material-ui Card components. The style for the Material-ui components is defined with makeStyles hook. The id returned from each object of pokemonData will act as {match.params.pokemonId} for Pokemon.jsx which is passed in props.
pokemonData用于使用material-ui Card组件为其每个元素创建一个卡片。 Material-ui组件的样式是通过makeStyles挂钩定义的。 从pokemonData的每个对象返回的id将用作在道具中传递的Pokemon.jsx的{ match.params.pokemonId }。
The TextField in the search bar sets the event.target.value to filter variable in the state with an onChange handler. In the JSX, with the help of classic JavaScript shorthand ‘&&’ check and the include function, it is checked, if the pokemonData[pokemonId].name has the value same as filter(see the code for more clarity). Based on that, the Pokemon card is rendered.
搜索栏中的TextField使用onChange处理程序将event.target.value设置为过滤状态下的变量。 在JSX中,借助经典JavaScript速记'&&'检查和include函数,检查pokemonData [pokemonId] .name是否具有与filter相同的值(有关更多信息,请参见代码)。 基于此,将生成Pokemon卡。
Well that’s it, after applying some style on the Material-ui components our Pokedex home page is ready. Copy the above code and paste it in src/components/Pokedex.jsx.
就是这样,在Material-ui组件上应用了某些样式之后,我们的Pokedex主页就准备好了。 复制上面的代码并将其粘贴到src / components / Pokedex.jsx中。
Step VI : Making our Pokemon page work.
步骤VI:使我们的Pokemon页面正常工作。
The pokemonId received from match.params, goes to the PokéAPI URL. We will then perform an axios fetch on the URL and get the Pokemon Data. We can destructure name, id, species, height, weight, types and sprites from the fetched Pokemon data and render them. Copy the above code and paste it in src/components/Pokemon.jsx.
从match.params收到的pokemonId进入PokéAPIURL。 然后,我们将对URL执行axios提取并获取Pokemon数据。 我们可以从获取的Pokemon数据中解构名称,id,种类,高度,重量,类型和Sprite并进行渲染。 复制上面的代码并将其粘贴到src / components / Pokemon.jsx中。
Believe it or not, our Pokemon.jsx page is also ready. With this, we are done with the fifth step.
信不信由你,我们的Pokemon.jsx页面也准备就绪。 至此,我们完成了第五步。
步骤6.构建应用程序以生成适用于Mac OS,Windows或Linux的分发就绪文件夹。 (Step 6. Build the application to generate distribution ready folders for Mac Os, Windows or Linux.)
Last but not the least, we will have to create a production build for application. As discussed earlier, we will use electron-builder for doing that. But before that, let’s set a custom icon for our application. In order to do that, there is only one hard and fast rule. We can only save the icon image as .ico or .png file and it’s size should be 256 * 256 pixels.You can use this image. Download and save the icon image in public folder. Now let’s make some final changes in our package.json file.
最后但并非最不重要的一点,我们将必须为应用程序创建一个生产版本。 如前所述,我们将使用电子生成器进行此操作。 但是在此之前,让我们为应用程序设置一个自定义图标。 为此,只有一条硬性规定。 我们只能将图标图像另存为.ico或.png文件,其大小应为256 * 256像素。您可以使用此图像 。 下载并保存公共文件夹中的图标图像。 现在,让我们在package.json文件中进行一些最终更改。
Copy the above code and paste it in the package.json file
复制上面的代码并将其粘贴到package.json文件中
Your icon is now good to go.
您的图标现在可以使用了。
We are almost there. Before building, go to public/index.html and change the title in the <head> section to Pokedex.
我们就快到了。 在构建之前,请转到public / index.html并将<head>部分中的标题更改为Pokedex 。
I guess now we are left with nothing but to build the application. Type the below command in your terminal to create a distribution ready folder for the Pokédex application.
我想现在我们只剩下构建应用程序了。 在终端中键入以下命令,以为Pokédex应用程序创建一个可分发的文件夹。
npm run build
npm运行构建
Keep in mind that the build process can take some time, because first ‘react-scripts build’ will be performed then the ‘electron-builder .’ will be performed. Both of these are time taking processes. The final folder structure will be:
请记住,构建过程可能会花费一些时间,因为将首先执行“React脚本构建”,然后执行“电子构建器”。 将被执行。 这两个都是耗时的过程。 最终的文件夹结构为:
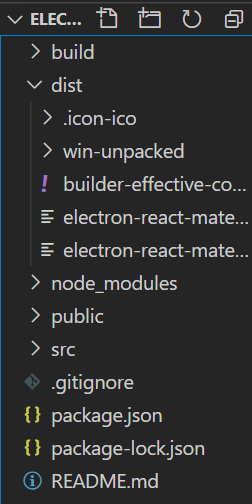
Go to dist folder, find the setup and install it. Congratulations, our work here is done and anytime you come across a new Pokémon, just look for it in your Pokédex application :p
转到dist文件夹,找到设置并安装。 恭喜,我们的工作已经完成,每当您遇到新的Pokémon时,只需在您的Pokédex应用程序中查找它即可:p
Code for this little project is available in this git-hub repository.
这个小项目的代码可以在git-hub仓库中找到 。


 534
534


 被折叠的 条评论
为什么被折叠?
被折叠的 条评论
为什么被折叠?
 到【灌水乐园】发言


