使用基于JSON的虚拟DOM的好处

json dom

Many former colleagues and friends have reached out to me and asked: “How did you get this efficient and fast when working inside the UI area?”

许多以前的同事和朋友与我联系并问:“在UI区域内工作时,您是如何高效而快速地获得这种信息的?”

While I have been using Javascript for 20 years, experience is really just a small point in a very fast evolving ecosystem.

在我使用Javascript 20年的同时,经验确实只是在快速发展的生态系统中的一小部分。

The biggest impact was switching to JSON based virtual DOM, which boosted my own productivity by at least 200%. Yes, this literally means that I can develop complex UI code 3 times faster as I could before.

最大的影响是切换到基于JSON的虚拟DOM,这使我自己的生产率提高了至少200%。 是的,从字面上看,这意味着我可以比以前快3倍地开发复杂的UI代码。

Since these concepts are still mostly unknown, I am writing this article to share my knowledge with you. The goal is that you can benefit as well and get to a new level of Frontend Development.

由于这些概念仍然几乎是未知的,因此我写这篇文章是为了与您分享我的知识。 目标是您也可以从中受益并达到前端开发的新水平。

内容 (Content)

  1. Introduction

    介绍
  2. What is JSON based virtual DOM?

    什么是基于JSON的虚拟DOM?
  3. Which properties can I use on a vdom node?

    我可以在vdom节点上使用哪些属性?
  4. Which implementation are we using for this article?

    本文将使用哪种实现?
  5. A quick overview of the neo.mjs JS class system enhancements

    neo.mjs JS类系统增强功能的快速概述
  6. Is our virtual DOM structure a Template?

    我们的虚拟DOM结构是模板吗?
  7. Constructing our first JSON based virtual DOM

    构造我们的第一个基于JSON的虚拟DOM
  8. Basic VDOM operations

    基本VDOM操作
  9. Changing multiple Configs

    更改多个配置
  10. The removeDom vdom property

    removeDom vdom属性

  11. The flag vdom property

    标志vdom属性
  12. Adding Components into a Component (Highlight of this article)

    将组件添加到组件中 (本文重点)

  13. getVdomRoot()

    getVdomRoot()
  14. Using the VDom Engine itself is optional (Highlight of this article)

    使用VDom引擎本身是可选的 (本文重点)

  15. Using Component Trees

    使用组件树
  16. Extending Classes (Highlight of this article)

    扩展类 (本文重点)

  17. Final Thoughts

    最后的想法

1.简介 (1. Introduction)

This is going to be a pretty long article. Please be open minded and curious, since these concepts are disruptive.

这将是一篇很长的文章。 由于这些概念具有破坏性,请保持开放的态度和好奇心。

Before we can dive deep into the benefits, it is important to cover the basics.

在深入了解这些好处之前,必须涵盖基础知识。

I marked the highlights of this article in bold inside the Content overview. I strongly recommend to read the article from top to bottom though.

我在内容概述中用粗体标记了本文的重点。 我强烈建议您从上至下阅读该文章。

Especially the section when it comes to extending classes is mind blowing.

尤其是关于扩展课程的部分令人震惊。

Using JSON based virtual DOM is especially useful, in case you want to create complex Components or Apps:

如果要创建复杂的组件或应用程序,则使用基于JSON的虚拟DOM尤其有用:

2.什么是基于JSON的虚拟DOM? (2. What is JSON based virtual DOM?)

With the term I am not referring to a JSON based String, but a nested Javascript structure of Objects and Arrays, following the JSON Syntax.

我所说的术语不是指基于JSON的字符串,而是指遵循JSON语法的嵌套对象和数组的Javascript结构。

Simply put:

简单的说:

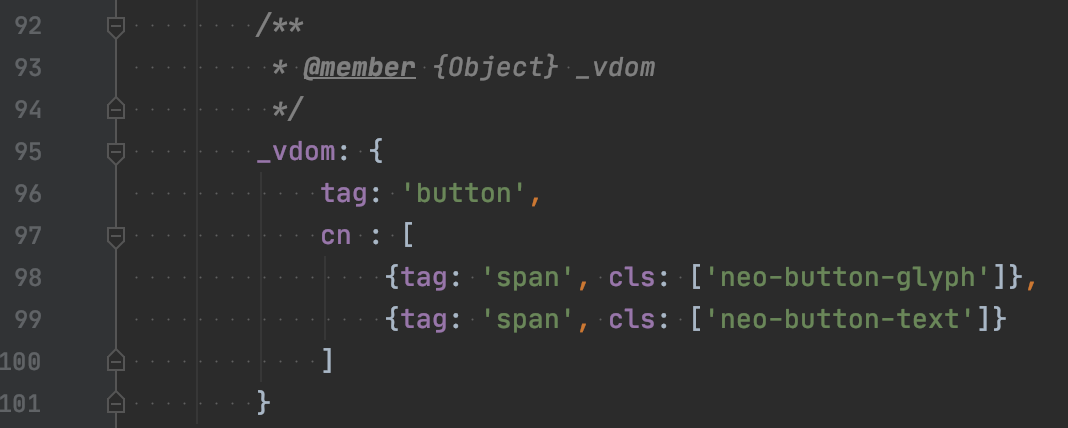
const jsonVdom = JSON.parse(jsonVdomString);

To give you a quick example of how this can look like:

给你一个简单的例子,看起来像这样:

Image for post

Many junior developers stopped looking deeper into this already at this point.

此时,许多初级开发人员已停止对此进行更深入的研究。

  1. Wait, I can achieve the same in Angular, React or Vue with a 3lines pseudo XML template.

    等等,我可以使用3lines伪XML模板在Angular,React或Vue中实现相同的功能。
  2. This does not look nice, since it is less compact.

    这看起来不太好,因为它不那么紧凑。
  3. Pseudo XML templates better match the DSL (domain specific language) pattern.

    伪XML模板与DSL(特定于域的语言)模式更好地匹配。

Since you are an open minded, curious and passionate developer, you will keep reading to figure out, what the real benefits are.

由于您是一个思维开放,好奇和热情的开发人员,因此您将继续阅读以找出真正的好处。

  1. Agreed, it is a bit longer. It is not a template though. Meaning: it is a persistent structure, which is meant to get changed dynamically at runtime. You can change it the same way before & after a Component gets mounted.

    同意,这会更长一些。 它不是模板。 含义:这是一个持久性结构,旨在在运行时动态更改。 您可以在安装组件之前和之后以相同的方式进行更改。
  2. This is not a comparison about Apples & Oranges. It does not matter if it looks nice at the first glance. What counts is what you can do with it.

    这不是关于Apples&Oranges的比较。 乍一看是否好都没关系。 重要的是您可以用它做什么。
  3. If you compare a pseudo XML template to the way HTML looks (e.g. inside the Chrome Dev Tools: Inspect Element), you are correct. However, JS provides an API to work with DOM nodes, which is way more object oriented. Unless you are deeply in love with regular expressions, you will agree that Javascript is meant for working with Objects & Arrays, rather than working with Strings.

    如果您将伪XML模板与HTML的外观进行比较(例如,在Chrome Dev Tools:Inspect Element中),那么您是正确的。 但是,JS提供了一个与DOM节点一起使用的API,这更加面向对象。 除非您对正则表达式深感兴趣,否则您将同意Javascript是用于对象和数组的,而不是用于字符串的。

3.我可以在vdom节点上使用哪些属性? (3. Which properties can I use on a vdom node?)

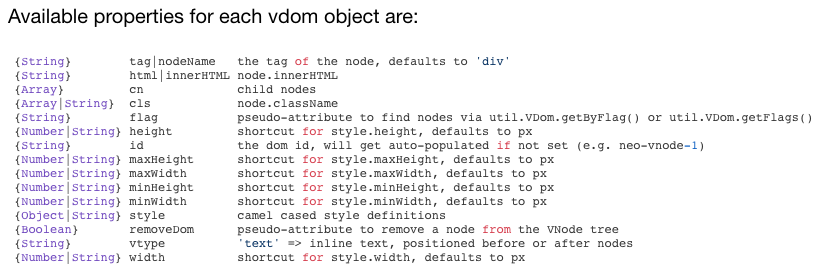
Inside the neo.mjs implementation, we can use:

在neo.mjs实现内部,我们可以使用:

Image for post

You can find the details on how these properties get applied here:

您可以在此处找到有关如何应用这些属性的详细信息:

https://github.com/neomjs/neo/blob/dev/src/vdom/Helper.mjs#L262

https://github.com/neomjs/neo/blob/dev/src/vdom/Helper.mjs#L262

In short:

简而言之:

  1. tag is the most important one. You can pick any html tags or tags of custom WebComponents.

    标签是最重要的。 您可以选择任何html标记或自定义WebComponents的标记。
  2. A vdom engine relies on each node having an id, to figure out which nodes got moved to different spots. You can manually assign ids, otherwise each node will get an automatically generated one (neo-vnode-x).

    vdom引擎依赖于每个具有ID的节点来确定哪些节点已移动到不同位置。 您可以手动分配ID,否则每个节点将获得一个自动生成的ID(neo-vnode-x)。
  3. html: the innerHTML of your node, in case it does not have child nodes.

    html:您的节点的innerHTML(如果没有子节点的话)。
  4. cn: the child nodes, which have the same properties available. You can nest your vdom structure as deeply as you like to.

    cn:子节点,具有相同的可用属性。 您可以随意嵌套vdom结构。
  5. style: You can define your style attribute as a String. It is strongly recommended though to stick to an Object based syntax. E.g.:

    样式:您可以将样式属性定义为字符串。 强烈建议您坚持使用基于对象的语法。 例如:

    style: {borderColor: ‘red’, marginRight: ‘10px’, marginTop: ‘-5px’}

    样式:{borderColor:“红色”,marginRight:“ 10px”,marginTop:“-5px”}

    You can use camelCase for style attribute names.

    您可以将camelCase用作样式属性名称。

  6. height, maxHeight, maxWidth, minHeight, minWidth, width are just convenience shortcuts, which will get put into the style object.

    height,maxHeight,maxWidth,minHeight,minWidth,width只是方便快捷方式,它们将被放入样式对象中。
  7. You can put in any HTML tag attributes directly into a vdom object.

    您可以将任何HTML标记属性直接放入vdom对象。

    E.g.: tabIndex: -1

    例如:tabIndex:-1

  8. vtype: ‘text’, flag & removeDom will get covered more in detail later on.

    vtype:'text',flag&removeDom稍后将详细介绍。

4.本文将使用哪种实现? (4. Which implementation are we using for this article?)

Since the neo.mjs implementation is the most advanced one, I will stick to it for this article.

由于neo.mjs实现是最高级的实现,因此在本文中我将坚持使用它。

neo.mjs is a disruptive next generation Javascript Frontend Framework, which enables you to build blazing fast multithreading UIs.

neo.mjs是一个具有破坏性的下一代Javascript前端框架,使您能够构建出色的快速多线程UI。

The project is using the MIT license, so you can use it for free:

该项目正在使用MIT许可证,因此您可以免费使用它:

You don’t have to use neo.mjs, in case you want to use JSON based virtual DOM. The MIT license enables you to extract & use the vdom implementation as you like to. You could also create an own implementation following the same design patterns.

如果您想使用基于JSON的虚拟DOM,则不必使用neo.mjs。 MIT许可证使您可以根据需要提取和使用vdom实现。 您还可以按照相同的设计模式创建自己的实现。

In case you are thinking about using neo.mjs, you should take a quick look at the Workers Setup:

如果您正在考虑使用neo.mjs,则应快速查看“工人设置”:

Image for post

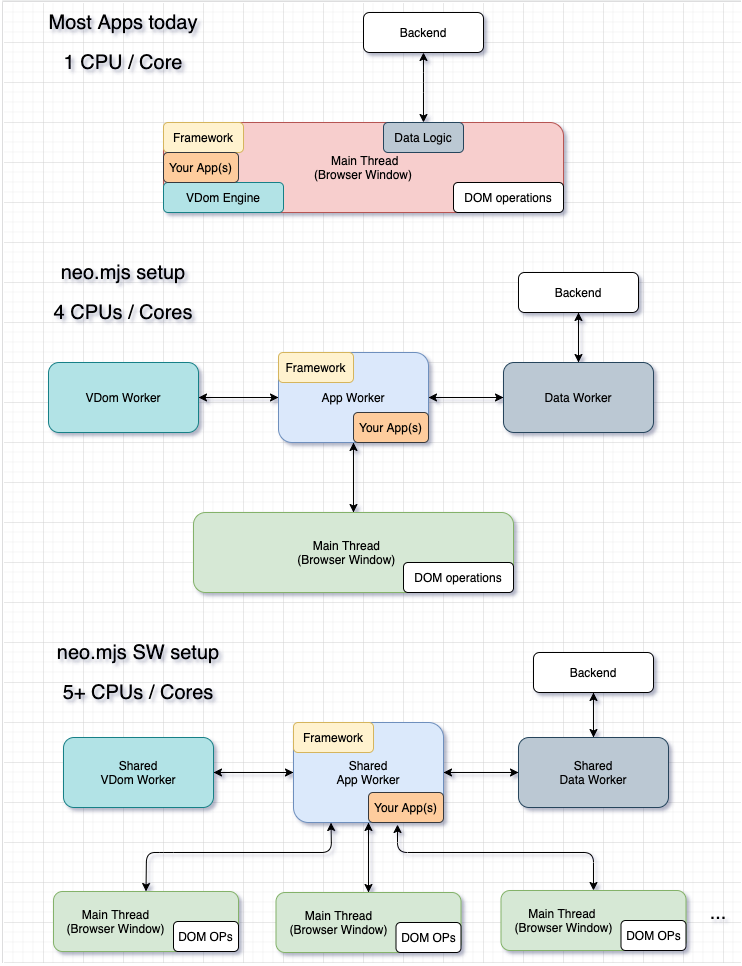
The important part for this article is that the VDom Engine lives inside a separate thread. This means that all calls to the Engine are async.

本文的重要部分是VDom Engine位于单独的线程中。 这意味着对引擎的所有调用都是异步的。

5. neo.mjs JS类系统增强功能的快速概述 (5. A quick overview of the neo.mjs JS class system enhancements)

ES6 is out there for a long time, so I am assuming you are familiar with the Javascript class system at this point.

ES6已经存在很长时间了,因此我假设您现在已经熟悉Javascript类系统。

The missing part are still class properties.

缺少的部分仍然是类属性。

To fill this gap, neo.mjs has enhanced JS classes with a Custom Config System.

为了填补这一空白,neo.mjs使用自定义配置系统增强了JS类。

Image for post

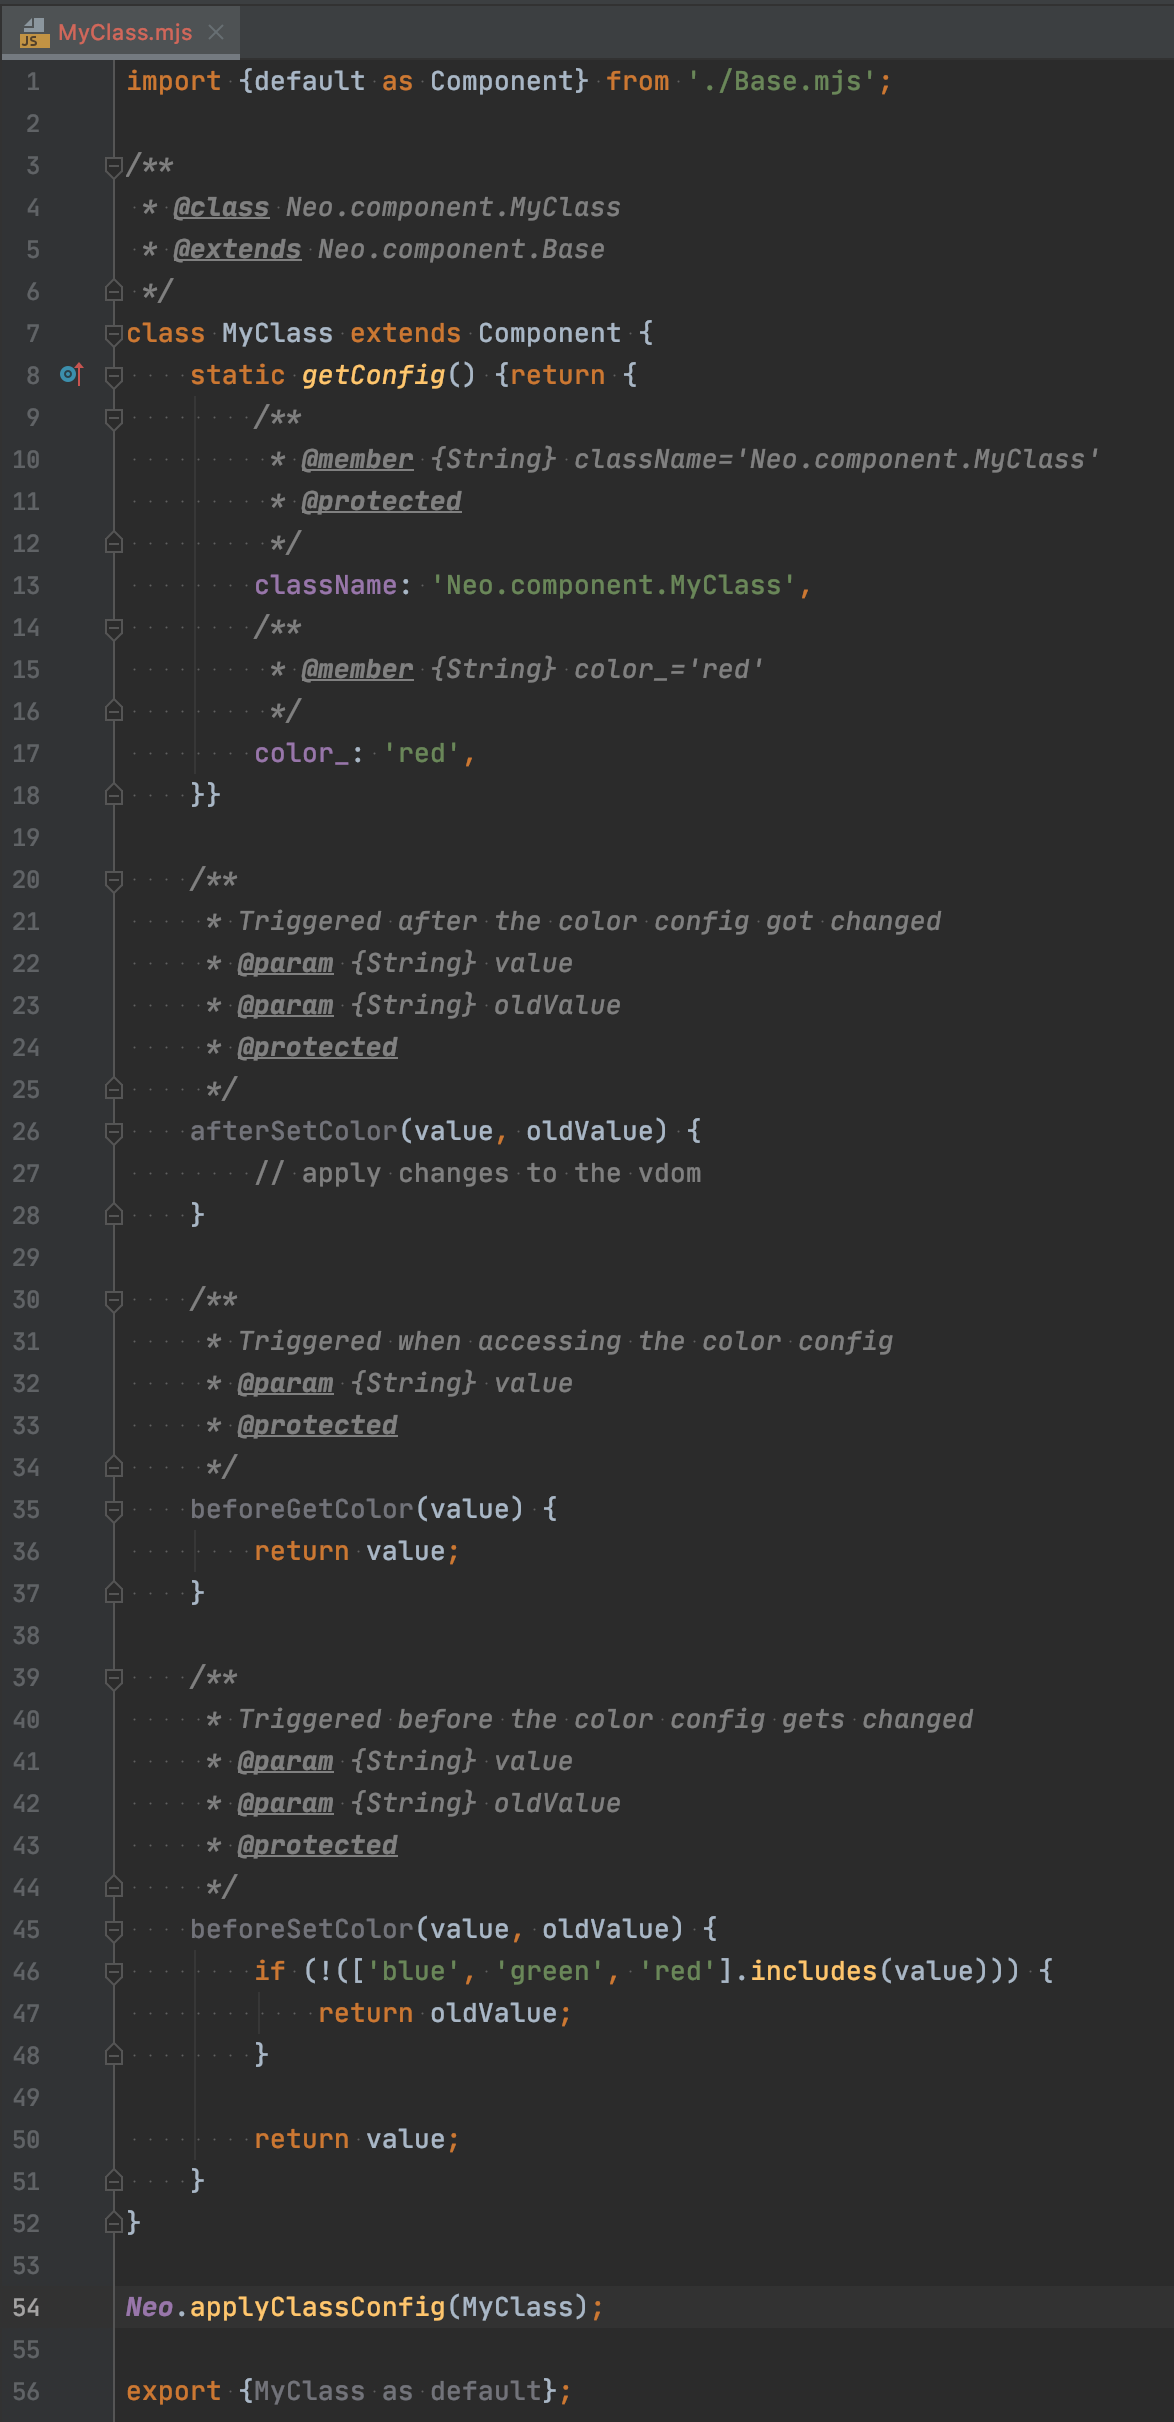
In short: Each class has the static getConfig() method available.

简而言之:每个类都有可用的静态getConfig()方法。

Inside of it, you can specify your class properties.

在其中,您可以指定您的类属性。

In case a config ends with a trailing underscore, this will generate afterSetX(), beforeSetX() and beforeGetX() for you.

如果配置以结尾的下划线结尾,则会为您生成afterSetX(),beforeSetX()和beforeGetX()。

Class configs do get applied to the class prototype via Object.defineProperties(). Meaning: configs get applied as getters & setters.

确实通过Object.defineProperties()将类配置应用于类原型。 含义:配置被用作getter和setter。

This enables you to work with configs in a consistent way, since assigning a new value will trigger the setter.

这使您能够以一致的方式使用配置,因为分配新值将触发设置器。

const myInstance = Neo.create(MyClass, {
color: blue
});myInstance.color = 'green'; // triggers the setter

As easy as this. neo.mjs is extremely config driven. You will rarely ever call methods and stick to changing configs instead.

如此简单。 neo.mjs是极其配置驱动的。 您很少会调用方法,而是坚持更改配置。

You can use afterSetColor() to map your config into the virtual DOM. You can add it into different spots. You can check for other configs and adjust your logic as you like to.

您可以使用afterSetColor()将您的配置映射到虚拟DOM中。 您可以将其添加到不同的位置。 您可以检查其他配置并根据需要调整逻辑。

You can use beforeSetColor() for pre-processing logic (e.g. to check if a new value is valid).

您可以将beforeSetColor()用于预处理逻辑(例如,检查新值是否有效)。

You can use beforeGetColor() to modify the value. Example: beforeGetController() → if you get a config object, create a Controller instance, otherwise return the instance.

您可以使用beforeGetColor()修改值。 示例:beforeGetController()→如果获得配置对象,则创建一个Controller实例,否则返回该实例。

In case you want to dive deeper into the Config System (not needed to follow this article):

如果您想更深入地了解Config系统(无需遵循本文):

https://github.com/neomjs/neo/blob/dev/src/Neo.mjs#L48

https://github.com/neomjs/neo/blob/dev/src/Neo.mjs#L48

https://github.com/neomjs/neo/blob/dev/src/core/Base.mjs

https://github.com/neomjs/neo/blob/dev/src/core/Base.mjs

6.我们的虚拟DOM结构是一个模板吗? (6. Is our virtual DOM structure a Template?)

In short: no.

简而言之:

As an example of a template:

作为模板的示例:

https://github.com/shlomiassaf/ngrid/blob/master/libs/ngrid/src/lib/grid/ngrid.component.html

https://github.com/shlomiassaf/ngrid/blob/master/libs/ngrid/src/lib/grid/ngrid.component.html

Image for post

This one is most likely following best practises for the Angular framework.

最有可能遵循Angular框架的最佳做法。

You will notice:

您会注意到:

  1. There are pseudo Tags, where you add configs / properties like HTML attributes (can be tricky to distinguish what is what).

    有伪标记,您可以在其中添加config /属性(例如HTML属性)(很难分辨是什么)。
  2. There are variables inside the HTML definitions.

    HTML定义内有变量。
  3. There are if statements inside the Template.

    模板中有if语句。
  4. There are for loops inside the Template.

    模板内有for循环。

It is compact and fits the DSL pattern, but the more complex your components get, the more if & else switches you will need.

它结构紧凑,适合DSL模式,但是您的组件越复杂,就需要更多&&else开关。

I have seen Templates with more than 1000 lines of code.

我已经看到了包含超过1000行代码的模板。

Templates are not extendable.

模板不可扩展。

Templates need to get compiled (which is a very expensive task).

模板需要进行编译(这是一项非常昂贵的任务)。

Ok, there are build time compilers like Svelte out there, but this assumes that your template includes all possible states and you can no longer easily extend or modify them at run time.

好的,那里有诸如Svelte之类的构建时编译器,但这是假设您的模板包含所有可能的状态,并且您再也无法在运行时轻松扩展或修改它们。

In neo.mjs, there are literally no templates at all. There is no need to compile the structures, which does create a nice performance boost.

在neo.mjs中,实际上根本没有模板。 无需编译结构,这确实可以提高性能。

You can think of it more like manually working with a JSX based output.

您可以将其想像成手动处理基于JSX的输出。

You will also notice, that there are no variables, if-statements or for loops inside the JSON based virtual DOM structures.

您还将注意到,在基于JSON的虚拟DOM结构中没有变量,if语句或for循环。

To really understand the benefits, it is important to read the next sections.

要真正理解其好处,重要的是阅读下一部分。

7.构建我们的第一个基于JSON的虚拟DOM (7. Constructing our first JSON based virtual DOM)

Let us continue to work with our MyClass Component file to cover the basics.

让我们继续使用MyClass Component文件来介绍基础知识。

I put this Component into a container.Viewport, to render it as an neo.mjs App. The current state looks like this:

我将此组件放入container.Viewport中,以将其呈现为neo.mjs App。 当前状态如下:

图片发布

The resulting DOM looks like this:

生成的DOM如下所示:

图片发布

While this example does not look fancy yet, we can already learn a lot here.

尽管这个示例看起来还不太理想,但是我们已经可以在这里学到很多东西。

We have a super basic vdom skeleton, containing a wrapper div node and inside another div containing the text and a margin style.

我们有一个超基本的vdom骨架,其中包含一个包装div节点,而在另一个div内则包含文本和边距样式。

Since our div is inside an App, it will get mounted right away (this is optional).

由于我们的div位于应用程序内部,因此它将立即挂载(这是可选的)。

inside the afterSetColor() method, we are accessing the inner div and assign the value of our color config to its style color attribute.

在afterSetColor()方法内部,我们正在访问内部div并将颜色配置的值分配给其样式color属性。

To trigger a vdom update, we are calling:

要触发vdom更新,我们正在调用:

 this.vdom = vdom; 

Keep in mind, this is a setter. It will send a post message to the VDom Engine inside the VDom worker to figure out the deltas, in case the Component is already mounted. Since it is not mounted when the initial value is assigned, it won’t trigger the Engine.

请记住,这是一个二传手。 如果组件已安装,它将向VDom工作器内部的VDom引擎发送发布消息,以找出增量。 由于在分配初始值时未安装,因此不会触发引擎。

Let us add a console log:

让我们添加一个控制台日志:

图片发布

We reload our “App” inside the Browser:(yes, we do not need any build processes or transpilations to do this)

我们将“ App”重新加载到浏览器中:(是的,我们不需要任何构建过程或编译即可)

图片发布

You will notice, that color is there as a setter (the highlighted config with the 3 dots) and its value is stored inside _color.

您会注意到,该颜色作为设置器(带有3个点的突出显示的配置)存在,其值存储在_ color内部。

We can just change the value directly inside the Console:

我们可以直接在控制台内部更改值:

图片发布

Our Component will adjust right away:

我们的组件将立即进行调整:

图片发布

Inside our Console, we will see our very first delta update:

在控制台内,我们将看到我们的第一个增量更新:

图片发布

So far, we needed 2 requestAnimationFrame calls. The first one for the initial mounting of the App and now the second one to change the color style.

到目前为止,我们需要2个requestAnimationFrame调用。 第一个用于App的初始安装,现在第二个用于更改颜色样式。

There are 3 different ways to assign our changes to the vdom object:

有3种不同的方式可以将我们的更改分配给vdom对象:

 this.vdom = vdom; 

Using the leading underscore won’t trigger an Engine call.

使用前导下划线不会触发引擎调用。

 this._vdom = vdom; // silent update 

Since our update is async, we might want to use a callback:

由于我们的更新是异步的,因此我们可能要使用回调:

 this.promiseVdomUpdate().then(() => {
// do something after the delta update got applied to the DOM
});

8.基本的VDOM操作 (8. Basic VDOM operations)

Let us modify our first example a bit:

让我们对第一个示例进行一些修改:

We changed our color config into itemHeight and adjusted our vdom skeleton a bit. As mentioned, JS is perfect to work with objects & arrays, so we can just iterate over our items.

我们将颜色配置更改为itemHeight,并稍微调整了vdom骨架。 如前所述,JS非常适合与对象和数组一起使用,因此我们可以迭代我们的项目。

Image for post

We do not need to keep our vdom skeleton static. Let us dynamically add a new item:

我们不需要保持vdom骨架静态。 让我们动态添加一个新项目:

afterSetItemHeight(value, oldValue) {
let vdom = this.vdom;
vdom.cn.push({style: {backgroundColor: 'blue'}});
vdom.cn.forEach(item => {
item.style.height = value;
});
this.vdom = vdom;
}
Image for post

We would not do this inside this itemHeight setter method, but just to get the idea.

我们不会在这个itemHeight setter方法内执行此操作,而只是为了了解它。

afterSetItemHeight(value, oldValue) {
let vdom = this.vdom;
vdom.cn.forEach(item => {
item.style.height = value;
});
vdom.cn.push(vdom.cn.shift());
this.vdom = vdom;
}
Image for post

We removed the first item and added it to the end of the items array.

我们删除了第一项并将其添加到items数组的末尾。

Since this happens before mounting the Component, our ids will still get created ascending (1, 2, 3) from the changed item order.

由于这种情况是在安装组件之前发生的,因此我们的ID仍将根据更改后的项目顺序升序创建(1、2、3)。

Let us change the itemHeight config inside the Console:

让我们在控制台中更改itemHeight配置:

Image for post
Image for post

Now our item order is 2, 3, 1. Let us look at the delta updates:

现在我们的物料顺序为2、3、1。让我们看一下增量更新:

Image for post

Hint: the VDom Engine can handle any combination of changes at once.

提示:VDom引擎可以一次处理任何更改组合。

I picked the example to add the first item at the end of our array for a purpose.

我选择了一个示例,目的是将第一个项目添加到数组的末尾。

vdom.cn.push(vdom.cn.shift());

You can easily do it inside the opposite direction:

您可以轻松地沿相反方向进行操作:

vdom.cn.unshift(vdom.cn.pop());

The use case for this is infinite scrolling. Imagine you want to create a Calendar month view and when you scroll through the weeks, you want to dynamically add new week rows at the top while removing rows at the bottom (or vice versa).

用例是无限滚动 。 假设您要创建一个日历月视图,并在周中滚动时,要在顶部动态添加新的周行,而在底部移除行(反之亦然)。

You can take a look at the implementation here:

您可以在此处查看实现:

https://github.com/neomjs/neo/blob/dev/src/calendar/view/MonthComponent.mjs#L410

https://github.com/neomjs/neo/blob/dev/src/calendar/view/MonthComponent.mjs#L410

How would you implement a store load logic? For this, we need to loop over the data:

您将如何实现商店加载逻辑? 为此,我们需要遍历数据:

Since we can load our store multiple times, we do want to reset the items array before adding the new items. Well, unless we do want to dynamically add more.

由于我们可以多次加载商店,因此我们确实想在添加新项目之前重置items数组。 好吧,除非我们确实希望动态添加更多内容。

9.更改多个配置 (9. Changing multiple Configs)

Let us change the code to implement a Button containing 2 configs:iconCls & text.

让我们更改代码以实现包含2个configs:iconCls和text的Button。

Let us take a quick look at the result:

让我们快速看一下结果:

图片发布

Inside afterSetIconCls(), we want to remove the old iconCls in case it exists. NeoArray can be a convenient Helper for this.

在afterSetIconCls()内部,我们希望删除旧的iconCls(如果存在)。 NeoArray可以为此提供便利。

Before we dynamically change configs, let us recall what happens:

在动态更改配置之前,让我们回顾发生的情况:

A config change in our Button use case will trigger the VDom Engine.

Button用例中的配置更改将触发VDom引擎。

This happens asynchronously (the Engine lives inside a Worker).

这是异步发生的(引擎位于Worker中)。

When you trigger a change, we will send our new vdom object, as well as a vnode object (containing the previous state) to the vdom.Helper class. This one will convert the new vdom object into a vnode and compare the old and new vnodes to figure out the deltas.

当您触发更改时,我们会将新的vdom对象以及一个vnode对象(包含以前的状态)发送到vdom.Helper类。 这将把新的vdom对象转换为一个vnode,并比较新旧vnode以找出增量。

Once the operation is done, the new vnode will get assigned to our Component. If a new call to the Engine would happen, before the new vnode got back, you could get into deep trouble.

操作完成后,新的vnode将分配给我们的组件。 如果该引擎新的呼叫会发生, 才能使新的vnode回来,你可能陷入大麻烦。

 const myButton = Neo.create(MyClass, {id: 'myButton'}; setTimeout(() => {
myButton.iconCls = ['fa', 'fa-user'];
myButton.text = 'New Text
}, 1000);

Doing this inside the Console:

在控制台内执行此操作:

图片发布

We are in luck, the framework detects that an Update is already running for this specific Component and delays the second update until the first update is finished.

我们很幸运,框架检测到此特定组件的更新已在运行,并将第二个更新延迟到第一个更新完成为止。

图片发布

2 updates is not what we want though.

2更新不是我们想要的。

 const myButton = Neo.create(MyClass, {id: 'myButton'}; setTimeout(() => {
myButton.set({
iconCls: ['fa', 'fa-user'],
text : 'New Text'
});
}, 1000);
图片发布

This is perfect.

太棒了。

We do get a callback as well, as you can see with the Promise <pending> log.

正如您在Promise <pending>日志中所看到的,我们也确实获得了回调。

 myButton.set({
iconCls: ['fa', 'fa-user'],
text : 'New Text'
}).then(() => {
// do something when done
});

We can also use setSilent(), in case we do not want to trigger the VDom Engine at all.

如果我们根本不想触发VDom引擎,我们也可以使用setSilent()。

10. removeDom vdom属性 (10. The removeDom vdom property)

Working with completely dynamic structures can get tricky. Let us stick to our Button example, with the change that we do not want to keep and iconCls or text span node inside the DOM, in case there is no value.

使用完全动态的结构可能会很棘手。 让我们继续执行我们的Button示例,如果没有值,我们不想保留更改,并在DOM中保留了iconCls或text span节点。

Without the removeDom config, we would need to do something like:

如果没有removeDom配置,我们将需要执行以下操作:

图片发布
图片发布

Not including the code here, since this is not what we should do.

这里不包括代码,因为这不是我们应该做的。

In case we remove the iconCls node in case there is no iconCls, we also need to re-create it in case we change the iconCls config. For the textNode, we need to check if there is an iconNode in place or not.

如果在没有iconCls的情况下删除iconCls节点,则在更改iconCls配置的情况下也需要重新创建它。 对于textNode,我们需要检查是否有一个iconNode。

This logic is not even removing and re-adding the textNode.

该逻辑甚至没有删除并重新添加textNode。

Now imagine a more complex Component with several configs → nodes which are optional. We could use the vdom flag property to find the right spots, but this would be a nightmare anyway.

现在想象一个更复杂的组件,它具有几个可选的配置节点。 我们可以使用vdom标志属性找到正确的位置,但是无论如何这将是一场噩梦。

So, how can we resolve this with the removeDom property?

那么,如何使用removeDom属性解决此问题?

All we need to do is to flag the component to get removed from the real DOM, in case there is no value.

我们要做的就是标记该组件以在没有值的情况下将其从真实DOM中删除。

Note that iconCls has the default value of null now.

请注意,iconCls现在的默认值为null。

Image for post

Our Button renders without the iconCls span node.

我们的Button渲染没有iconCls span节点。

Let us change our button inside the Console and add an iconCls plus remove the text at the same time:

让我们更改控制台内的按钮并添加iconCls并同时删除文本:

Image for post

We removed the textNode and re-added our iconNode.

我们删除了textNode并重新添加了iconNode。

It will even keep the same id in case you remove and re-add it multiple times.

如果您多次删除并重新添加它,它甚至会保留相同的ID。

I am super excited about this feature, since it allows us to keep the vdom structure in place.

我对此功能感到非常兴奋,因为它使我们能够将vdom结构保持在适当的位置。

11. flag vdom属性 (11. The flag vdom property)

So far, we accessed childNodes directly like

到目前为止,我们直接访问childNodes就像

vdom.cn[0]

This is the fastest way and perfectly fine for trivial structures.

这是最快的方法,对于微不足道的结构来说非常好。

Now imagine some “Real Live” structures:

现在想象一下一些“实时”结构:

Image for post
Image for post
Image for post

Well, obviously you can still access your node directly.

好吧,显然您仍然可以直接访问您的节点。

This is no fun though. In case your structures get dynamic, it would become close to impossible.

不过这没什么好玩的。 如果您的结构变得动态,它将几乎变得不可能。

Let us try this again using the flag property:

让我们使用flag属性再次尝试:

We import util.Vdom. We add the flag property to our target node. No worries, this one will not get into the real DOM.

我们导入util.Vdom。 我们将flag属性添加到目标节点。 不用担心,这将不会进入真正的DOM。

图片发布

Flags do not have to be unique. While getByFlag() returns the first flag it finds, you can also use getFlags() to get all nodes containing a specific flag.

标志不必是唯一的。 尽管getByFlag()返回找到的第一个标志,但您也可以使用getFlags()来获取包含特定标志的所有节点。

Image for post

Note that we did pass the vdom top level node.

请注意,我们确实通过了vdom顶级节点。

In case our tree is really big, we can pass a child node as well, to reduce the search area (performance).

如果我们的树真的很大,我们也可以传递一个子节点,以减小搜索范围(性能)。

vdom.Util is worth a closer look, since it does provide more methods to find specific nodes (by class, style or in general any combination of node properties.

vdom.Util值得一看,因为它确实提供了更多的方法来查找特定的节点(按类,样式或一般而言,节点属性的任何组合)。

https://github.com/neomjs/neo/blob/dev/src/util/VDom.mjs

https://github.com/neomjs/neo/blob/dev/src/util/VDom.mjs

12.将组件添加到组件 (12. Adding Components into a Component)

I just got asked, if it was possible to add column based filters into a table.Container.

我只是被问到,是否有可能将基于列的过滤器添加到table.Container中。

table.Container got a new config: showHeaderFilters_: false, which will get passed to the matching header.Toolbar instance, which will then pass it to header.Button.

table.Container获得了一个新配置:showHeaderFilters_:false,它将被传递到匹配的header.Toolbar实例,该实例随后将其传递给header.Button。

Image for post
Image for post

This way, we can just toggle it on or off on the tableContainer itself.

这样,我们可以在tableContainer本身上打开或关闭它。

To really understand how powerful JSON based virtual DOM can be, let us take a closer look into table.header.Button:

要真正了解基于JSON的虚拟DOM的强大功能,让我们仔细研究一下table.header.Button:

https://github.com/neomjs/neo/blob/dev/src/table/header/Button.mjs#L217

https://github.com/neomjs/neo/blob/dev/src/table/header/Button.mjs#L217

Image for post

You can learn a lot from this tiny code snippet.

您可以从这个很小的代码片段中学到很多东西。

If we set the showHeaderFilter config to true for a headerButton instance, we will check, if this Component already has a filterField instance or not.

如果将headerHeader实例的showHeaderFilter配置设置为true,则将检查此Component是否已经具有filterField实例。

In case this.filterField does not exist yet, we use Neo.create() to create the instance. You can use the editorFieldConfig to change any configs of the editor you like to. This does include the module, so you can easily switch to SelectFields, CheckBoxes or whatever you like best.

如果this.filterField还不存在,我们使用Neo.create()创建实例。 您可以使用editorFieldConfig更改所需的编辑器的任何配置。 这确实包括该模块,因此您可以轻松切换到SelectFields,CheckBoxes或您最喜欢的任何内容。

After the create() call, our new instance already has a vdom property, including the initial state of all passed configs.

在create()调用之后,我们的新实例已经具有vdom属性,包括所有传递的配置的初始状态。

So all we need to do is dropping the field vdom anywhere into the header.Button vdom.

所以我们要做的就是将字段vdom放到header.Button vdom中的任何位置。

me.vdom.cn.push(me.filterField.vdom);

As easy as this.

如此简单。

In case we set the showHeaderFilter config to false, we just use the removeDom flag again. Meaning: the JS instance (and its state) are kept, while we just remove or re-add the real DOM.

如果将showHeaderFilter配置设置为false,则只需再次使用removeDom标志。 含义:保留JS实例(及其状态),而我们只是删除或重新添加真实的DOM。

The logic to show or hide the editor fields is also worth a look:

显示或隐藏编辑器字段的逻辑也值得一看:

https://github.com/neomjs/neo/blob/dev/src/table/header/Toolbar.mjs#L55

https://github.com/neomjs/neo/blob/dev/src/table/header/Toolbar.mjs#L55

Image for post

We are doing silent updates on each header button and then trigger a vdom update for the Toolbar which contains the Buttons. The result is just 1 call to the Engine.

我们正在对每个标题按钮进行静默更新,然后为包含按钮的工具栏触发vdom更新。 结果只有1次调用引擎。

Inside the forEach loop, we could as well use:

在forEach循环中,我们也可以使用:

item.showHeaderFilter = value;

This would trigger one update for each Button instance on its own. These updates can run in parallel though, since there is no vdom intersection for each Button.

这将单独触发每个Button实例的一次更新。 但是,由于每个Button没有vdom交集,因此这些更新可以并行运行。

The nice part is that you are in control when and what you like to update.

令人高兴的是,您可以控制何时以及要更新什么。

I recently added the removeDom property to card layout items as well. Meaning: all inactive (not visible) cards do get removed from the real DOM.

我最近也将removeDom属性也添加到卡布局项目中。 含义:所有无效(不可见)的卡都会从真实DOM中删除。

The result was incredible: The dom for most demo Apps got reduced by 80%+, while keeping the full functionality (including the state and even scroll states).

结果令人难以置信:大多数演示应用程序的dom减少了80%以上,同时保留了完整的功能(包括状态,甚至滚动状态)。

While you can argue, that display: none nodes do not get any Browser based layout calculations, the reduction had a huge impact on the main thread memory usage, resulting in a better performance.

尽管您可以辩解为该显示:没有节点不会获得任何基于浏览器的布局计算,但是减少操作对主线程内存使用量产生了巨大影响,从而导致了更好的性能。

13. getVdomRoot() (13. getVdomRoot())

Our self written Button example was pretty close to the real implementation:

我们自己编写的Button示例非常接近实际实现:

Image for post

Now, for the table.header.Button, we would like to have this button nested into a wrapper node.

现在,对于table.header.Button,我们希望将此按钮嵌套到包装节点中。

Image for post

You will notice that the structure is almost the same, just wrapped into the th tag.

您会注意到,结构几乎相同,只是包裹在th标签中。

Now we do want our afterSetX() methods to access the “same” nodes and we do want to get all our top level configs (e.g. cls on component level) applied to the button tag again.

现在,我们确实希望我们的afterSetX()方法访问“相同”节点,并且确实希望将所有顶级配置(例如,组件级别的cls)再次应用于按钮标签。

getVdomRoot() resolves this easily. We also need to adjust getVnodeRoot() to the same level, for consistency reasons (e.g. form fields change the vnode (previous state) in case a user types into them).

getVdomRoot()可以轻松解决此问题。 出于一致性原因,我们还需要将getVnodeRoot()调整为相同级别(例如,如果用户键入vnode,则表单字段会更改vnode(先前状态))。

14.使用VDom Engine本身是可选的 (14. Using the VDom Engine itself is optional)

In case you are still sceptical about the JSON based virtual DOM concepts, this part should convince you.

如果您仍然对基于JSON的虚拟DOM概念持怀疑态度,那么此部分应该说服您。

Imagine you have a Table like this one:

假设您有一个像这样的表:

Image for post

In case you want to update all cells randomly, it will result in 1800 single delta update calls.

如果您要随机更新所有单元,将导致1800次单个增量更新调用。

Of course, we could group them and pass the full table view to the VDom Engine, but in case we would use a SocketConnection and real get data for 1 cell at a time, we definitely do not want to parse the entire View.

当然,我们可以对它们进行分组,然后将整个表视图传递给VDom引擎,但是如果我们要使用SocketConnection并一次实际获取1个单元格的数据,则我们绝对不希望解析整个View。

We do exactly know which cell changed and what the new content should be.

我们确实知道哪个单元已更改以及新内容应该是什么。

Manually updating the cells results in 20 requestAnimationFrames on my machine, with 60fps around 300ms.

手动更新单元格会在我的计算机上产生20个req​​uestAnimationFrames,大约300毫秒内显示60fps。

You can by far not even see all changes.

到目前为止,您甚至都看不到所有更改。

https://neomjs.github.io/pages/node_modules/neo.mjs/dist/production/examples/tableStore/index.html

https://neomjs.github.io/pages/node_modules/neo.mjs/dist/production/examples/tableStore/index.html

Hint: the demo is faster having the Console closed, since 1800 update logs are slowing it down.

提示:关闭控制台后,演示会更快,因为1800个更新日志使它变慢了。

https://github.com/neomjs/neo/blob/dev/src/table/View.mjs#L217

https://github.com/neomjs/neo/blob/dev/src/table/View.mjs#L217

Image for post

In case you send a vdom object to the VDom Engine, this will create deltas and pass them to the main thread.

如果将vdom对象发送到VDom引擎,这将创建增量并将其传递给主线程。

Obviously you can just manually create these update calls as well and send them from your scope (the App worker) directly to the main thread.

显然,您也可以手动创建这些更新调用,并将它们从您的范围(App工作程序)直接发送到主线程。

We also adjust the vdom silently, to keep the state in place.(To do it 100% correctly, we would need to adjust the vnode as well, feature request.)

我们还以静默方式调整vdom,以保持状态不变(要正确100%完成此操作,我们还需要调整vnode,即功能请求)。

The Helix Performance demo is using the same strategy for manual updates:

Helix Performance演示使用相同的策略进行手动更新:

Image for post

In case I scroll very fast horizontally (Magic Mouse or TrackPad), I get up to 30.000 delta updates per second on my machine.

如果我非常快速地水平滚动(Magic Mouse或TrackPad),则我的计算机上每秒可获得30.000个增量更新。

Try it:

试试吧:

https://neomjs.github.io/pages/node_modules/neo.mjs/dist/production/examples/component/coronaHelix/index.html

https://neomjs.github.io/pages/node_modules/neo.mjs/dist/production/examples/component/coronaHelix/index.html

15.使用组件树 (15. Using Component Trees)

Component Trees are basically an abstraction layer on top of the vdom Tree.

组件树基本上是vdom树顶部的抽象层。

https://github.com/neomjs/neo/blob/dev/apps/covid/view/MainContainer.mjs#L39

https://github.com/neomjs/neo/blob/dev/apps/covid/view/MainContainer.mjs#L39

Image for post

In case you are working with Containers, you can just drop Components (or component config objects) into the items array and use layouts (like flexbox or card).

如果您使用的是容器,则可以将组件(或组件配置对象)放到items数组中,并使用布局(例如flexbox或card)。

This is really optional though. If you prefer to stick to the vdom tree itself, this is completely fine.

不过,这实际上是可选的。 如果您愿意坚持使用vdom树本身,那就完全可以了。

Since the Component Tree itself is JSON based as well, you can very easily mix it with JSON based virtual DOM.

由于组件树本身也是基于JSON的,因此您可以非常轻松地将其与基于JSON的虚拟DOM混合使用。

17.扩展类 (17. Extending Classes)

Of course you can extend classes in Angular, React or Vue as well, but there is simply no way to really extend your template(s).

当然,您也可以在Angular,React或Vue中扩展类,但是根本没有办法真正扩展您的模板。

Now, in neo.mjs, you can do this. I would not recommend to override the entire vdom object, but you can add new configs to your extended class. These can modify your vdom object to add more features (child nodes) or modify existing ones.

现在,在neo.mjs中,您可以执行此操作。 我不建议覆盖整个vdom对象,但可以将新的配置添加到扩展类中。 这些可以修改vdom对象以添加更多功能(子节点)或修改现有功能。

Of course, you can override the afterSetX() methods as well.

当然,您也可以覆盖afterSetX()方法。

Image for post

Well, this would most likely result in 2 calls to the VDom Engine, assuming that your parent method does change the vdom as well.

好吧,假设您的父方法也确实更改了vdom,这很可能导致对VDom引擎的2次调用。

Image for post

You can however use the silentVdomUpdate flag to prevent this and you will end up with just 1 VDom Engine call.

但是,您可以使用silentVdomUpdate标志来防止这种情况,并且最终只会进行1个VDom Engine调用。

Amazing, right?

太好了吧?

16.最后的想法 (16. Final Thoughts)

If you read up to this point, I am extremely proud of you.

如果您读到这一点,我将为您感到骄傲。

This article was not only long, but not easy to understand at a first glance.

这篇文章不仅篇幅长,而且乍一看也不容易理解。

Even though I created this virtual DOM implementation on my own, I am still just scratching the surface of what is possible with it.

即使我自己创建了这个虚拟DOM实现,我仍然只是从头开始了解它的可能范围。

In case you do understand the basic concepts, the next step for you is to dive into the neo.mjs code base:

如果您了解基本概念,那么下一步是进入neo.mjs代码库:

You are ready to take a look at some of the more advanced components now and actually understand what is happening.

您现在准备看一些更高级的组件,并真正了解正在发生的事情。

You are also ready now to create your first JSON based virtual DOM components on your own!

您现在也准备自己创建第一个基于JSON的虚拟DOM组件!

I am looking forward to see what talented developers like you can do with it. You are very welcome to add PRs to the repo, in case you created a new example or component which you would like to show off (or just getting reviewed).

我期待看到像您这样有才能的开发人员可以使用它。 非常欢迎您将PR添加到仓库中,以防您创建了想要炫耀(或只是得到审查)的新示例或组件。

Thanks for reading this & happy coding,Tobias

感谢您阅读本节快乐的编码,Tobias

翻译自: https://medium.com/dataseries/your-benefits-of-working-with-json-based-virtual-dom-7318a983da9e

json dom

  • 0
    点赞
  • 0
    收藏
    觉得还不错? 一键收藏
  • 0
    评论

“相关推荐”对你有帮助么?

  • 非常没帮助
  • 没帮助
  • 一般
  • 有帮助
  • 非常有帮助
提交
评论
添加红包

请填写红包祝福语或标题

红包个数最小为10个

红包金额最低5元

当前余额3.43前往充值 >
需支付:10.00
成就一亿技术人!
领取后你会自动成为博主和红包主的粉丝 规则
hope_wisdom
发出的红包
实付
使用余额支付
点击重新获取
扫码支付
钱包余额 0

抵扣说明:

1.余额是钱包充值的虚拟货币,按照1:1的比例进行支付金额的抵扣。
2.余额无法直接购买下载,可以购买VIP、付费专栏及课程。

余额充值