


 本文档介绍了如何在JupyterLab环境中本地运行笔记本管道,引用自Medium的一篇文章,提供了一种在jupyterlab中管理并执行Notebook工作流程的方法。
jupyterlab
In Creating notebook pipelines using Elyra and Kubeflow Pipelines I’ve introduced Elyra’s Notebook Pipelines visual editor and outlined how you can assemble a machine learning workflow pipeline from a set of notebooks and run it on Kubeflow Pipelines. With the release of Elyra v1.1 you can now run the same notebook pipelines in your local JupyterLab environment.
在使用Elyra和Kubeflow Pipelines创建笔记本管道时,我介绍了Elyra的Notebook Pipelines可视编辑器,并概述了如何从一组笔记本中组装机器学习工作流管道并在Kubeflow Pipelines上运行。 随着Elyra v1.1的发布,您现在可以在本地JupyterLab环境中运行相同的笔记本管道。
Even though running notebook pipelines in a local (likely resource constraint) environment has its drawbacks and limits, it can still be a viable solution during development or if you don’t have access to a Kubeflows deployment at all.
即使在本地(可能是资源紧张)环境中运行笔记本管道也有其缺点和局限性,但在开发过程中或根本无法访问Kubeflows部署时,它仍然是可行的解决方案。
If you haven’t read the previous blog post — no worries — all you need to know to get started is covered in this article. If you have read that blog post there are just four things you need to know and you can likely skip the rest of this post: (1) Choose the new Run in-place locally runtime configuration, (2) notebooks are executed within JupyterLab, (3) runtime logs are displayed in the terminal window, and (4) the output artifacts are accessed using the File Browser and not stored on cloud storage.
如果您没有阅读上一篇博客文章(无后顾之忧),那么本文将介绍您入门所需的全部知识。 如果您已经阅读了该博客文章,则只需要了解四件事,并且可能会跳过本文的其余部分:(1)选择新的本地就地运行 运行时配置,(2)笔记本在JupyterLab中执行,(3)运行时日志显示在终端窗口中,(4)使用文件浏览器访问输出工件,而不存储在云存储中。
To assemble a machine learning workflow pipeline you
要组装机器学习工作流程管道,您需要
- drag the desired notebooks from the JupyterLab File Browser onto the Elyra pipeline editor canvas, 将所需的笔记本从JupyterLab文件浏览器拖到Elyra管道编辑器画布上,
- configure the runtime properties for each notebook, and 为每个笔记本配置运行时属性,并
- connect the notebook nodes as desired to define relationships that govern the order in which the notebooks are executed. 根据需要连接笔记本节点,以定义控制笔记本执行顺序的关系。

We’ve published a short tutorial in the Elyra examples Github repository that walks you through the steps using the example pipeline shown above.
我们已经在Elyra示例Github存储库中发布了一个简短的教程,该教程将引导您使用上面显示的示例管道进行操作。
配置笔记本节点 (Configuring notebook nodes)
Each node in the pipeline represents a notebook execution. The node’s properties define the runtime configuration for the notebook.
管道中的每个节点代表一个笔记本执行。 节点的属性定义笔记本的运行时配置。

During local execution, notebooks are executed as a sub-process in JupyterLab. However, when you configure a notebook node you must select a runtime image (Docker image) that will be used should you decide to run the pipeline in a remote environment, such as Kubeflow Pipelines.
在本地执行期间,笔记本将在JupyterLab中作为子流程执行。 但是,当您配置笔记本节点时 ,如果您决定在Kubeflow Pipelines等远程环境中运行管道,则必须选择将使用的运行时映像 (Docker映像)。
A notebook might depend on a set of local input files, such as Python scripts, configuration files or data files. You should declare those files as input file dependencies to make the pipeline also runnable in remote environments.
笔记本可能取决于一组本地输入文件,例如Python脚本,配置文件或数据文件。 您应该将那些文件声明为输入文件依赖项,以使管道也可以在远程环境中运行。
A notebook might also evaluate the value of environment variables, which you can define in the node configuration as necessary.
笔记本可能还会评估环境变量的值,您可以根据需要在节点配置中定义这些变量 。
Last but not least a notebook might produce output files, such as trained model files. You should declare those files as output files to make the pipeline runnable in remote environments.
最后但并非最不重要的一点是,笔记本可能会生成输出文件 ,例如经过训练的模型文件。 您应该将这些文件声明为输出文件,以使管道在远程环境中可运行。
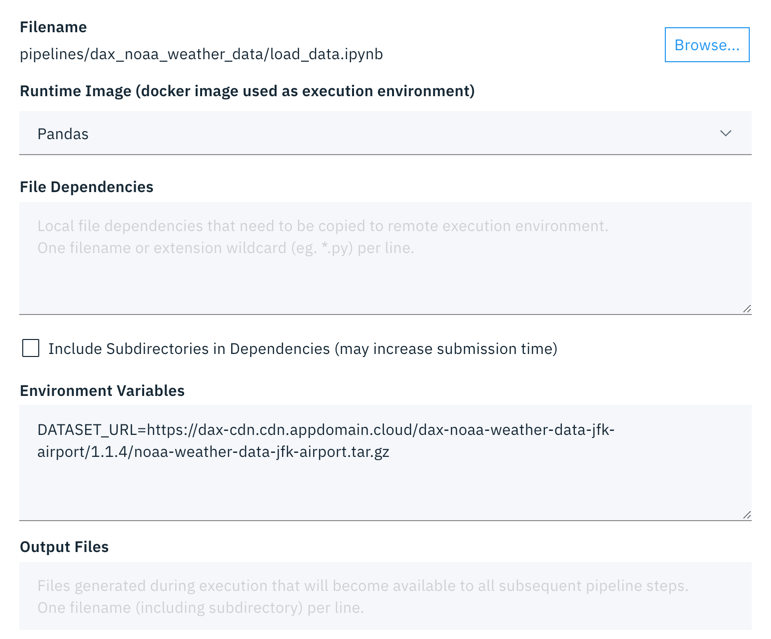
Let’s illustrate this for the load_data notebook from the flow above, which has no input file dependencies, requires the environment variable DATASET_URL to be defined, and produces a data file named data/noaa-weather-data-jfk-airport/jfk_weather.csv as an output. The following node configuration works just fine during local execution, but would lead to a failure during pipeline execution in a remote environment when the Part 1 — Data Cleaning notebook is run. (Spoiler alert — execution of that node would fail because an input file is not found. You’ll see in a minute why.)
让我们从上面的流程中为load_data笔记本进行说明,该笔记本没有输入文件依赖性,需要定义环境变量DATASET_URL ,并生成名为data/noaa-weather-data-jfk-airport/jfk_weather.csv的数据文件, data/noaa-weather-data-jfk-airport/jfk_weather.csv :输出。 以下节点配置在本地执行期间工作正常,但在运行“ Part 1 — Data Cleaning笔记本时,在远程环境中的管道执行期间会导致失败。 (剧透警报-由于未找到输入文件,因此该节点的执行将失败。稍后,您将看到原因。)
在本地运行笔记本管道 (Running a notebook pipeline locally)
To run a pipeline from the pipeline editor click the ▷ (run) button and select the Run in-place locally runtime configuration. (This configuration is only available in Elyra 1.1 and later.)
要从管道编辑器运行管道,请单击▷(运行)按钮,然后选择“就地运行本地运行时配置”。 (此配置仅在Elyra 1.1及更高版本中可用。)

Each notebook in the pipeline is executed using the kernel that’s specified in the notebook’s kernel spec.
管道中的每个笔记本都使用笔记本的内核规范中指定的内核执行。
监控笔记本管道的运行 (Monitoring a notebook pipeline run)
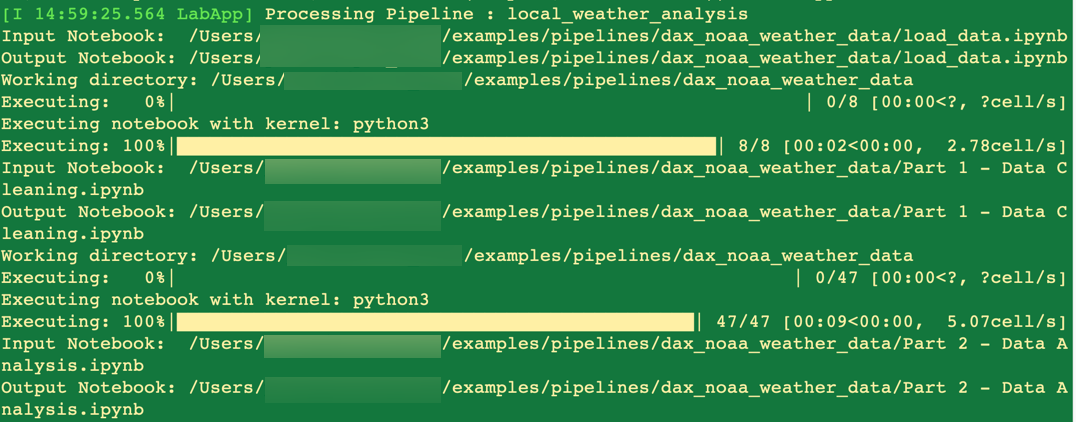
You can monitor the pipeline run progress in the terminal window where JupyterLab is running:
您可以在运行JupyterLab的终端窗口中监视管道运行进度:
You’ll receive a notification after the pipeline run completed.
管道运行完成后,您会收到通知。

访问笔记本管道输出工件 (Accessing the notebook pipeline output artifacts)
During local execution the output cells of the source notebooks are updated and all generated artifacts stored in the local file system. You can therefore access them using the JupyterLab File Browser.
在本地执行期间,将更新源笔记本的输出单元,并将所有生成的工件存储在本地文件系统中。 因此,您可以使用JupyterLab文件浏览器访问它们。

如果要在本地和远程运行管道,需要考虑的事项 (Things to consider if you want to run a pipeline locally and remotely)
When you are running a notebook pipeline locally notebooks are executed in a single environment where input and output artifacts are stored in a shared file system. Therefore, if one notebook produces an output artifact that a subsequent notebook requires, it is readily accessible.
当您运行笔记本管道时,本地笔记本将在一个输入和输出工件存储在共享文件系统中的单一环境中执行。 因此,如果一个笔记本产生了后续笔记本所需的输出伪像,则可以轻松访问它。

When you are running a notebook pipeline remotely, for example on Kubeflow Pipelines, each notebook is processed in an isolated environment — a Docker container. Each environment has access to a shared cloud storage bucket from where input artifacts are downloaded from and output artifacts are saved to. The input file dependencies and output file declarations in the node configurations are used to determine which files need to be “imported” from the cloud storage bucket before the notebook is executed and “exported” to cloud storage after notebook execution has completed.
当您在Kubeflow Pipelines等上远程运行笔记本管道时,每个笔记本都在一个隔离的环境— Docker容器中进行处理。 每个环境都可以访问共享的云存储桶,从中可以从中下载输入工件,并将输出工件保存到其中。 节点配置中的输入文件相关性和输出文件声明用于确定在执行笔记本之前需要从云存储桶中“导入”哪些文件,以及在笔记本执行完成后需要“导出”到云存储中。

In order to make a pipeline runnable locally and in remote environments you therefore have to declare input dependencies and output files in your notebook runtime configurations, as shown in the example below for the load_data notebook.
为了使管道可以在本地和远程环境中运行,因此必须在笔记本运行时配置中声明输入依赖项和输出文件,如以下load_data笔记本示例所示。

Above configuration will yield compatible execution results when the pipeline runs locally or remotely because the same input files and output files are available in both environments.
当管道在本地或远程运行时,上述配置将产生兼容的执行结果,因为在两种环境中都可以使用相同的输入文件和输出文件。
To learn more about executing pipelines on Kubeflow Pipelines refer to the Creating notebook pipelines using Elyra and Kubeflow Pipelines blog post.
要了解有关在Kubeflow管道上执行管道的更多信息,请参阅使用Elyra和Kubeflow Pipelines创建笔记本管道的博客文章。
运行自己的管道 (Running your own pipelines)
With the built-in support for local pipeline execution you can now run sets of notebooks within JupyterLab. If you’d like to try this out, using the tutorial or your own set of notebooks, you have several options.
借助对本地管道执行的内置支持,您现在可以在JupyterLab中运行多组笔记本。 如果您想尝试使用本教程或您自己的笔记本电脑进行尝试,则可以选择几种方法。
使用预构建的Docker映像尝试JupyterLab和Elyra (Try JupyterLab and Elyra using the pre-built Docker image)
The Elyra community publishes ready-to-use Docker images on Docker Hub, which have JupyterLab v2 and the Elyra extension pre-installed. The latest — tagged image is built using the most current published version. Docker images with locked in versions, such as 1.1.0 , are published as well.
Elyra社区在Docker Hub上发布了现成的Docker映像 ,这些映像已预先安装了JupyterLab v2和Elyra扩展。 使用latest发布的版本构建带有latest标签的图像。 锁定了版本(如1.1.0 Docker映像也将发布。
$ docker run -it -p 8888:8888 elyra/elyra:latest jupyter lab --debugand open the displayed URL (e.g. http://127.0.0.1:8888/?token=...) in your web browser.
并在网络浏览器中打开显示的URL(例如http://127.0.0.1:8888/?token=... )。
If you already have notebooks stored on your local file system you should mount the desired directory (e.g. /local/dir/) to make them available.
如果已经在本地文件系统上存储了笔记本,则应该挂载所需的目录(例如/local/dir/ )以使它们可用。
$ docker run -it -p 8888:8888 -v /local/dir/:/home/jovyan/work -w /home/jovyan/work elyra/elyra:latest jupyter lab --debug在Binder上尝试JupyterLab和Elyra (Try JupyterLab and Elyra on Binder)
If you don’t have Docker installed or don’t want to download the image (e.g. because of bandwidth constraints) you can try JupyterLab and Elyra in your web browser without having to install anything, thanks to mybinder.org. Open https://mybinder.org/v2/gh/elyra-ai/elyra/v1.1.0?urlpath=lab/tree/binder-demo and you are good to go.
如果您没有安装Docker或不想下载映像(例如,由于带宽限制),则可以通过mybinder.org在Web浏览器中尝试JupyterLab和Elyra,而无需安装任何内容 。 打开https://mybinder.org/v2/gh/elyra-ai/elyra/v1.1.0?urlpath=lab/tree/binder-demo ,您一切顺利。
安装JupyterLab和Elyra (Install JupyterLab and Elyra)
If your local environment meets the prerequisites, you can run JupyterLab and Elyra natively on your own machine by following the installation instructions.
如果您的本地环境满足先决条件,则可以按照安装说明在本地计算机上本地运行JupyterLab和Elyra。
如何参与 (How to get involved)
The Elyra extension for JupyterLab is maintained by a small group of open source developers and data scientists. We welcome all kinds of contributions, wether it’s feedback, a bug report, improvements to the documentation, or code. Learn more at https://github.com/elyra-ai/elyra#contributing-to-elyra.
JupyterLab的Elyra扩展由一小部分开源开发人员和数据科学家维护。 我们欢迎各种意见,反馈,错误报告,对文档的改进或代码。 在https://github.com/elyra-ai/elyra#contributing-to-elyra中了解更多信息。
Thanks for reading!
谢谢阅读!
翻译自: https://medium.com/codait/running-notebook-pipelines-locally-in-jupyterlab-1fae14b8e081
jupyterlab


 被折叠的 条评论
为什么被折叠?
被折叠的 条评论
为什么被折叠?
 到【灌水乐园】发言


