


sam服务器是什么
介绍 (Introduction)
Over the last year at CMRA, we have been incorporating more machine learning models into our applications. There are plenty of data science blogs about developing models. However, there are very few tutorials about deploying models into production. Fortunately, there are options available for this and it continues to get easier.
去年,在CMRA,我们将更多的机器学习模型整合到我们的应用程序中。 有很多关于开发模型的数据科学博客。 但是,很少有关于将模型部署到生产中的教程。 幸运的是,有一些可用的选项,并且它变得越来越容易。
Popular options for deploying models developed in Python include using services written in Flask or Django for client applications to interface with. AWS, Azure, and Google Cloud each offer their own brand of Machine Learning as a Service (MLaaS) products. These services offer convenient workflows, cloud based notebooks, and marketplaces for models. As nice as both options are there are drawbacks when it comes to costs and scaling.
部署使用Python开发的模型的流行选项包括使用Flask或Django编写的服务来与客户端应用程序进行交互。 AWS,Azure和Google Cloud各自提供自己的品牌的机器学习即服务(MLaaS)产品。 这些服务提供了便捷的工作流程,基于云的笔记本以及模型市场。 尽管这两种选择都很好,但是在成本和扩展方面存在弊端。
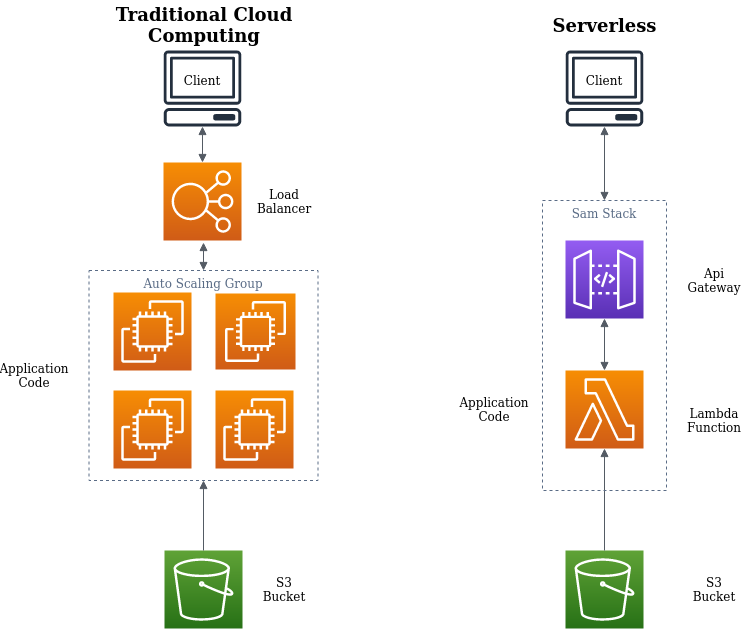
We chose to create a Serverless application using the popular Lambda service from AWS. A Serverless Architecture offers several compelling advantages over the other options:
我们选择使用来自AWS的流行的Lambda服务来创建无服务器应用程序。 与其他选项相比,无服务器架构具有许多引人注目的优势:
- Out of the box integration with AWS Services like S3 and DynoDB (to name a few). 与AWS服务(例如S3和DynoDB)的现成集成(仅举几例)。
- Automated deployments with SAM CLI. 使用SAM CLI进行自动部署。
- Pay as you go model. 按需付费模型。
- Automatic scaling. 自动缩放。
先决条件 (Prerequisites)
You will need to have the following technologies installed to follow along with this tutorial:
您将需要安装以下技术,才能随本教程一起学习:
Python 3.8.3 64 Bit (Preferably with Anaconda)
Python 3.8.3 64位(最好是Anaconda )
A free AWS Account
一个免费的AWS账户
SAM CLI by following the instructions here
按照此处的说明操作SAM CLI
Important note — Make sure that you config your AWS CLI with the IAM account that you created as part of the SAM CLI instructions. You can configure AWS CLI by running $ aws configure and filling in all of the prompts for your IAM credentials.
重要说明 —确保使用作为SAM CLI说明的一部分创建的IAM帐户配置AWS CLI。 您可以通过运行$ aws configure并填写IAM凭据的所有提示来配置AWS CLI。
背景 (Background)
Earlier this year, CMRA was working on developing several virtual activities designed to teach learners how ML technologies will work in an Advanced Robotics Manufacturing context.
今年早些时候,CMRA正在开发一些虚拟活动,旨在向学习者传授ML技术如何在高级机器人制造环境中发挥作用。
One such activity was a game where you are in charge of a factory with machines that periodically breakdown. Predicting when the machines breakdown and assigning a technician to fix the machine results in lost money.
一个这样的活动是一场游戏,您要负责一个工厂,该工厂的机器定期发生故障。 预测机器何时发生故障并指派技术人员修复机器会导致金钱损失。
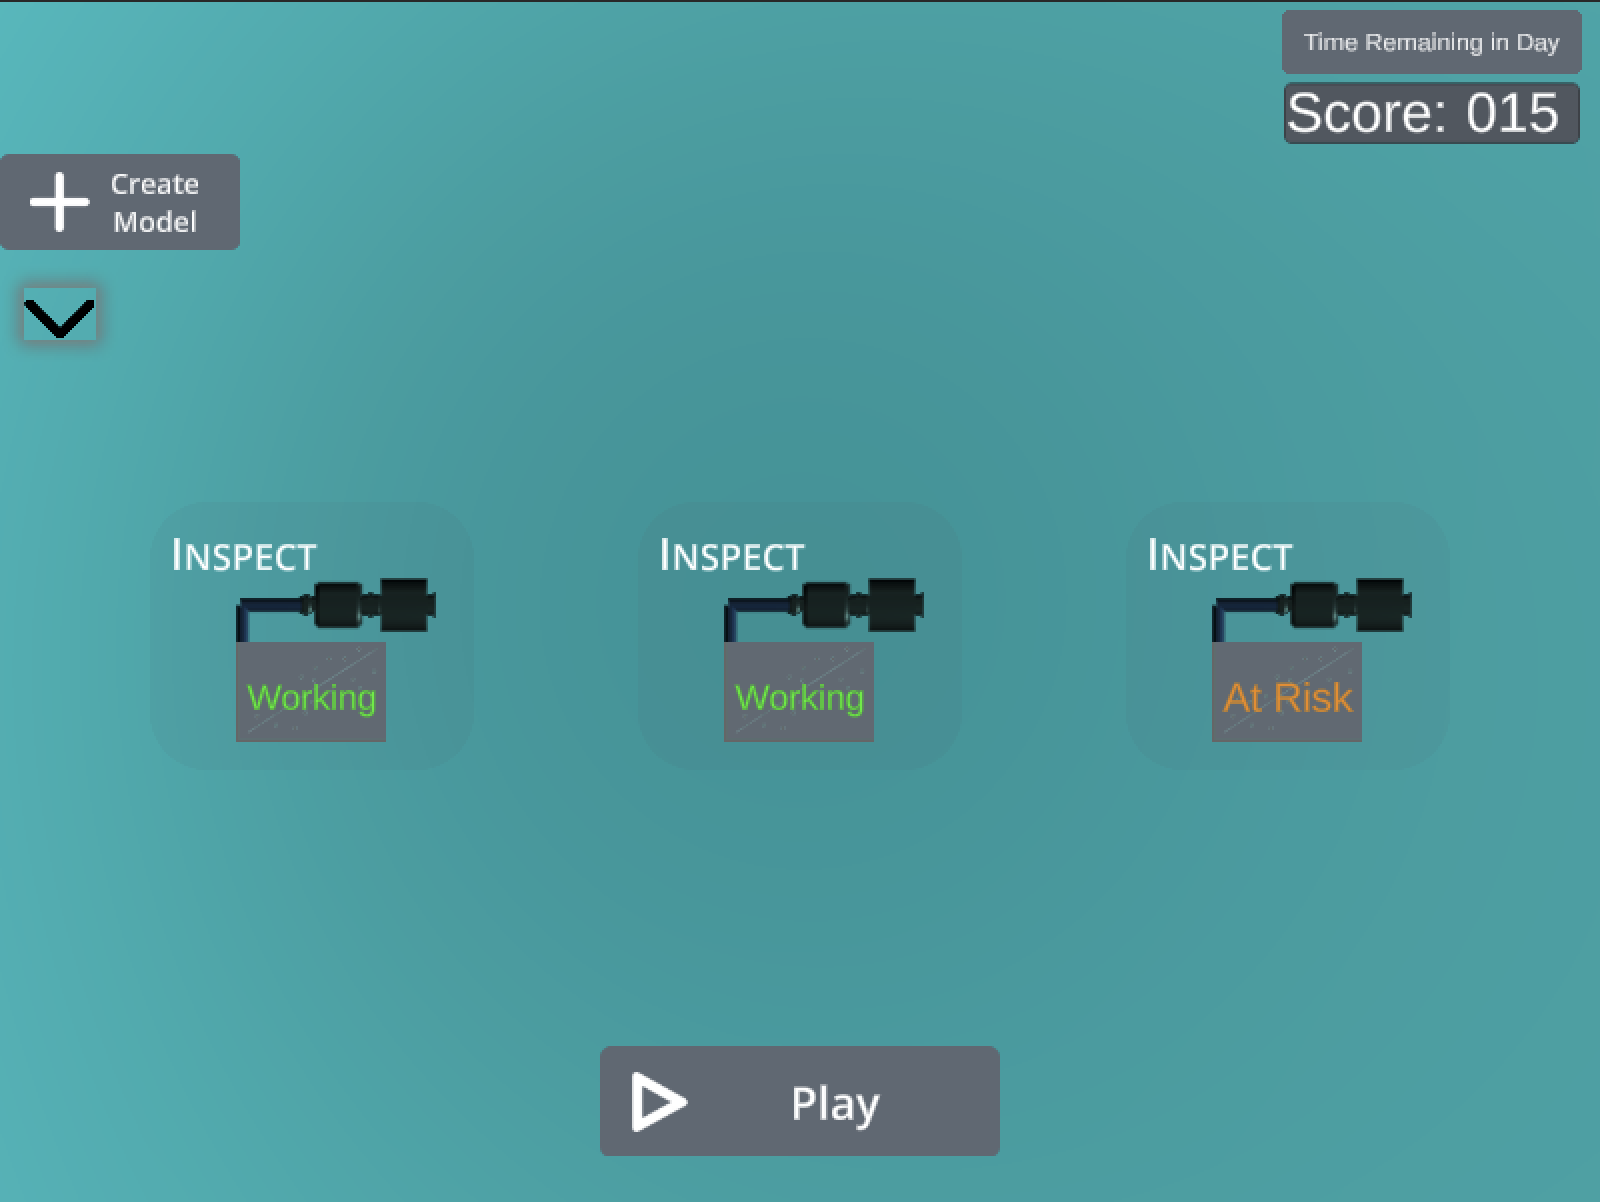
Fortunately there is a dataset available which contains machine sensor data. The sensor values have a simple linear relationship to the state of the machine — breaking or working. Predicting the breaking state allows for the player to put a technician on a machine before the machine goes offline and requires even more time to repair.
幸运的是,有一个可用数据集,其中包含机器传感器数据。 传感器值与机器状态(断裂或工作)具有简单的线性关系。 预测断裂状态允许玩家在机器脱机之前将技术人员放到机器上,并且需要更多时间进行维修。
The dataset pictured below is pretty simple. Each instance of the data sample has a labeled state and each individual feature has a linear relationship to the state. The other features of the dataset include temperature, vibration, current, and noise. Noise, no pun intended, has no linear relationship to the working or breaking state of machines.
下图所示的数据集非常简单。 数据样本的每个实例都有一个标记的状态,每个单独的特征与该状态都有线性关系。 数据集的其他功能包括温度,振动,电流和噪声。 噪声(并非双关语)与机器的工作或断裂状态没有线性关系。
[
  {
    "state": "Breaking",
    "temp": "88",
    "vibration": "79",
    "current": "12",
    "noise": "84"
  },
  {
    "state": "Working",
    "temp": "27",
    "vibration": "47",
    "current": "59",
    "noise": "48"
  },

  ...  {
    "state": "Working",
    "temp": "73",
    "vibration": "11",
    "current": "84",
    "noise": "29"
  }
]
部署训练有素的模型 (Deploying a Trained Model)
We won’t spend a lot of time on this topic since the primary focus of this article is to deploy a model.
因为本文的主要重点是部署模型,所以我们不会在这个主题上花费很多时间。
Pictured below is the script that trains on the machine factory dataset located here. A simple python script will load the data, process the data, train a model, and save a pickled version of that model. I recommend running the training script with Python 3.8 in a Jupyter Notebook. The linked repository at the end of this article includes the script in notebook form. I also recommend using VS Code’s wonderful Python package to take advantage of builtin notebooks with linting and VS Code keybindings.
下图是在此处的机器工厂数据集上训练的脚本。 一个简单的python脚本将加载数据,处理数据,训练模型并保存该模型的腌制版本。 我建议在Jupyter Notebook中使用Python 3.8运行培训脚本。 本文结尾处的链接存储库包含笔记本形式的脚本。 我还建议使用VS Code出色的Python 软件包 ,以利用带有linting和VS Code键绑定的内置笔记本的优势。
This script converts the JSON data into a Pandas DataFrame object and normalizes the features and encodes the 2 states into 0 and 1.
该脚本将JSON数据转换为Pandas DataFrame对象,并对功能进行规范化,并将2种状态编码为0和1。
The model is built using Scikit Learn’s LogisticRegression model with the ‘liblinear’ default solver. The accuracy comes in at an impressive 97%! As we previously said, the machine states are pretty predictable and probably wouldn’t require an ML model in the real world.
该模型是使用Scikit Learn的LogisticRegression模型和“ liblinear”默认求解器构建的。 准确率高达97%! 如前所述,机器状态是可以预测的,并且在现实世界中可能不需要ML模型。
The model and the encoding ( a mapping of the state labels to the encoded values) are pickled and saved to a local file. The resulting pickled file can be set aside for now. This is the last time we will use the above training script. Assume that this was work completed by your talented data scientist.
腌制模型和编码(状态标签到编码值的映射)并将其保存到本地文件。 可以将生成的腌制文件暂时放在一旁。 这是我们最后一次使用上述培训脚本。 假设这是您的才华横溢的数据科学家完成的工作。
使用SAM CLI部署模型 (Deploying the Model with SAM CLI)
认识SAM (Meet SAM)
Now that we have SAM CLI installed, let’s take it for a quick test drive. We will start by initializing our application:
现在,我们已经安装了SAM CLI,让我们对其进行快速测试。 我们将从初始化应用程序开始:
$ sam initWhich template source would you like to use?
 1 - AWS Quick Start Templates
 2 - Custom Template Location
Choice: 1Which runtime would you like to use?
 1 - nodejs12.x
 2 - python3.8
 ...
Runtime: 2Project name [sam-app]: your_app_nameCloning app templates from https://github.com/awslabs/aws-sam-cli-app-templates.gitAWS quick start application templates:
 1 - Hello World Example
 ...
Template selection: 1
This will be our actual app, but to start out we will choose to checkout the quick start template, install Python 3.8, name our project, and use the ‘Hello World Example’.
这将是我们的实际应用程序,但是首先,我们将选择签出快速入门模板,安装Python 3.8,为我们的项目命名,并使用“ Hello World Example”。
We will start by invoking the HelloWorld Lambda function. The function can be invoked by simply running $ sam local invoke in the project’s root directory. If everything is wired up properly, SAM CLI should run a simulated Docker container of the AWS Lambda environment and return a 200 response with the message ‘Hello World’.
我们将首先调用HelloWorld Lambda函数。 只需在项目的根目录中运行$ sam local invoke ,即可调用该函数。 如果一切连接正确,则SAM CLI应该运行AWS Lambda环境的模拟Docker容器,并返回200响应,并显示消息“ Hello World”。
Opening up HelloWorld/app.py reveals the Lambda function. All Lambda functions have an event and context parameter. The event parameter is usually a Python dict with data about the event that triggered the function. This can be data from an API request or from a direct invocation coming from any event that is configured to trigger the Lambda function (e.g. S3 file upload). The context parameter will go unused for our application. This parameter returns a Context object that provides data about the environment that the function is running in.
打开HelloWorld / app.py将显示Lambda函数。 所有Lambda函数都有一个事件和上下文参数。 event参数通常是Python字典,其中包含有关触发函数的事件的数据。 这可以是来自API请求的数据,也可以是来自配置为触发Lambda函数(例如,S3文件上传)的任何事件的直接调用中的数据。 对于我们的应用程序,上下文参数将不使用。 此参数返回一个Context对象,该对象提供有关函数在其中运行的环境的数据。
The HelloWorld function uses neither parameter. Instead, it returns the requisite response all Lambda functions are required to return when invoked by API Gateway. This is a JSON response with an HTTP status code and a message body.
HelloWorld函数不使用任何参数。 而是返回由API网关调用时所有Lambda函数都需要返回的必需响应。 这是带有HTTP状态代码和消息正文的JSON响应。
def lambda_handler(event, context):   return {
        "statusCode": 200,
        "body": json.dumps({
            "message": "hello world",
            # "location": ip.text.replace("\n", "")
        }),
        }
创建我们自己的Lambda函数 (Creating Our Own Lambda Function)
We are ready to write our own function now that we have the basic feel for how to invoke Lambda functions locally. Let’s rename the folder containing the HelloWorldFunction ‘model_inference’ and replace the app.py code with the following snippet:
现在,我们已经对如何在本地调用Lambda函数有了基本的了解,现在就可以编写自己的函数了。 让我们重命名包含HelloWorldFunction'model_inference'的文件夹,并使用以下代码段替换app.py代码:
There’s a lot to decompose here. First of all we want to take the pickled model that we uploaded to S3 and load it into memory. Lambda provides a convenient Python library called Boto3 that can directly interface with any service that the Lambda function is authorized to work with. We will setup the Lambda’s policy but for right now let’s assume that the load pickle file will return the pickled model and encoding map when given the S3 Bucket and key (file name).
这里有很多要分解的东西。 首先,我们要获取上载到S3的腌制模型并将其加载到内存中。 Lambda提供了一个称为Boto3的便捷Python库,该库可以直接与Lambda函数被授权使用的任何服务接口。 我们将设置Lambda的策略,但现在,让我们假定当给定S3存储桶和键(文件名)时,加载pickle文件将返回该pickled模型和编码图。
The load_pickle function instantiates an S3 client and receives a download_file method which saves the pickle to a specified local path.
load_pickle函数实例化一个S3客户端,并接收一个download_file方法,该方法将泡菜保存到指定的本地路径。
Once the model is loaded, the event is processed and the JSON request payload data is converted to the Python dict format. The rest of the code mirrors the training script. The features are extracted by name, normalized, and then fed into the model’s predict method. The prediction is mapped back to the state of ‘working’ or ‘breaking’ and is passed to the JSON response message.
加载模型后,将处理事件,并将JSON请求有效负载数据转换为Python dict格式。 其余代码反映了培训脚本。 按名称提取特征,将其标准化,然后输入模型的预测方法中。 预测被映射回“工作”或“中断”状态,并传递给JSON响应消息。
配置模板 (Configuring the Template)
Getting this all to work requires a few more steps. SAM CLI projects include a template.yaml file at the root of the project. This template has 3 major sections — Globals, Resources, and Outputs.
要使所有这些工作正常进行,还需要一些步骤。 SAM CLI项目在项目的根目录中包含template.yaml文件。 该模板包含3个主要部分-全局,资源和输出。
The Globals section holds all of the global settings that apply to all Lambda functions in your project. The warmup request takes a little bit of time. To be on the safe side we increased the Timeout for all functions to be 60 seconds.
“全局”部分包含适用于您项目中所有Lambda函数的所有全局设置。 预热请求需要一点时间。 为了安全起见,我们将所有功能的超时设置为60秒。
Resources specifies each function in the project. Every function has a type. The ModelInferenceFunction has a type ofAWS::Serverless::Function. Properties about the function are set below each resource. The CodeUri matches the function’s parent directory name (model_inference). Policies for the Lambda function are set under Policies. We would like this function to read from S3 and download the pickled file that we uploaded. Therefore, we gave this function an S3ReadPolicy and specified the bucket name. Other policies can be added to allow access to other AWS services as needed.
资源指定了项目中的每个功能。 每个函数都有一个类型。 ModelInferenceFunction具有AWS :: Serverless :: Function的类型。 有关功能的属性设置在每个资源的下方。 CodeUri与函数的父目录名称(model_inference)匹配。 Lambda函数的策略在“策略”下设置。 我们希望此功能可以从S3中读取并下载上载的腌制文件。 因此,我们为该函数提供了S3ReadPolicy并指定了存储桶名称。 可以添加其他策略以允许根据需要访问其他AWS服务。
All functions are triggered by an event. In our case the API Gateway service will be the service that triggers Lambda invocations. That is to say that once deployed the API Gateway service will give us an endpoint that we can send HTTP requests to and trigger our Lambda function. We also specify the API’s properties which include the the path name and the HTTP method.
所有功能均由事件触发。 在我们的例子中,API网关服务将是触发Lambda调用的服务。 也就是说,一旦部署,API网关服务将为我们提供一个终结点,我们可以向该终结点发送HTTP请求并触发我们的Lambda函数。 我们还指定了API的属性,包括路径名和HTTP方法。
The outputs specify the values for your application’s components once the stack is deployed. Calling the aws cloudformation describe-stacks command will return the API endpoint, Lambda ARN, and Lambda IAM Role ARN. SAM CLI applications are deployed using the CloudFormation service which acts as an orchestration tool for spinning up and connecting multiple AWS services that work together.
部署堆栈后,输出将指定应用程序组件的值。 调用aws cloudformation describe-stacks命令将返回API端点,Lambda ARN和Lambda IAM角色ARN。 SAM CLI应用程序使用CloudFormation服务进行部署,该服务充当用于协调和连接可协同工作的多个AWS服务的编排工具。
安装依赖项 (Installing Dependencies)
If you run the updated function by calling sam invoke local you will be in for a disappointing surprise. None of the included dependencies are available. Fortunately, installing dependencies for a SAM CLI application is pretty straight forward.
如果您通过调用sam invoke local来运行更新的功能,那么您将感到失望。 所包含的依赖项均不可用。 幸运的是,为SAM CLI应用程序安装依赖项非常简单。
We need to create a requirements.txt file in the root directory for all of the requisite dependencies that will be used by our function. In our case we just need to install Pandas and Sklearn.
我们需要在根目录中为我们的函数将使用的所有必需依赖项创建一个requirements.txt文件。 在我们的情况下,我们只需要安装Pandas和Sklearn。
It works best if we create a pristine environment and freeze only the dependencies that we need for the project in the root directory. We can create an environment in python by running python3 -m venv env. This will create an env/ folder that will hold all of the data for our virtual environment. We can activate the environment by running source env/bin/activate.
如果我们创建一个原始环境并在根目录中仅冻结项目所需的依赖项,则效果最佳。 我们可以通过运行python3 -m venv env在python中创建一个环境。 这将创建一个env /文件夹,其中包含我们虚拟环境的所有数据。 我们可以通过运行source env/bin/activate来激活环境。
You can tell when you have the environment activated when the environment name (env) appears to the left of the command line. We can now install our dependencies and‘freeze’ dependencies into a requirements.txt file.
当环境名称(env)出现在命令行左侧时,您可以知道何时激活了环境。 现在,我们可以将依赖项和“冻结”依赖项安装到requirements.txt文件中。
(env) $ pip install sklearn pandas
(env) $ pip freeze > requirements.txt
After we are done, we can exit the environment by simply calling the deactivate command.
完成后,我们只需调用deactivate命令即可退出环境。
Now we can build our lambda function with the included dependencies by including the requirements.txt manifest. This will create a build directory under .aws-sam/ that will be be packaged and sent to AWS when we are ready to deploy.
现在,通过包含requirements.txt清单,可以使用包含的依赖项来构建lambda函数。 这将在.aws-sam /下创建一个构建目录,在我们准备部署时将其打包并发送到AWS。
$ sam build -m requirements.txt调用自定义事件 (Invoking Custom Events)
We still need to pass inference data to our Lambda function. We can do this by creating a custom event called single_inference.json and saving it within the events folder. This json file will be passed to the Lambda function upon invocation by calling sam local invoke -e events/single_Infernce.json.
我们仍然需要将推断数据传递给Lambda函数。 为此,我们可以创建一个名为single_inference.json的自定义事件并将其保存在events文件夹中。 该json文件将在调用时通过调用sam local invoke -e events/single_Infernce.json传递给Lambda函数。
{
  "data": {
    "temp": "10",
    "vibration": "1.0",
    "current": "0",
    "noise": "78"
  }
}
在本地测试API端点 (Testing the API Endpoint Locally)
Sam also offers a convenient local server that will allow us to perform a full integration test of our API endpoint and Lambda function. We can start the server at localhost:3000 by calling sam local start-api.
Sam还提供了一个方便的本地服务器,使我们可以对API端点和Lambda函数执行完整的集成测试。 我们可以通过调用sam local start-api在localhost:3000上启动服务器。
When testing the API endpoint, you will notice that the event data looks slightly different than a direct invocation. This is why we process all incoming events with the parse_event function. API Invocations are in JSON. The ‘body’ and ‘data’ of the request needs to be extracted from the JSON. A direct invocation only requires us to select the ‘data’ key of a Python dict. Other services that can be used to trigger functions likely have different types or shapes to the event data. It’s best to log the event and become familiar with what a particular service’s event looks like.
测试API端点时,您会注意到事件数据看起来与直接调用略有不同。 这就是为什么我们使用parse_event函数处理所有传入事件的原因。 API调用采用JSON。 需要从JSON中提取请求的“正文”和“数据”。 直接调用仅需要我们选择Python字典的“数据”键。 可用于触发功能的其他服务可能与事件数据具有不同的类型或形状。 最好记录事件并熟悉特定服务事件的外观。
def parse_event(event):
  if 'body' in event.keys():
    return json.loads(event['body'])['data']
  else:
    return event['data']
The local endpoint can now be called with a simple curl request that includes the factory data in JSON format.
现在可以通过简单的curl请求调用本地端点,该请求包含JSON格式的工厂数据。
$ curl --request POST \
  --url https://localhost:3000/inferences \
  --header 'content-type: application/json' \
  --data '{
  "data": {
    "temp": "1",
    "vibration": "1.0",
    "current": "88",
    "noise": "23"
  }
}=> {"prediction": "Working"}
部署到AWS (Deploy to AWS)
We are now ready to deploy our little ML Serverless application to AWS! Deploying an application couldn’t be simpler. Simply call sam deploy --guided and follow the prompts to deploy to your AWS account.
现在,我们准备将我们的小型ML Serverless应用程序部署到AWS! 部署应用程序再简单不过了。 只需致电sam deploy --guided然后按照提示进行部署即可将其部署到您的AWS账户。
Once the deploy completes, you can sign into AWS console and see the creation of your Lambda function, API Gateway Endpoint, and your CloudFormation stack. At this point we can also test our production endpoint by calling our endpoint at the given endpoint url. The invocation URL can be found at API Gateway -> API -> Stages -> Prod. On this screen you will see the ‘invocation url’ and you can test the endpoint by sending another CURL request.
部署完成后,您可以登录AWS控制台并查看Lambda函数,API Gateway Endpoint和CloudFormation堆栈的创建。 此时,我们还可以通过在给定的端点URL上调用我们的端点来测试生产端点。 可以在API网关-> API->阶段->产品中找到调用URL。 在此屏幕上,您将看到“调用URL”,并且可以通过发送另一个CURL请求来测试端点。
$ curl --request POST \
  --url https://<your-endpoint-url>/Prod/inferences \
  --header 'content-type: application/json' \
  --data '{
  "data": {
    "temp": "1",
    "vibration": "1.0",
    "current": "88",
    "noise": "23"
  }
}=> {"prediction": "Working"}
结论 (Conclusion)
Congratulations! We have successfully deployed a simple logistical regression model that can now be invoked on demand without running a server.
恭喜你! 我们已经成功部署了一个简单的逻辑回归模型,该模型现在可以在不运行服务器的情况下按需调用。
In review, we used SAM CLI to quickly set up an AWS-connected project, then transplanted code from the provided CMRA template into it, so that it would load a saved (pickled) model and execute it. We then configured the YAML config file to point to the right functions, and installed the necessary dependencies. We set up single instance inference testing, tested it locally, and finally deployed it to AWS.
作为回顾,我们使用SAM CLI快速建立了一个与AWS连接的项目,然后将代码从提供的CMRA模板移植到该项目中,以便它可以加载保存的(腌制的)模型并执行它。 然后,我们将YAML配置文件配置为指向正确的功能,并安装了必要的依赖项。 我们设置了单实例推理测试,在本地对其进行了测试,最后将其部署到AWS。
We can add more lambda functions that handle other tasks. For instance, it wouldn’t take a lot of effort to create a TrainingFunction that is invoked each time a new dataset is uploaded to a particular S3 bucket. The training set can be loaded within the function and the model can be saved for the InferenceFunction to use.
我们可以添加更多的lambda函数来处理其他任务。 例如,创建每次将新数据集上载到特定S3存储桶时都会调用的TrainingFunction并不需要花费很多精力。 可以将训练集加载到函数中,并可以保存模型以供InferenceFunction使用。
I hope this article demystifies what it takes to deploy an ML model to a serverless backend. Do not hesitate to respond in the comments with any feedback or questions.
我希望本文能揭开将ML模型部署到无服务器后端所需的神秘性。 如有任何反馈或问题,请随时在评论中回复。
This material is based upon work supported by the National Science Foundation under Grant Number 1937063.
该材料基于美国国家科学基金会在授权号1937063下的支持。
sam服务器是什么


 552
552


 被折叠的 条评论
为什么被折叠?
被折叠的 条评论
为什么被折叠?
 到【灌水乐园】发言


