


Hi All, this is a series of blogs that I intend to write about how to use TensorFlow 2.0 for deep learning.
大家好,我打算撰写一系列博客,介绍如何使用TensorFlow 2.0进行深度学习。
In this blog, I will go over how to classify Fashion Mnist data set using TensorFlow 2.0. Last time in Part1 we used a simple Dense model to classify these images. In this blog Part2, we are going to use Conv2D layers for this task. Again the idea is still the same, using TensorFlow 2.0 inbuilt layers to show how easy it is to use Conv2D layers along with MaxPooling2D layer to show how the classification model can be improved from the prior dense model.
在此博客中,我将介绍如何使用TensorFlow 2.0对Fashion Mnist数据集进行分类。 上一次在Part1中,我们使用了一个简单的Dense模型对这些图像进行分类。 在此博客第2部分中,我们将使用Conv2D图层来完成此任务。 再次,想法仍然是相同的,使用TensorFlow 2.0内置层来展示将Conv2D层与MaxPooling2D层一起使用是多么容易,以展示如何从先前的密集模型中改进分类模型。
Using the same template as we did before, here are five steps to run this classification.
使用与之前相同的模板,下面是执行此分类的五个步骤。
1. Dataset: Load the data set, do some feature engineering if needed.2. Build Model: Build a TensorFlow model with various layers.3. Compile Model: Here we compile the model, select the loss & Optimizer functions.4. Fit Model: Here we finally train the model using the training data and get some metrics.5. Evaluate Model: We check our model performance on the validation data.
1. 数据集:加载数据集,必要时进行一些功能设计。 构建模型:构建具有不同层的TensorFlow模型3。 编译模型:这里我们编译模型,选择损失和优化器功能。4。 拟合模型:在这里,我们最终使用训练数据来训练模型并获得一些指标。5。 评估模型:我们根据验证数据检查模型性能。
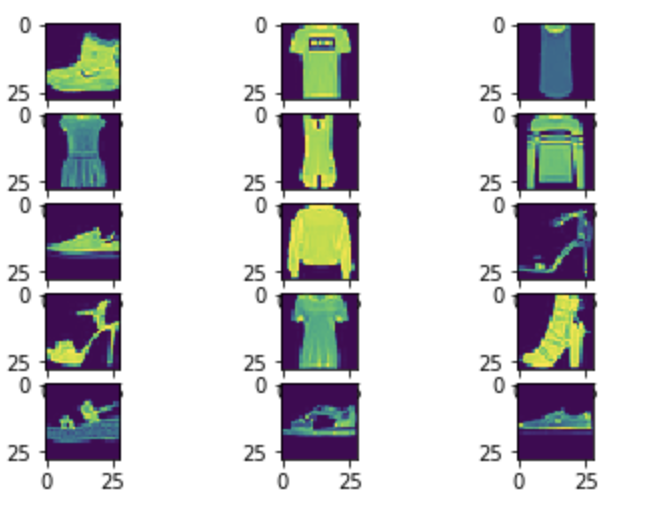
Dataset:This part remains the same as part1, as we are still using the same dataset. Fashion Minst: This is a dataset of 70,000 images. These are small grey scaled images with a standard size of 28x28 pixels. Here are a few examples.
数据集:该部分与part1相同,因为我们仍在使用相同的数据集。 Fashion Minst:这是一个包含70,000张图像的数据集。 这些是标准尺寸为28x28像素的小型灰度图像。 这里有一些例子。
First, let’s look at how to load data. This is going to use TensorFlow Datasets to do this.
首先,让我们看一下如何加载数据。 这将使用TensorFlow数据集来做到这一点。
#Imports
import tensorflow as tf
import tensorflow.keras as keras
from tensorflow.keras.models import Sequential
from tensorflow.keras.layers import Flatten,Conv2D,MaxPool2D,Dense#Load Dataset
mnist = tf.keras.datasets.fashion_mnist
(training_images, training_labels), (test_images, test_labels) =
 fashion_mnist.load_data()#Reshape & Scaletraining_images=training_images.reshape(60000, 28, 28, 1)
training_images=training_images / 255.0
test_images = test_images.reshape(10000, 28, 28, 1)
test_images=test_images/255.0
As you can see this function loads all the 70k images and splits it into two parts 60k for training and 10k for testing.
如您所见,此功能将加载所有70k图像,并将其分为两部分:60k用于训练,10k用于测试。
Build Model:
构建模型:
model= Sequential([
                  Conv2D(16,(3,3),input_shape(28,28,1),
                         activation='relu'),
                  MaxPool2D(2,2),
                  Flatten(),
                  Dense(512,activation='relu'),
                  Dense(10,activation='softmax')
                 ])
This is the updated model using Conv2D layer and MaxPooling2D layer. To get a little bit more into the details:
这是使用Conv2D层和MaxPooling2D层的更新模型。 要进一步了解细节:
# Here is the model summary:model.summary()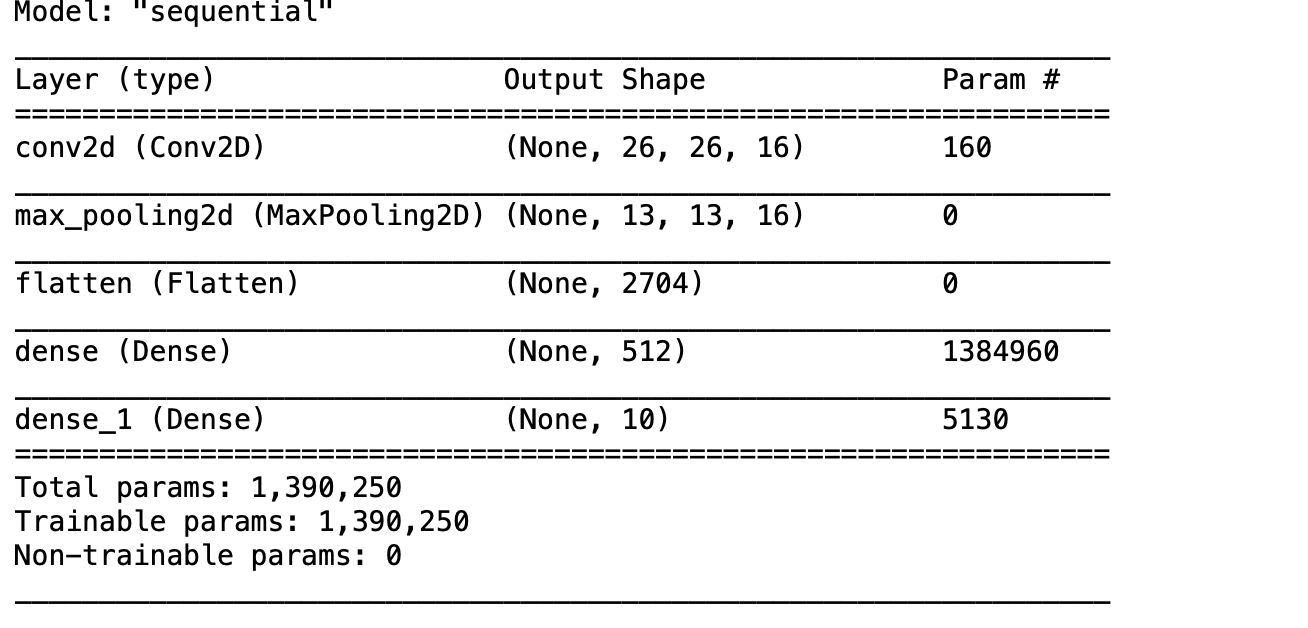
Conv2D: This convolution layer can be thought of as matrix multiplication using the kernel size matrix in our example (3,3) so if our input size of the image is (28,28) our first Conv2D output would be a matrix of (28–3+1,28–3+1) so (26,26). We also have this process run for each filter so in our example of 16 filters the end dimensions are (26,26,16).
Conv2D:在我们的示例(3,3)中,可以使用内核大小矩阵将此卷积层视为矩阵乘法,因此,如果我们图像的输入大小为(28,28),则我们的第一个Conv2D输出将是(28)的矩阵–3 + 1,28–3 + 1)如此(26,26)。 我们还为每个过滤器运行此过程,因此在我们的16个过滤器示例中,最终尺寸为(26,26,16)。
MaxPooling2D: After this Con2D layer, we use MaxPooling2D that dimensions are reduced to (13,13,16) when we use the unit size of (2,2) after the above layer.
MaxPooling2D:在此Con2D层之后,我们使用MaxPooling2D,当我们在上一层之后使用(2,2)的单位大小时,尺寸减小到(13,13,16)。
One more new parameter we used in the layers is the activation function ‘Relu’. There are also activation functions available from TensorFlow. Here is a link to all of them.
我们在图层中使用的另一个新参数是激活函数“ Relu”。 TensorFlow还提供了激活功能。 这里 是所有这些的链接。
Compile Model:
编译模型:
After we build the model we need to compile it. Here we need to select the loss functions and the optimizers. As you can see from the below code snippet this is very easy in TensorFlow. This is the same as we had in the last post.
构建模型后,我们需要对其进行编译。 在这里,我们需要选择损失函数和优化器。 从下面的代码片段中可以看出,在TensorFlow中这非常容易。 这与上一篇文章中的相同。
model.compile(
     optimizer='Adam',
     loss='sparse_categorical_crossentropy',
     metrics=['accuracy'])
Fit Model:Without further ado, here is the simple fit line used to train the model.
拟合模型:事不宜迟,这是用于训练模型的简单拟合线。
model.fit(train_rescale,train_label,epochs=5)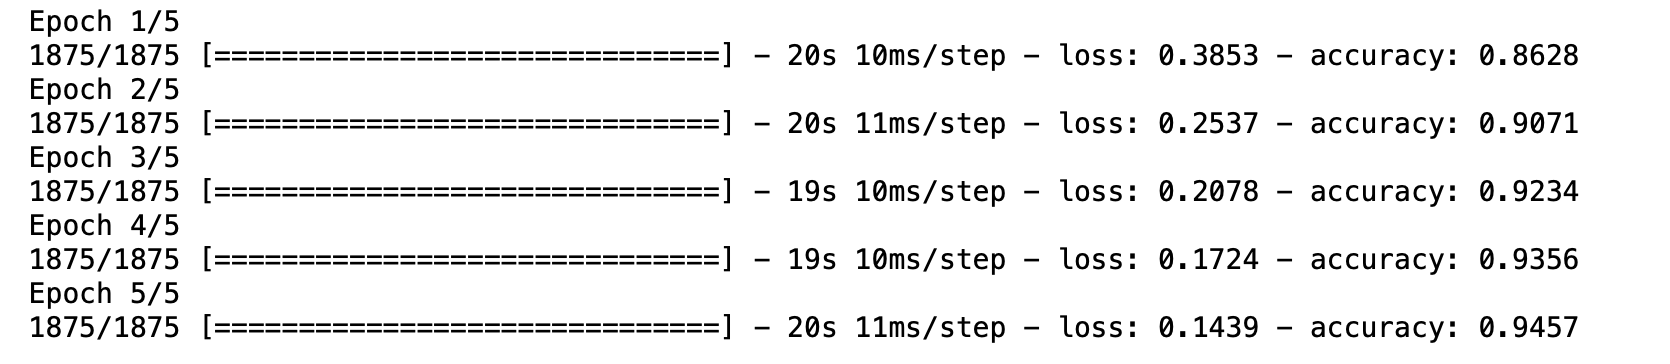
Evaluate Model:Now the final test to see how the model performs on our test dataset.
评估模型:现在是最终测试,以查看模型在测试数据集上的表现。
model.evaluate(test_rescale,test_label)
Here is a quick reminder of how the Dense only model performed.
这是有关仅密集模型的执行情况的快速提醒。

As you can see adding the 2 more lines in the model with Conv2D and MaxPooling2D improves the overall performance on the classification task from 87.72% to 91.12%.
如您所见,在使用Conv2D和MaxPooling2D的模型中添加另外2行,可以将分类任务的整体性能从87.72%提高到91.12%。
Good luck !!!
祝好运 !!!
翻译自: https://medium.com/@sailaja.karra/deep-learning-using-tensorflow-part2-aa956b24d84d


 450
450

 被折叠的 条评论
为什么被折叠?
被折叠的 条评论
为什么被折叠?
 到【灌水乐园】发言


