


詹金斯搭建
In this article, I will demonstrate how to setup Docker Containers as Jenkins Dynamic Node. Also, we gonna see how to deploy our HTML Websites dynamically in Kubernetes using Jenkins CI/CD (Continuous Integration & Continuous Deployment) pipeline.
在本文中,我将演示如何将Docker容器设置为Jenkins动态节点。 此外,我们将看到如何使用Jenkins CI / CD(持续集成和持续部署)管道在Kubernetes中动态部署HTML网站。
Before starting, I would like to suggest if you want to know more about Git, Jenkins, Kubernetes and CI/CD pipeline then definitely checkout my below mentioned blog.
在开始之前,我想建议您是否想了解有关Git,Jenkins,Kubernetes和CI / CD管道的更多信息,然后肯定要查看我下面提到的博客。
In the above-mentioned blog I talked about Git, Jenkins, and Kubernetes. That's why I am skipping those parts in this blog. Let's start with Docker.
在上述博客中,我谈到了Git,Jenkins和Kubernetes。 这就是为什么我在本博客中跳过了那些部分。 让我们从Docker开始。
码头工人: (Docker :)

Docker is a set of platform as a service products that use OS-level virtualization to deliver software in packages called containers. Containers are isolated from one another and bundle their own software, libraries, and configuration files; they can communicate with each other through well-defined channels. All containers are run by a single operating system kernel and therefore use fewer resources than virtual machines.
Docker是一组平台即服务产品,它们使用操作系统级虚拟化以称为容器的软件包交付软件。 容器彼此隔离,并捆绑了自己的软件,库和配置文件。 他们可以通过定义明确的渠道相互交流。 所有容器均由单个操作系统内核运行,因此使用的资源少于虚拟机。
To know more about docker: https://www.docker.com/get-started
要了解有关Docker的更多信息: https : //www.docker.com/get-started
动态集群或节点: (Dynamic Cluster or Node :)
A dynamic cluster or node is an application deployment target that can expand and contract depending on the workload in your environment. Dynamic clusters work with autonomic managers, including the application placement controller and the dynamic workload manager to maximize the use of your computing resources. Dynamic clusters are required for many of the Intelligent Management, including high availability and service policies.
动态集群或节点是一个应用程序部署目标,可以根据您环境中的工作负载进行扩展和收缩。 动态集群与自主管理器(包括应用程序放置控制器和动态工作负载管理器)一起使用,以最大程度地利用您的计算资源。 许多智能管理都需要动态集群,包括高可用性和服务策略。
Jenkins is one of the most used Continuous Integration tools for build automation due to its capacity in managing a great number of nodes, that are called slaves, with executors for a wide range of tasks related to project build and deploy. Each executor runs Jenkins jobs, alleviating the Jenkins server from running all the tasks. Jenkins uses these Docker Containers to execute the respective tasks dynamically and once the task is done it automatically terminates the container which saves lots of resources.
Jenkins是用于构建自动化的最常用的持续集成工具之一,因为它具有管理大量节点(称为从节点)的能力,并具有执行程序来执行与项目构建和部署相关的各种任务。 每个执行程序都运行Jenkins作业,从而减轻了Jenkins服务器运行所有任务的负担。 Jenkins使用这些Docker容器动态地执行各自的任务,一旦任务完成,它将自动终止该容器,从而节省了大量资源。
To know more about Jenkins Distributed Architecture: https://www.jenkins.io/doc/book/architecting-for-scale/
要了解有关Jenkins分布式体系结构的更多信息,请访问: https : //www.jenkins.io/doc/book/architecting-for-scale/
因此,让我们看看问题陈述: (So, Let’s see the Problem Statement :)
1. Create a container image that has Linux and other basic configuration required to run Slave for Jenkins. ( example here we require kubectl to be configured )2. When we launch the job it should automatically start job on slave based on the label provided for a dynamic approach.3. Create a job chain of job1 & job2 using the build pipeline plugin in Jenkins 4. Job1: Pull the GitHub repo automatically when some developers push the repo to GitHub and perform the following operations as:I) Create the new image dynamically for the application and copy the application code into that corresponding docker imageII) Push that image to the docker hub (Public repository) Note: GitHub code contains the application code and Dockerfile to create a new image.5. Job 2: Should be run on the dynamic slave of Jenkins configured with Kubernetes kubectl command. Launch the application on the top of the Kubernetes cluster performing the following operations:I) If launching the first time then create a deployment of the pod using the image created in the previous job. Else if deployment already exists then do a rollout of the existing pod making zero downtime for the user.II) If the Application created the first time, then Expose the application. Else don’t expose it.
1.创建具有运行Slave for Jenkins所需的Linux和其他基本配置的容器映像。 (在这里的例子中,我们要求配置kubectl)2。 当我们启动作业时,它应该根据为动态方法提供的标签在从属服务器上自动启动作业。 使用Jenkins 4中的构建管道插件创建作业1和作业2的工作链。作业1:当一些开发人员将存储库推送到GitHub时,自动拉GitHub存储库,并执行以下操作:I)为应用程序动态创建新映像,并将应用程序代码复制到相应的docker imageII中)将该映像推送到docker hub(公共存储库)注:GitHub代码包含应用程序代码和Dockerfile来创建新映像。5。 作业2:应在使用Kubernetes kubectl命令配置的Jenkins动态从属服务器上运行。 在Kubernetes集群的顶部启动应用程序,执行以下操作:I)如果是首次启动,请使用上一个作业中创建的映像创建Pod的部署。 否则,如果已经存在部署,则对现有的pod进行部署,使用户的停机时间为零。II)如果应用程序是首次创建的,则公开该应用程序。 否则不要暴露它。
先决条件: (Pre-requisites :)
- I am using RedHat Enterprise Linux 8 as my base operating system in VirtualBox. You can use any Linux OS to perform this task. In my base OS, I installed two main programs, 1st one is Jenkins and 2nd is Docker-CE. I will show you how to set both in a few minutes. 我在VirtualBox中将RedHat Enterprise Linux 8用作基本操作系统。 您可以使用任何Linux OS来执行此任务。 在基本操作系统中,我安装了两个主要程序,第一个是Jenkins,第二个是Docker-CE。 我将在几分钟内告诉您如何设置两者。
- Next, I am using Minikube in VirtualBox as a Kubernetes server. For creating a local connectivity in my system I created one host-only adapter and in my system, Windows10, RHEL8, & Minikube are connected with it. 接下来,我将VirtualBox中的Minikube用作Kubernetes服务器。 为了在系统中创建本地连接,我创建了一个仅主机的适配器,并且在系统中将Windows10,RHEL8和Minikube与之连接。
- Finally, I am using Git in my Windows system to develop the code and to upload it to GitHub. 最后,我在Windows系统中使用Git来开发代码并将其上传到GitHub。
让我们在RHEL8上设置Jenkins和Docker-CE: (Let's set up Jenkins and Docker-CE on RHEL8 :)
In my previous blog, I already talked that setting up Jenkins on RHEL8 is a very simple task. You just need to run few commands on the terminal. Here again, I am giving the link, Just visit there and follow the commands and you will be able to setup Jenkins very easily.
在我以前的博客中,我已经谈到在RHEL8上设置Jenkins是一项非常简单的任务。 您只需要在终端上运行一些命令即可。 我再次在这里提供链接,只需访问那里并遵循命令,您将可以非常轻松地设置Jenkins。
Link to setup Jenkins: https://www.fosstechnix.com/install-jenkins-on-centos-8/
链接到安装Jenkins: https : //www.fosstechnix.com/install-jenkins-on-centos-8/
Next, we need to setup Docker-CE. This is also very much easy to set up in RHEL8. I am providing one link, follow the steps and you will be able to easily setup Docker-CE on RHEL8.
接下来,我们需要设置Docker-CE。 在RHEL8中也很容易设置。 我提供一个链接,按照步骤进行操作,您将可以轻松在RHEL8上设置Docker-CE。
Link to setup Docker-CE: https://computingforgeeks.com/install-docker-and-docker-compose-on-rhel-8-centos-8/
链接到安装Docker-CE: https : //computingforgeeks.com/install-docker-and-docker-compose-on-rhel-8-centos-8/
Great, you have successfully set up Jenkins and Docker-CE on RHEL8.
太好了,您已经在RHEL8上成功设置了Jenkins和Docker-CE。
在Docker Image上设置Kubectl: (Setting up Kubectl on Docker Image :)
Here comes the actual business of this task. Actually frankly speaking without reading my previous blog, you won't be able to understand how these things are working. I again suggest before jumping into Docker Image creation, definitely read that article. For reference here is the link :
这是此任务的实际工作。 坦率地说,如果不阅读我以前的博客,您将无法理解这些功能的工作原理。 我再次建议在进入Docker Image创建之前,一定要阅读该文章。 供参考,以下是链接:
Done, now I hope you know how kubectl works and how to connect the program with Minikube. Now we need to set up one Docker Container which will be able to run the kubectl program and will be able to contact to Minikube. For that, the best way to create Docker Image is by using Dockerfile.
完成,现在我希望您知道kubectl的工作原理以及如何将程序与Minikube连接。 现在,我们需要设置一个Docker容器,该容器将能够运行kubectl程序并能够与Minikube联系。 为此,创建Docker映像的最佳方法是使用Dockerfile。
To know more about Dockerfile: https://docs.docker.com/engine/reference/builder/
要了解有关Dockerfile的更多信息: https ://docs.docker.com/engine/reference/builder/
这是我用来创建Docker映像的Dockerfile: (Here is the Dockerfile I used to create the Docker Image :)
FROM centos


RUN yum install java-11-openjdk-devel -y
RUN yum install openssh-server -y


COPY kubernetes.repo /etc/yum.repos.d/
RUN yum install kubectl -y


COPY config /root/.kube/
COPY ca.crt /root/
COPY client.crt /root/
COPY client.key /root/


RUN mkdir /root/jenkins


RUN ssh-keygen -A
EXPOSE 22
CMD ["/usr/sbin/sshd", "-D"] && /bin/bash
Let's look closely at what this Dockerfile is doing.
让我们仔细看看这个Dockerfile的功能。
- 1st, I am using centos as my base OS and install openssh server and java program in the image because Jenkins Contact to it 's dynamic container using ssh and in backend, Jenkins needs java to execute the tasks. 首先,我使用centos作为基本操作系统,并在映像中安装openssh服务器和Java程序,因为Jenkins使用ssh与其动态容器联系,在后端,Jenkins需要Java来执行任务。
- Next, I copied the Kubernetes repo inside “/etc/yum.repos.d” folder and installed the “kubectl” program. For reference here is the Kubernetes repo file. 接下来,我将Kubernetes仓库复制到“ /etc/yum.repos.d”文件夹中,并安装了“ kubectl”程序。 供参考的是Kubernetes存储库文件。
[kubernetes]
name=Kubernetes
baseurl=https://packages.cloud.google.com/yum/repos/kubernetes-el7-x86_64
enabled=1
gpgcheck=1
repo_gpgcheck=1
gpgkey=https://packages.cloud.google.com/yum/doc/yum-key.gpg https://packages.cloud.google.com/yum/doc/rpm-package-key.gpg- Next, I copied the required certificates on the “/root/” folder which I collected from the Windows Minikube Installation folder. Also, I used one configuration file which I copied inside “/root/.kube” folder. That means our kubectl is ready to contact to Minikube. For reference here is the config file. 接下来,将所需的证书复制到从Windows Minikube安装文件夹中收集的“ / root /”文件夹中。 另外,我使用了一个配置文件,该文件复制到“ /root/.kube”文件夹中。 这意味着我们的kubectl已准备好与Minikube联系。 供参考的是配置文件。
apiVersion: v1
kind: Config
clusters:
- cluster:
   server: https://192.168.99.100:8443
   certificate-authority: /root/ca.crt
  name: rmcluster
contexts:
- context:
   cluster: rmcluster
   user: raktim
users:
- name: raktim
  user:
   client-certificate: /root/client.crt
client-key: /root/client.key- Lastly, I created one directory for Jenkins where Jenkins will run its tasks, and using ssh-keygen, I generated a random ssh key, which is required to establish a secure connection. Finally, I exposed 22 port, because ssh works on that port, and also started the ssh service and bash shell to execute the commands using Jenkins. 最后,我为Jenkins创建了一个目录,Jenkins将在该目录中运行其任务,并使用ssh-keygen生成了一个随机的ssh密钥,这是建立安全连接所必需的。 最后,我公开了22端口,因为ssh在该端口上工作,并且还启动了ssh服务和bash shell以使用Jenkins执行命令。
Great, now the last work and we will be done with our Docker Image building. Create one directory in Linux and inside that make sure you have these files : ca.crt, client.key, client.crt, config, kubernetes.repo, Dockerfile. Now run this below mentioned command and your Image will be created.
太好了,现在是最后的工作,我们将完成Docker Image的构建。 在Linux中创建一个目录,并在其中确保您具有以下文件:ca.crt,client.key,client.crt,config,kubernetes.repo和Dockerfile。 现在运行下面提到的命令,您的图像将被创建。
docker build -t kube:v9 .I give my image name as “kube” and version “v9” , you can give anything you want.
我将映像名称命名为“ kube”,版本名称命名为“ v9”,您可以提供任何所需的名称。
Great, your Image has been created. Now we gonna configure Jenkins Dynamic Cluster. But before that, we need to provide one API endpoint to Jenkins where it can contact to Docker services. For that you need to run :
太好了,您的图片已创建。 现在我们将配置Jenkins动态集群。 但是在此之前,我们需要为Jenkins提供一个API终结点,可以与Docker服务联系。 为此,您需要运行:
vim /usr/lib/systemd/system/docker.serviceNow see the below-mentioned screenshot and add this highlighted line to create one API Endpoint.
现在,请参阅下面提到的屏幕截图,并添加此突出显示的行以创建一个API端点。

After adding you need to run two commands to activate this endpoint. Use the below mentioned commands one after another.
添加后,您需要运行两个命令来激活此端点。 依次使用下面提到的命令。
systemctl daemon-reloadsystemctl restart dockerGood Job, now we can easily configure Jenkins Dynamic Cluster or Node.
做得好,现在我们可以轻松配置Jenkins动态集群或节点。
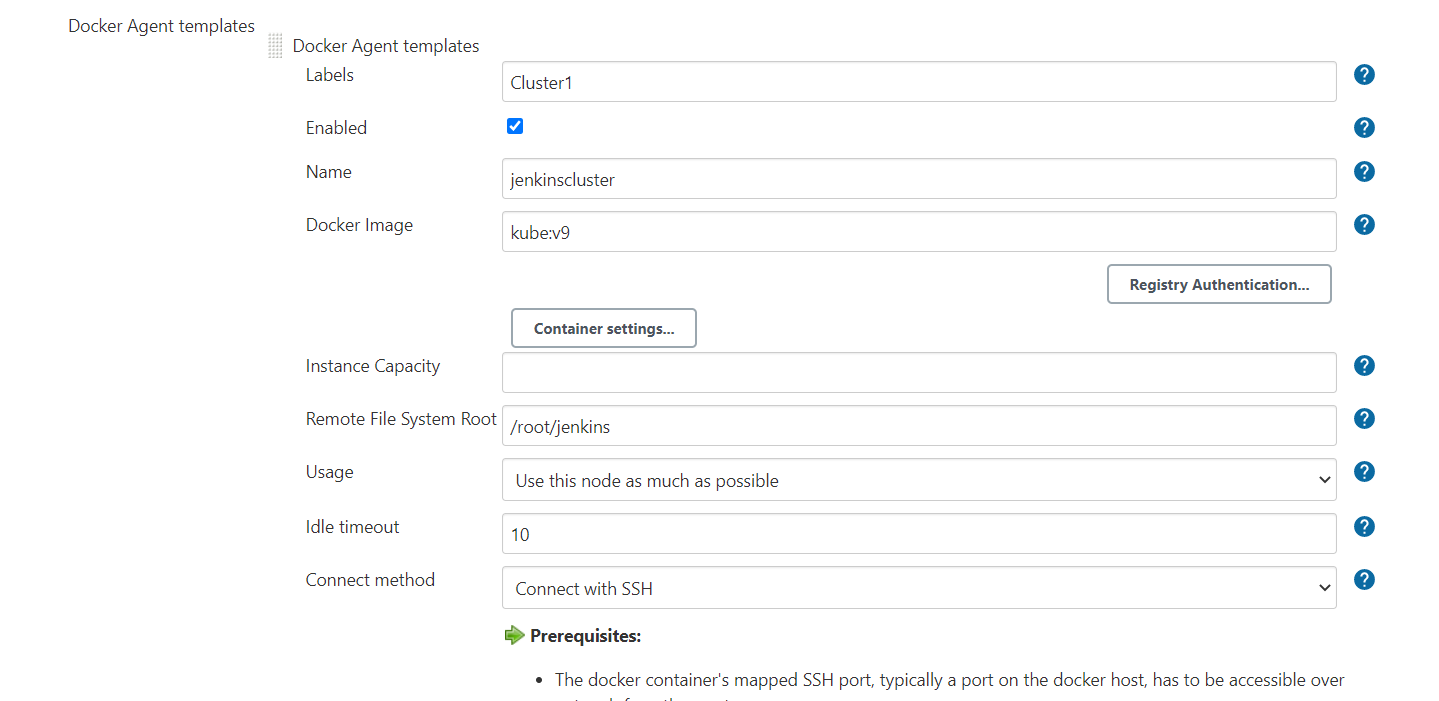
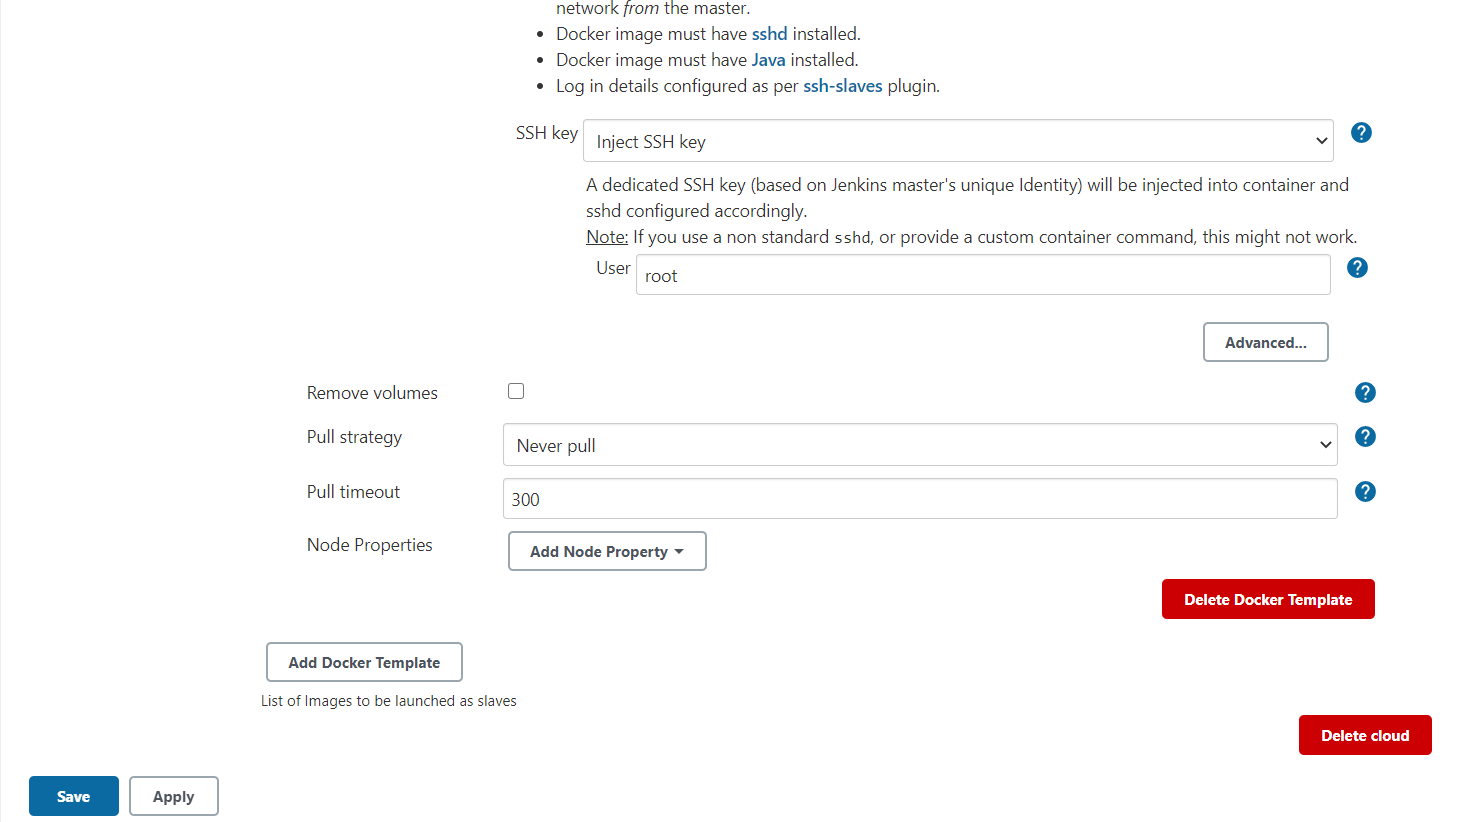
Go to Jenkins Home Page => Manage Jenkins => Manage Nodes and Cloud => Configure Clouds => Add a new Cloud (Note : if you don't find this option, then you have to install one plugin called “Docker”). Next follow the below mentioned screenshot to setup Jenkins Dynamic Cluster. Just remember here the Docker Host URI will be your IP address of RHEL8 along with the port number you exposed for Docker. In our case it's 4243.
转到Jenkins主页=>管理Jenkins =>管理节点和云=>配置云=>添加新云(注意:如果找不到此选项,则必须安装一个名为“ Docker”的插件)。 接下来,按照下面提到的屏幕快照设置Jenkins Dynamic Cluster。 请记住,这里的Docker主机URI将是您的RHEL8的IP地址以及您为Docker公开的端口号。 在我们的例子中是4243。
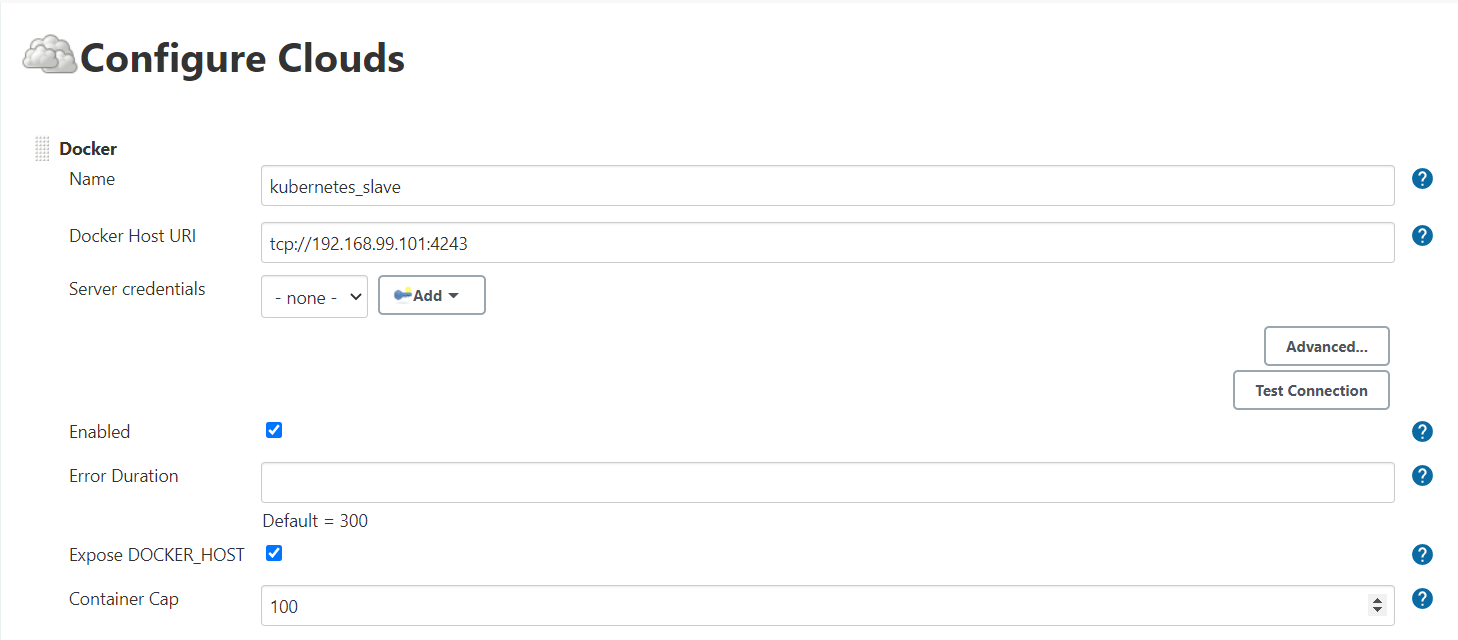
Next save. And we are ready to jump into Creating Jenkins Jobs.
下次保存。 我们已经准备好进入创建詹金斯工作。
詹金斯·乔布斯1: (Jenkins Job 1 :)
Let's look at what we need to perform in Job1 :
让我们看看在Job1中需要执行的操作:
Job 1: Pull the GitHub repo automatically when some developers push repo to GitHub and perform the following operations as:I) Create the new image dynamically for the application and copy the application code into that corresponding docker imageII) Push that image to the docker hub (Public repository) Note: GitHub code contains the application code and Dockerfile to create a new image.
任务1:当一些开发人员将仓库推送到GitHub并执行以下操作时自动拉GitHub仓库:I)为应用程序动态创建新映像并将应用程序代码复制到相应的docker imageII)将映像推送到docker hub (公共存储库)注:GitHub代码包含应用程序代码和Dockerfile来创建新映像。
让我们构建job1: (Let's build job1 :)
Follow the screenshots below and configure the Job 1. I am not showing how to pull code from GitHub because I hope if you went through my previous article then you know. The only difference is here I used another repository. GitHub repository link :
请遵循下面的屏幕快照并配置Job1。我没有展示如何从GitHub中提取代码,因为我希望如果您阅读了我的上一篇文章,就知道了。 唯一的区别是在这里我使用了另一个存储库。 GitHub存储库链接:
Next, to perform further task we need to run the below mentioned Commands on the execute shell of Job1.
接下来,要执行进一步的任务,我们需要在Job1的执行外壳上运行以下提到的命令。
sudo rm -f /root/DevOpsAL/hello.html
sudo cp -rvf * /root/DevOpsAL/sudo docker build -t raktim00/web:v1 /root/DevOpsAL/
sudo docker push raktim00/web:v1
Note: Make sure before running these command you have an account on docker hub and definitely login to Docker from your RHEL8 cli using “docker login” command. For reference here is my Docker Hub Account :
注意:确保在运行这些命令之前,您已经在docker hub上拥有一个帐户,并且一定要使用“ docker login”命令从RHEL8 cli登录到Docker。 作为参考,这里是我的Docker Hub帐户:
Now let's check the console output of Job 1.
现在,让我们检查作业1的控制台输出。
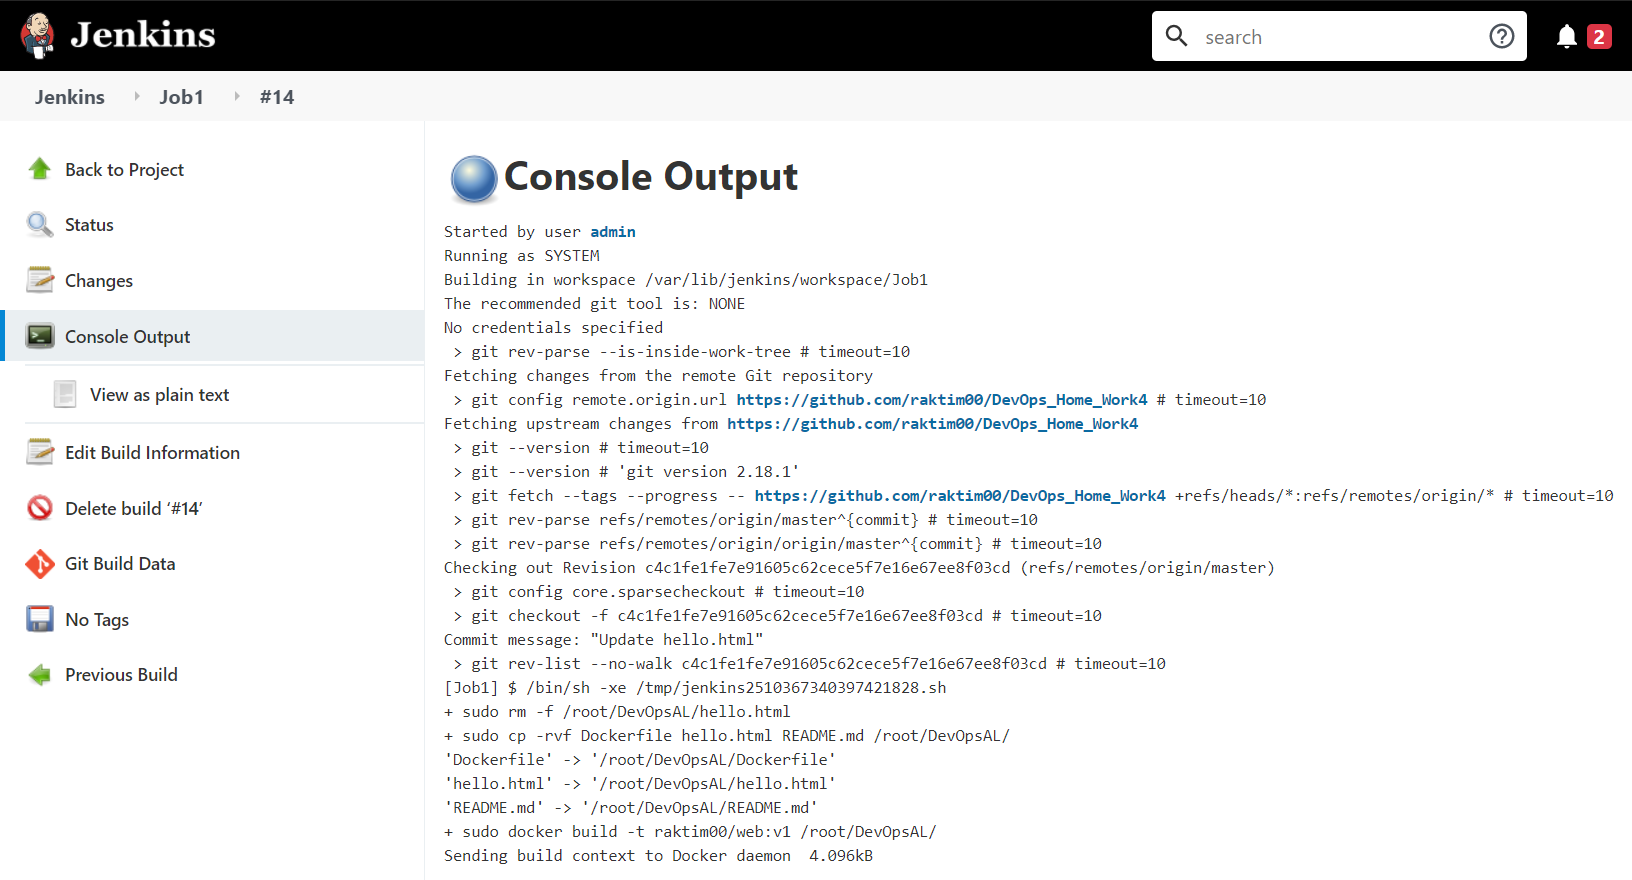
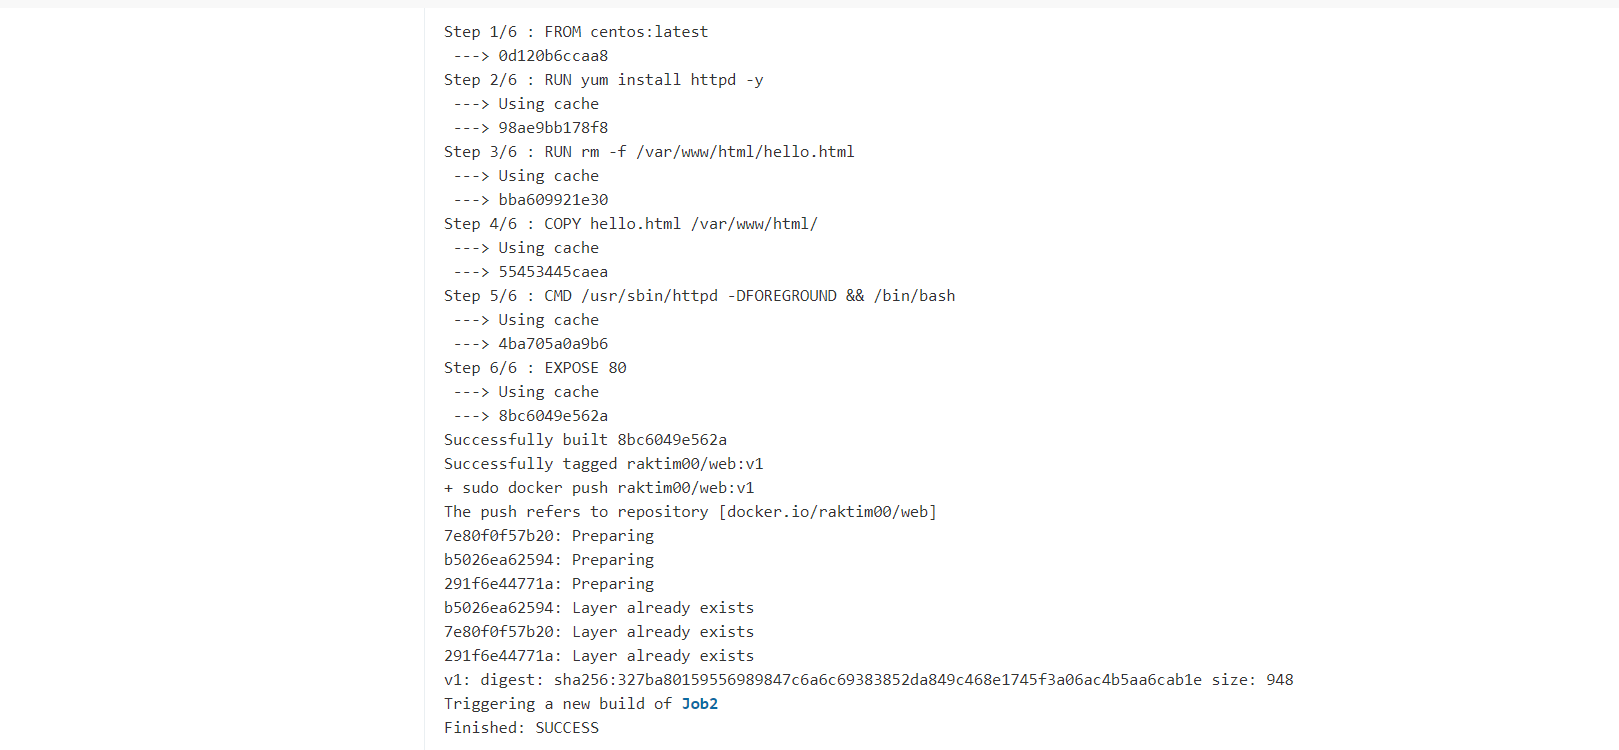
Hurry, we have successfully created our next docker image by integrating the code and required libraries and programs in it. Also, we have successfully pushed the image to the docker hub.
快点,我们已经通过将代码以及所需的库和程序集成到其中,成功创建了下一个docker映像。 此外,我们已将映像成功推送到docker hub。
詹金斯(Jenkins)Job 2: (Jenkins Job 2 :)
Let’s look at what we need to perform in Job2 :
让我们看一下在Job2中需要执行的操作:
Job 2: Should be run on the dynamic slave of Jenkins configured with Kubernetes kubectl command. Launch the application on the top of the Kubernetes cluster performing the following operations:I) If launching the first time then create a deployment of the pod using the image created in the previous job. Else if deployment already exists then do a rollout of the existing pod making zero downtime for the user.II) If the Application created the first time, then Expose the application. Else don’t expose it.
作业2:应在使用Kubernetes kubectl命令配置的Jenkins动态从属服务器上运行。 在Kubernetes集群的顶部启动应用程序,执行以下操作:I)如果是首次启动,请使用上一个作业中创建的映像创建Pod的部署。 否则,如果已经存在部署,则对现有的pod进行部署,使用户的停机时间为零。II)如果应用程序是首次创建的,则公开该应用程序。 否则不要暴露它。
让我们构建Job2: (Let's build Job2 :)
Now here we will see the actual power of Jenkins Dynamic Cluster. So, let setup Job2. For that follow the below screenshot.
现在,在这里我们将看到Jenkins Dynamic Cluster的实际功能。 因此,让我们设置Job2。 为此,请遵循以下屏幕截图。
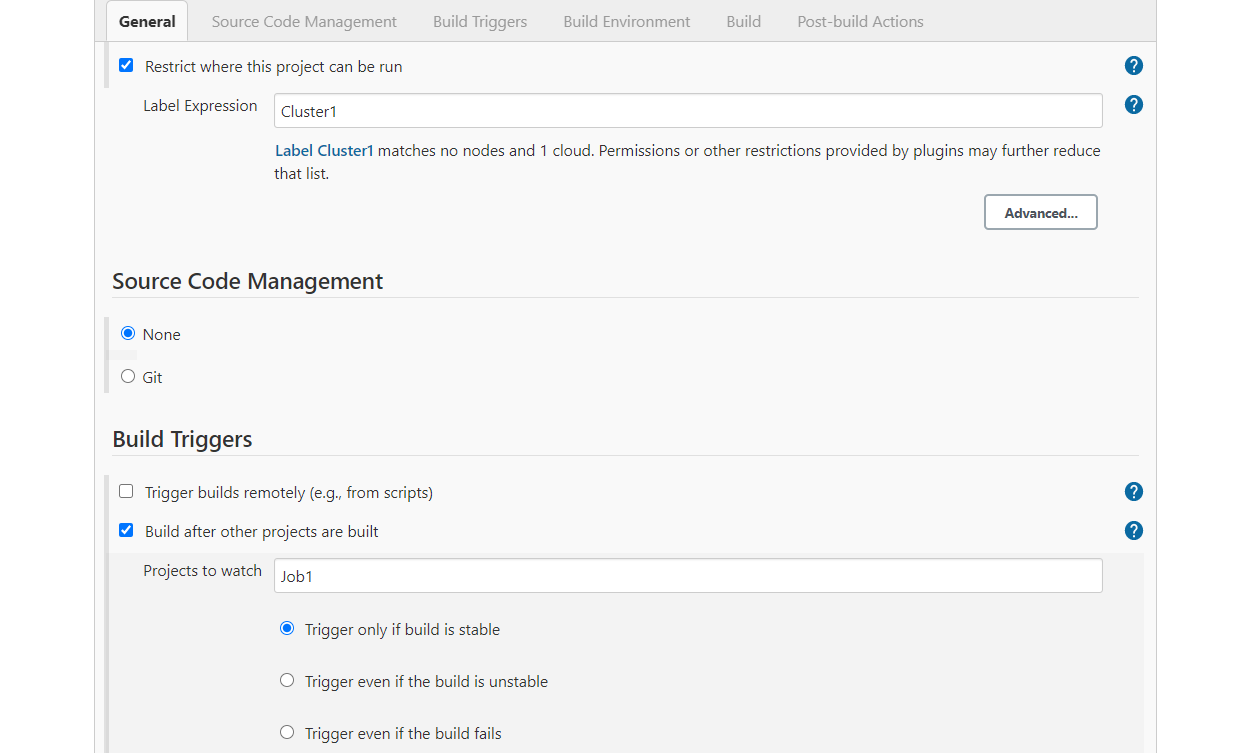
As, you can see here I restricted the location of my task building to Cluster1, because this is our docker dynamic cluster. Next I want after Job1 build successfully, Job2 will start automatically. So, I used Build Triggers.
就像您在这里看到的那样,我将任务构建的位置限制为Cluster1,因为这是我们的docker动态集群。 接下来,我要在Job1构建成功后自动启动Job2。 因此,我使用了构建触发器。
Next in the execute shell write these commands :
接下来在execute shell中编写以下命令:
if kubectl get deployments|grep webdeploy
then
kubectl rollout restart deploy/webdeploy
kubectl rollout status deploy/webdeploy
else
kubectl create deploy webdeploy — image=raktim00/web:v1
kubectl expose deploy webdeploy — port=80 — type=NodePort
kubectl scale deployment webdeploy — replicas=3
kubectl get all
fi
Finally, save the configuration of Job2 and click on “Build Now”. You will see it’s successfully build. Let's see the console output.
最后,保存Job2的配置,然后单击“立即构建”。 您将看到它已成功构建。 让我们看一下控制台输出。
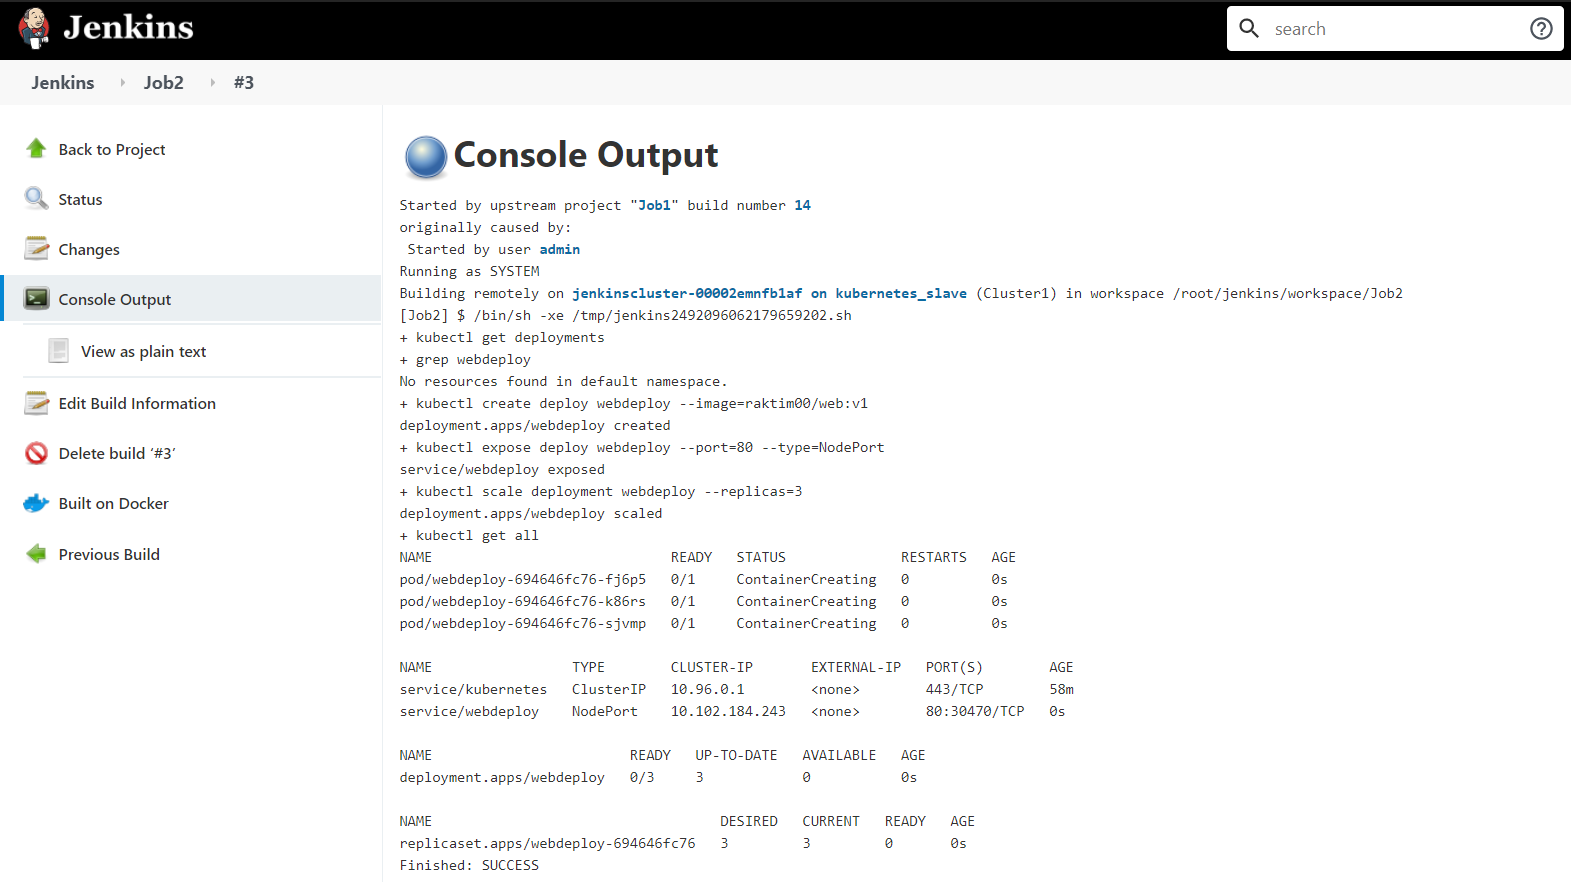
So, finally we have successfully completed both Jenkins Jobs. Now it's time to check our Website is working or not. Go to the Windows Command Prompt to check the IP address of the Minikube. In Windows Command Prompt run :
因此,终于我们成功地完成了两个詹金斯·乔布斯的工作。 现在是时候检查我们的网站是否正常工作。 转到Windows命令提示符以检查Minikube的IP地址。 在Windows命令提示符下运行:
minikube service list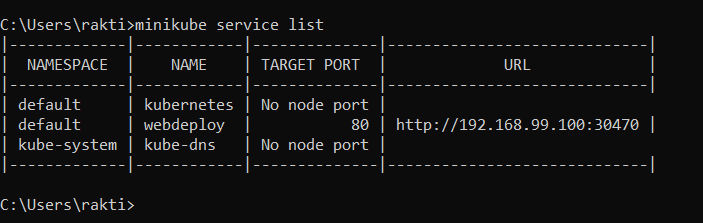
Now let's check the Web address.
现在让我们检查网址。
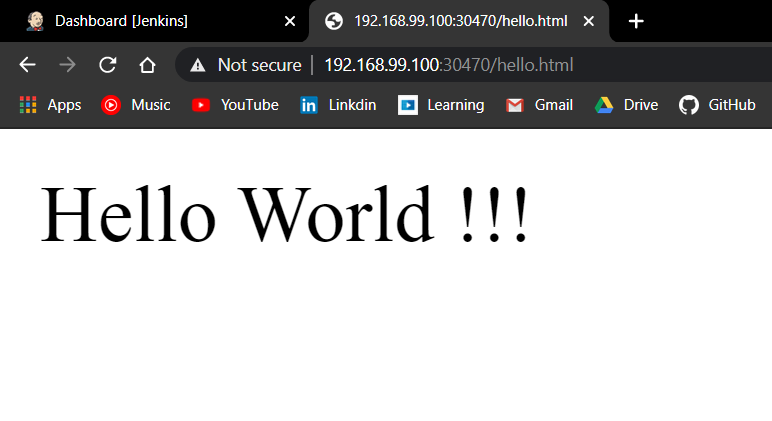
Yeeeeaaa,工作正常… (Yeeeeaaa, it's working fine…)
最后工作: (Final Work :)
To give this pipeline a beautiful visual we are using a build pipeline. In my previous blog, I explained in details about build a pipeline plugin. In the below screenshot you can see the complete pipeline :
为了使该管道具有美观的外观,我们使用了构建管道。 在我以前的博客中,我详细介绍了有关构建管道插件的信息。 在下面的屏幕截图中,您可以看到完整的管道:
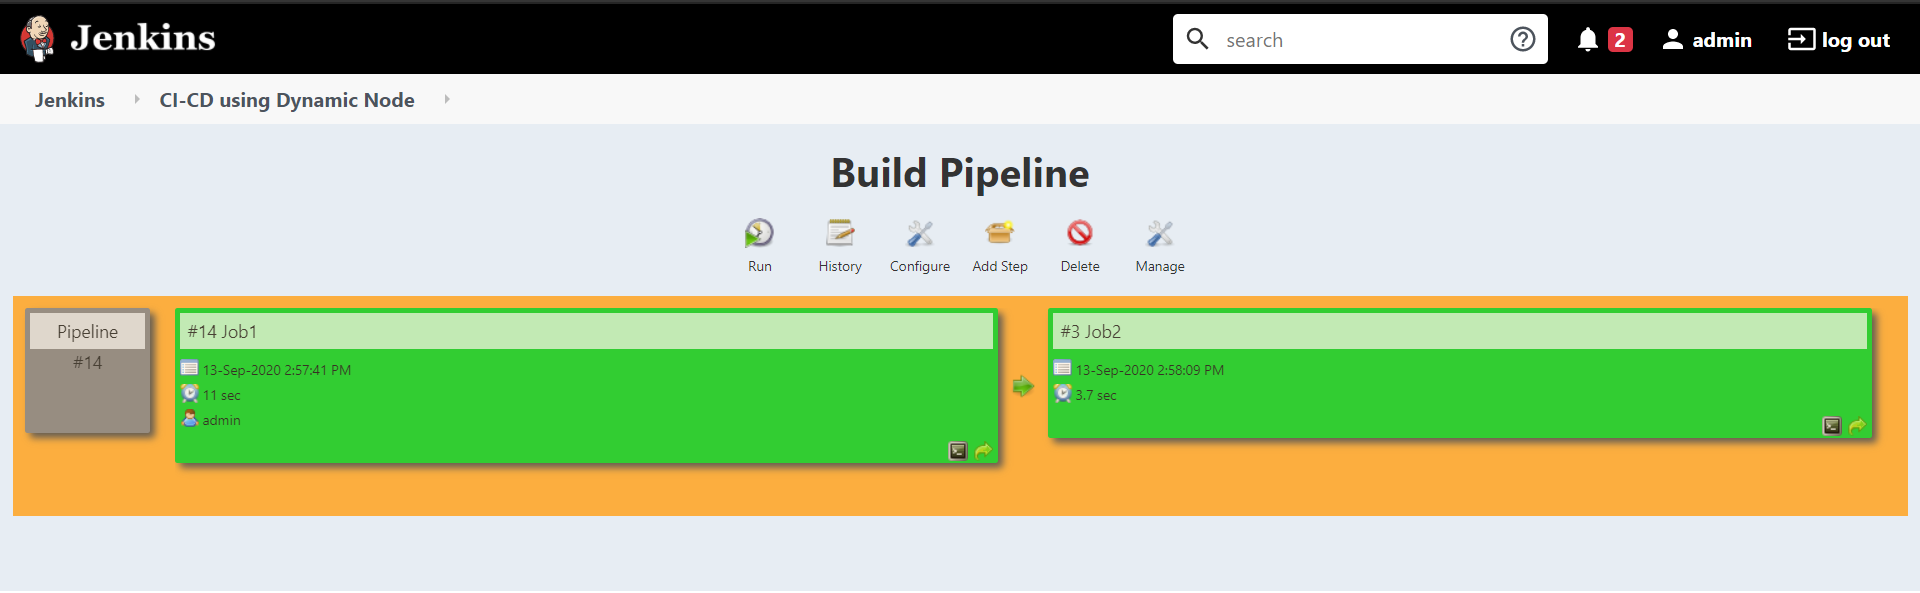
So, finally, we have successfully use the dynamic Jenkins cluster.
因此,最后,我们已经成功使用了动态Jenkins集群。
- There are lots of Future possibilities like We can create advanced deployment scripts to deploy more greater infrastructure. Also, we can use this dynamic method in distributed systems on Cloud. Also, we can use more technologies like Prometheus, Elastic Search, etc. to filter metrics and logs using Jenkins and take decisions based on them to scale our deployments. 有很多未来的可能性,例如我们可以创建高级部署脚本来部署更多的基础架构。 另外,我们可以在云上的分布式系统中使用这种动态方法。 而且,我们可以使用Prometheus,Elastic Search等更多技术来使用Jenkins过滤指标和日志,并根据它们做出决策以扩展我们的部署。
- I tried to make it as simple as possible. Hope You learned Something from here. Feel free to check out my LinkedIn profile and obviously feel free to comment. 我试图使其尽可能简单。 希望您从这里学到了一些东西。 随时查看我的LinkedIn个人资料,显然可以发表评论。
- I write DevOps, Cloud Computing, Machine Learning etc. blogs so feel free to follow me on Medium. And Last but not least if you have any queries DM me on LinkedIn. 我写了DevOps,云计算,机器学习等博客,因此请随时关注Medium。 最后但并非最不重要的一点是,如果您有任何疑问,请在LinkedIn上向我发送DM。
Subscribe to FAUN topics and get your weekly curated email of the must-read tech stories, news, and tutorials 🗞️
订阅 FAUN主题, 并每周收到必须阅读的技术故事,新闻和教程的精选电子邮件🗞️
Follow us on Twitter 🐦 and Facebook 👥 and Instagram 📷 and join our Facebook and Linkedin Groups 💬
在 Twitter上 关注我们 🐦 和 Facebook 👥 和 Instagram 📷 并加入我们的 Facebook 和 Linkedin 组 💬

如果此帖子有帮助,请单击下面的拍手👏按钮几次,以表示对作者的支持! ⬇ (If this post was helpful, please click the clap 👏 button below a few times to show your support for the author! ⬇)
翻译自: https://medium.com/@raktim00/ci-cd-pipeline-using-jenkins-dynamic-nodes-86ea854ff7a7
詹金斯搭建


 559
559

 被折叠的 条评论
为什么被折叠?
被折叠的 条评论
为什么被折叠?
 到【灌水乐园】发言


