


aws延迟测试
After my first approach to AWS Amplify, I want to deal with the implementation of source code linters and end-to-end tests with Cypress, obviously automated in the AWS Amplify CI/CD pipeline. Let’s face up this new challenge!
在我采用AWS Amplify的第一种方法之后,我想用Cypress处理源代码linter和端到端测试的实现,显然在AWS Amplify CI / CD管道中是自动化的。 让我们面对这个新挑战!
References: this is the link to the GitHub repository and this is the link to the web application related to this post.
参考:这是到GitHub存储库 的链接 ,这是到与该帖子相关的Web应用程序的链接 。
林特 (Linter)
The linter is a tool that analyzes the source code to flag programming errors, bugs, stylistic errors and suspicious constructs — wikipedia
linter是一个用于分析源代码以标记编程错误,错误,风格错误和可疑结构的工具-维基百科
Linter tools allows to increase the quality of the source code. Using these tools in a CI/CD pipeline also allows to deploy an application when its source code meets certain quality levels.
Linter工具允许提高源代码的质量。 在CI / CD管道中使用这些工具还可以在应用程序的源代码达到一定质量级别时对其进行部署。
The web application I created with AWS Amplify includes a React frontend and few Python lambdas in backend. For this reason I need two different tools, specific to the two technologies used.
我使用AWS Amplify创建的Web应用程序包括一个React前端和后端的几个Python lambda。 因此,我需要两种不同的工具,具体针对所使用的两种技术。
ESLint (ESLint)
One of the best linters I’ve had the chance to test for JavaScript is ESLint: its functions are not limited to test but it includes automatic fix of a large number of problems.
我有机会测试JavaScript的最好的短毛绒之一是ESLint :它的功能不仅限于测试,还包括自动修复大量问题的功能。
ESLint installation is simple: from the main directory of our project, we can install the linter with the following command:
ESLint的安装很简单:在项目的主目录中,我们可以使用以下命令来安装linter:
npm install eslint --save-devOnce the installation is complete, we can run the first configuration wizard:
安装完成后,我们可以运行第一个配置向导:
npx eslint --initYou will be asked for various information: in general you can choose whether to use ESLint for:
系统将要求您提供各种信息:通常,您可以选择是否将ESLint用于:
- syntax checking 语法检查
- syntax checking and problem finding 语法检查和问题查找
- syntax checking, problem finding and code style checking 语法检查,问题发现和代码样式检查
This last option is interesting and includes most popular styles, such as Airbnb and Google source code styles. Once the configuration is complete, the required packages are installed. In my case:
最后一个选项很有趣,其中包括最受欢迎的样式,例如Airbnb和Google源代码样式。 配置完成后,将安装必需的软件包。 就我而言:
"devDependencies": {
    "eslint": "^7.8.1",
    "eslint-config-google": "^0.14.0",
    "eslint-plugin-react": "^7.20.6"
  }
Now that we’ve set up ESLint, let’s check the code:
现在我们已经设置了ESLint,让我们检查一下代码:
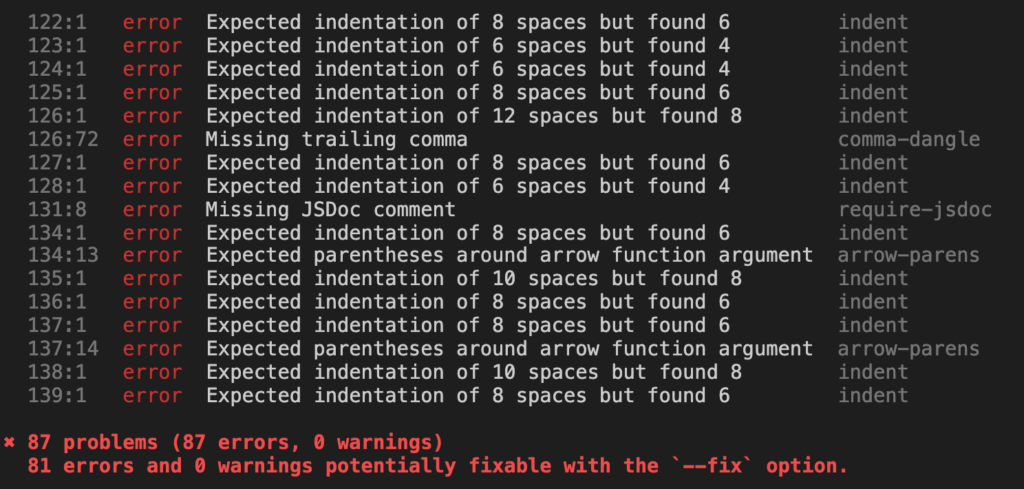
npx eslint src/*.jsDepending on the options chosen during configuration, the result may not be the most optimistic, revealing a long series of problems.
根据配置过程中选择的选项,结果可能不是最乐观的,从而暴露出一系列问题。
But as I said initially, ESLint allows us to automatically correct some of these, using the following command:
但是正如我最初说的,ESLint允许我们使用以下命令自动更正其中的一些:
npx eslint src/*.js --fixGreat! Of the 87 problems initially detected, only 6 require our intervention to be corrected.
大! 在最初发现的87个问题中,只有6个需要我们的干预得到纠正。

We can also decide to ignore some specific problems. If you want, for example, to avoid reporting for missing JSDoc comments, you must modify the rules section of the ESLint configuration file .eslintrc.js.
我们还可以决定忽略一些特定的问题。 例如,如果要避免报告缺少的JSDoc注释,则必须修改ESLint配置文件.eslintrc.js的rules部分。
'rules': {
    "require-jsdoc": "off"
  }
Only one problem remains, related to a line that is too long. We need to fix it manually.
仅剩下一个问题,与行太长有关。 我们需要手动修复它。

The goal is to automate this process in the CI / CD pipeline, in order to stop the deployment in case some errors are detected.
目标是在CI / CD管道中自动化此过程,以在检测到某些错误时停止部署。
Let’s configure the pipeline by editing the amplify.yml file like this:
让我们通过编辑amplify.yml文件来配置管道,如下所示:
frontend:
  phases:
    preBuild:
      commands:
        - npm ci
    build:
      commands:
        - npx eslint src/*.js
        - npm run build
  artifacts:
    baseDirectory: build
    files:
      - '**/*'
  cache:
    paths:
      - node_modules/**/*
Among the commands of the build phase of the frontend, we insert the command to run ESLint. If it detects a problem, the pipeline will stop automatically.
在前端的构建阶段的命令中,我们插入命令以运行ESLint。 如果检测到问题,管道将自动停止。
As far as the frontend is concerned that’s all! For any further information on the use of ESLint, I suggest to consult the excellent documentation.
就前端而言,仅此而已! 有关使用ESLint的更多信息,我建议查阅优秀的文档 。
皮林特 (Pylint)
It’s time to check the backend code. Having built some AWS Lambda functions in Python, I chose Pylint for this purpose. Installation is normally done with PIP:
现在该检查后端代码了。 在Python中构建了一些AWS Lambda函数之后,我为此选择了Pylint 。 安装通常通过PIP完成:
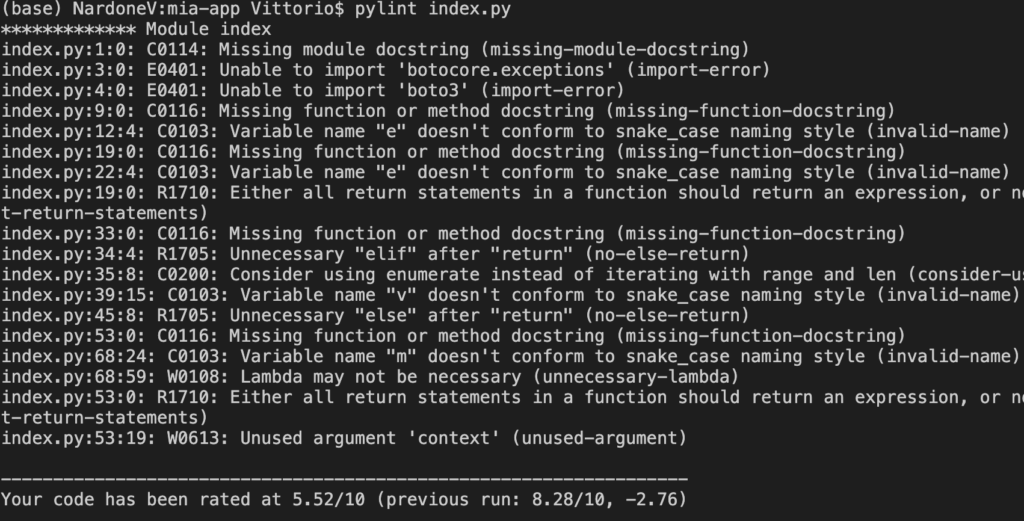
pip install pylintTo parse a file with Pylint just run it specifying the filename as an argument.
要使用Pylint解析文件,只需运行它,并指定文件名作为参数即可。
Unlike the tool seen above, Pylint attributes a score (up to 10) to the analyzed code. The score is obviously based on the problems found.
与上面看到的工具不同,Pylint将得分(最高10分)归因于所分析的代码。 分数显然基于发现的问题。
Some problems can be ignored by editing the configuration file. To generate a configuration file to be customized later with your own settings, you need to run the command:
通过编辑配置文件可以忽略某些问题。 要生成以后使用您自己的设置进行自定义的配置文件,您需要运行以下命令:
pylint --generate-rcfileThe generated file is well documented and understandable.
生成的文件有据可查且易于理解。
In order to integrate Pylint into the AWS Amplify pipeline, the operations to be performed are more complicated than previously seen for ESLint.
为了将Pylint集成到AWS Amplify管道中,要执行的操作比以前在ESLint中看到的更为复杂。
First you need to install Pylint in the Docker image used for the backend build phase. As explained in the previous article that I wrote about AWS Amplify, the default Docker image used for the build of the solution is not correctly configured: there is in fact a known problem related to the configuration of Python 3.8 also reported in this issue (Amplify can’t find Python3.8 on build phase of CI/CD ).
首先,您需要在用于后端构建阶段的Docker映像中安装Pylint。 如我在上一篇关于AWS Amplify的文章中所述,未正确配置用于构建解决方案的默认Docker映像:实际上,此问题中也报告了与Python 3.8的配置有关的已知问题(Amplify在CI / CD的构建阶段找不到Python3.8)。
The easiest workaround I identified is to create a Docker image with all the requirements. Below the Dockerfile.
我确定的最简单的解决方法是创建具有所有要求的Docker映像。 在Dockerfile下面。
FROM amazonlinux:latest


RUN yum update -y
RUN yum -y install \
    git \
    curl \
    openssl \
    gcc-c++ \
    gcc \
    openssl-devel \
    bzip2-devel \
    libffi-devel \
    make \
    sudo \
    tar


RUN yum -y install \
    xorg-x11-server-Xvfb \
    gtk2-devel \
    gtk3-devel \
    libnotify-devel \
    GConf2 \
    nss \
    libXScrnSaver \
    alsa-lib


RUN curl -sL https://rpm.nodesource.com/setup_12.x | sudo -E bash -
RUN sudo yum install -y nodejs


RUN curl https://www.python.org/ftp/python/3.8.1/Python-3.8.1.tgz --output /tmp/Python-3.8.1.tgz
RUN cd /tmp && sudo tar xzf Python-3.8.1.tgz
WORKDIR /tmp/Python-3.8.1/
RUN sudo ./configure --enable-optimizations
RUN sudo make altinstall
RUN pip3.8 install --user pipenv pylint
RUN ln -fs /usr/local/bin/python3.8 /usr/bin/python3
RUN ln -fs /usr/local/bin/pip3.8 /usr/bin/pip3
RUN echo "export PATH=/root/.local/bin:${PATH}" >> /root/.bashrc


ENTRYPOINT [ "bash" ]
Once Pylint is installed, we need to configure the pipeline by modifying the amplify.yml file like this:
一旦安装了Pylint ,我们需要通过修改amplify.yml文件来配置管道,如下所示:
backend:
  phases:
    build:
      commands:
        - '# Evaluate backend Python code quality'
        - find amplify/backend/function -name index.py -type f | xargs pylint --fail-under=5
        - '# Execute Amplify CLI with the helper script'
        - amplifyPush --simple
We use find to Pylint all the index.py files of our backend lambda functions. Pay attention to the -fail-under parameter: this instructs Pylint to consider a source code evaluation lower than 5 as failed. In this case the Pylint exit code will be non-zero and the CI/CD pipeline execution is interrupted. With a rating higher than 5, the exit code will be zero. The default threshold is 10, corresponding to a “perfect” source code and honestly very difficult to obtain in the presence of complex applications.
我们使用find来将后端lambda函数的所有index.py文件都设置为Pylint 。 请注意-fail-under参数:这指示Pylint将低于5的源代码评估视为failed 。 在这种情况下,Pylint退出代码将为非零值,并且CI / CD管道执行会中断。 如果评分高于5,则退出代码为零。 默认阈值为10 ,对应于“完美”的源代码,说实话,在存在复杂应用程序的情况下很难获得。
We’ve completed introducing linters to our pipeline. Let’s see now how to automate the testing of our application.
我们已经完成了将棉短绒引入我们的生产线的工作。 现在让我们看看如何自动化我们的应用程序的测试。
赛普拉斯的端到端测试 (End-to-end test with Cypress)
Cypress is a solution that allows you to perform automatic tests of our web application, simulating the operations a user performs via UI. The tests are collected in suite.
赛普拉斯是一种解决方案,使您可以对我们的Web应用程序执行自动测试,以模拟用户通过UI执行的操作。 测试是在套件中收集的。
Passing the tests ensures proper operation from the user’s point of view.
通过测试可确保从用户的角度正确操作。
The Amplify console offers integration with Cypress (an end-to-end test framework) for browser-based testing. For web apps using Cypress, the Amplify console automatically detects test commands on the repo connection, runs the tests, and provides access to videos, screenshots and any other artifacts made available during the build phase — AWS
Amplify控制台提供了与Cypress(端到端测试框架)的集成,用于基于浏览器的测试。 对于使用赛普拉斯的Web应用程序,Amplify控制台会自动检测回购连接上的测试命令,运行测试,并提供对视频,屏幕截图以及在构建阶段提供的任何其他工件的访问权限-AWS
Installation is very simple:
安装非常简单:
npm install cypressWith the following command Cypress is started:
通过以下命令启动赛普拉斯:
npx cypress openThis will involve creating a cypress directory in our project which includes all configuration files and test suites. Some examples are present in cypress/integration . I don’t go into the details of how to build a test suite because there is already a huge documentation about it.
这将涉及在我们的项目中创建一个cypress目录,其中包含所有配置文件和测试套件。 柏树/山林有一些例子。 我不讨论如何构建测试套件的细节,因为已经有大量的文档 。
为AWS Amplify和Cognito配置Cypress (Configuring Cypress for AWS Amplify and Cognito)
Let’s see how to properly configure our project to integrate with AWS Amplify.
让我们看看如何正确配置我们的项目以与AWS Amplify集成。
The configuration file cypress.json is now present in the root of the project and we must edit in this way:
配置文件cypress.json现在位于项目的根目录中,我们必须以这种方式进行编辑:
{
    "baseUrl": "http://localhost:3000/",
    "experimentalShadowDomSupport": true
}
The first parameter set the base URL of our web application.
第一个参数设置我们的Web应用程序的基本URL。
The experimentalShadowDomSupport parameter is very important in the case of React applications using the AWS Amplify Cognito authentication backend and its UI components. In a nutshell, by not enabling Shadow DOM support, we will not be able to authenticate into our application during the testing phases.
对于使用AWS Amplify Cognito身份验证后端及其UI组件的React应用程序而言, experimentalShadowDomSupport参数非常重要。 简而言之,通过不启用Shadow DOM支持,我们将无法在测试阶段对我们的应用程序进行身份验证。
The test suite used to verify the login and logout functionality of the web application is the following:
用于验证Web应用程序的登录和注销功能的测试套件如下:
export const labels = {
    // Auth
    signInLabel: 'Sign In',
    signOutLabel: 'Sign Out',
    signInHeader: 'Sign in to your account',
    signInResetPassword: 'Reset password',
    signInCreateAccount: 'Create account',
}


export const selectors = {
    // Auth component classes
    signInSlot: '[slot="sign-in"]',
    signInHeader: '[data-test="sign-in-header-section"]',
    signInResetPasswordLink: '[data-test="sign-in-forgot-password-link"]',
    signInCreateAccountLink: '[data-test="sign-in-create-account-link"]',
    signInEmailInput: '[data-test="sign-in-email-input"]',
    signInPasswordInput: '[data-test="sign-in-password-input"]',
    signInSignInButton: '[data-test="sign-in-sign-in-button"]',
    signOutButton: '[data-test="sign-out-button"]',
}


export const login = {
    username: Cypress.env('username'),
    password: Cypress.env('password')
}


function SignIn() {
        // it is ok for the username to be visible in the Command Log
        expect(login.username, 'username was set').to.be.a('string').and.not.be.empty
        // but the password value should not be shown
        if (typeof login.password !== 'string' || !login.password) {
          throw new Error('Missing password value, set using CYPRESS_password=...')
        }


        cy.get(selectors.signInSlot)
          .find(selectors.signInEmailInput, { includeShadowDom: true })
          .type(login.username, {log: false, force: true});


        cy.get(selectors.signInSlot)
          .find(selectors.signInPasswordInput, { includeShadowDom: true })
          .type(login.password, {log: false, force: true});

        cy.get(selectors.signInSlot)
          .find(selectors.signInSignInButton, { includeShadowDom: true })
          .contains(labels.signInLabel)
          .click();
};


describe('Authenticator:', function() {
    // Step 1: setup the application state
    beforeEach(function() {
      cy.visit('/');
    });

    describe('Sign In', () => {
      it('check sign in page', () => {
        cy.get(selectors.signInSlot)
        .find(selectors.signInHeader, { includeShadowDom: true })
        .contains(labels.signInHeader)
        .should('be.visible');


      cy.get(selectors.signInSlot)
        .find(selectors.signInResetPasswordLink, { includeShadowDom: true })
        .contains(labels.signInResetPassword)
        .should('be.visible');


      cy.get(selectors.signInSlot)
        .find(selectors.signInCreateAccountLink, { includeShadowDom: true })
        .contains(labels.signInCreateAccount)
        .should('be.visible');


      cy.get(selectors.signInSlot)
        .find(selectors.signInEmailInput, { includeShadowDom: true })
        .should('be.visible')
        .should('be.enabled');


      cy.get(selectors.signInSlot)
        .find(selectors.signInPasswordInput, { includeShadowDom: true })
        .should('be.visible')
        .should('be.enabled');


      cy.get(selectors.signInSlot)
        .find(selectors.signInSignInButton, { includeShadowDom: true })
        .contains(labels.signInLabel)
        .should('be.visible');
      });


      it('allows a user to signin', () => {
        // Take an action (Sign in)
        SignIn();


        // Make an assertion (Check for sign-out text)
        cy.get(selectors.signOutButton, { includeShadowDom: true, timeout: 10000 })
            .contains(labels.signOutLabel)
            .should("be.visible");
      });
    });


    describe('Sign Out', () => {
        it('allows a user to signout', () => {
          // Take an action (Sign in)
          SignIn();


          // Click on sign-out button
          cy.get(selectors.signOutButton, { includeShadowDom: true, timeout: 10000 })
            .contains(labels.signOutLabel)
            .click();

          // Make an assertion (Check for sign-in button)
          cy.get(selectors.signInSlot).find(selectors.signInSignInButton, { includeShadowDom: true })
            .contains(labels.signInLabel)
            .should("be.visible");
        });
      });

  });
For security reasons, the username and password to be used for testing are not specified in the script but must be defined in environment variables directly on the AWS Amplify console. The variables are CYPRESS_username and CYPRESS_password.
出于安全原因,用于测试的用户名和密码未在脚本中指定,但必须直接在AWS Amplify控制台上的环境变量中定义。 变量是CYPRESS_username和CYPRESS_password 。

管道配置 (Pipeline Configuration)
Last step is pipeline configuration for running the tests, as explained by Cypress. And here’s the complete amplify.yml file.
最后一步是用于运行测试的管道配置, 如Cypress所述 。 这是完整的amplify.yml文件。
version: 1
backend:
  phases:
    build:
      commands:
        - '# Evaluate backend Python code quality'
        - find amplify/backend/function -name index.py -type f | xargs pylint --fail-under=5 --rcfile=pylint.rc
        - '# Execute Amplify CLI with the helper script'
        - amplifyPush --simple
frontend:
  phases:
    preBuild:
      commands:
        - npm ci
    build:
      commands:
        - npx eslint src/*.js
        - npm run build
  artifacts:
    baseDirectory: build
    files:
      - '**/*'
  cache:
    paths:
      - node_modules/**/*


test:
  artifacts:
    baseDirectory: cypress
    configFilePath: '**/mochawesome.json'
    files:
      - '**/*.png'
      - '**/*.mp4'
  phases:
    preTest:
      commands:
        - npm install
        - npm install wait-on
        - npm install  mocha mochawesome mochawesome-merge mochawesome-report-generator
        - 'npm start & npx wait-on http://localhost:3000'
    test:
      commands:
        - 'npx cypress run --reporter mochawesome --reporter-options "reportDir=cypress/report/mochawesome-report,overwrite=false,html=false,json=true,timestamp=mmddyyyy_HHMMss"'
    postTest:
      commands:
        - npx mochawesome-merge ./cypress/report/mochawesome-report/mochawesome*.json > cypress/report/mochawesome.json
Again, as with linters, our deployment pipeline will stop if the tests fail.
再次,与短绒一样,如果测试失败,我们的部署管道将停止。
It is possible to watch execution video of the tests on the AWS Amplify console, by downloading the artifacts. Here is an example.
通过下载工件,可以在AWS Amplify控制台上观看测试的执行视频。 这是一个例子。
结论 (Conclusions)
The combined use of linter and end-to-end test tools allows to release high quality source code, tested as an end user. With AWS Amplify we have the ability to integrate these tools by simplifying DevOps operations and maintaining control of the CI/CD phases.
结合使用linter和端到端测试工具,可以发布经过最终用户测试的高质量源代码。 借助AWS Amplify,我们能够通过简化DevOps操作并维持对CI / CD阶段的控制来集成这些工具。
In conclusion I confirm the impressions of the first post: the next time I have to create a solution, a simple PoC or a more complex web application, I will definitely consider using AWS Amplify! Obviously flanked by Cypress and one or more linters.
总之,我确认第一篇文章的印象 :下次我必须创建解决方案,简单的PoC或更复杂的Web应用程序时,我一定会考虑使用AWS Amplify! 显然是在赛普拉斯和一个或多个短绒的侧面。
Did we have fun? See you next time!
我们玩得开心吗? 下次见!
Originally published at https://www.vittorionardone.it on September 8, 2020.
最初于 2020年9月8日 发布在 https://www.vittorionardone.it 上。
翻译自: https://medium.com/swlh/aws-amplify-ci-cd-code-lint-end-to-end-testing-eb837dedb952
aws延迟测试


 1775
1775

 被折叠的 条评论
为什么被折叠?
被折叠的 条评论
为什么被折叠?
 到【灌水乐园】发言


