


Spring对于程序员说来说都不陌生;作为一个强大的开源技术,帮助我们能够更好的进行项目的开发与维护。直接进入主题吧。Spring的启动过程实际上就是Ioc容器初始化以及载入Bean的过程;本文主要是学习记录下前半部分(Ioc容器的初始化),新手上路,如有错误,请指正!1.从配置文件说起
org.springframework.web.context.ContextLoaderListener
contextConfigLocation
classpath:applicationContext.xml
在一般的WEB项目中,项目的启动一般是从web.xml文件的载入开始的。如果我们的项目中使用了Spring,那么你肯定会在你的web.xml文件中看到上面的配置。Spring正是通过ContextLoaderListener监听器来进行容器初始化的。下面通过代码进行分析。
2.Spring容器加载的三步走
step1:创建一个WebApplicationContext
step2:配置并且刷新Bean
step3:将容器初始化到servlet上下文中
3.WebApplicationContext的创建过程
public class ContextLoaderListener extends ContextLoader implements ServletContextListener
从ContextLoaderListener的定义可以看出,该监听器继承了ContextLoader,并且重写了ServletContextListener中的contextInitialized和contextDestroyed方法。
在contextInitialized中,通过调用父类(ContextLoader)的initWebApplicationContext方法进行容器创建:
@Override
public void contextInitialized(ServletContextEvent event) {
initWebApplicationContext(event.getServletContext());
}
下面来看initWebApplicationContext的代码:
public WebApplicationContext initWebApplicationContext(ServletContext servletContext) {
//1:判断当前容器是否存在,如果存在则报容器已经存在的异常信息
if (servletContext.getAttribute(WebApplicationContext.ROOT_WEB_APPLICATION_CONTEXT_ATTRIBUTE) != null) {
throw new IllegalStateException(
"Cannot initialize context because there is already a root application context present - " +
"check whether you have multiple ContextLoader* definitions in your web.xml!");
}
Log logger = LogFactory.getLog(ContextLoader.class);
//下面这个日志就是我们经常在启动Spring项目时看到的日志信息:
//Initializing Spring root WebApplicationContext
//Root WebApplicationContext: initialization started
servletContext.log("Initializing Spring root WebApplicationContext");
if (logger.isInfoEnabled()) {
logger.info("Root WebApplicationContext: initialization started");
}
long startTime = System.currentTimeMillis();
try {
// Store context in local instance variable, to guarantee that
// it is available on ServletContext shutdown.
//如果当前容器为null,则创建一个容器,并将servletContext上下文作为参数传递进去,
if (this.context == null) {
this.context = createWebApplicationContext(servletContext);
}
//判断当前容器是否为可配置的,只有是Configurable的容器,才能进行后续的配置
if (this.context instanceof ConfigurableWebApplicationContext) {
ConfigurableWebApplicationContext cwac = (ConfigurableWebApplicationContext) this.context;
if (!cwac.isActive()) {
// The context has not yet been refreshed -> provide services such as
// setting the parent context, setting the application context id, etc
if (cwac.getParent() == null) {
// The context instance was injected without an explicit parent ->
// determine parent for root web application context, if any.
ApplicationContext parent = loadParentContext(servletContext);
cwac.setParent(parent);
}
//三步走中的第二步:配置并且刷新当前容器
configureAndRefreshWebApplicationContext(cwac, servletContext);
}
}
//将配置并且刷新过的容器存入servlet上下文中,并以WebApplicationContext的类名作为key值
servletContext.setAttribute(WebApplicationContext.ROOT_WEB_APPLICATION_CONTEXT_ATTRIBUTE, this.context);
ClassLoader ccl = Thread.currentThread().getContextClassLoader();
if (ccl == ContextLoader.class.getClassLoader()) {
currentContext = this.context;
}
else if (ccl != null) {
currentContextPerThread.put(ccl, this.context);
}
if (logger.isDebugEnabled()) {
logger.debug("Published root WebApplicationContext as ServletContext attribute with name [" +
WebApplicationContext.ROOT_WEB_APPLICATION_CONTEXT_ATTRIBUTE + "]");
}
if (logger.isInfoEnabled()) {
long elapsedTime = System.currentTimeMillis() - startTime;
logger.info("Root WebApplicationContext: initialization completed in " + elapsedTime + " ms");
}
//返回创建好的容器
return this.context;
}
catch (RuntimeException ex) {
logger.error("Context initialization failed", ex);
servletContext.setAttribute(WebApplicationContext.ROOT_WEB_APPLICATION_CONTEXT_ATTRIBUTE, ex);
throw ex;
}
catch (Error err) {
logger.error("Context initialization failed", err);
servletContext.setAttribute(WebApplicationContext.ROOT_WEB_APPLICATION_CONTEXT_ATTRIBUTE, err);
throw err;
}
}
下面我们在看下是如何创建WebApplicationContext的
protected WebApplicationContext createWebApplicationContext(ServletContext sc) {
//首先来确定context是由什么类定义的,并且判断当前容器是否为可配置的
Class> contextClass = determineContextClass(sc);
if (!ConfigurableWebApplicationContext.class.isAssignableFrom(contextClass)) {
throw new ApplicationContextException("Custom context class [" + contextClass.getName() +
"] is not of type [" + ConfigurableWebApplicationContext.class.getName() + "]");
}
//创建可配置的上下文容器
return (ConfigurableWebApplicationContext) BeanUtils.instantiateClass(contextClass);
}
最后来看下determineContextClass这个方法
protected Class> determineContextClass(ServletContext servletContext) {
//首先从web.xml中查看用户是否自己定义了context
String contextClassName = servletContext.getInitParameter(CONTEXT_CLASS_PARAM);
//如果有,则通过反射创建实例
if (contextClassName != null) {
try {
return ClassUtils.forName(contextClassName, ClassUtils.getDefaultClassLoader());
}
catch (ClassNotFoundException ex) {
throw new ApplicationContextException(
"Failed to load custom context class [" + contextClassName + "]", ex);
}
}
/*如果没有,则去defaultStrategies里面取【defaultStrategies是Propertites类的/对象,在ContextLoader中的静态代码块中初始化的;具体可看下下面的图像】;默认容器是XmlWebApplicationContext*/
else {
contextClassName = defaultStrategies.getProperty(WebApplicationContext.class.getName());
try {
return ClassUtils.forName(contextClassName, ContextLoader.class.getClassLoader());
}
catch (ClassNotFoundException ex) {
throw new ApplicationContextException(
"Failed to load default context class [" + contextClassName + "]", ex);
}
}
}
总的来说就是:Spring的web工程首先回去检查用户是否自己定义了context,如果有就采用;如果没有就使用Spring默认的。defaultStrategies初始化:

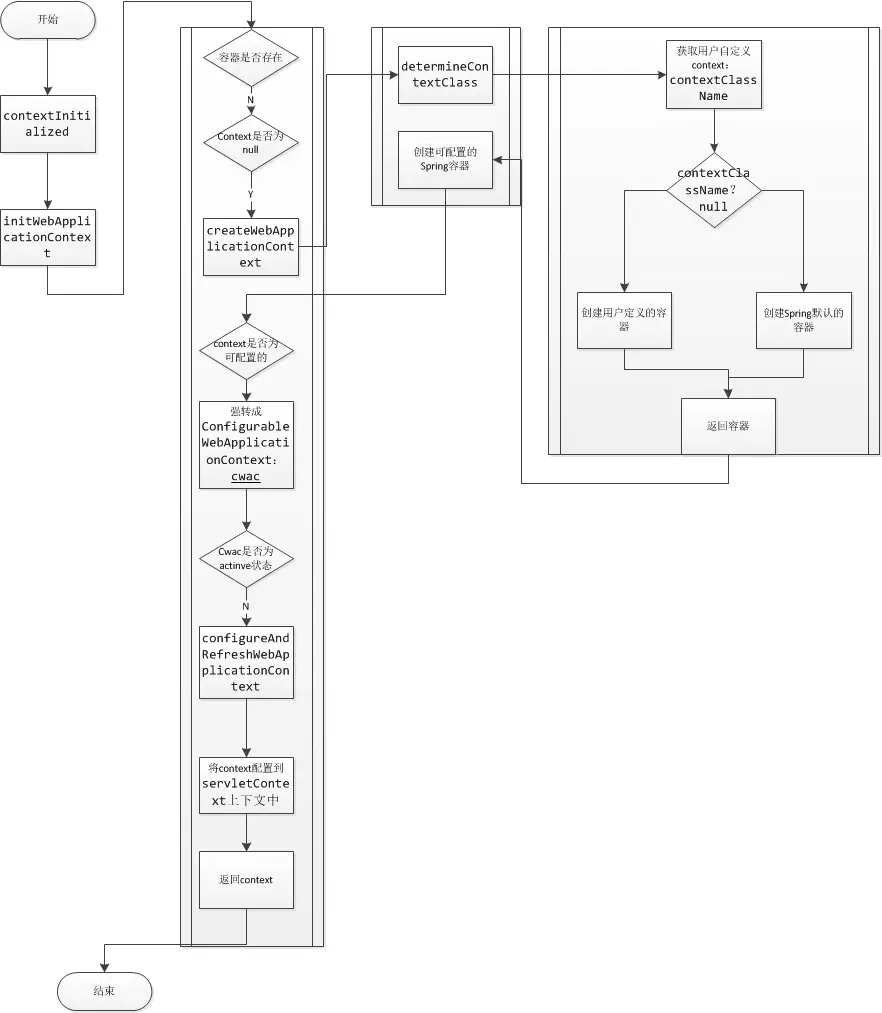
至此,容器创建完成。下面是整个过程的一个流程图(有疏漏,回头补一个时序图):
来源:[]()


 307
307


 被折叠的 条评论
为什么被折叠?
被折叠的 条评论
为什么被折叠?
 到【灌水乐园】发言


