


1、前言
最近简单看了下google推出的框架Jetpack,感觉此框架的内容可以对平时的开发有很大的帮助,也可以解决很多开发中的问题,对代码的逻辑和UI界面实现深层解耦,打造数据驱动型UI界面。
Android Architecture组件是Android Jetpack的一部分,它们是一组库,旨在帮助开发者设计健壮、可测试和可维护的应用程序,包含一下组件:
带你领略Android Jetpack组件的魅力
Android Jetpack 架构组件之 Lifecycle(使用篇)
Android Jetpack 架构组件之 Lifecycle(源码篇)
Android Jetpack 架构组件之 ViewModel (源码篇)
Android Jetpack 架构组件之 LiveData(使用、源码篇)
Android Jetpack架构组件之 Paging(使用、源码篇)
Android Jetpack 架构组件之 Room(使用、源码篇)
Android Jetpack 架构组件之Navigation
Android Jetpack架构组件之WorkManger
实战:从0搭建Jetpack版的WanAndroid客户端
上述时Android Architecture所提供的架构组件,本文主要从使用和源码的角度分析Paging组件
2、Paging简介
分页库概述
Paging Library中DataSource,PagedList,PagedAdapter三者之间的关系以及数据加载到数据展示的流程
比如当一条新的item插入到数据库,DataSource会被初始化,LiveData后台线程就会创建一个新的PagedList。这个新的PagedList会被发送到UI线程的PagedListAdapter中,PagedListAdapter使用DiffUtil在对比现在的Item和新建Item的差异。当对比结束,PagedListAdapter通过调用RecycleView.Adapter.notifyItemInserted()将新的item插入到适当的位置
PagedList:是Paging Library的关键组件,它是一个异步加载应用程序数据块或页面的集合
Data
每个PagedList实例都会加载应用程序DataSource的最新数据
数据从应用程序的后端或数据库流入PagedList对象
UI:PagedList类与 PagedListAdapter一起加载 数据到RecyclerView中
Paging组件好处
分页库使您可以更轻松地在应用程序中的RecyclerView逐步和优雅地加载数据
数据请求消耗的网络带宽更少,系统资源更少
即使在数据更新和刷新期间,应用程序仍会继续快速响应用户输入
3、Paging组件的使用
3.1、添加依赖
def paging_version = "1.0.0"
implementation "android.arch.paging:runtime:$paging_version"
testImplementation "android.arch.paging:common:$paging_version"
implementation "android.arch.paging:rxjava2:1.0.0-rc1"
3.2、Paging使用步骤
定义分页配置
Page size :页面大小即每次加载时加载的数量
Prefetch distance:预取距离,给定UI中最后一个可见的Item,超过这个item应该预取一段数据
UI占位符:setEnablePlaceholders()
val myPagingConfig = PagedList.Config.Builder() // 分页设置
.setPageSize(50)
.setPrefetchDistance(150)
.setEnablePlaceholders(true)
.build()
使用分页配置创建LiveData ,传入DataSource.Factory,用于创建DataSource,从DataSource中加载数据到PagedList中
val concertList = LivePagedListBuilder(myConcertDataSource, myPagingConfig)
.setFetchExecutor(myExecutor)
.build()
观察LiveData,在数据改变时调用适配器刷新数据
viewModel.concertList.observe(this, { pagedList ->
adapter.submitList(pagedList) })
3.3、Paging和Room的使用
在Room的@Dao中添加查询方法
@Dao
interface UserDao {
@Query("SELECT * FROM user")
fun getAll() : DataSource.Factory // 返回DataSOurce.Factory配合PagingList使用
}
在ViewModel中查询数据库并创建LiveData
class ViewModelUser(application: Application) : AndroidViewModel(application) {
val dao = UserDataBase.getInstence(application)?.getDao()
传入Room返回的DataSource.Factory
var liveArray : LiveData> =
LivePagedListBuilder(dao!!.getAll(),PagedList.Config.Builder()
.setPageSize(10)
.setPrefetchDistance(10)
.setEnablePlaceholders(true)
.build()).build()
}
创建PagedListAdapter的实现类,加载并显示数据
class Adapter : PagedListAdapter(diffCallback) {
override fun onCreateViewHolder(parent: ViewGroup, viewType: Int): UserViewHolder {
val layoutInflater = LayoutInflater.from(parent.context)
return UserViewHolder(layoutInflater.inflate(R.layout.item,parent,false))
}
override fun onBindViewHolder(holder: UserViewHolder, position: Int) {
val user = getItem(position)
if (user != null){
holder.bind(user)
}else{
holder.clear()
}
}
companion object {
val diffCallback = object : DiffUtil.ItemCallback() {
override fun areItemsTheSame(oldItem: User?, newItem: User?): Boolean {
return oldItem?.id == newItem?.id
}
override fun areContentsTheSame(oldItem: User?, newItem: User?): Boolean {
return oldItem == newItem
}
}
}
class UserViewHolder(val view : View) :
RecyclerView.ViewHolder(view){
private val tvId : TextView = view.findViewById(R.id.tvId)
private val tvName : TextView = view.findViewById(R.id.tvName)
fun bind(user: User){
tvId.text = user.id.toString()
tvName.text = user.name
}
fun clear(){
tvName.text = null
tvId.text = null
}
}
这里说一下传入的DiffUtil.ItemCallback<> 实例,当数据加载到PagedListAdapter时,会回调DiffUtil.ItemCallback中两个抽象方法,确认数据和之前是否发生了改变,如果改变则调用Adapter更新数据:
areItemTheSame():是否为同一个Item
areContentsTheSame():数据内容是否发生变化
添加LiveData观察者
val viewModel = ViewModelProviders.of(this).get(ConcertViewModel::class.java!!)
val recyclerView = findViewById(R.id.concert_list)
val adapter = ConcertAdapter()
viewModel.concertList.observe(this, { pagedList ->
... })
recyclerView.setAdapter(adapter)
这里使用ViewModel中保存加载到的LivaData(关于ViewModel点击查看另一篇Android Jetpack架构组件之 ViewModel (源码篇)),为LiveData添加观察者,当数据发生改变时回调方法,将数据发送到PagedListAdapter中更新界面UI
将 LiveData 实例连接到 PagedListAdapter
adapter.submitList(pagedList)
Room和PagedList配合使用有点
Room数据库查询数据作为PagedList的数据源,实现列表的自动加载和下拉加载更多数据
当数据库改变时会自动回调观察者从而刷新界面
3.4、使用RxJava2观察分页数据
Paging除了支持LiveData加载数据外,还支持RxJava2观察数据,通过创建一个Observable或Flowable实例,观察数据的改变并发送数据到Adapter,下面用Flowable代替LiveData:
var liveArray : Flowable> = RxPagedListBuilder(dao!!.getAll(),PagedList.Config.Builder()
.setPageSize(10)
.setPrefetchDistance(10)
.setEnablePlaceholders(true)
.build()).buildFlowable(BackpressureStrategy.LATEST)
和创建LiveData一样传入DataSource.Factory和PagedList.Config,并配置背压策略,创建Flowable后像RxJava正常使用一样订阅观察者即可获取数据:
viewModel.concertList.subscribe({
flowableList -> adapter.submitList(flowableList)
3.5、Paging使用的注意事项
构建可观察者列表
观察对象的创建一般在ViewModel中,UI代码观察ViewModel中的LiveData对象,实现列表和内容的联系
向LivePagedListBuilder 或RxPagedListBuilder 传入DataSource.Factory的实例,创建可观察的PagedList对象
一个DataSource对象为一个PagedList加载页面
工厂类创建新实例 PagedList以响应内容更新
选择正确的数据类型
Paging组件除了自身创建的DataSource以及Room的配合使用外,还支持自定以实现DataSource,组件提供了一下三种模式的DataSource,我们在使用时只需根据自己的需求选择何时的实现子类:
PageKeyedDataSource:如果页面需要实现上一页、下一页,需要将请求的Token传递到下一步
ItemKeyedDataSource:程序需要根据上一条数据信息(ID)获取下一条数据时
PositionalDataSource:需要从数据存储中选择的任何位置获取数据页;例如,请求可能返回以位置1200开头的20个数据项
数据无效时通知
在加载数据时,很多都会配合数据刷新和数据时效性,使用分页库时,数据层由表或行变得陈旧时通知应用程序的其他层,使用DataSource.invalidate()通知数据刷新
应用的UI可以使用下拉刷新模型触发数据失效功能
内容更新
构建可观察 PagedList对象时,需要考虑内容的更新方式,按数据的来源分为本地加载和网络加载:
从Room数据库加载数据,在数据路内容发生改变时,则会自动将更新推送到您应用的UI
如果分页网络API数据,则通常会进行用户交互;例如:“滑动刷新”作为当前DataSource失效,并请求新数据的信号
4、Paging自定义DataSource
在开发过程中,除了查询本地数据库和Room配合使用不需要自定义DataSource外,其他加载网络数据时可能都需要自定义来控制数据的获取,下面以实现ItemKeyedDataSource为例分析使用自定义DataSource
实现ItemKeyedDataSource的子类
class ItemDataSource : ItemKeyedDataSource() {
override fun loadInitial(params: LoadInitialParams, callback: LoadInitialCallback) {
TODO("not implemented") //To change body of created functions use File | Settings | File Templates.
}
override fun loadAfter(params: LoadParams, callback: LoadCallback) {
TODO("not implemented") //To change body of created functions use File | Settings | File Templates.
}
override fun loadBefore(params: LoadParams, callback: LoadCallback) {
TODO("not implemented") //To change body of created functions use File | Settings | File Templates.
}
override fun getKey(item: ArticleBean): Int {
TODO("not implemented") //To change body of created functions use File | Settings | File Templates.
}
}
实现ItemKeyedDataSource的子类,这里传入的两个泛型:Key表示每一个Item的标志,这里使用Int即每个Item的id,Value :加载的数据,这里传入数据类型Bean,然后重写四个方法:
getKey:记录当前加载时最新的Item的Key
loadInitial:执行每次进入界面的第一次加载,即数据刷新
loadBefore:在指定LoadParams中Key之前加载列表数据
loadAfter:在指定LoadParams中Key之后加载列表数据
实现方法中加载数据的逻辑:
override fun getKey(item: M) = item.id
/**
* 初始化时的加载
*/
override fun loadInitial(params: LoadInitialParams, callback: LoadInitialCallback) {
api.getArticleList(0) //初始化加载第一页
.compose(RxHelper.rxSchedulerHelper())
.subscribe({
callback.onResult(it?.data!!.datas!!)
}, {
refreshFailed(it.message, params, callback)
})
}
/**
* 加载更多
*/
override fun loadAfter(params: LoadParams, callback: LoadCallback) {
api.getArticleList(page) // 下拉加载更多数据
.compose(RxHelper.rxSchedulerHelper())
.subscribe({
callback.onResult(it.data!!.datas!!)
}, {
networkFailed(it.message, params, callback)
})
}
创建具体DataSource.Factory实现类,用于创建自定义的DataSource
class ItemDataSourceFactory() :
DataSource.Factory() {
val sourceLiveData = MutableLiveData()
override fun create(): DataSource {
val source = ItemDataSource()
sourceLiveData.postValue(source)
return source
}
}
实现了DataSource.Factory,重写onCreate()方法创建DataSource实例,这里使用了LiveData包装了DataSource的实例,这样做的好处就是可以对创建的DataSource的时效性进行控制,例如我们在刷新的时候只需调用
ItemDataSourceFactory.sourceLivaData.value?.invalidate()
这里会通知DataSource的数据失效,就会重新初始化加载数据
使用自定义的DataSource和Factory
使用的方式和前面的一致,唯一的区别就是Factory的来源不同,前面Factory是从数据库Room中查询生成,这里直接传入实现的Factory的实例即可:
val concertList = LivePagedListBuilder(
ItemDataSourceFactory, 20).build()
到此Paging组件执行时会根据传递的Factory创建DataSource,然后调用DataSource中重写的方法初始化和加载数据到PagedList,然后使用数据刷新界面
总结
从上面的使用可以看出Paging的组件的成员的职责
DataSource:数据的来源,需要设置初始化和加载更多的逻辑以及每次加载变化的Key
DataSource。Factory:工厂类提供DataSource的实例
PagedList.Config:PagedList的配置类,设置初始化数量和界面预取数量等
PagedList:数据集散中心;根据需要向DataSource索取加载数据,并将得到的数据传递到PagedListAdapter
PagedListAdapter:数据适配器,这里处了起到普通界面加载适配器的作用外,更重要的是根据滑动显示的坐标,起到了确定什么时候要求向PagedList加载数据(后面源码分析)
DiffUtil.ItemCallback:判断数据是否发生改变以相应界面的更新
5、源码分析
无论是使用Room还是自定义Datasource,Paging组件的开始执行都是从创建LiveData开始的,所以我们源码的分析也从LiveData的创建开始
5.1、LiveData>
创建LiveData>
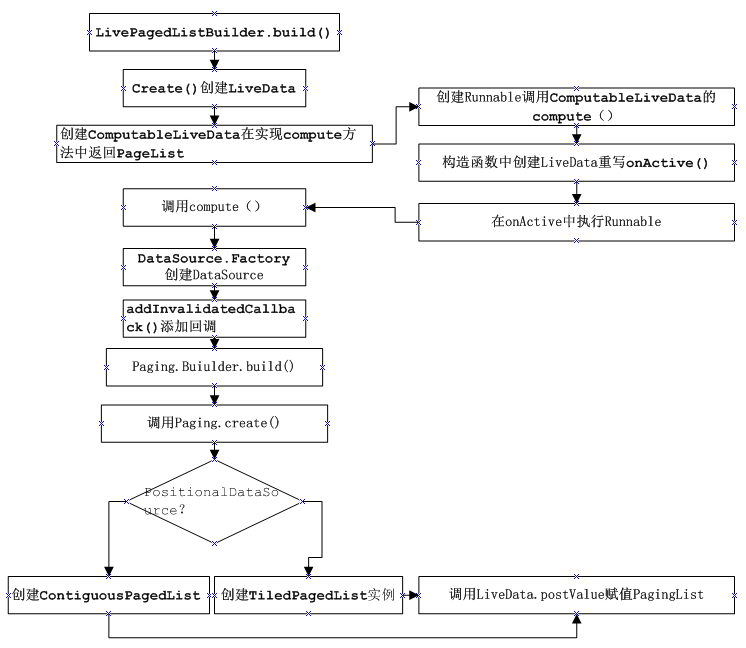
LiveData>的创建过程如上图,使用LivePagedListBuilder配置Factory和Config,然后调用build创建实例,在build方法中直接调用了create()方法创建LiveData
create()
@AnyThread
@NonNull
private static LiveData> create(
@Nullable final Key initialLoadKey,
@NonNull final PagedList.Config config,
@Nullable final PagedList.BoundaryCallback boundaryCallback,
@NonNull final DataSource.Factory dataSourceFactory,
@NonNull final Executor notifyExecutor,
@NonNull final Executor fetchExecutor) {
// 创建ComputableLiveData类
return new ComputableLiveData>(fetchExecutor) {
@Nullable
private PagedList mList;
@Nullable
private DataSource mDataSource;
private final DataSource.InvalidatedCallback mCallback =
new DataSource.InvalidatedCallback() {
@Override
public void onInvalidated() {
invalidate();
}
};
@Override
protected PagedList compute() { // 重写compute方法
@Nullable Key initializeKey = initialLoadKey;
if (mList != null) {
//noinspection unchecked
initializeKey = (Key) mList.getLastKey();
}
do {
if (mDataSource != null) {
mDataSource.removeInvalidatedCallback(mCallback);
}
// 从Builder中传入的Factory中创建DataSource
mDataSource = dataSourceFactory.create();
mDataSource.addInvalidatedCallback(mCallback);
// 创建PagedList
mList = new PagedList.Builder<>(mDataSource, config)
.setNotifyExecutor(notifyExecutor)
.setFetchExecutor(fetchExecutor)
.setBoundaryCallback(boundaryCallback)
.setInitialKey(initializeKey)
.build();
} while (mList.isDetached());
return mList;
}
}.getLiveData();
}
在create()中直接返回了ComputableLiveData的实例,在ComputableLiveData实例重写的compute中执行了一些主要操作:
创建DataSource的刷新回调
调用传入的Factory的create()创建DataSource实例
创建并返回PagedList实例
PagedList.build() & PagedList.create()
先来看一下PagedList的创建过程,在PagedList.build()中调用了PagedList.create(),所以真正的创建是在create()中发生的,
private static PagedList create(...) {
if (dataSource.isContiguous() || !config.enablePlaceholders) {
......
return new ContiguousPagedList<>(contigDataSource,
notifyExecutor,
fetchExecutor,
boundaryCallback,
config,
key,
lastLoad);
} else {
return new TiledPagedList<>((PositionalDataSource) dataSource,
notifyExecutor,
fetchExecutor,
boundaryCallback,
config,
(key != null) ? (Integer) key : 0);
}
}
从代码中看出根据 条件(dataSource.isContiguous() || !config.enablePlaceholders)的不同分别创建ContiguousPagedList和TiledPagedList,其实这里就是区分上面的三个自定义DataSource的类型,如果是PositionalDataSource创建TiledPagedList,其他的返回ContiguousPagedList,我们依次查看三个DataSource中的isContiguous()方法:
PositionalDataSource
@Override
boolean isContiguous() {
return false;
}
ItemKeyedDataSource和PageKeyedDataSource都继承与ContiguousDataSource,只查看ContiguousDataSource中
@Override
boolean isContiguous() {
return true;
}
ComputableLiveData
public ComputableLiveData(@NonNull Executor executor) {
mExecutor = executor;
mLiveData = new LiveData() {
@Override
protected void onActive() {
mExecutor.execute(mRefreshRunnable);
}
};
}
带着对ComputableLiveData作用和何时执行compute这两个疑问,查看ComputableLiveData源码,发现在ComputableLiveData的构造函数中创建LiveData实例,并在onActive()中执行了Runnable接口(关于onActive()请查看Android Jetpack架构组件之 LiveData),下面查看Runnable接口中执行了哪些逻辑:
@VisibleForTesting
final Runnable mRefreshRunnable = new Runnable() {
@WorkerThread
@Override
public void run() {
boolean computed;
do {
computed = false;
others.
if (mComputing.compareAndSet(false, true)) {
try {
T value = null;
while (mInvalid.compareAndSet(true, false)) {
computed = true;
value = compute(); // 调用了compuet创建了PagedList
}
if (computed) {
mLiveData.postValue(value); // 设置LiveData的值
}
} finally {
mComputing.set(false);
}
}
} while (computed && mInvalid.get());
}
};
在Runnable中调用了ComputableLiveData的compute()方法创建了PagedList,所以此处的Value就是PagedList,然后为mLiveData初始化赋值PagedList,细心的同学会留意到,在上面的create()方法最后一句调用了getLiveData()获取到的就是ComputableLiveData构造函数中创建的LIveData
@SuppressWarnings("WeakerAccess")
@NonNull
public LiveData getLiveData() {
return mLiveData;
}
到此LiveData的创建就完成了。
5.2、数据初始化加载
ContiguousPagedList
从上面的执行过程中,我们知道当我们自定义实现ItemKeySource时,创建的PagedList实际为ContiguousPagedList,查看ContiguousPagedList构造函数源码:
super(new PagedStorage(), mainThreadExecutor, backgroundThreadExecutor,
boundaryCallback, config);
mDataSource = dataSource;
mLastLoad = lastLoad;
if (mDataSource.isInvalid()) {
detach();
} else {
mDataSource.dispatchLoadInitial(key,
mConfig.initialLoadSizeHint,
mConfig.pageSize,
mConfig.enablePlaceholders,
mMainThreadExecutor,
mReceiver);
}
在构造函数中执行一下逻辑:
创建PagedStore实例,主要根据滑动的位置显示是否要继续加载数据
调用DataSource.dispatchLoadInitial方法,此时使用的时ItermKeyDataSource的dispatchLoadInitial方法
@Override
final void dispatchLoadInitial(@Nullable Key key, int initialLoadSize, int pageSize,
boolean enablePlaceholders, @NonNull Executor mainThreadExecutor,
@NonNull PageResult.Receiver receiver) {
LoadInitialCallbackImpl callback =
new LoadInitialCallbackImpl<>(this, enablePlaceholders, receiver);
loadInitial(new LoadInitialParams<>(key, initialLoadSize, enablePlaceholders), callback);
callback.mCallbackHelper.setPostExecutor(mainThreadExecutor);
}
在ItermKeyDataSource的dispatchLoadInitial()方法中调用了抽象函数loadInitial(),根据前面的学习我们知道在oadInitial()中设置了初始化的网络请求,到此实现了Paging组件初始化数据的加载;
5.3、数据的显示
在自定义ItemDataSource的loadInitial()中加载数据后,调用了callback.onResult(it?.data!!.datas!!)方法,此处的callback是LoadInitialCallback的实现类LoadInitialCallbackImpl,在onResult()方法中又调用了LoadCallbackHelper.dispatchResultToReceiver()
LoadCallbackHelper.dispatchResultToReceiver()
void dispatchResultToReceiver(final @NonNull PageResult result) {
Executor executor;
if (executor != null) {
executor.execute(new Runnable() {
@Override
public void run() {
mReceiver.onPageResult(mResultType, result);
}
});
} else {
mReceiver.onPageResult(mResultType, result);
}
}
在dispatchResultToReceiver()方法中,调用PageResult.Receiver.onPageResult()方法,这里的mReceiver是在调用 mDataSource.dispatchLoadInitial()时传入的最后一个参数,他的实现在ContiguousPagedList中:
private PageResult.Receiver mReceiver = new PageResult.Receiver() {
// Creation thread for initial synchronous load, otherwise main thread
// Safe to access main thread only state - no other thread has reference during construction
@AnyThread
@Override
public void onPageResult(@PageResult.ResultType int resultType,
@NonNull PageResult pageResult) {
List page = pageResult.page;
if (resultType == PageResult.INIT) {
mStorage.init(pageResult.leadingNulls, page, pageResult.trailingNulls,
pageResult.positionOffset, ContiguousPagedList.this);
if (mLastLoad == LAST_LOAD_UNSPECIFIED) {
// Because the ContiguousPagedList wasn't initialized with a last load position,
// initialize it to the middle of the initial load
mLastLoad =
pageResult.leadingNulls + pageResult.positionOffset + page.size() / 2;
}
} else if (resultType == PageResult.APPEND) {
mStorage.appendPage(page, ContiguousPagedList.this);
} else if (resultType == PageResult.PREPEND) {
mStorage.prependPage(page, ContiguousPagedList.this);
} else {
throw new IllegalArgumentException("unexpected resultType " + resultType);
}
}
}
};
在onPageResult()方法中根据resultType的类型执行操作,PageResult的三个数据类型分别对应者ItemKeyDataSource的三个方法:
loadInitial:对应初始化状态PageResult.INIT
loadBefore:对应初始化状态PageResult.PREPEND
loadAfter:对应初始化状态PageResult.APPEND
此出分析初始化,回调的类型为PageResult.INIT,调用了PagedStorage的init()方法:
void init(int leadingNulls, @NonNull List page, int trailingNulls, int positionOffset,
@NonNull Callback callback) {
init(leadingNulls, page, trailingNulls, positionOffset);
callback.onInitialized(size());
}
在init()方法中首先调用另一个init()方法记录加载的位置,并保存加载的数据,主要用于控制下拉加载,这部分我们稍后分析,然后调用callback.onInitialized(),在onInitialzed()方法中调用了notifyInserted(),在notifyInserted()中遍历mCallbacks回调callback的onInserted()
public void onInitialized(int count) {
notifyInserted(0, count);
}
void notifyInserted(int position, int count) {
if (count != 0) {
for (int i = mCallbacks.size() - 1; i >= 0; i--) {
Callback callback = mCallbacks.get(i).get();
if (callback != null) {
callback.onInserted(position, count);
}
}
}
}
到此我们可以得出结论
加载的数据保存在PagedStorage中,并记录了加载的位置信息
加载完成后根据数据的变化,回调callback.onInserted()通知数据改变的数量和位置
那CallBack是从哪来的呢?应该是哪里需要哪里才会注册回调,想想数据位置的变化在哪个地方能用得着,哪个地方优惠根据position和count处理呢?答案就时Adapter
PagedListAdapter
在前面的实例中,使用submitList()设置数据,而submiList()直接调用了mDiffer.submitList(pagedList)
public void submitList(final PagedList pagedList) {
if (mPagedList == null && mSnapshot == null) {
// fast simple first insert
mPagedList = pagedList;
pagedList.addWeakCallback(null, mPagedListCallback);
return;
}
}
此处调用了addWeakCallback()添加Callback实例mPagedListCallback,
private PagedList.Callback mPagedListCallback = new PagedList.Callback() {
@Override
public void onInserted(int position, int count) {
mUpdateCallback.onInserted(position, count);
}
@Override
public void onRemoved(int position, int count) {
mUpdateCallback.onRemoved(position, count);
}
@Override
public void onChanged(int position, int count) {
// NOTE: pass a null payload to convey null -> item
mUpdateCallback.onChanged(position, count, null);
}
};
mPagedListCallback的onInserted()直接回调mUPdateCallback.onInserted(),在mUPdateCallback.onInserted()中直接调用Adapter的notifyItemRangeInserted(position, count)实现数据更新
5.4、数据下拉加载
Paging的好处之一就是自动帮我们实现了下拉加载的操作,其时他的实现是依靠adapter的滑动位置,根本的逻辑和平时自己写的滑动到底加载数据大致一致,都是根据可见position和数据量的比较触发加载,在PagingAdapter中的getItem()中直接调用mDiffer.getItem(position),
public T getItem(int index) {
mPagedList.loadAround(index); // 调用加载数据
return mPagedList.get(index);
}
在getItem()中处了获取到数据以外,还调用了mPagedList.loadAround(index)去加载数据,loadAround()方法中有调用了loadAroundInternal()
@MainThread
@Override
protected void loadAroundInternal(int index) {
int prependItems = mConfig.prefetchDistance - (index - mStorage.getLeadingNullCount());
int appendItems = index + mConfig.prefetchDistance
- (mStorage.getLeadingNullCount() + mStorage.getStorageCount());
mPrependItemsRequested = Math.max(prependItems, mPrependItemsRequested);
if (mPrependItemsRequested > 0) {
schedulePrepend();
}
mAppendItemsRequested = Math.max(appendItems, mAppendItemsRequested);
if (mAppendItemsRequested > 0) {
scheduleAppend();
}
}
根据现在显示的index和设置的Config计算需要请求的数量,调用scheduleAppend()加载更多数据,
@MainThread
private void scheduleAppend() {
mBackgroundThreadExecutor.execute(new Runnable() {
@Override
public void run() {
if (isDetached()) {
return;
}
if (mDataSource.isInvalid()) {
detach();
} else {
//调用DataSource的加载更多方法
mDataSource.dispatchLoadAfter(position, item, mConfig.pageSize,
mMainThreadExecutor, mReceiver);
}
}
});
}
是不是有发现了熟悉的身影,还记得初始化时调用的mDataSource.dispatchLoadInitial()吗?这里调用mDataSource.dispatchLoadAfter()方法,调用我们实现的loadAfter()加载更多数据,之后数据的显示都和初始化一致将PageResult.INIT换成PageResult.APPEND然后想Adapter中追加数据;
到此整个Paging的执行逻辑和原理都分析完了,从整体的流程看架构的设计还是有他独特的魅力的,架构的内涵读者自己体味,下面还有一点,我们知道DataSource的刷新是从调用Invalidate()开始的,有没有相过是如何实现的
Invalidate()
@AnyThread
public void invalidate() {
if (mInvalid.compareAndSet(false, true)) {
for (InvalidatedCallback callback : mOnInvalidatedCallbacks) {
callback.onInvalidated();
}
}
}
调用InvalidatedCallback 的onInvalidate(),这里的InvalidatedCallback其实在我们代码分析的第一步就添加了,还记得吗?在创建PageList时,调用了Factory.create(),之后就给DataSource添加了CallBack()
// 创建CallBack
private final DataSource.InvalidatedCallback mCallback =
new DataSource.InvalidatedCallback() {
@Override
public void onInvalidated() {
invalidate();
}
};
// 添加CallBack
mDataSource.addInvalidatedCallback(mCallback);
invalidate()
public void invalidate() {
ArchTaskExecutor.getInstance().executeOnMainThread(mInvalidationRunnable);
}
@VisibleForTesting
final Runnable mInvalidationRunnable = new Runnable() {
@MainThread
@Override
public void run() {
boolean isActive = mLiveData.hasActiveObservers();
if (mInvalid.compareAndSet(false, true)) {
if (isActive) {
mExecutor.execute(mRefreshRunnable);
}
}
}
};
在invalidate()中执行了mInvalidationRunnable 中的run(),run()方法中有重新执行了mRefreshRunnable,还记的mRefreshRunnable执行了什么吗?对就是冲新创建了DataSource和PagedLIst,然后冲新加载数据,然后上面所有过程再来一次!!
本篇时整个组件的最后一篇其实也是最长的一篇(因为我最后写的),,因为Paging组件也是Jetpack组件中比较复杂的一个,使用频率也非常高,后期会针对自定义DataSource进行封装,好了这篇真的花了好长时间,感觉整个下午都在写这个,希望对自己对大家都有所帮助!


 237
237


 被折叠的 条评论
为什么被折叠?
被折叠的 条评论
为什么被折叠?
 到【灌水乐园】发言


