


一、数据库集群使用场景
1.随着访问量的不断增加,单台MySQL数据库服务器压力不断地增加,需要对MySQL进行优化和架构改造,如果MySQL优化不能明显改善压力,可以使用高可用、主从复制、读写分离出来、拆分库、拆分表等方法来进行优化。
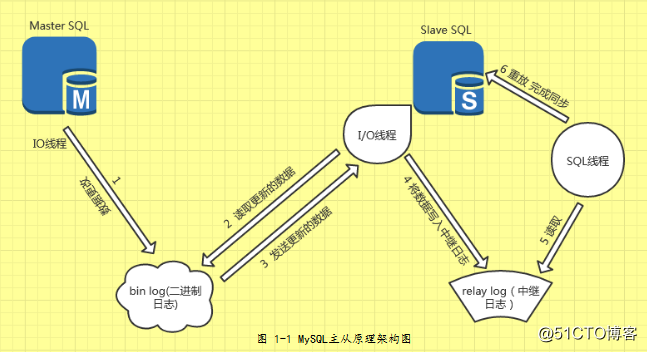
2.MySQL主从复制集群在中小企业、大型企业中被广泛应用,MySQL主从复制的目的实现数据冗余备份,将master数据库数据定时同步至slave库中,一旦master数据库宕机,可以将web应用数据库配置快速切换到salve数据库,确保Web应用有较高的可用率,MySQL主从复制架构图如图1-1所示。
二、MySQL主从复制实战
MySQL主从复制环境构建至少需要2台服务器,可以配置1主多从、多主多从,以1主1从为例,MySQL主从复制架构实战步骤如下:
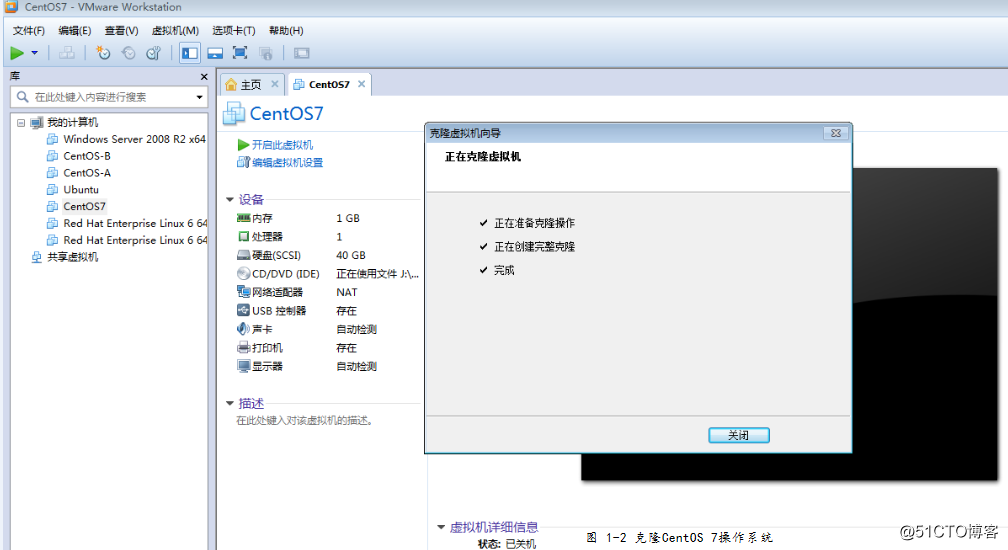
1.在虚拟机上克隆一台CentOS主机
2.开启两台CentOS 7主机,并做相关配置
1)配置两台CentOS主机名称
[root@localhost sky9890]# hostnamectl
Static hostname: #localhost.localdomain
Transient hostname: localhost.localdomain
Icon name: computer-vm
Chassis: vm
Machine ID: 6c938bf5dc5b492088dafb0e745f01ec
Boot ID: 170db1b33955402daa0ee3d6911486ba
Virtualization: vmware
Operating System: CentOS Linux 7 (Core)
CPE OS Name: cpe:/o:centos:centos:7
Kernel: Linux 3.10.0-862.11.6.el7.x86_64
Architecture: x86-64
[root@localhost sky9890]# hostnamectl set-hostname MySQL_Master #配置永久生效的主机名
[root@localhost sky9890]# hostnamectl#查看主机名称,重新启动系统后生效
Static hostname: mysql_master
Pretty hostname: MySQL_Master
..................................................................
[root@localhost sky9890]# hostnamectl set-hostname MySQL_Slave
2)Master和Slave主机网络
MySQL Master:192.168.153.142#配置Master IP
[root@localhost sky9890]# vim /etc/sysconfig/network-scripts/ifcfg-eth0
TYPE="Ethernet"
BOOTPROTO="static"
NAME="ens33"
UUID="9f75af90-bd5d-467e-b433-216456e4a49e"
DEVICE="eth0"
ONBOOT="yes"
IPADDR=192.168.153.142
NETMASK=255.255.255.0
GATEWAY=192.168.153.2
MySQL Slave:192.168.153.143 #配置Slave IP
[root@localhost sky9890]# vim /etc/sysconfig/network-scripts/ifcfg-eth0
TYPE="Ethernet"
BOOTPROTO="static"
DEFROUTE="yes"
IPV4_FAILURE_FATAL="no"
IPV6INIT="yes"
IPV6_AUTOCONF="yes"
IPV6_DEFROUTE="yes"
IPV6_FAILURE_FATAL="no"
IPV6_ADDR_GEN_MODE="stable-privacy"
NAME="ens33"
DEVICE="eth0"
ONBOOT="yes"
IPADDR=192.168.153.143
NETMASK=255.255.255.0
GATEWAY=192.168.153.2
3.MySQL Master配置
[root@mysql_master sky9890]# vim /etc/my.cnf
[client]
port = 3306
socket = /tmp/mysql.sock
[mysqld]
port = 3306
socket = /tmp/mysql.sock
skip-external-locking
key_buffer_size = 256M
max_allowed_packet = 1M
table_open_cache = 256
sort_buffer_size = 1M
read_buffer_size = 1M
read_rnd_buffer_size = 4M
myisam_sort_buffer_size = 64M
thread_cache_size = 8
query_cache_size= 16M
thread_concurrency = 8
log-bin=mysql-bin
binlog_format=mixed
server-id = 1
[mysqldump]
quick
max_allowed_packet = 16M
[mysql]
no-auto-rehash
[myisamchk]
key_buffer_size = 128M
sort_buffer_size = 128M
read_buffer = 2M
write_buffer = 2M
[mysqlhotcopy]
interactive-timeout
4.MySQL Master创建用户及授权
[root@mysql_master etc]# useradd testtongbu
[root@mysql_master etc]# passwd testtongbu
[root@mysql_master etc]# mysql -uroot -p
MySQL [(none)]> grant replication slave on *.* to 'testtongbu '@'%' identified by '12345678';
MySQL [(none)]> show master status;
+------------------+----------+--------------+------------------+
| File | Position | Binlog_Do_DB | Binlog_Ignore_DB |
+------------------+----------+--------------+------------------+
| mysql-bin.000008 | 867 | | |
+------------------+----------+--------------+------------------+
5.MySQL Slave配置
[root@mysql_master sky9890]# vim /etc/my.cnf
[client]
port = 3306
socket = /tmp/mysql.sock
[mysqld]
port = 3306
socket = /tmp/mysql.sock
skip-external-locking
key_buffer_size = 256M
max_allowed_packet = 1M
table_open_cache = 256
sort_buffer_size = 1M
read_buffer_size = 1M
read_rnd_buffer_size = 4M
myisam_sort_buffer_size = 64M
thread_cache_size = 8
query_cache_size= 16M
thread_concurrency = 8
#log-bin=mysql-bin
#binlog_format=mixed
server-id = 2
[mysqldump]
quick
max_allowed_packet = 16M
[mysql]
no-auto-rehash
[myisamchk]
key_buffer_size = 128M
sort_buffer_size = 128M
read_buffer = 2M
write_buffer = 2M
[mysqlhotcopy]
interactive-timeout
[root@mysql_slave sky9890]#
MySQL [(none)]> change master to master_host='192.168.153.142', master_port=3306, master_user='testtongbu',
master_passwork='12345678', master_log_file='mysql-bin.000008', master_log_pos=867;
MySQL [(none)]> slave start;
MySQL [(none)]> show slave status\G
*************************** 1. row ***************************
Slave_IO_State: Waiting for master to send event
Master_Host: 192.168.153.142
Master_User: testtongbu
Master_Port: 3306
Connect_Retry: 60
Master_Log_File: mysql-bin.000008
Read_Master_Log_Pos: 867
Relay_Log_File: mysql_slave-relay-bin.000005
Relay_Log_Pos: 596
Relay_Master_Log_File: mysql-bin.000008
Slave_IO_Running: Yes
Slave_SQL_Running: Yes #IO、SQL线程状态为Yes,代表slave已正常连接master实现同步
Replicate_Do_DB:
Replicate_Ignore_DB:
Replicate_Do_Table:
Replicate_Ignore_Table:
Replicate_Wild_Do_Table:
Replicate_Wild_Ignore_Table:
Last_Errno: 0
Last_Error:
Skip_Counter: 0
Exec_Master_Log_Pos: 867
Relay_Log_Space: 904
Until_Condition: None
Until_Log_File:
Until_Log_Pos: 0
Master_SSL_Allowed: No
Master_SSL_CA_File:
Master_SSL_CA_Path:
Master_SSL_Cert:
Master_SSL_Cipher:
Master_SSL_Key:
Seconds_Behind_Master: 0
Master_SSL_Verify_Server_Cert: No
Last_IO_Errno: 0
Last_IO_Error:
Last_SQL_Errno: 0
Last_SQL_Error:
Replicate_Ignore_Server_Ids:
Master_Server_Id: 1
6.测试同步结果
MySQL Master操作:
MySQL [(none)]> create database tongbu_test charset=utf8;
MySQL [(none)]> use tongbu_test;
MySQL [tongbu_test]> create table test(id varchar(20),name varchar(20));
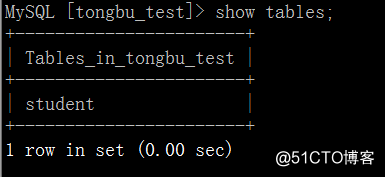
MySQL [tongbu_test]> show tables;
MySQL [tongbu_test]> create table student(id varchar(20),name varchar(20));
ERROR 1223 (HY000): Can't execute the query because you have a conflicting read lock
MySQL [tongbu_test]> unlock tables;
MySQL [tongbu_test]> create table student(id varchar(20),name varchar(20));
MySQL [(none)]> insert into student values("001","吴氏亲宗");
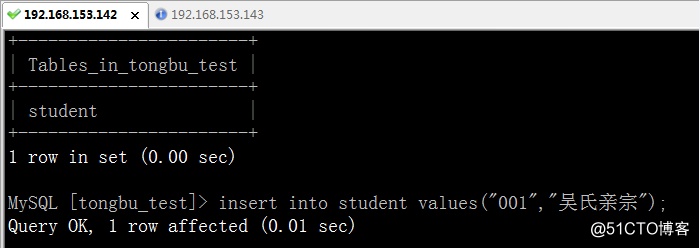
MySQL Slave操作:
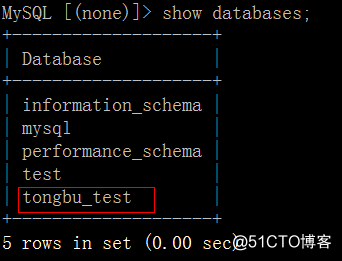
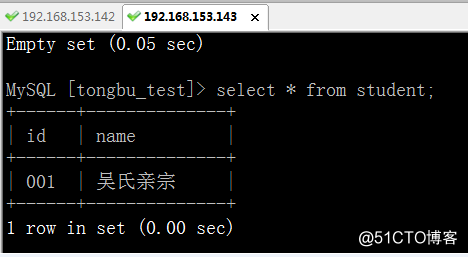
通过MySQL Slave测试数据来看,主从数据库同步成功。
7.MySQL主从同步排错思路
1)server-id,主从不能相同。
2)slave指定master IP、用户名、密码、bin-log文件名及position的信息要一致。
3)Slave_IO_Runngin:Yes Slave_SQL_Runngin:Yes,只有这两个状态都为Yes,才算是正从同步成功。
4)当主从产生延迟后,如何忽略错误后,继续同步?
MySQL Master:
MySQL [(none)]> flush tables with read block; #将数据库设置为全局读锁,不允许写入新数据。
MySQL Slave:
MySQL [tongbu_test]> stop slave;
MySQL [tongbu_test]> set global sql_salve_skip_counter =1
MySQL [tongbu_test]> start slave;
注意以上几步至少要操作一次,有可能要两次才能解决问题。
最后将master端解锁:MySQL [(none)]> unlock tables;


 2822
2822


 被折叠的 条评论
为什么被折叠?
被折叠的 条评论
为什么被折叠?
 到【灌水乐园】发言


