


实现popover组件过程中遇到了很多的坑,所以单独列出来总结一下
实现组件四步走
需求分析
弹出框的出现形式,可以是点击出现,hover出现。
弹出框的显示位置,可以是上下左右四个方向显示,如果还想扩充,可以无限扩充位置
弹出框的内容,通过参数控制内容,内容是否可以满足html标签
弹出框如何关闭,点击外部body关闭,点击按钮关闭,点击弹出框内的按钮关闭
由此可见,一个小小的弹出框,需要实现如此多的需求,这个组件很难
状态分析,这个组件没分析出有什么状态
UI设计
其他位置靠脑补
代码实现
用户如何使用?
     <xxx-popover>
        <template slot="content">
            <div>popover内容</div>
        </template>
        <template slot="trigger">
            <xxx-button>click me</xxx-button>
        </template>
    </xxx-popover>
用户需要用具名插槽将内容和按钮都包裹起来
首先实现一个最基本的,我们点击按钮显示这个content
html结构
<div class="popover"@click="xxx">
    <div class="content" v-if="visible">
      <slot name="content"></slot>
    </div>
    <div class="trigger">
      <slot name="trigger"></slot>
    </div>
  </div>
methods:{
   showContent(){
      this.visible=!this.visible
    }
}
这个需求很简单
如何点击其他位置控制显隐呢
设想,点击body控制this.visible
showContent(){
      this.visible=!this.visible
      console.log('显示了')
      if(this.visible){
        document.body.addEventListener('click',()=>{
          this.visible=false
          console.log('关闭了')
        })
      }
    }
然后发现点击毫无反应
通过打log发现
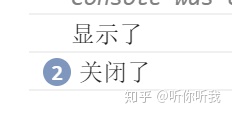
点击一次按钮,同时触发显示和关闭
然后将关闭事件变为延时操作
if(this.visible){
          setTimeout(()=>{
            document.body.addEventListener('click',()=>{
              this.visible=false
              console.log('关闭了')
            })
          },1000)
      }
1s后再绑定关闭事件
显示成功,但是第三次点击按钮时,又变成以前那样了,同时触发显示和关闭,因为现在我有两个监听器都在监听了,我body上的监听应该移除
setTimeout(()=>{
            document.body.addEventListener('click',function x(){
              this.visible=false
              console.log('关闭了')
              document.body.removeEventListener('click',x)
              console.log('移除监听器了')
            }.bind(this))
          },1000)
发现还是一个样子,点击后的log倒是说明了一点问题
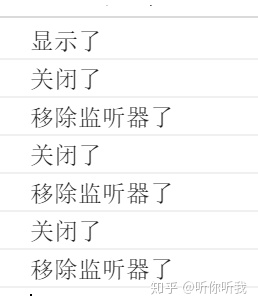
这个监听器被重复的声明又移除,原因是事件的冒泡
我点击按钮,事件冒泡了三次,所以这个也触发了三次,我阻止了事件冒泡之后,发现功能实现了,但是log的次数反而增加了
我们将函数x放到外面去,同时发现了body的范围可能不是全屏的,我们换成document监听
showContent() {
      this.visible = !this.visible
      console.log('显示了')
      if (this.visible) {
        this.$nextTick(()=>{
          let eventHandler = () => {
            this.visible = false
            console.log('关闭了')
            document.removeEventListener('click', eventHandler)
            console.log('移除监听器了')
          }
          document.addEventListener('click',eventHandler)
        })
      }
    }
这样看似解决了所有问题,其实对于组件来说,这样的解决方法是不好的
几个问题:
1,假设我的popover外面的盒子上有overflowhidden,那就显示不出来了,所以这一套代码只是一个思路
2,不能用stop来解决冒泡的问题,会导致很多bug,会打断用户的事件链
最终的实现方式,将所有操作都抽离出来,一个函数不超过五行代码
     onClickDoc(e) {
      if (this.$refs.popover && (this.$refs.popover === e.target ||
          this.$refs.contentWrapper.contains( e.target ))) {
        return;
      }
      this.close()
    },
    open() {
      this.visible = true
      setTimeout( () => {
        this.positionContent()
        document.addEventListener( 'click', this.onClickDoc )
      } )
    },
    close() {
      this.visible = false
      document.removeEventListener( 'click', this.onClickDoc )
    },
    showContent(event) {
      if (this.$refs.triggerWrapper.contains( event.target )) {
        if (this.visible === true) {
          this.close()
        } else {
          this.open()
        }
      }
    }
实现position
和其他组件一样,接收一个props参数position,然后分别写样式,有些样式可以直接写css,但是有一些需要js操作
比如要控制弹出层的位置,需要拿到我们trigger按钮的宽高,需要拿到我们弹出层的宽高,而弹出层的宽高都是根据内容来的
我们使用一个hash表来存储每个方向上需要设置弹出层的位置
const {height:height2}=contentWrapper.getBoundingClientRect()
const {width,height,top, left} = triggerWrapper.getBoundingClientRect()
let positions={
        top:{
          top:top + window.scrollY,
          left:left + window.scrollX
        },
        bottom:{
          top:top + height+window.scrollY,
          left:left + window.scrollX
        },
        left:{
          top:top+window.scrollY+(height-height2)/2,
          left:left + window.scrollX
        },
        right:{
          top:top+window.scrollY+(height-height2)/2,
          left:left + window.scrollX+width
        }
      }
然后直接设置就好了
contentWrapper.style.left=positions[this.position].left+'px'
contentWrapper.style.top=positions[this.position].top+'px'
实现点击popover框中的按钮关闭
用户可以传一个按钮到popover中,这个按钮可以控制将popover关闭
使用插槽的slot-scoped
我们在插槽里面可以写一个div,这样div就能代替插槽的位置,但是我们又想让这个div能够使用组件里面的方法,就可以用slot-scoped来获取
第一步:将关闭的方法传出来
<slot name="content" +:close="close"></slot>第二步:通过slot-scoped拿到这个close方法
<template slot="content" slot-scope="{close}">第三步:组件中传的button中就可以使用close了
<button @click="close">关闭</button>


 被折叠的 条评论
为什么被折叠?
被折叠的 条评论
为什么被折叠?
 到【灌水乐园】发言


