


前言
现在大部分App底部都有一个菜单,实现这个功能也有好多办法:
- TabHost+Fragment
- RadioGroup+Fragment
- FragmentTabHost+Fragment
- 5.0以后有个新控件,BottomNavigator
这篇主要介绍下FragmentTabHost配合Fragment使用
运行效果图
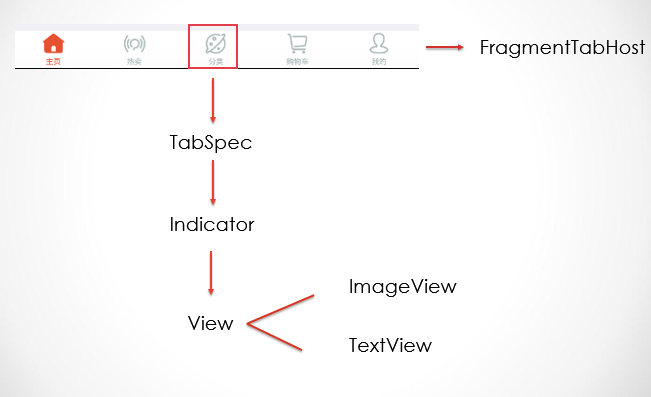
效果图分析
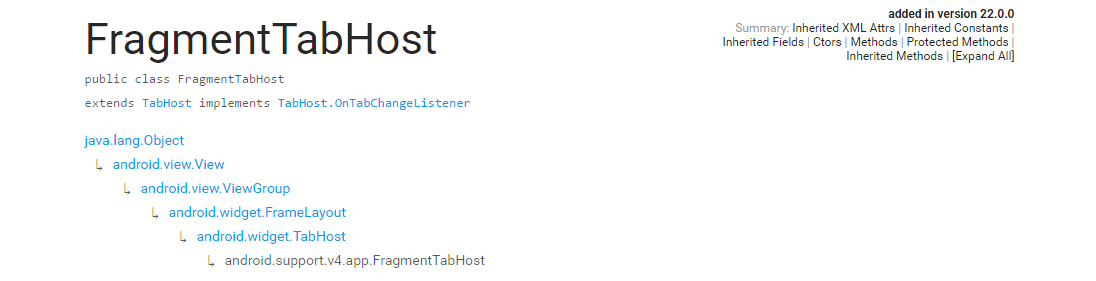
FragmentTabHost简单介绍
首先我们看下官方文档的介绍
OK,接着官方还给出了一份使用的代码,我们也来看下
Activity中使用
import com.example.android.supportv4.R;
import android.os.Bundle;
import android.support.v4.app.FragmentActivity;
import android.support.v4.app.FragmentTabHost;
/**
* This demonstrates how you can implement switching between the tabs of a
* TabHost through fragments, using FragmentTabHost.
*/
public class FragmentTabs extends FragmentActivity {
private FragmentTabHost mTabHost;
@Override
protected void onCreate(Bundle savedInstanceState) {
super.onCreate(savedInstanceState);
setContentView(R.layout.fragment_tabs);
mTabHost = (FragmentTabHost)findViewById(android.R.id.tabhost);
mTabHost.setup(this, getSupportFragmentManager(), R.id.realtabcontent);
mTabHost.addTab(mTabHost.newTabSpec("simple").setIndicator("Simple"),
FragmentStackSupport.CountingFragment.class, null);
mTabHost.addTab(mTabHost.newTabSpec("contacts").setIndicator("Contacts"),
LoaderCursorSupport.CursorLoaderListFragment.class, null);
mTabHost.addTab(mTabHost.newTabSpec("custom").setIndicator("Custom"),
LoaderCustomSupport.AppListFragment.class, null);
mTabHost.addTab(mTabHost.newTabSpec("throttle").setIndicator("Throttle"),
LoaderThrottleSupport.ThrottledLoaderListFragment.class, null);
}
}
Fragment中使用
import com.example.android.supportv4.R;
import android.os.Bundle;
import android.support.v4.app.Fragment;
import android.support.v4.app.FragmentTabHost;
import android.view.LayoutInflater;
import android.view.View;
import android.view.ViewGroup;
public class FragmentTabsFragmentSupport extends Fragment {
private FragmentTabHost mTabHost;
@Override
public View onCreateView(LayoutInflater inflater, ViewGroup container,
Bundle savedInstanceState) {
mTabHost = new FragmentTabHost(getActivity());
mTabHost.setup(getActivity(), getChildFragmentManager(), R.id.fragment1);
mTabHost.addTab(mTabHost.newTabSpec("simple").setIndicator("Simple"),
FragmentStackSupport.CountingFragment.class, null);
mTabHost.addTab(mTabHost.newTabSpec("contacts").setIndicator("Contacts"),
LoaderCursorSupport.CursorLoaderListFragment.class, null);
mTabHost.addTab(mTabHost.newTabSpec("custom").setIndicator("Custom"),
LoaderCustomSupport.AppListFragment.class, null);
mTabHost.addTab(mTabHost.newTabSpec("throttle").setIndicator("Throttle"),
LoaderThrottleSupport.ThrottledLoaderListFragment.class, null);
return mTabHost;
}
@Override
public void onDestroyView() {
super.onDestroyView();
mTabHost = null;
}
}
FragmentTabHost 布局问题
官方在给出例子的时候,并没有贴出对应的布局文件,这个布局文件有一些要求,所以我就把我自己写的贴出来吧,方便大家观看
xmlns:android="http://schemas.android.com/apk/res/android"
xmlns:app="http://schemas.android.com/apk/res-auto"
xmlns:tools="http://schemas.android.com/tools"
android:layout_width="match_parent"
android:layout_height="match_parent"
android:orientation="vertical"
tools:context="com.study.buttomtabdemo.MainActivity">
android:id="@+id/flayout_content"
android:layout_width="match_parent"
android:layout_height="0dp"
android:layout_weight="1"/>
android:id="@android:id/tabhost"
android:layout_width="match_parent"
android:layout_height="wrap_content"
android:background="#ffffff">
android:id="@android:id/tabcontent"
android:layout_width="0dp"
android:layout_height="0dp"
android:layout_weight="0"/>
这里要注意以下几点:
1.我自己自定义了一个FragmentTabHost,因为原来的FragmentTabHost每次切换Fragment事都会走一遍onCreateView()和onResume()方法;
2.id必须是android:id=”@android:id/tabhost”这个;
3.里面的FrameLayout的id必须是android:id=”@android:id/tabcontent”
FragmentTabHost 使用
下面就到了具体使用的过程了
1.定义Tab类
因为它属于Tab的一个组合吧,里面包含好多个Tab,所以我们先定义一个Tab类
/**
* 主页TAB对应实体
* Created by HFS on 2017/5/7.
*/
public class Tab {
private int title; // 文字
private int icon; // 图标
private Class fragment; // 对应fragment
public Tab(Class fragment,int title, int icon ) {
this.title = title;
this.icon = icon;
this.fragment = fragment;
}
public int getTitle() {
return title;
}
public void setTitle(int title) {
this.title = title;
}
public int getIcon() {
return icon;
}
public void setIcon(int icon) {
this.icon = icon;
}
public Class getFragment() {
return fragment;
}
public void setFragment(Class fragment) {
this.fragment = fragment;
}
}
这里面要对应相应的Fragment,所以需要一个Fragment对象
2.初始化Tab集合
有几个Tab就往Tab集合添加几个Tab
Tab tab_home = new Tab(HomeFragment.class,R.string.home,R.drawable.selector_icon_home);
Tab tab_hot = new Tab(HotFragment.class,R.string.hot,R.drawable.selector_icon_hot);
Tab tab_category = new Tab(CategoryFragment.class,R.string.catagory,R.drawable.selector_icon_category);
Tab tab_cart = new Tab(CartFragment.class,R.string.cart,R.drawable.selector_icon_cart);
Tab tab_mine = new Tab(MineFragment.class,R.string.mine,R.drawable.selector_icon_mine);
mTabs.add(tab_home);
mTabs.add(tab_hot);
mTabs.add(tab_category);
mTabs.add(tab_cart);
mTabs.add(tab_mine);
3.setUp
找到该控件之后,就要调用对应的这个方法
mInflater = LayoutInflater.from(this);
mTabhost = (FragmentTabHost) this.findViewById(android.R.id.tabhost);
mTabhost.setup(this,getSupportFragmentManager(),R.id.flayout_content);
4.添加TabSpec
到这一步就要添加TabSpec了,有几个Tab,就添加几个TabSpec
for (Tab tab : mTabs){
TabHost.TabSpec tabSpec = mTabhost.newTabSpec(getString(tab.getTitle()));
tabSpec.setIndicator(buildIndicator(tab));
mTabhost.addTab(tabSpec,tab.getFragment(),null);
}
//构建Indicator
private View buildIndicator(Tab tab){
View view =mInflater.inflate(R.layout.tab_indicator,null);
ImageView img = (ImageView) view.findViewById(R.id.icon_tab);
TextView text = (TextView) view.findViewById(R.id.txt_indicator);
img.setBackgroundResource(tab.getIcon());
text.setText(tab.getTitle());
return view;
}
5.设置默认显示第一个
mTabhost.setCurrentTab(0);
6.设置没有分割线
mTabhost.getTabWidget().setShowDividers(LinearLayout.SHOW_DIVIDER_NONE);
自定义FragmentTabHost类
package com.study.buttomtabdemo.widget;
/**
* Created by monkey
* on 2014/9/24
* 功能描述:修改过的FragmentTabHost,保存fragment实例不销毁
*/
/*
* Copyright (C) 2012 The Android Open Source Project
*
* Licensed under the Apache License, Version 2.0 (the "License");
* you may not use this file except in compliance with the License.
* You may obtain a copy of the License at
*
* http://www.apache.org/licenses/LICENSE-2.0
*
* Unless required by applicable law or agreed to in writing, software
* distributed under the License is distributed on an "AS IS" BASIS,
* WITHOUT WARRANTIES OR CONDITIONS OF ANY KIND, either express or implied.
* See the License for the specific language governing permissions and
* limitations under the License.
*/
import java.util.ArrayList;
import android.content.Context;
import android.content.res.TypedArray;
import android.os.Bundle;
import android.os.Parcel;
import android.os.Parcelable;
import android.support.v4.app.Fragment;
import android.support.v4.app.FragmentManager;
import android.support.v4.app.FragmentTransaction;
import android.util.AttributeSet;
import android.view.View;
import android.view.ViewGroup;
import android.widget.FrameLayout;
import android.widget.LinearLayout;
import android.widget.TabHost;
import android.widget.TabWidget;
/**
* Special TabHost that allows the use of {@link Fragment} objects for its tab
* content. When placing this in a view hierarchy, after inflating the hierarchy
* you must call {@link #setup(Context, FragmentManager, int)} to complete the
* initialization of the tab host.
*
*
* Here is a simple example of using a FragmentTabHost in an Activity:
*
* {@sample
* development/samples/Support4Demos/src/com/example/android/supportv4/app/
* FragmentTabs.java complete}
*
*
* This can also be used inside of a fragment through fragment nesting:
*
* {@sample
* development/samples/Support4Demos/src/com/example/android/supportv4/app/
* FragmentTabsFragmentSupport.java complete}
*/
public class FragmentTabHost extends TabHost implements
TabHost.OnTabChangeListener {
private final ArrayList mTabs = new ArrayList();
private FrameLayout mRealTabContent;
private Context mContext;
private FragmentManager mFragmentManager;
private int mContainerId;
private OnTabChangeListener mOnTabChangeListener;
private TabInfo mLastTab;
private boolean mAttached;
static final class TabInfo {
private final String tag;
private final Class> clss;
private final Bundle args;
private Fragment fragment;
TabInfo(String _tag, Class> _class, Bundle _args) {
tag = _tag;
clss = _class;
args = _args;
}
}
static class DummyTabFactory implements TabContentFactory {
private final Context mContext;
public DummyTabFactory(Context context) {
mContext = context;
}
@Override
public View createTabContent(String tag) {
View v = new View(mContext);
v.setMinimumWidth(0);
v.setMinimumHeight(0);
return v;
}
}
static class SavedState extends BaseSavedState {
String curTab;
SavedState(Parcelable superState) {
super(superState);
}
private SavedState(Parcel in) {
super(in);
curTab = in.readString();
}
@Override
public void writeToParcel(Parcel out, int flags) {
super.writeToParcel(out, flags);
out.writeString(curTab);
}
@Override
public String toString() {
return "FragmentTabHost.SavedState{"
+ Integer.toHexString(System.identityHashCode(this))
+ " curTab=" + curTab + "}";
}
public static final Creator CREATOR = new Creator() {
public SavedState createFromParcel(Parcel in) {
return new SavedState(in);
}
public SavedState[] newArray(int size) {
return new SavedState[size];
}
};
}
public FragmentTabHost(Context context) {
// Note that we call through to the version that takes an AttributeSet,
// because the simple Context construct can result in a broken object!
super(context, null);
initFragmentTabHost(context, null);
}
public FragmentTabHost(Context context, AttributeSet attrs) {
super(context, attrs);
initFragmentTabHost(context, attrs);
}
private void initFragmentTabHost(Context context, AttributeSet attrs) {
TypedArray a = context.obtainStyledAttributes(attrs,
new int[] { android.R.attr.inflatedId }, 0, 0);
mContainerId = a.getResourceId(0, 0);
a.recycle();
super.setOnTabChangedListener(this);
}
private void ensureHierarchy(Context context) {
// If owner hasn't made its own view hierarchy, then as a convenience
// we will construct a standard one here.
if (findViewById(android.R.id.tabs) == null) {
LinearLayout ll = new LinearLayout(context);
ll.setOrientation(LinearLayout.VERTICAL);
addView(ll, new LayoutParams(
ViewGroup.LayoutParams.MATCH_PARENT,
ViewGroup.LayoutParams.MATCH_PARENT));
TabWidget tw = new TabWidget(context);
tw.setId(android.R.id.tabs);
tw.setOrientation(TabWidget.HORIZONTAL);
ll.addView(tw, new LinearLayout.LayoutParams(
ViewGroup.LayoutParams.MATCH_PARENT,
ViewGroup.LayoutParams.WRAP_CONTENT, 0));
FrameLayout fl = new FrameLayout(context);
fl.setId(android.R.id.tabcontent);
ll.addView(fl, new LinearLayout.LayoutParams(0, 0, 0));
mRealTabContent = fl = new FrameLayout(context);
mRealTabContent.setId(mContainerId);
ll.addView(fl, new LinearLayout.LayoutParams(
LinearLayout.LayoutParams.MATCH_PARENT, 0, 1));
}
}
/**
* @deprecated Don't call the original TabHost setup, you must instead call
* {@link #setup(Context, FragmentManager)} or
* {@link #setup(Context, FragmentManager, int)}.
*/
@Override
@Deprecated
public void setup() {
throw new IllegalStateException(
"Must call setup() that takes a Context and FragmentManager");
}
public void setup(Context context, FragmentManager manager) {
ensureHierarchy(context); // Ensure views required by super.setup()
super.setup();
mContext = context;
mFragmentManager = manager;
ensureContent();
}
public void setup(Context context, FragmentManager manager, int containerId) {
ensureHierarchy(context); // Ensure views required by super.setup()
super.setup();
mContext = context;
mFragmentManager = manager;
mContainerId = containerId;
ensureContent();
mRealTabContent.setId(containerId);
// We must have an ID to be able to save/restore our state. If
// the owner hasn't set one at this point, we will set it ourself.
if (getId() == View.NO_ID) {
setId(android.R.id.tabhost);
}
}
private void ensureContent() {
if (mRealTabContent == null) {
mRealTabContent = (FrameLayout) findViewById(mContainerId);
if (mRealTabContent == null) {
throw new IllegalStateException(
"No tab content FrameLayout found for id "
+ mContainerId);
}
}
}
@Override
public void setOnTabChangedListener(OnTabChangeListener l) {
mOnTabChangeListener = l;
}
public void addTab(TabSpec tabSpec, Class> clss, Bundle args) {
tabSpec.setContent(new DummyTabFactory(mContext));
String tag = tabSpec.getTag();
TabInfo info = new TabInfo(tag, clss, args);
if (mAttached) {
// If we are already attached to the window, then check to make
// sure this tab's fragment is inactive if it exists. This shouldn't
// normally happen.
info.fragment = mFragmentManager.findFragmentByTag(tag);
if (info.fragment != null && !info.fragment.isDetached()) {
FragmentTransaction ft = mFragmentManager.beginTransaction();
// ft.detach(info.fragment);
ft.hide(info.fragment);
ft.commit();
}
}
mTabs.add(info);
addTab(tabSpec);
}
@Override
protected void onAttachedToWindow() {
super.onAttachedToWindow();
String currentTab = getCurrentTabTag();
// Go through all tabs and make sure their fragments match
// the correct state.
FragmentTransaction ft = null;
for (int i = 0; i < mTabs.size(); i++) {
TabInfo tab = mTabs.get(i);
tab.fragment = mFragmentManager.findFragmentByTag(tab.tag);
// if (tab.fragment != null && !tab.fragment.isDetached()) {
if (tab.fragment != null) {
if (tab.tag.equals(currentTab)) {
// The fragment for this tab is already there and
// active, and it is what we really want to have
// as the current tab. Nothing to do.
mLastTab = tab;
} else {
// This fragment was restored in the active state,
// but is not the current tab. Deactivate it.
if (ft == null) {
ft = mFragmentManager.beginTransaction();
}
// ft.detach(tab.fragment);
ft.hide(tab.fragment);
}
}
}
// We are now ready to go. Make sure we are switched to the
// correct tab.
mAttached = true;
ft = doTabChanged(currentTab, ft);
if (ft != null) {
ft.commitAllowingStateLoss();
mFragmentManager.executePendingTransactions();
}
}
@Override
protected void onDetachedFromWindow() {
super.onDetachedFromWindow();
mAttached = false;
}
@Override
protected Parcelable onSaveInstanceState() {
Parcelable superState = super.onSaveInstanceState();
SavedState ss = new SavedState(superState);
ss.curTab = getCurrentTabTag();
return ss;
}
@Override
protected void onRestoreInstanceState(Parcelable state) {
SavedState ss = (SavedState) state;
super.onRestoreInstanceState(ss.getSuperState());
setCurrentTabByTag(ss.curTab);
}
@Override
public void onTabChanged(String tabId) {
if (mAttached) {
FragmentTransaction ft = doTabChanged(tabId, null);
if (ft != null) {
ft.commit();
}
}
if (mOnTabChangeListener != null) {
mOnTabChangeListener.onTabChanged(tabId);
}
}
private FragmentTransaction doTabChanged(String tabId,
FragmentTransaction ft) {
TabInfo newTab = null;
for (int i = 0; i < mTabs.size(); i++) {
TabInfo tab = mTabs.get(i);
if (tab.tag.equals(tabId)) {
newTab = tab;
}
}
if (newTab == null) {
throw new IllegalStateException("No tab known for tag " + tabId);
}
if (mLastTab != newTab) {
if (ft == null) {
ft = mFragmentManager.beginTransaction();
}
if (mLastTab != null) {
if (mLastTab.fragment != null) {
// ft.detach(mLastTab.fragment);
ft.hide(mLastTab.fragment);
}
}
if (newTab != null) {
if (newTab.fragment == null) {
newTab.fragment = Fragment.instantiate(mContext,
newTab.clss.getName(), newTab.args);
ft.add(mContainerId, newTab.fragment, newTab.tag);
} else {
// ft.attach(newTab.fragment);
ft.show(newTab.fragment);
}
}
mLastTab = newTab;
}
return ft;
}
}
总结
以上所述是小编给大家介绍的Android 使用FragmentTabHost实现底部菜单功能,希望对大家有所帮助,如果大家有任何疑问请给我留言,小编会及时回复大家的。在此也非常感谢大家对脚本之家网站的支持!


 312
312


 被折叠的 条评论
为什么被折叠?
被折叠的 条评论
为什么被折叠?
 到【灌水乐园】发言


