


Automatic (recommended):
Install EPEL and nux Desktop repository rpms.
# rpm -ivh
https://dl.fedoraproject.org/pub/epel/7/x86_64/e/epel-release-7-8.noarch.rpm
# rpm -ivh
http://li.nux.ro/download/nux/dextop/el7/x86_64/nux-dextop-release-0-5.el7.nux.noarch.rpm
Installation: Issue the following command
to install xrdp
# yum -y install xrdp
tigervnc-server
You will get the following output, make sure you are getting
package from the newly created repository.
-->
Running transaction check
---> Package xrdp.x86_64
0:0.6.1-2.el7.nux will be installed
--> Finished Dependency
Resolution
Dependencies Resolved
================================================================================
Package
Arch
Version
Repository
Size
================================================================================
Installing:
xrdp
x86_64
0.6.1-2.el7.nux
xrdp
271 k
Transaction Summary
================================================================================
Install 1 Package
Total download size: 271 k
Installed size: 1.5 M
Is this ok [y/d/N]: y
Downloading packages:
xrdp-0.6.1-2.el7.nux.x86_64.rpm | 271 kB
00:05
Running transaction check
Running transaction test
Transaction test succeeded
Running transaction
Installing : xrdp-0.6.1-2.el7.nux.x86_64 1/1
Verifying :
xrdp-0.6.1-2.el7.nux.x86_64
1/1
Installed:
xrdp.x86_64 0:0.6.1-2.el7.nux
Install Japanese Keyboard
# cd /etc/xrdp
# wget
http://www.mail-archive.com/xrdp-devel@lists.sourceforge.net/msg00263/km-e0010411.ini
# cp km-e0010411.ini km-0411.ini
# cp km-e0010411.ini km-e0200411.ini
# cp km-e0010411.ini km-e0210411.ini
Once it is installed, lets start the xrdp
service.
# systemctl start
xrdp.service
xrdp will listen on 3389, lets confirm this by issuing
following command.
# netstat -antup
| grep xrdp
tcp 0
0 0.0.0.0:3389
0.0.0.0:*
LISTEN
1508/xrdp
tcp 0
0 127.0.0.1:3350
0.0.0.0:*
LISTEN
1507/xrdp-sesman
By default, services wont auto start after system reboot.
Issue the following command to enable the service at system start
up.
# systemctl enable
xrdp.service
lets start firewall enabled
# systemctl start
firewalld
By default, firewall wont auto start after system reboot.
Issue the following command to enable the firewall at system start
up.
# systemctl enable
firewalld
Next is to create iptables rule to allow rdp connection from
the external machines, following command will add the exception for
rdp port (3389).
# firewall-cmd --permanent
--zone=public --add-port=3389/tcp
# firewall-cmd --reload
Configure SELinux
# chcon --type=bin_t /usr/sbin/xrdp
# chcon --type=bin_t /usr/sbin/xrdp-sesman
Test:
Now take rdp from any windows machine using Remote Desktop
Connection, enter ip address of Linux server in computer field and
click on connect.
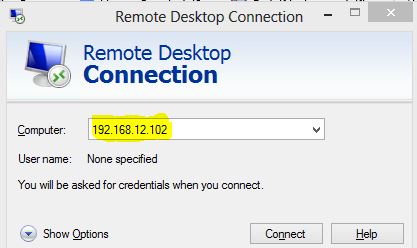
CentOS 7 – xrdp MSTSC
You would be asked to enter the user name and password, you
can either use root or any user that you have it on system. Make
sure you use module “sesman-Xvnc”.

CentOS 7 – xrdp Login page
If you click ok, you will see the processing. In less than a
half min, you will get a desktop.
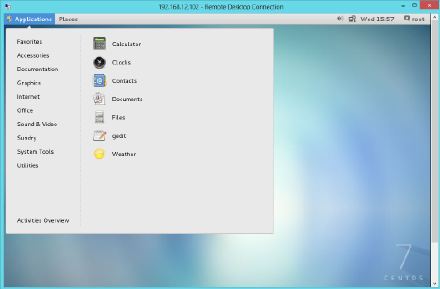
CentOS 7 – xrdp Desktop
That's All, you have successfully configured xRDP on CentOS 7 /
RHEL 7. We welcome your comments.
[Reference]
[Xrdp-devel] Keyboard issue and Japanese Keyboard Layout


 931
931


 被折叠的 条评论
为什么被折叠?
被折叠的 条评论
为什么被折叠?
 到【灌水乐园】发言


