


(1) 安装unixODBC
1. copy the unixODBC*.tar.gz file somewhere you can create files and directories
2. gunzip unixODBC*.tar.gz
3. tar xvf unixODBC*.tar
Doing so will create a unixODBC directory with all source files inside.
./configure
make
make install
由于当前系统已经安装了默认的unixODBC,因此此步跳过了,具体的需要自己亲自测试。
系统版本为:/usr/lib/libodbc.so.1.0.0,最后测试代码通过,因此也没有更新到2.2.14
(2) 安装myODBC
#rpm -ivh MyODBC-3.51.03-1.i386.rpm
(3) 下载otl
(4) 设置ODBC
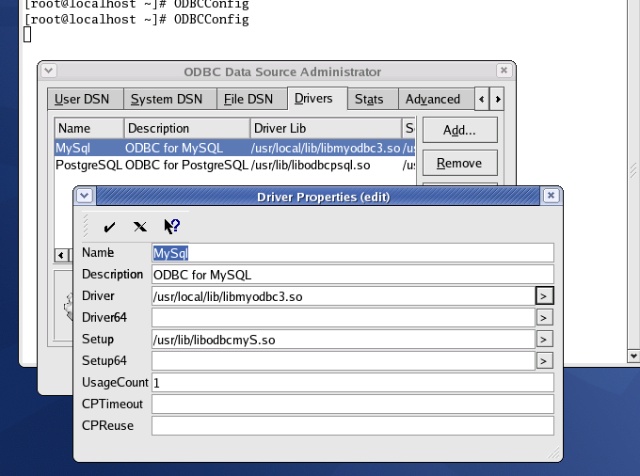
1. 添加MySql驱动
在unixODBC安装成功后,就可以设置ODBC了。运行ODBCConfig程序(在/usr/bin下),添加MySql驱动
其他数据库驱动设置相关资料:
TXT libodbctxt.so libodbctxtS.so
NNTP libnn.so libodbcnnS.so
MiniSQL libodbcmini.so libodbcminiS.so
PostgreSQL libodbcpsql.so libodbcpsqlS.so
MySQL (注释) libodbcmyS.so
Sybase/MS SQL (注释) libtdsS.so
Oracle (注释) liboraodbcS.so2. 设置DSN
DSN分为User DSN、System DSN和File DSN三种,我们以System DSN为例。选中System DSN一栏以后,点击Add…
列表中会列出你已经安装好的数据库驱动程序,我这里只装了MySQL和PostgreSQL,然后选择你所要使用的驱动程序,然后点击OK。这里使用的是MySQL的数据库驱动,不同的数据库,这个窗口的内容会有所不同。Name是数据源的名称,Description是描述,Server可以选择服务器,如果本机启动了MySQL就可以选择localhost,如果Port和Socket有特殊要求,再根据实际情况进行修改,Database是用来选择数据库的,下拉菜单不一定包含所有的数据库,你可以把自己已经创建好的数据库名称填写在这里。都配置好之后,点击"√"保存退出。
这样Linux/Unix下的ODBC数据源就已经设置好了,大家还可以在ODBCConfig程序的Status栏中查看ODBC的使用情况,在Advanced栏中设置是否做日志或者启动连接池,在About栏中,有一个Linux/Unix ODBC的示意图,在Credits按钮中可以看到所有开发者的名字的列表。 ODBCConfig程序中所有有关数据库驱动程序的信息被放在odbcinst.ini(在/etc下)文件中,有关DSN的信息被放在odbc.ini(在/etc下)文件中。
本例中的/etc/odbc.ini 如下:
[test] -> 设置的DNS名字Description = MySql
Driver = MySql
Server = localhost
Database = test -> 实际数据的名字Port =
Socket =
Option =
Stmt =
(5) MySql 数据库设置
mysql -uroot 登录后
mysql> CREATE DATABASE test;
默认的本机root密码为空,在修改过程中出现了:
# mysql -uroot -p
Enter password:
ERROR 1045 (28000): Access denied for user 'root'@'localhost' (using password: NO)
没有密码是不安全的,因此需要设置root用户密码。
使用网上介绍的方法修改root用户的密码:
# mysqladmin -uroot -p password 'newpassword'
Enter password:
mysqladmin: connect to server at 'localhost' failed
error: 'Access denied for user 'root'@'localhost' (using password: YES)'
解决方法,如下:
# /etc/init.d/mysql stop // 或者 使用 service mysqld stop# mysqld_safe --user=mysql --skip-grant-tables --skip-networking &
# mysql -u root mysql
mysql> UPDATE user SET Password=PASSWORD('123456') where USER='root';
mysql> FLUSH PRIVILEGES;
mysql> quit
# /etc/init.d/mysql restart 或者 service mysqld restart
# mysql -uroot -p
Enter password:
(6) 手工测试ODBC配置DSN
unixODBC还提供了命令台下查看数据库的程序,这就是isql,用法如下:
isql DSN [UID [PWD]] [options]
DSN 数据源名称
UID 用户ID
PWD 用户密码
Options:
-b 批处理,没有提示符的模式
-dx 设置列之间的分隔符为x
-w 将查询结果输出为HTML格式
-c 第一行输出列名
--version 输出isql的版本号
测试结果:
#isql test root 123456+---------------------------------------+
| Connected! |
| |
| sql-statement |
| help [tablename] |
| quit |
| |
+---------------------------------------+
SQL> show tables;
+---------------+
| Tables_in_test|
+---------------+
| test |
| test_tab |
+---------------+
SQLRowCount returns 2
2 rows fetched
或者使用 DataManager来进行图形界面查看。
(6) 代码测试 otl_test.cpp
#include
using namespace std;
#include
#include
#include
#define OTL_ODBC_MYSQL // Compile OTL 4/ODBC/MySQL
#define OTL_ODBC_UNIX // uncomment this line if UnixODBC is used
#include // include the OTL 4 header file
otl_connect db; // connect object
void insert()
// insert rows into table
{
otl_stream o(1, // buffer size should be == 1 always on INSERT
"insert into test_tab values(:f1,:f2)",
// SQL statement
db // connect object
);
char tmp[32];
for(int i=1;i<=100;++i){
#if defined(_MSC_VER)
#if (_MSC_VER >= 1400) // VC++ 8.0 or higher
sprintf_s(tmp,sizeof(tmp),"Name%d",i);
#else
sprintf(tmp,"Name%d",i);
#endif
#else
sprintf(tmp,"Name%d",i);
#endif
o<
}
}
void update(const int af1)
// insert rows into table
{
otl_stream o(1, // buffer size should be == 1 always on UPDATE
"UPDATE test_tab "
" SET f2=:f2 "
" WHERE f1=:f1",
// UPDATE statement
db // connect object
);
o<
o<
}
void select(const int af1)
{
// MyODBC does not allow any ih/nput bind variables in the WHERE clause
// in a SELECT statement.
// Therefore, the SELECT statement has to be generated literally.
char stmbuf[1024];
#if defined(_MSC_VER)
#if (_MSC_VER >= 1400) // VC++ 8.0 or higher
sprintf_s(stmbuf,sizeof(stmbuf),
"select * from test_tab where f1>=%d and f1<=%d*2",
af1,
af1
);
#else
sprintf(stmbuf,
"select * from test_tab where f1>=%d and f1<=%d*2",
af1,
af1
);
#endif
#else
sprintf(stmbuf,
"select * from test_tab where f1>=%d and f1<=%d*2",
af1,
af1
);
#endif
otl_stream i(50, // buffer size may be > 1
stmbuf, // SELECT statement
db // connect object
);
// create select stream
int f1;
char f2[31];
while(!i.eof()){ // while not end-of-data
i>>f1;
cout<
i>>f2;
if(i.is_null())
cout<
else
cout<
cout<
}
}
int main()
{
otl_connect::otl_initialize(); // initialize ODBC environment
try{
//db.rlogon("UID=root;PWD=123456;DSN=test"); // connect to ODBC
db.rlogon("root/123456@test"); // connect to ODBC, alternative format
// of connect string
cout << "Connect to test successed" << endl;
// otl_cursor::direct_exec(db, "use test");
cout << "Exec use test succeed" << endl;
otl_cursor::direct_exec
(
db,
"drop table test_tab",
otl_exception::disabled // disable OTL exceptions
); // drop table
otl_cursor::direct_exec
(
db,
"create table test_tab(f1 int, f2 varchar(30))"
); // create table
insert(); // insert records into the table
update(10); // update records in the table
select(8); // select records from the table
}
catch(otl_exception& p){ // intercept OTL exceptions
cerr << "Exception:" << endl;
cerr<
cerr<
cerr<
cerr<
}
db.logoff(); // disconnect from ODBC
return 0;
}
g++ -o"otl_test" otl_test.cpp -lmyodbc3
由于使用了最新的myodbc,因此需要指定使用odbc3.
(7) 测试结果
./mysql_otl
Connect to test successed
Exec use test succeed
f1=8, f2=Name8
f1=9, f2=Name9
f1=10, f2=Name changed
f1=11, f2=NULL
f1=12, f2=Name12
f1=13, f2=Name13
f1=14, f2=Name14
f1=15, f2=Name15
f1=16, f2=Name16
(8) 结果验证mysql -uroot -p
Enter password:
Welcome to the MySQL monitor. Commands end with ; or \g.
Your MySQL connection id is 41 to server version: 4.1.20
Type 'help;' or '\h' for help. Type '\c' to clear the buffer.
mysql> show databases;
+----------+
| Database |
+----------+
| mysql |
| test |
+----------+
2 rows in set (0.00 sec)
mysql> use test;
Reading table information for completion of table and column names
You can turn off this feature to get a quicker startup with -A
Database changed
mysql> show tables;
+----------------+
| Tables_in_test |
+----------------+
| test_tab |
+----------------+
1 rows in set (0.00 sec)
mysql> select * from test_tab;
+------+--------------+
| f1 | f2 |
+------+--------------+
| 1 | Name1 |
.................... 其他数据省略
+------+--------------+
100 rows in set (0.00 sec)


 427
427


 被折叠的 条评论
为什么被折叠?
被折叠的 条评论
为什么被折叠?
 到【灌水乐园】发言


