


背景
大家都知道,在网页中浏览器资源开销最大便是DOM节点了,DOM很慢并且非常庞大,网页性能问题大多数都是有JavaScript修改DOM所引起的。我们使用Javascript来操纵DOM,操作效率往往很低,由于DOM被表示为树结构,每次DOM中的某些内容都会发生变化,因此对DOM的更改非常快,但更改后的元素,并且它的子项必须经过Reflow / Layout阶段,然后浏览器必须重新绘制更改,这很慢的。因此,回流/重绘的次数越多,您的应用程序就越卡顿。但是,Javascript运行速度很快,虚拟DOM是放在JS 和 HTML中间的一个层。它可以通过新旧DOM的对比,来获取对比之后的差异对象,然后有针对性的把差异部分真正地渲染到页面上,从而减少实际DOM操作,最终达到性能优化的目的。
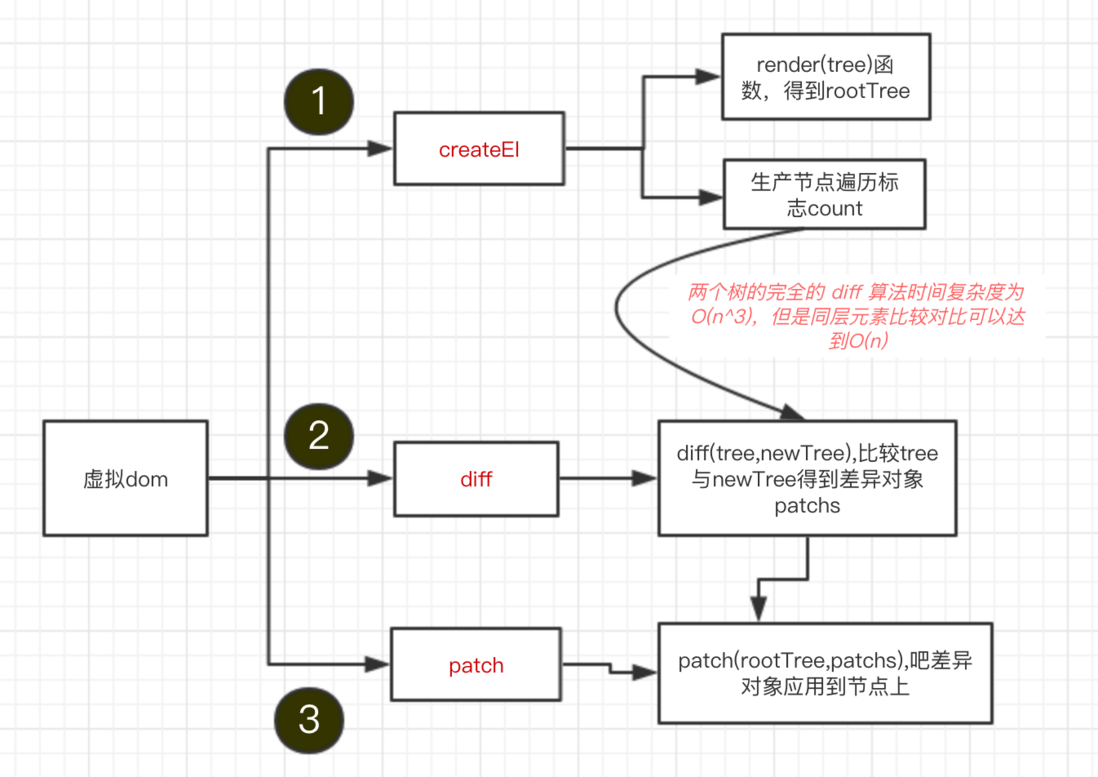
虚拟dom原理流程
简单概括有三点:
用JavaScript模拟DOM树,并渲染这个DOM树
比较新老DOM树,得到比较的差异对象
把差异对象应用到渲染的DOM树。
下面是流程图:
下面我们用代码一步步去实现一个流程图
用JavaScript模拟DOM树并渲染到页面上
其实虚拟DOM,就是用JS对象结构的一种映射,下面我们一步步实现这个过程。
我们用JS很容易模拟一个DOM树的结构,例如用这样的一个函数createEl(tagName, props, children)来创建DOM结构。
tagName标签名、props是属性的对象、children是子节点。
然后渲染到页面上,代码如下:
const createEl = (tagName, props, children) => new CreactEl(tagName, props, children)
const vdom = createEl('div', { 'id': 'box' }, [
createEl('h1', { style: 'color: pink' }, ['I am H1']),
createEl('ul', {class: 'list'}, [createEl('li', ['#list1']), createEl('li', ['#list2'])]),
createEl('p', ['I am p'])
])
const rootnode = vdom.render()
document.body.appendChild(rootnode)
通过上面的函数,调用vdom.render()这样子我们就很好的构建了如下所示的一个DOM树,然后渲染到页面上
I am H1
- #list1
- #list2
I am p
下面我们看看CreactEl.js代码流程:
import { setAttr } from './utils'
class CreateEl {
constructor (tagName, props, children) {
// 当只有两个参数的时候 例如 celement(el, [123])
if (Array.isArray(props)) {
children = props
props = {}
}
// tagName, props, children数据保存到this对象上
this.tagName = tagName
this.props = props || {}
this.children = children || []
this.key = props ? props.key : undefined
let count = 0
this.children.forEach(child => {
if (child instanceof CreateEl) {
count += child.count
} else {
child = '' + child
}
count++
})
// 给每一个节点设置一个count
this.count = count
}
// 构建一个 dom 树
render () {
// 创建dom
const el = document.createElement(this.tagName)
const props = this.props
// 循环所有属性,然后设置属性
for (let [key, val] of Object.entries(props)) {
setAttr(el, key, val)
}
this.children.forEach(child => {
// 递归循环 构建tree
let childEl = (child instanceof CreateEl) ? child.render() : document.createTextNode(child)
el.appendChild(childEl)
})
return el
}
}
上面render函数的功能是把节点创建好,然后设置节点属性,最后递归创建。这样子我们就得到一个DOM树,然后插入(appendChild)到页面上。
比较新老dom树,得到比较的差异对象
上面,我们已经创建了一个DOM树,然后在创建一个不同的DOM树,然后做比较,得到比较的差异对象。
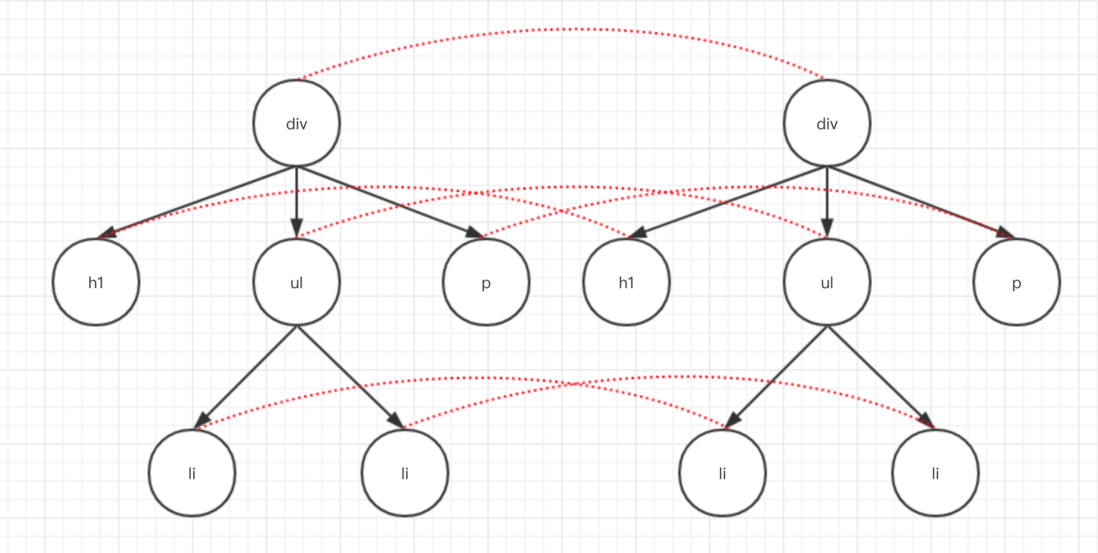
比较两棵DOM树的差异,是虚拟DOM的最核心部分,这也是人们常说的虚拟DOM的diff算法,两颗完全的树差异比较一个时间复杂度为 O(n^3)。但是在我们的web中很少用到跨层级DOM树的比较,所以一个层级跟一个层级对比,这样算法复杂度就可以达到 O(n)。如下图
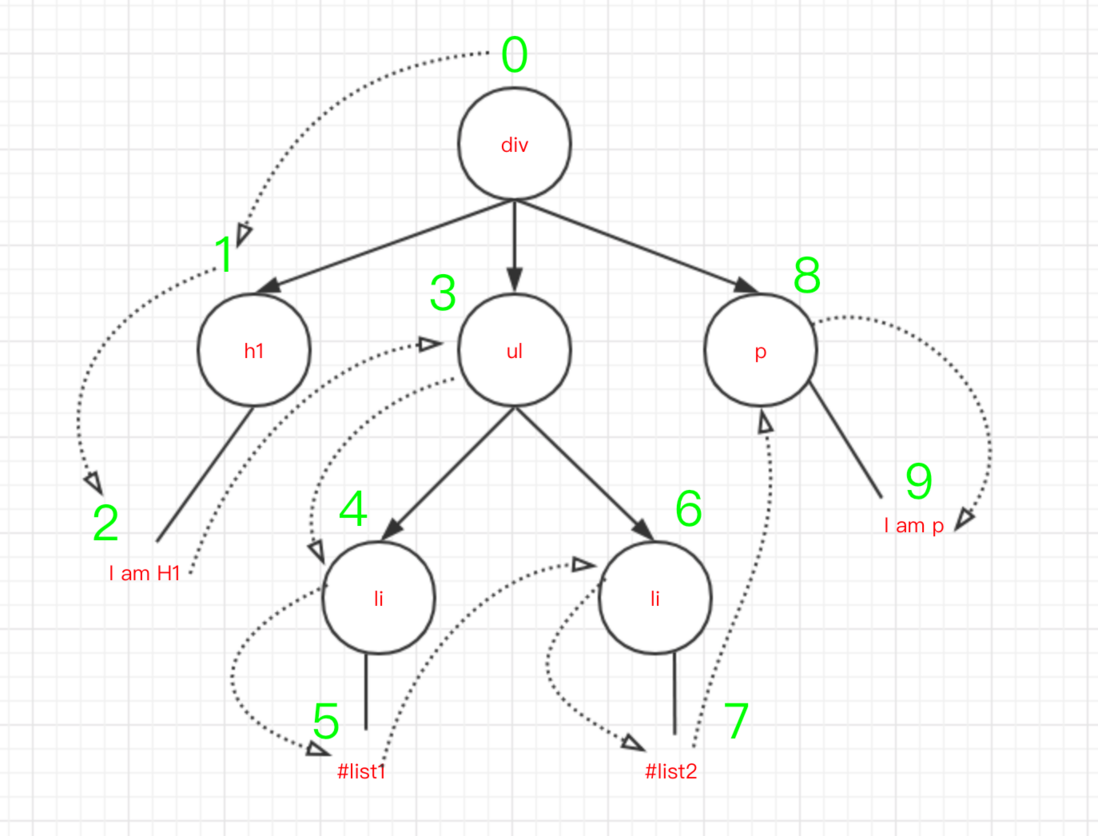
其实在代码中,我们会从根节点开始标志遍历,遍历的时候把每个节点的差异(包括文本不同,属性不同,节点不同)记录保存起来。如下图:
两个节点之间的差异有总结起来有下面4种
0 直接替换原有节点
1 调整子节点,包括移动、删除等
2 修改节点属性
3 修改节点文本内容
如下面两棵树比较,把差异记录下来。

主要是简历一个遍历index(看图3),然后从根节点开始比较,比较万之后记录差异对象,继续从左子树比较,记录差异,一直遍历下去。主要流程如下
// 这是比较两个树找到最小移动量的算法是Levenshtein距离,即O(n * m)
// 具体请看 https://www.npmjs.com/package/list-diff2
import listDiff from 'list-diff2'
// 比较两棵树
function diff (oldTree, newTree) {
// 节点的遍历顺序
let index = 0
// 在遍历过程中记录节点的差异
let patches = {}
// 深度优先遍历两棵树
deepTraversal(oldTree, newTree, index, patches)
// 得到的差异对象返回出去
return patches
}
function deepTraversal(oldNode, newNode, index, patches) {
let currentPatch = []
// ...中间有很多对patches的处理
// 递归比较子节点是否相同
diffChildren(oldNode.children, newNode.children, index, patches, currentPatch)
if (currentPatch.length) {
// 那个index节点的差异记录下来
patches[index] = currentPatch
}
}
// 子数的diff
function diffChildren (oldChildren, newChildren, index, patches, currentPatch) {
const diffs = listDiff(oldChildren, newChildren)
newChildren = diffs.children
// ...省略记录差异对象
let leftNode = null
let currentNodeIndex = index
oldChildren.forEach((child, i) => {
const newChild = newChildren[i]
// index相加
currentNodeIndex = (leftNode && leftNode.count) ? currentNodeIndex + leftNode.count + 1 : currentNodeIndex + 1
// 深度遍历,递归
deepTraversal(child, newChild, currentNodeIndex, patches)
// 从左树开始
leftNode = child
})
}
然后我们调用完diff(tree, newTree)等到最后的差异对象是这样子的。
{
"1": [
{
"type": 0,
"node": {
"tagName": "h3",
"props": {
"style": "color: green"
},
"children": [
"I am H1"
],
"count": 1
}
}
]
...
}
key是代表那个节点,这里我们是第二个,也就是h1会改变成h3,还有省略的两个差异对象代码没有贴出来~~
然后看下diff.js的完整代码,如下
import listDiff from 'list-diff2'
// 每个节点有四种变动
export const REPLACE = 0 // 替换原有节点
export const REORDER = 1 // 调整子节点,包括移动、删除等
export const PROPS = 2 // 修改节点属性
export const TEXT = 3 // 修改节点文本内容
export function diff (oldTree, newTree) {
// 节点的遍历顺序
let index = 0
// 在遍历过程中记录节点的差异
let patches = {}
// 深度优先遍历两棵树
deepTraversal(oldTree, newTree, index, patches)
// 得到的差异对象返回出去
return patches
}
function deepTraversal(oldNode, newNode, index, patches) {
let currentPatch = []
if (newNode === null) { // 如果新节点没有的话直接不用比较了
return
}
if (typeof oldNode === 'string' && typeof newNode === 'string') {
// 比较文本节点
if (oldNode !== newNode) {
currentPatch.push({
type: TEXT,
content: newNode
})
}
} else if (oldNode.tagName === newNode.tagName && oldNode.key === newNode.key) {
// 节点类型相同
// 比较节点的属性是否相同
let propasPatches = diffProps(oldNode, newNode)
if (propasPatches) {
currentPatch.push({
type: PROPS,
props: propsPatches
})
}
// 递归比较子节点是否相同
diffChildren(oldNode.children, newNode.children, index, patches, currentPatch)
} else {
// 节点不一样,直接替换
currentPatch.push({ type: REPLACE, node: newNode })
}
if (currentPatch.length) {
// 那个index节点的差异记录下来
patches[index] = currentPatch
}
}
// 子数的diff
function diffChildren (oldChildren, newChildren, index, patches, currentPatch) {
var diffs = listDiff(oldChildren, newChildren)
newChildren = diffs.children
// 如果调整子节点,包括移动、删除等的话
if (diffs.moves.length) {
var reorderPatch = {
type: REORDER,
moves: diffs.moves
}
currentPatch.push(reorderPatch)
}
var leftNode = null
var currentNodeIndex = index
oldChildren.forEach((child, i) => {
var newChild = newChildren[i]
// index相加
currentNodeIndex = (leftNode && leftNode.count) ? currentNodeIndex + leftNode.count + 1 : currentNodeIndex + 1
// 深度遍历,从左树开始
deepTraversal(child, newChild, currentNodeIndex, patches)
// 从左树开始
leftNode = child
})
}
// 记录属性的差异
function diffProps (oldNode, newNode) {
let count = 0 // 声明一个有没没有属性变更的标志
const oldProps = oldNode.props
const newProps = newNode.props
const propsPatches = {}
// 找出不同的属性
for (let [key, val] of Object.entries(oldProps)) {
// 新的不等于旧的
if (newProps[key] !== val) {
count++
propsPatches[key] = newProps[key]
}
}
// 找出新增的属性
for (let [key, val] of Object.entries(newProps)) {
if (!oldProps.hasOwnProperty(key)) {
count++
propsPatches[key] = val
}
}
// 没有新增 也没有不同的属性 直接返回null
if (count === 0) {
return null
}
return propsPatches
}
得到差异对象之后,剩下就是把差异对象应用到我们的dom节点上面了。
把差异对象应用到渲染的dom树
到了这里其实就简单多了。我们上面得到的差异对象之后,然后选择同样的深度遍历,如果那个节点有差异的话,判断是上面4种中的哪一种,根据差异对象直接修改这个节点就可以了。
function patch (node, patches) {
// 也是从0开始
const step = {
index: 0
}
// 深度遍历
deepTraversal(node, step, patches)
}
// 深度优先遍历dom结构
function deepTraversal(node, step, patches) {
// 拿到当前差异对象
const currentPatches = patches[step.index]
const len = node.childNodes ? node.childNodes.length : 0
for (let i = 0; i < len; i++) {
const child = node.childNodes[i]
step.index++
deepTraversal(child, step, patches)
}
//如果当前节点存在差异
if (currentPatches) {
// 把差异对象应用到当前节点上
applyPatches(node, currentPatches)
}
}
这样子,调用patch(rootnode, patches)就直接有针对性的改变有差异的节点了。
path.js完整代码如下:
import {REPLACE, REORDER, PROPS, TEXT} from './diff'
import { setAttr } from './utils'
export function patch (node, patches) {
// 也是从0开始
const step = {
index: 0
}
// 深度遍历
deepTraversal(node, step, patches)
}
// 深度优先遍历dom结构
function deepTraversal(node, step, patches) {
// 拿到当前差异对象
const currentPatches = patches[step.index]
const len = node.childNodes ? node.childNodes.length : 0
for (let i = 0; i < len; i++) {
const child = node.childNodes[i]
step.index++
deepTraversal(child, step, patches)
}
//如果当前节点存在差异
if (currentPatches) {
// 把差异对象应用到当前节点上
applyPatches(node, currentPatches)
}
}
// 把差异对象应用到当前节点上
function applyPatches(node, currentPatches) {
currentPatches.forEach(currentPatch => {
switch (currentPatch.type) {
// 0: 替换原有节点
case REPLACE:
var newNode = (typeof currentPatch.node === 'string') ? document.createTextNode(currentPatch.node) : currentPatch.node.render()
node.parentNode.replaceChild(newNode, node)
break
// 1: 调整子节点,包括移动、删除等
case REORDER:
moveChildren(node, currentPatch.moves)
break
// 2: 修改节点属性
case PROPS:
for (let [key, val] of Object.entries(currentPatch.props)) {
if (val === undefined) {
node.removeAttribute(key)
} else {
setAttr(node, key, val)
}
}
break;
// 3:修改节点文本内容
case TEXT:
if (node.textContent) {
node.textContent = currentPatch.content
} else {
node.nodeValue = currentPatch.content
}
break;
default:
throw new Error('Unknow patch type ' + currentPatch.type);
}
})
}
// 调整子节点,包括移动、删除等
function moveChildren (node, moves) {
let staticNodelist = Array.from(node.childNodes)
const maps = {}
staticNodelist.forEach(node => {
if (node.nodeType === 1) {
const key = node.getAttribute('key')
if (key) {
maps[key] = node
}
}
})
moves.forEach(move => {
const index = move.index
if (move.type === 0) { // 变动类型为删除的节点
if (staticNodeList[index] === node.childNodes[index]) {
node.removeChild(node.childNodes[index]);
}
staticNodeList.splice(index, 1);
} else {
let insertNode = maps[move.item.key]
? maps[move.item.key] : (typeof move.item === 'object')
? move.item.render() : document.createTextNode(move.item)
staticNodelist.splice(index, 0, insertNode);
node.insertBefore(insertNode, node.childNodes[index] || null)
}
})
}
到这里,最基本的虚拟DOM原理已经讲完了,也简单了实现了一个虚拟DOM,如果本文有什么不对的地方请指正。


 1095
1095


 被折叠的 条评论
为什么被折叠?
被折叠的 条评论
为什么被折叠?
 到【灌水乐园】发言


