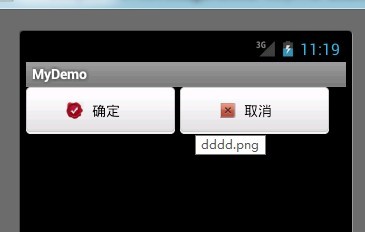
很多时候,android提供的组件并不能满足我们的需求,于是我们不得不按需求开发自定义控件。
Step 1.
写好自定义控件的内部布局文件。
android:id="@+id/image"android:layout_width="wrap_content"android:layout_height="wrap_content"android:layout_gravity="center_vertical"android:paddingBottom="5dip"android:paddingLeft="40dip"android:paddingTop="5dip"android:src="@drawable/confirm" />
android:id="@+id/text"android:layout_width="wrap_content"android:layout_height="wrap_content"android:layout_gravity="center_vertical"android:layout_marginLeft="8dip"android:text="确定"android:textColor="#000000" />
Step 2:
写好自定义的控件类并继承LinearLayout,并写好相关方法,用于控制自定义控件的内容。
packageorg.hjw.mybutton;importandroid.content.Context;importandroid.util.AttributeSet;importandroid.view.LayoutInflater;importandroid.widget.ImageView;importandroid.widget.LinearLayout;importandroid.widget.TextView;public class my extendsLinearLayout {privateImageView image;privateTextView text;publicmy(Context context, AttributeSet attrs) {super(context, attrs);
LayoutInflater ll=(LayoutInflater) context
.getSystemService(Context.LAYOUT_INFLATER_SERVICE);
ll.inflate(R.layout.my_button,this);
image=(ImageView) findViewById(R.id.image);
text=(TextView) findViewById(R.id.text);
}public void setImage(intResid) {
image.setImageResource(Resid);
}public voidsetText(String ext) {
text.setText(ext);
}
}
Step3:
需要使用自定义控件时,只需要在xml文件中加入即可,这里我们在主布局文件中加入。
android:background="@drawable/bg_button"
/>
Step 4:
为了使用户体验效果更好,可以加入背景图片的变化效果。
Step 5:
最后在主Activity中像使用其他控件一样使用此控件。
package org.hjw.mybutton;
import android.os.Bundle;
import android.app.Activity;
import android.view.Menu;
import android.view.View;
import android.widget.Toast;
public class MainActivity extends Activity {
private my My, My2;
@Override
protected void onCreate(Bundle savedInstanceState) {
super.onCreate(savedInstanceState);
setContentView(R.layout.activity_main);
My = (my) findViewById(R.id.myButton1);
My2 = (my) findViewById(R.id.myButton2);
My2.setImage(R.drawable.cancel);
My2.setText("取消");
My.setImage(R.drawable.confirm);
My.setText("确定");
My.setOnClickListener(new View.OnClickListener() {
@Override
public void onClick(View v) {
Toast.makeText(getApplicationContext(), "You just clicked!", 1)
.show();
}
});
}
@Override
public boolean onCreateOptionsMenu(Menu menu) {
// Inflate the menu; this adds items to the action bar if it is present.
getMenuInflater().inflate(R.menu.main, menu);
return true;
}
}
Step 6:
我们看看效果吧。

╭︿︿︿╮ {/ o o /} ( (oo) ) ︶ ︶︶


 532
532


 被折叠的 条评论
为什么被折叠?


