


设置更改root密码
设置mysql的root用户密码:(默认为空)
1.查看mysql任务是否开启:ps aux |grep mysql
若无开启则-->/etc/init.d/mysqld start
2.登录mysql :
/usr/local/mysql/bin/mysql -uroot
(单独在命令行运行mysqlm命令是不生效的,因为mysql命令并不是在PATH
环境变量中定义)
若想不用在命令行中敲写绝对路径:
(1)临时生效(重启失效)
export PATH=$PATH:/usr/local/mysql/bin/

(2)永久生效:
vim /etc/profile
添加内容:
export PATH=$PATH:/usr/local/mysql/bin/

修改完再加载一下配置文件:source /etc/profile
登陆了mysql后的退出命令:quit 或者exit
2.登陆mysql的root用户:
mysql -u用户名 -p'用户密码'
mysql -uroot -p (root用户密码默认为空,-u后面的同户名可以有空格;-p后面跟的密码不能有空格)
3.设置密码:
推出mysql登陆状态,在命令行中设置:
mysqladmin -uroot password '123456'
修改密码后就需要输入用户名密码才能登陆:
mysql -u root -p'123456' (密码最好用单引号引起来)
修改密码:(命令行下)记得密码的状态下:
mysqladmin -u root -p'123456' password '123456789'
忘记密码的情况下修改密码:
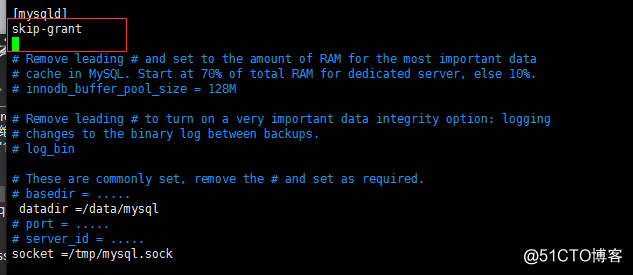
1.vim /etc/my.cnf
在[mysqld]中增加 skip-grant
(表示忽略授权,这样我们登陆mysql就不需要输入用户名密码)
修改后重启服务:/etc/init.d/mysqld restart

2.登陆mysql,修改mysql库的一个表(user)
(1)use mysql (切换到mysql库)
use +库名 表示切换到该库下
(2)执行修改命令
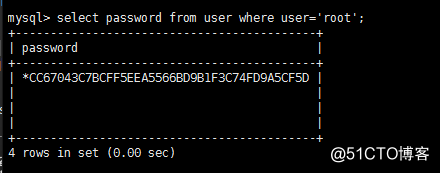
(可以看出我们的密码是经过加密的)
修改命令:
update user set password=password('123456') where user='root';
password()是mysql的一个加密函数;
3.退出mysql状态:exit
修改配置文件
vim /etc/my.cnf
在[mysqld]中删除 skip-grant
4.重启服务:
/etc/init.d/mysqld restart
{重置密码的步骤:
1.修改配置文件vim/etc/my.cnf -->添加skip-grant-->重启服务/etc/init.d/mysqld restart
2.进到mysql下-->use mysql切换库-->修改update user set password=password('123456') where user='root';
3.修改配置文件vim/etc/my.cnf -->删除skip-grant-->重启服务/etc/init.d/mysqld restart
连接MySQL

连接方式:
1.连接本机的mysql
mysql -uroot -p123456
mysql -u用户名 -p'用户密码'
2.链接远程的mysql(tcp/ip)
mysql -uroot -p123456 -h127.0.0.1 -P3306
mysql -u用户名 -p'用户密码' -h目标ip -P监听的端口
3.使用socket连接:

mysql -uroot -p123456 -S/tmp/mysql.sock
mysql -u用户名 -p'用户密码' -S监听的socket
4.mysql -uroot -p'123456' -e "show databases"
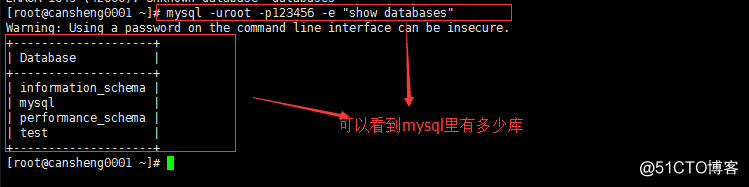
(-e 这个多数用在shell脚本)
mysql -uroot -p123456 相当于 mysql -uroot -p123456 -S/tmp/mysql.sock
因为没有指定ip 的时候就会默认使用socket去连接()默认的sock就是/tmp/mysql.sock。
MySQL常用命令(需要用分号终结‘;’)
1. 查询库 show databases;
2. 切换库 use mysql;
3.查看库里的表 show tables;
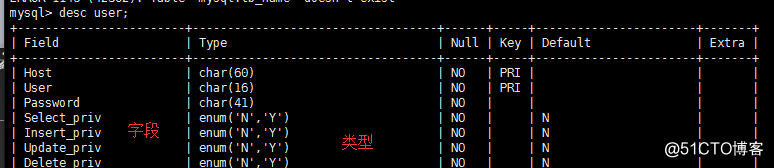
4. 查看表里的字段 desc tb_name(表名);
desc user;
5.查看建表语句 show create table tb_name\G;
show create table user\G;
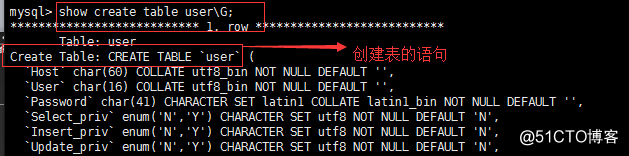
(使用\G能让显示的内容更加调理,看起来更直观)
6. 查看当前用户 select user();

(mysq的命令历史文件ls-la
 )
)
7.查看当前使用的数据库 select database();

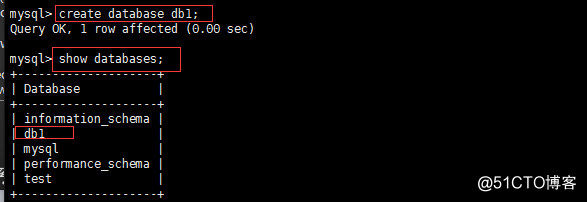
8. 创建库 create database db1;
9. 创建表 use db1; create table t1(`id` int(4), `name` char(40));
(字段是要用反引号引起来)
mysql> create table t1(`id` int(4),`name` char(40)) CHARSET=utf8;
(创建表时指定字符集CHARSET=utf8)
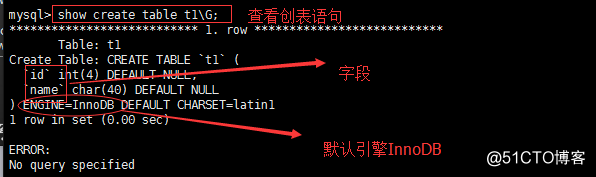
CHARSET 表示字符集,创建表的时候可以指定。
删除表:drop table 表名;
drop table t1;
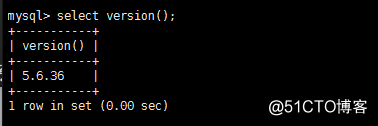
10. 查看当前数据库版本 select version();
11.查看数据库状态 show status;

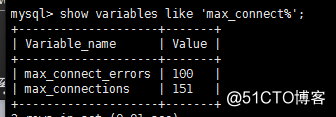
12.查看各参数 show variables; show variables like 'max_connect%';
13. 修改参数 set global max_connect_errors=1000;
(仅在当前内存生效,若要永久生效则修改配置文件vim /etc/my.cnf)
14.查看队列 show processlist; show full processlist;
(加上 full 会显示更全面的内容,这个命令常用)


 611
611


 被折叠的 条评论
为什么被折叠?
被折叠的 条评论
为什么被折叠?
 到【灌水乐园】发言


