


 本文详细介绍了如何使用cmd批量创建目录、使用Ant Design进行React后台管理系统页面布局,包括左侧导航组件、头部组件的创建,以及动态加载菜单、路由设置等。通过配置文件动态生成左侧菜单,并解决样式问题、选中状态和刷新后子导航展开问题。
一、admin页面布局及路由创建
0)cmd批量创建目录及子目录
//创建各个目录,及charts和子目录bar
md home category product role user charts\bar charts\line charts\pie
或
mkdir home category product role user charts\bar charts\line charts\pie
目录结构
│
│
├─category
├─charts
│ ├─bar
│ ├─line
│ └─pie
├─header
│
│
│
├─home
├─left
│
│
│
├─product
├─role
└─user
0.2 写基础文件,分别如下
F:admin-client\src\pages\admin>tree /f
卷 工作 的文件夹 PATH 列表
卷序列号为 284A-4B0E
F:.
│
│
├─category
│
│
│
├─charts
│ ├─bar
│ │
│ │
│ │
│ ├─line
│ │
│ │
│ │
│ └─pie
│
│
│
├─header
│
│
│
├─home
│
│
│
├─left
│
│
│
├─product
│
│
│
├─role
│
│
│
└─user
1)用antd进行页面布局src/pages/admin/
import React,{Component} from 'react'
import {Redirect} from 'react-router-dom'
import memoryUtils from '../../utils/memoryUtils'
import { Layout } from 'antd'; //引入antd的页面布局
import LeftNav from './left' //因为文件名是index所以可省略
import Header from './header/index'
const { Footer, Sider, Content } = Layout;
class Admin extends Component{
constructor(props){
super(props);
}
render(){
// 读取memoryUtils里的user数据,如果不存在就跳转到登录页面
const user=
if(!user || !){
return <Redirect to='/login'/>
}
return(
<Layout style={{minHeight:'100%'}}>
<Sider>
<LeftNav/>
</Sider>
<Layout>
<Header/>
<Content style={{backgroundColor:'#fff'}}>Content</Content>
<Footer style={{textAlign:'center',color:'#333'}}>版权所有@pasaulis</Footer>
</Layout>
</Layout>
)
}
}
export default Admin
2)分离出1步左侧组件src/pages/admin/left/
import React,{Component} from 'react'
import {Link} from 'react-router-dom'
import './'
import logo from '../../../assets/images/'
import { Menu, Icon } from 'antd';
const { SubMenu } = Menu;
export default class LeftNav extends Component{
state = {
collapsed: false,
};
toggleCollapsed = () => {
({
collapsed: !,
});
};
render(){
return (
<div className='left'>
<Link className='left-header'>
<img src={logo} alt='logo' />
<h1>深蓝管理后台</h1>
</Link>
<Menu
defaultSelectedKeys={['1']}
defaultOpenKeys={['sub1']}
mode="inline"
theme="dark"
inlineCollapsed={}
>
<Menu.Item key="1">
<Icon type="pie-chart" />
<span>首页</span>
</
<SubMenu
key="sub1"
title={
<span>
<Icon type="appstore" />
<span>商品管理</span>
</span>
}
>
<Menu.Item key="5">分类管理</
<Menu.Item key="6">商品管理</
</SubMenu>
<SubMenu
key="sub2"
title={
<span>
<Icon type="appstore" />
<span>用户管理</span>
</span>
}
>
<Menu.Item key="9">Option 9</
<Menu.Item key="10">Option 10</
<SubMenu key="sub3">
<Menu.Item key="11">Option 11</
<Menu.Item key="12">Option 12</
</SubMenu>
</SubMenu>
<SubMenu
key="sub3"
title={
<span>
<Icon type="user" />
<span>角色管理</span>
</span>
}
>
<Menu.Item key="5">分类管理</
<Menu.Item key="6">商品管理</
</SubMenu>
<SubMenu
key="sub4"
title={
<span>
<Icon type="appstore" />
<span>图形图表</span>
</span>
}
>
<Menu.Item key="5">分类管理</
<Menu.Item key="6">商品管理</
</SubMenu>
</Menu>
</div>
)
}
}
2.2 left/
.left {
.left-header {
display: flex;
align-items: center;
height: 80px;
background-color:#002140;
img{
height: 40px;
width: 40px;
margin:0 12px;
}
h1{
color:white;
font-size: 20px;
margin-bottom: 0;
}
}
}
3)分离出1步头部组件src/pages/admin/header/
import React,{Component} from 'react'
import './'
export default class Header extends Component{
render(){
return(
<div className='header'>
header
</div>
)
}
}
/
.header{
height: 80px;
}
4)写的路由
【1】引入路由组件
【2】以下8条为引入需要配置路由的页面
【3】路由配置在要显示的位置,即内容里
【】如果以上都不匹配跳转到home页
import React,{Component} from 'react'
import {Redirect,Route,Switch} from 'react-router-dom' //【1】引入路由组件
import memoryUtils from '../../utils/memoryUtils'
import { Layout } from 'antd'; //引入antd的页面布局
import LeftNav from './left' //因为文件名是index所以可省略
import Header from './header/index'
//【2】以下8条为引入需要配置路由的页面
import Home from './home'
import Category from './category' //产品分类
import Product from './product'
import Role from './role' //角色管理页面
import User from './user' //用户管理页面
import Bar from './charts/bar' //图表页面
import Pie from './charts/pie'
import Line from './charts/line'
const { Footer, Sider, Content } = Layout;
class Admin extends Component{
constructor(props){
super(props);
}
render(){
// 读取memoryUtils里的user数据,如果不存在就跳转到登录页面
const user=
if(!user || !){
return <Redirect to='/login'/>
}
return(
<Layout style={{minHeight:'100%'}}>
<Sider>
<LeftNav/>
</Sider>
<Layout>
<Header/>
{/*【3】路由配置在要显示的位置,即内容里 */}
<Content style={{backgroundColor:'#fff'}}>
<Switch>
<Route path='/home' component={Home}/>
<Route path='/category' component={Category}/>
<Route path='/product' component={Product}/>
<Route path='/role' component={Role}/>
<Route path='/user' component={User}/>
<Route path='/charts/bar' component={Bar}/>
<Route path='/charts/line' component={Line}/>
<Route path='/charts/pie' component={Pie}/>
{/*【】如果以上都不匹配跳转到home页 */}
<Redirect to='/home'/>
</Switch>
</Content>
<Footer style={{textAlign:'center',color:'#333'}}>版权所有@pasaulis</Footer>
</Layout>
</Layout>
)
}
}
export default Admin
5)完善左侧导航路径src/page/admin/left/
import React,{Component} from 'react'
import {Link} from 'react-router-dom'
import './'
import logo from '../../../assets/images/'
import { Menu, Icon } from 'antd';
const { SubMenu } = Menu;
export default class LeftNav extends Component{
state = {
collapsed: false,
};
toggleCollapsed = () => {
({
collapsed: !,
});
};
render(){
return (
<div className='left'>
<Link className='left-header'>
<img src={logo} alt='logo' />
<h1>深蓝管理后台</h1>
</Link>
<Menu
defaultSelectedKeys={['1']}
defaultOpenKeys={['sub1']}
mode="inline"
theme="dark"
inlineCollapsed={}
>
<Menu.Item key="1">
<Link to='/home'>
<Icon type="pie-chart" />
<span>首页</span>
</Link>
</
<SubMenu
key="sub1"
title={
<span>
<Icon type="appstore" />
<span>商品管理</span>
</span>
}
>
<Menu.Item key="2"><Link to='/category'>分类管理</Link></
<Menu.Item key="3"><Link to='/product'>商品管理</Link></
</SubMenu>
<SubMenu
key="sub2"
title={
<span>
<Icon type="appstore" />
<span>用户管理</span>
</span>
}
>
<Menu.Item key="4"><Link to='/user'>用户管理</Link></
</SubMenu>
<SubMenu
key="sub3"
title={
<span>
<Icon type="user" />
<span>角色管理</span>
</span>
}
>
<Menu.Item key="8"><Link to='/category'>角色管理</Link></
<Menu.Item key="9">角色管理</
</SubMenu>
<SubMenu
key="sub4"
title={
<span>
<Icon type="appstore" />
<span>图形图表</span>
</span>
}
>
<Menu.Item key="10"><Link to='/charts/bar'>柱状图表</Link></
<Menu.Item key="11"><Link to='/charts/line'>线图表</Link></
<Menu.Item key="12"><Link to='/charts/pie'>饼图表</Link></
</SubMenu>
</Menu>
</div>
)
}
}
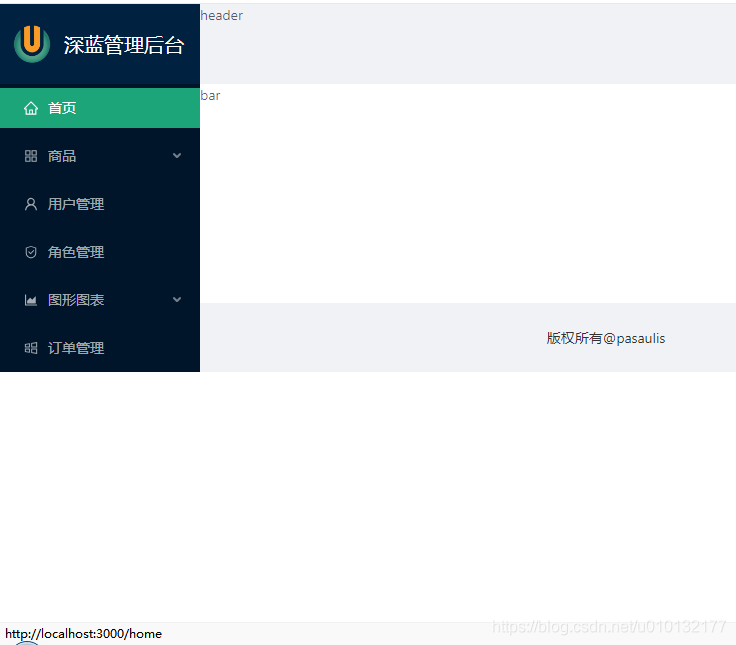
效果:http://localhost:3000/home

6)完善5步:动态加载左导航src/config/配置文件
src/pages/admin/left/
【1】根据配置文件自动写入左侧导航到页面
【2】调用自动写左导航函数,自动写入到此处
import React,{Component} from 'react'
import {Link} from 'react-router-dom'
import './'
import logo from '../../../assets/images/'
import { Menu, Icon } from 'antd';
import menuList from '../../../config/'
const { SubMenu } = Menu;
export default class LeftNav extends Component{
state = {
collapsed: false,
};
toggleCollapsed = () => {
({
collapsed: !,
});
};
// 【1】根据配置文件自动写入左侧导航到页面函数
getMenuItem=(menuList)=>{
return menuList.map(item=>{//多级把参数内再写一函数
if(!){//如果不存在children则返回:
return(
<Menu.Item key={}>
<Link to={}>
<Icon type={}/>
<span>{}</span>
</Link>
</
)
}else{//否则返回
return(
<SubMenu
key={}
title={
<span>
<Icon type={}/>
<span>{}</span>
</span>
}
>
{
//递归调用此函数本身写入子级菜单
()
}
</SubMenu>
)
}
})
}
render(){
return (
<div className='left'>
<Link to='/home' className='left-header'>
<img src={logo} alt='logo' />
<h1>深蓝管理后台</h1>
</Link>
<Menu
defaultSelectedKeys={['1']}
defaultOpenKeys={['sub1']}
mode="inline"
theme="dark"
inlineCollapsed={}
>
{
//【2】调用自动写左导航函数,自动写入到此处
(menuList)
}
{/* 以下为写死的方式,注释掉
<Menu.Item key="1">
<Link to='/home'>
<Icon type="pie-chart" />
<span>首页</span>
</Link>
</
<SubMenu
key="sub1"
title={
<span>
<Icon type="appstore" />
<span>商品管理</span>
</span>
}
>
<Menu.Item key="2"><Link to='/category'>分类管理</Link></
<Menu.Item key="3"><Link to='/product'>商品管理</Link></
</SubMenu>
<SubMenu
key="sub2"
title={
<span>
<Icon type="appstore" />
<span>用户管理</span>
</span>
}
>
<Menu.Item key="4"><Link to='/user'>用户管理</Link></
</SubMenu>
<SubMenu
key="sub3"
title={
<span>
<Icon type="user" />
<span>角色管理</span>
</span>
}
>
<Menu.Item key="8"><Link to='/category'>角色管理</Link></
<Menu.Item key="9">角色管理</
</SubMenu>
<SubMenu
key="sub4"
title={
<span>
<Icon type="appstore" />
<span>图形图表</span>
</span>
}
>
<Menu.Item key="10"><Link to='/charts/bar'>柱状图</Link></
<Menu.Item key="11"><Link to='/charts/line'>线图表</Link></
<Menu.Item key="12"><Link to='/charts/pie'>饼图表</Link></
</SubMenu> */}
</Menu>
</div>
)
}
}
效果同上,菜单会自动根据config内的加载。
附件src/config/
const menuList = [
{
title: '首页', // 菜单标题名称
key: '/home', // 对应的path
icon: 'home', // 图标名称
isPublic: true, // 公开的
},
{
title: '商品',
key: '/products',
icon: 'appstore',
children: [ // 子菜单列表
{
title: '品类管理',
key: '/category',
icon: 'bars'
},
{
title: '商品管理',
key: '/product',
icon: 'tool'
},
]
},
{
title: '用户管理',
key: '/user',
icon: 'user'
},
{
title: '角色管理',
key: '/role',
icon: 'safety',
},
{
title: '图形图表',
key: '/charts',
icon: 'area-chart',
children: [
{
title: '柱形图',
key: '/charts/bar',
icon: 'bar-chart'
},
{
title: '折线图',
key: '/charts/line',
icon: 'line-chart'
},
{
title: '饼图',
key: '/charts/pie',
icon: 'pie-chart'
},
]
},
{
title: '订单管理',
key: '/order',
icon: 'windows',
},
]
export default menuList
css样式陷阱及解决
随便刷新一个类似多级页面,http://localhost:3000/charts/bar
样式会变成这样(页面不能全屏),且控制台报错:
Refused to apply style from
'http://localhost:3000/charts/css/'
because its MIME type ('text/html') is not a supported stylesheet
MIME type, and strict MIME checking is enabled.
解决把之前写在public目录下的样式的相对引用改成绝对引用:
【1】重置样式处改成绝对路径:<link rel="stylesheet" href="/css/" />原:
<!DOCTYPE html>
<html>
<head>
<meta charset="utf-8" />
<link rel="icon" href="%PUBLIC_URL%/" />
<meta name="viewport" content="width=device-width, initial-scale=1" />
<meta name="theme-color" content="#000000" />
<meta
name="description"
content="Web site created using create-react-app"
/>
<link rel="apple-touch-icon" href="%PUBLIC_URL%/" />
<!--
provides metadata used when your web app is installed on a
user's mobile device or desktop. See https://developers.google.com/web/fundamentals/web-app-manifest/
-->
<!-- 【1】重置样式 -->
<link rel="stylesheet" href="/css/" />
<link rel="manifest" href="%PUBLIC_URL%/" />
<!--
Notice the use of %PUBLIC_URL% in the tags above.
It will be replaced with the URL of the `public` folder during the build.
Only files inside the `public` folder can be referenced from the HTML.
Unlike "/" or "", "%PUBLIC_URL%/" will
work correctly both with client-side routing and a non-root public URL.
Learn how to configure a non-root public URL by running `npm run build`.
-->
<title>Admin</title>
</head>
<body>
<noscript>You need to enable JavaScript to run this app.</noscript>
<div></div>
<!--
This HTML file is a template.
If you open it directly in the browser, you will see an empty page.
You can add webfonts, meta tags, or analytics to this file.
The build step will place the bundled scripts into the <body> tag.
To begin the development, run `npm start` or `yarn start`.
To create a production bundle, use `npm run build` or `yarn build`.
-->
</body>
</html>
7)6步动态加载左导航函数用reduce()写
/*
根据menu的数据数组生成对应的标签数组
使用reduce() + 递归调用
*/
getMenuNodes = (menuList) => {
// 得到当前请求的路由路径
const path =
return menuList.reduce((pre, item) => {
// 如果当前用户有item对应的权限, 才需要显示对应的菜单项
if ((item)) {
// 向pre添加<
if(!) {
((
<Menu.Item key={}>
<Link to={}>
<Icon type={}/>
<span>{}</span>
</Link>
</
))
} else {
// 查找一个与当前请求路径匹配的子Item
const cItem = .find(cItem => ()===0)
// 如果存在, 说明当前item的子列表需要打开
if (cItem) {
=
}
// 向pre添加<SubMenu>
((
<SubMenu
key={}
title={
<span>
<Icon type={}/>
<span>{}</span>
</span>
}
>
{()}
</SubMenu>
))
}
}
return pre
}, [])
}
使用:
{(menuList)}
效果同6
8)路由的withRouter高阶函数的使用,左导航完善:点在一个页面刷新不能显示选中状态
在控制台点开之前安装的react组件,搜索随便一个带路由的组件选中查看其带有的属性:,而leftNav组件没有这些,因此无法确定选定状态
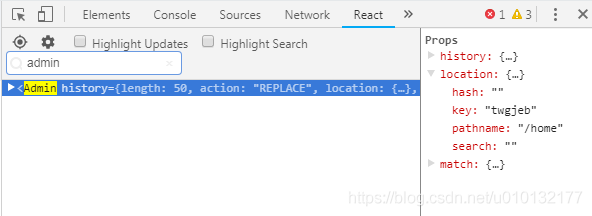
通过router的withRouter()高阶函数让leftNav具有路由属性,从而能确定当前页面位置,让导航具有选定状态:
src/pages/admin/left/
【1】withRouter:高阶函数,用于把非路由组件包装成路由组件
【2】用withRouter高阶组件:
包装非路由组件, 返回一个新的组件
新的组件向非路由组件传递3个属性: history/location/match
【3】获取当前页面的路径
【4】选中路径为3步获取的路径,从而确定选中状态,刷新后也会有选中效果
import React,{Component} from 'react'
import {Link,withRouter} from 'react-router-dom' //【1】withRouter:高阶函数,用于把非路由组件包装成路由组件
import './'
import logo from '../../../assets/images/'
import { Menu, Icon } from 'antd';
import menuList from '../../../config/'
const { SubMenu } = Menu;
class LeftNav extends Component{
state = {
collapsed: false,
};
toggleCollapsed = () => {
({
collapsed: !,
});
};
// 根据配置文件自动写入左侧导航到页面
getMenuItem=(menuList)=>{
return menuList.map(item=>{
if(!){
return(
<Menu.Item key={}>
<Link to={}>
<Icon type={}/>
<span>{}</span>
</Link>
</
)
}else{
return(
<SubMenu
key={}
title={
<span>
<Icon type={}/>
<span>{}</span>
</span>
}
>
{()}
</SubMenu>
)
}
})
}
render(){
//【3】获取当前页面的路径
const path=
return (
<div className='left'>
<Link to='/home' className='left-header'>
<img src={logo} alt='logo' />
<h1>深蓝管理后台</h1>
</Link>
<Menu
defaultSelectedKeys={[path]} //【4】选中路径为3步获取的路径,从而确定选中状态,刷新后也会有选中效果
defaultOpenKeys={[path]}
mode="inline"
theme="dark"
inlineCollapsed={}
>
{(menuList)}
</Menu>
</div>
)
}
}
/*【2】用withRouter高阶组件:
包装非路由组件, 返回一个新的组件
新的组件向非路由组件传递3个属性: history/location/match
*/
export default withRouter(LeftNav)
9)再优化:访问/跳转到/home后,没有选中状态
把上一步的leftNav组件的default改成selectedKeys即可。
<Menu
selectedKeys={[path]} //【1】换属性
defaultOpenKeys={[path]}
mode="inline"
theme="dark"
inlineCollapsed={}
>
10)再优化:刷新后带子导航的没有默认展开
【1】得到当前请求的路由路径
【2】查找一个与当前请求路径匹配的子Item
【3】在第一次render()之前执行一次读取左导航config函数,防止放在render内多次渲染的浪费,为第一个render()准备数据(必须同步的)
【4】得到需要打开菜单项的key
【5】获取默认需要打开的路径
【6】调用方式修改,防止多次渲染,浪费资源
import React,{Component} from 'react'
import {Link,withRouter} from 'react-router-dom' //withRouter:高阶函数,用于把非路由组件包装成路由组件
import './'
import logo from '../../../assets/images/'
import { Menu, Icon } from 'antd'
import menuList from '../../../config/'
const { SubMenu } = Menu;
class LeftNav extends Component{
state = {
collapsed: false,
};
//控制左导航是否收缩
toggleCollapsed = () => {
({
collapsed: !,
});
};
// 根据配置文件自动写入左侧导航到页面
getMenuItem=(menuList)=>{
// 【1】得到当前请求的路由路径
const path =
return menuList.map(item=>{
if(!){
return(
<Menu.Item key={}>
<Link to={}>
<Icon type={}/>
<span>{}</span>
</Link>
</
)
}else{
// 【2】查找一个与当前请求路径匹配的子Item
const cItem = .find(cItem => ()===0)
// 如果存在, 说明当前item的子列表需要打开
if (cItem) {
=
}
return(
<SubMenu
key={}
title={
<span>
<Icon type={}/>
<span>{}</span>
</span>
}
>
{()}
</SubMenu>
)
}
})
}
/*
【3】在第一次render()之前执行一次读取左导航config函数,防止放在render内多次渲染的浪费
为第一个render()准备数据(必须同步的)
*/
componentWillMount () {
= (menuList)
}
render(){
// 得到当前请求的路由路径
let path=
// 【4】得到需要打开菜单项的key
const openKey =
return (
<div className='left'>
<Link to='/home' className='left-header'>
<img src={logo} alt='logo' />
<h1>深蓝管理后台</h1>
</Link>
<Menu
selectedKeys={[path]}
defaultOpenKeys={[openKey]} //【5】获取默认需要打开的路径
mode="inline"
theme="dark"
inlineCollapsed={}
> {/*【6】调用方式修改,防止多次渲染,浪费资源*/}
{}
</Menu>
</div>
)
}
}
/*用withRouter高阶组件:
包装非路由组件, 返回一个新的组件
新的组件向非路由组件传递3个属性: history/location/match
*/
export default withRouter(LeftNav)
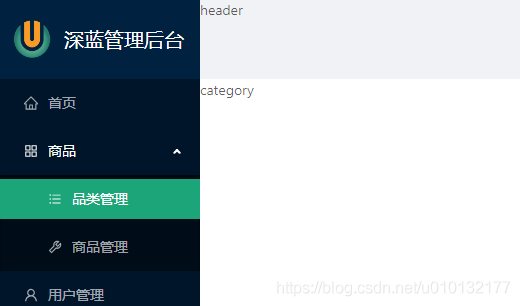
效果,刷新后,商品及子分类依然展开
转载
原作者:深蓝冰河原地址:CSDN
原链接:


 3170
3170

 被折叠的 条评论
为什么被折叠?
被折叠的 条评论
为什么被折叠?
 到【灌水乐园】发言


