


环境:
系统: CentOS 7.3
关闭 selinux 和防火墙
一、安装jumpserver
1 setenforce 0# 可以设置配置文件永久关闭2 systemctl stop iptables.service3 4
5 修改字符集,否则可能报 input/output error的问题,因为日志里打印了中文6 localedef -c -f UTF-8 -i zh_CN zh_CN.UTF-8
7 export LC_ALL=zh_CN.UTF-8
8 echo 'LANG=zh_CN.UTF-8' > /etc/locale.conf
1、准备 Python3 和 Python 虚拟环境
1 yum -y install wget sqlite-devel xz gcc automake zlib-devel openssl-devel epel-release git2 wget https://www.python.org/ftp/python/3.6.1/Python-3.6.1.tar.xz
3 tar xvf Python-3.6.1.tar.xz && cd Python-3.6.1
4 ./configure && make && make install
5 # 这里必须执行编译安装,否则在安装 Python 库依赖时会有麻烦...6 建立 Python 虚拟环境7 cd /opt8 python3 -m venv py39 source /opt/py3/bin/activate
2、安装 Jumpserver、MySQL
项目提交较多 git clone 时较大,你可以选择去 Github 项目页面直接下载zip包。
1 cd /opt/
2 git clone --depth=1 https://github.com/jumpserver/jumpserver.git && cd jumpserver && git checkout master
3 安装依赖 RPM 包4 cd /opt/jumpserver/requirements5 yum -y install $(catrpm_requirements.txt) # 如果没有任何报错请继续6 安装 Python 库依赖7 pip install -r requirements.txt # 不要指定-i参数,因为镜像上可能没有最新的包,如果没有任何报错请继续,8 如若出错请尝试:
pip install -r requirements.txt -i https://pypi.tuna.tsinghua.edu.cn/simple
9 安装 Redis, Jumpserver 使用 Redis 做 cache 和 celery broke10 yum -y installredis11 systemctl start redis
systemctl enabled redis
12 安装 MySQL:centos7下13 yum -y install mariadb mariadb-devel mariadb-server # centos7下安装的是mariadb14 systemctl enable mariadb15 systemctl start mariadb16 初始无密码,直接mysql命令进去数据库后修改root密码
17
3、配置MySQL库、用户、权限
1 MariaDB [(none)]>use mysql;2 MariaDB [mysql]> update user set password=password('your password') where user='root';3 flush privileges;4
5 创建数据库 Jumpserver 并授权6
7 > create database jumpserver default charset 'utf8';8 > grant all on *.* to 'jumpserver'@'localhost' identified by 'somepassword'; #这里给了jumpserver用户说有权限,不建议,如果后面jumpserver读取数据库出错可以改成这样。9
10 修改 Jumpserver 配置文件11 cd /opt/jumpserver12 cpconfig_example.py config.py13 viconfig.py14
15 修改config.py文件:16 注意: 配置文件是 Python 格式,不要用 TAB,而要用空格17 class DevelopmentConfig(Config):18 DEBUG =True19 DB_ENGINE = 'mysql'
20 DB_HOST = '127.0.0.1'
21 DB_PORT = 3306
22 DB_USER = 'jumpserver'
23 DB_PASSWORD = 'somepassword'
24 DB_NAME = 'jumpserver'
25
26
27 生成数据库表结构和初始化数据28 cd /opt/jumpserver/utils29 bash make_migrations.sh
30
31 运行 Jumpserver32 cd /opt/jumpserver33 ./jms start all # 后台运行使用 -d 参数./jms start all -d34 # 新版本更新了运行脚本,使用方式./jms start|stop|status|restart all 后台运行请添加 -d 参数
运行不报错,请浏览器访问 http://172.16.13.17:8080/ 默认账号: admin 密码: admin 页面显示不正常先不用处理,这时候在启动下
./jms start all 一般就可以正常访问了,如果不行搭建 nginx 代理后就可以正常访问了。
4、安装coco
1 安装 SSH Server 和 WebSocket Server: Coco2 新开一个终端,连接测试机,别忘了 source /opt/py3/bin/activate3 cd /opt4 source /opt/py3/bin/activate5 git clone https://github.com/jumpserver/coco.git && cd coco && git checkout master
6
7
8 安装依赖9 cd /opt/coco/requirements10 yum -y install $(catrpm_requirements.txt)11 pip install -r requirements.txt -i https://pypi.org/simple
12
如果出错请尝试这条:
pipinstall -r requirements.txt -i https://pypi.tuna.tsinghua.edu.cn/simple
13 查看配置文件并运行14 cd /opt/coco15 cpconf_example.py conf.py # 如果 coco 与 jumpserver 分开部署,请手动修改 conf.py16 ./cocod start # 后台运行使用 -d 参数./cocod start -d
启动成功后去Jumpserver 会话管理-终端管理(http://192.168.244.144:8080/terminal/terminal/)接受coco的注册,如果页面不正常可以等部署完成后再处理
5、安装Luna
1 安装 Web Terminal 前端: Luna2 Luna 已改为纯前端,需要 Nginx 来运行访问3
4 访问(https://github.com/jumpserver/luna/releases)下载对应版本的 release 包,直接解压,不需要编译
5
6 解压 Luna7
8 pwd
9 /opt/
10
11 wget https://github.com/jumpserver/luna/releases/download/v1.0.0/luna.tar.gz
12 tar xvf luna.tar.gz13 ls /opt/luna
6、安装docker、guacamole组件
1 安装 Windows 支持组件(如果不需要管理 windows 资产,可以直接跳过这一步)2 因为手动安装 guacamole 组件比较复杂,这里提供打包好的 docker 使用, 启动 guacamole3 Docker安装4 方法一:5
6 curl https://download.docker.com/linux/centos/docker-ce.repo -o /etc/yum.repos.d/docker.repo
7
8 yum install -y docker-ce9
10 速度比较慢,大家也可以直接下载rpm包11 方法二:12
13 https://download.docker.com/linux/centos/7/x86_64/stable/Packages/
14
15 下载完,上传到linux下 也需要用yum安装,可以自动解决依赖关系16
17 yum install -y docker-ce-xxxx.rpm18
19
20
21 systemctl start docker22 systemctl enable docker.service
启动 Guacamole
这里所需要注意的是 guacamole 暴露出来的端口是 8081,若与主机上其他端口冲突请自定义
修改 JUMPSERVER_SERVER 环境变量的配置,填上 Jumpserver 的内网地址, 启动成功后去 Jumpserver 会话管理-终端管理(http://192.168.244.144:8080/terminal/terminal/)接受[Gua]开头的一个注册,如果页面显示不正常可以等部署完成后再处理
注意:这里一定要改写一下本机的IP地址, 否则会出错, 下载时间可能有点长
$ docker run--name jms_guacamole -d -p 8081:8080 -v /opt/guacamole/key:/config/guacamole/key -e JUMPSERVER_KEY_DIR=/config/guacamole/key -e JUMPSERVER_SERVER=http:// registry.jumpserver.org/public/guacamole:1.0.0
由于部署2台jumpserver,可以下好的镜像打包传过去在加载,节省时间
把现有镜像,导出为一个文件:
docker save-o registry.tar(自定义名称) registry.jumpserver.org/public/guacamole:1.0.0我们还可以用该文件恢复本地镜像:
docker load--input registry.tar或者
docker load< registry.tar
7、安装Nginx整合各组件
1 yum -y installnginx2 准备配置文件 修改 /etc/nginx/nginx.conf3 内容如下:4 # For moreinformation on configuration, see:5 # * Official English Documentation: http://nginx.org/en/docs/
6 # * Official Russian Documentation: http://nginx.org/ru/docs/
7
8 user nginx;9 worker_processes auto;10 error_log /var/log/nginx/error.log;11 pid /run/nginx.pid;12
13 # Load dynamic modules. See /usr/share/nginx/README.dynamic.14 include /usr/share/nginx/modules/*.conf;15
16 events {17 worker_connections 1024;18 }19
20 http {21 log_format main '$remote_addr - $remote_user [$time_local] "$request" '22 '$status $body_bytes_sent "$http_referer" '23 '"$http_user_agent" "$http_x_forwarded_for"';24
25 access_log /var/log/nginx/access.log main;26
27 sendfile on;28 tcp_nopush on;29 tcp_nodelay on;30 keepalive_timeout 65;31 types_hash_max_size 2048;32
33 include /etc/nginx/mime.types;34 default_type application/octet-stream;35
36 # Load modular configuration files from the /etc/nginx/conf.d directory.37 # Seehttp://nginx.org/en/docs/ngx_core_module.html#include38 # for more information.39 include /etc/nginx/conf.d/*.conf;40 }41
42
43 准备配置文件 修改:44 vim /etc/nginx/conf.d/jumpserver.conf45
46
47 server {48 listen 80;49
50 proxy_set_header X-Real-IP $remote_addr;51 proxy_set_header Host $host;52 proxy_set_header X-Forwarded-For $proxy_add_x_forwarded_for;53
54 location /luna/ {55 try_files $uri / /index.html;56 alias /opt/luna/;57 }58
59 location /media/ {60 add_header Content-Encoding gzip;61 root /opt/jumpserver/data/;62 }63
64 location /static/ {65 root /opt/jumpserver/data/;66 }67
68 location /socket.io/ {69 proxy_passhttp://localhost:5000/socket.io/; # 如果coco安装在别的服务器,请填写它的ip70 proxy_buffering off;71 proxy_http_version 1.1;72 proxy_set_header Upgrade $http_upgrade;73 proxy_set_header Connection "upgrade";74 }75
76 location /guacamole/ {77 proxy_passhttp://localhost:8081/; # 如果guacamole安装在别的服务器,请填写它的ip78 proxy_buffering off;79 proxy_http_version 1.1;80 proxy_set_header X-Forwarded-For $proxy_add_x_forwarded_for;81 proxy_set_header Upgrade $http_upgrade;82 proxy_set_header Connection $http_connection;83 access_log off;84 }85
86 location / {87 proxy_passhttp://localhost:8080; # 如果jumpserver安装在别的服务器,请填写它的ip88 }89 }
systemctl enable nginx.service
systemctl restart nginx.service
二、mariadb同步
1 master配置:2 vim /etc/my.cnf3 在[mysqld]下添加
6 server_id=1
7 log-bin=/var/lib/mysql/master-bin8 修改配置文件后,重启mysql9
10 grant replication slave on *.* to 'test'@'%' identified by 'junjun'; #设置从数据库同步时用到的用户。11 show master status; #查看file、position值后面会用到。
1 slave配置:2 vim /etc/my.cnf3 在[mysqld]下添加
5 server-id=2
6 relay-log=/var/lib/mysql/relay-bin
slave-skip-errors = all7 修改配置文件后,重启mysql8
9 stop slave; # 停止slave同步10
11 change master tomaster_host='172.16.13.17',master_user='test',master_password='junjun',master_log_file='master-bin.000001',master_log_pos=245; #指定master之前设置的对应用户、密码、file、pos值。13 start slave; #开启同步。
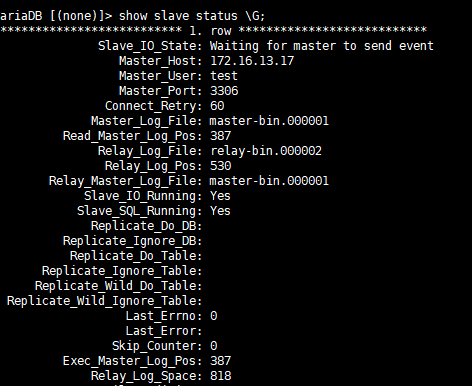
查看同步状态,如下出现两个“Yes”,表明同步成功! 同时记得去master解锁!!!!
show slave status \G;
1 同步 /opt/coco/keys 目录2 此目录记录用户密钥相关信息,如不同步jumpserver备机无法同步主机生产的私钥,从而无法远程管理资产。3
4 两台jumpserver做免密互信登录操作:5
6 制定计划任务:7 crontab -e8
9 * * * * * sleep 10;/usr/bin/scp -r /opt/coco/keys/ 172.16.13.18:/opt/coco/ > /dev/null 2>&1
10 * * * * * sleep 20;/usr/bin/scp -r /opt/coco/keys/ 172.16.13.18:/opt/coco/ > /dev/null 2>&1
11 * * * * * sleep 30;/usr/bin/scp -r /opt/coco/keys/ 172.16.13.18:/opt/coco/ > /dev/null 2>&1
12 * * * * * sleep 40;/usr/bin/scp -r /opt/coco/keys/ 172.16.13.18:/opt/coco/ > /dev/null 2>&1
13 * * * * * sleep 50;/usr/bin/scp -r /opt/coco/keys/ 172.16.13.18:/opt/coco/ > /dev/null 2>&1
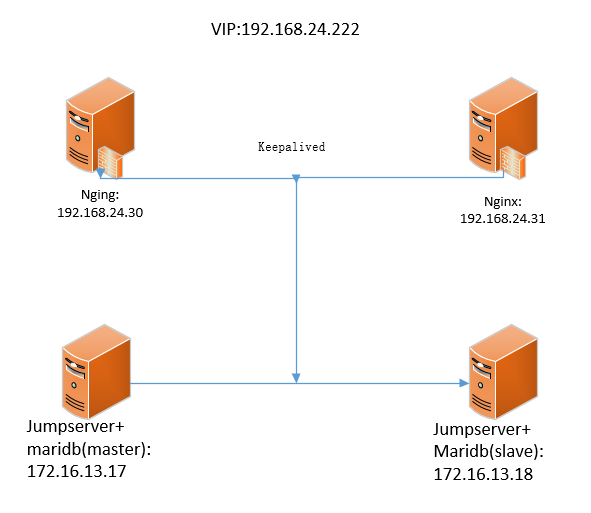
三、Nginx负载+keepalived高可用
1 yum -y installnginx2 准备配置文件 修改 /etc/nginx/nginx.conf3 内容如下:4 # For moreinformation on configuration, see:5 # * Official English Documentation: http://nginx.org/en/docs/
6 # * Official Russian Documentation: http://nginx.org/ru/docs/
7
8 user nginx;9 worker_processes auto;10 error_log /var/log/nginx/error.log;11 pid /run/nginx.pid;12
13 # Load dynamic modules. See /usr/share/nginx/README.dynamic.14 include /usr/share/nginx/modules/*.conf;15
16 events {17 worker_connections 1024;18 }19
20 http {21 log_format main '$remote_addr - $remote_user [$time_local] "$request" '22 '$status $body_bytes_sent "$http_referer" '23 '"$http_user_agent" "$http_x_forwarded_for"';24
25 access_log /var/log/nginx/access.log main;26
27 sendfile on;28 tcp_nopush on;29 tcp_nodelay on;30 keepalive_timeout 65;31 types_hash_max_size 2048;32
33 include /etc/nginx/mime.types;34 default_type application/octet-stream;35
36 # Load modular configuration files from the /etc/nginx/conf.d directory.37 # Seehttp://nginx.org/en/docs/ngx_core_module.html#include38 # for more information.39 include /etc/nginx/conf.d/*.conf;40 upstream LB {41 ip_hash;42 server 172.16.13.17:80 max_fails=3 fail_timeout=30s;43 server 172.16.13.18:80 max_fails=3 fail_timeout=30s;44 }45 }46 准备配置文件 修改:47 vim /etc/nginx/conf.d/jumpserver.conf48
49 server {50 listen 80;51 server_name 127.0.0.1 192.168.24.222;52
53 # access_log /usr/local/nginx/logs/oa-access.log main;54 # error_log /usr/local/nginx/logs/oa-error.log;55
56 location / {57 proxy_passhttp://LB;58 proxy_redirect off ;59 proxy_set_header Host $host;60 proxy_set_header X-Real-IP $remote_addr;61 proxy_set_header REMOTE-HOST $remote_addr;62 proxy_set_header X-Forwarded-For $proxy_add_x_forwarded_for;63 # proxy_connect_timeout 300;64 # proxy_send_timeout 300;65 # proxy_read_timeout 600;66 # proxy_buffer_size 256k;67 # proxy_buffers 4 256k;68 # proxy_busy_buffers_size 256k;69 # proxy_temp_file_write_size 256k;70 # proxy_next_upstream error timeout invalid_header http_500 http_503 http_404;71 # proxy_max_temp_file_size 128m;72 # proxy_cache mycache;73 # proxy_cache_valid 200 302 60m;74 # proxy_cache_valid 404 1m;75 }76 }
另一台Nginx配置完全一样。
安装Keepalived
访问Keepalived官网(http://www.keepalived.org)下载软件包,并上传到服务器上。
或者直接用命令下载并解压:
1 tar zxf keepalived-1.1.17.tar.gz2
3 安装依赖插件:4
5 yum install -y gcc openssl-devel popt-devel6
7
8 cd /usr/local/src/keepalived-1.1.17/
9 ./configure --prefix=/usr/local/keepalived && make && make install
10
11
12 cp /usr/local/keepalived/etc/rc.d/init.d/keepalived /etc/init.d/
13 cp /usr/local/keepalived/etc/sysconfig/keepalived /etc/sysconfig/
14 mkdir -p /etc/keepalived15 cp /usr/local/keepalived/etc/keepalived/keepalived.conf /etc/keepalived/
16 ln -s /usr/local/keepalived/sbin/keepalived /sbin/
17 service keepalived restart #如不成功,在修改配置文件后就可以了18 chkconfig --add keepalived19 chkconfig keepalived on
master配置文件
vim/etc/keepalived/keepalived.conf! Configuration File forkeepalived #全局定义
global_defs {
notification_email { #指定keepalived在发生事件时(比如切换)发送通知邮件的邮箱
#ops@wangshibo.cn #设置报警邮件地址,可以设置多个,每行一个。 需开启本机的sendmail服务
#tech@wangshibo.cn
}
#notification_email_from ops@wangshibo.cn #keepalived在发生诸如切换操作时需要发送email通知地址
#smtp_server127.0.0.1#指定发送email的smtp服务器
#smtp_connect_timeout30#设置连接smtp server的超时时间
#router_id master-node #运行keepalived的机器的一个标识,通常可设为hostname。故障发生时,发邮件时显示在邮件主题中的信息。
}
vrrp_script chk_http_port { #检测nginx服务是否在运行。有很多方式,比如进程,用脚本检测等等
script"/opt/nginx.sh"#这里通过脚本监测
interval2#脚本执行间隔,每2s检测一次
weight-5 #脚本结果导致的优先级变更,检测失败(脚本返回非0)则优先级 -5fall2 #检测连续2次失败才算确定是真失败。会用weight减少优先级(1-255之间)
rise1#检测1次成功就算成功。但不修改优先级
}
vrrp_instance VI_1 { #keepalived在同一virtual_router_id中priority(0-255)最大的会成为master,也就是接管VIP,当priority最大的主机发生故障后次priority将会接管
state MASTER #指定keepalived的角色,MASTER表示此主机是主服务器,BACKUP表示此主机是备用服务器。注意这里的state指定instance(Initial)的初始状态,就是说在配置好后,这台服务器的初始状态就是这里指定的,但这里指定的不算,还是得要通过竞选通过优先级来确定。如果这里设置为MASTER,但如若他的优先级不及另外一台,那么这台在发送通告时,会发送自己的优先级,另外一台发现优先级不如自己的高,那么他会就回抢占为MASTER
interface eno16777736 #指定HA监测网络的接口。实例绑定的网卡,因为在配置虚拟IP的时候必须是在已有的网卡上添加的
mcast_src_ip192.168.24.30# 发送多播数据包时的源IP地址,这里注意了,这里实际上就是在哪个地址上发送VRRP通告,这个非常重要,一定要选择稳定的网卡端口来发送,这里相当于heartbeat的心跳端口,如果没有设置那么就用默认的绑定的网卡的IP,也就是interface指定的IP地址
virtual_router_id51#虚拟路由标识,这个标识是一个数字,同一个vrrp实例使用唯一的标识。即同一vrrp_instance下,MASTER和BACKUP必须是一致的
priority100#定义优先级,数字越大,优先级越高,在同一个vrrp_instance下,MASTER的优先级必须大于BACKUP的优先级
advert_int1#设定MASTER与BACKUP负载均衡器之间同步检查的时间间隔,单位是秒
authentication { #设置验证类型和密码。主从必须一样
auth_type PASS #设置vrrp验证类型,主要有PASS和AH两种
auth_pass1111#设置vrrp验证密码,在同一个vrrp_instance下,MASTER与BACKUP必须使用相同的密码才能正常通信
}
virtual_ipaddress { #VRRP HA 虚拟地址 如果有多个VIP,继续换行填写,也可只写ip 192.168.24.222192.168.24.222/24dev eno16777736
}
track_script { #执行监控的服务。注意这个设置不能紧挨着写在vrrp_script配置块的后面(实验中碰过的坑),否则nginx监控失效!!
chk_http_port #引用VRRP脚本,即在 vrrp_script 部分指定的名字。定期运行它们来改变优先级,并最终引发主备切换。
}
}
BACKUP配置文件
vim/etc/keepalived/keepalived.conf! Configuration File forkeepalived #全局定义
global_defs {
notification_email {
#ops@wangshibo.cn
#tech@wangshibo.cn
}
#notification_email_from ops@wangshibo.cn
#smtp_server127.0.0.1#smtp_connect_timeout30#router_id master-node
}
vrrp_script chk_http_port {
script"/opt/nginx.sh"interval2weight-5fall2rise1}
vrrp_instance VI_1 {
state BACKUP
interface eno16777736
mcast_src_ip192.168.24.31virtual_router_id51priority99advert_int1authentication {
auth_type PASS
auth_pass1111}
virtual_ipaddress {192.168.24.222}
track_script { !
chk_http_port
}
}
Nginx状态监测脚本:尝试重启Nginx服务,如果还是未成功则关闭Keepalived服务。
1 vim /opt/nginx.sh
2
3 #!/bin/bash4 counter=$(ps -C nginx --no-heading|wc -l)5 if [ "${counter}" = "0" ]; then
6 systemctl restart nginx.service7 sleep 2
8 counter=$(ps -C nginx --no-heading|wc -l)9 if [ "${counter}" = "0" ]; then
10 /etc/init.d/keepalived stop11 fi
12 fi
测试:


停掉192.168.24.30的keepalived服务:


注意!!!因为做的MySQL主从,不是主主,所以jumpserver管理设置操作请在master(172.16.13.30)上操作。普通只需登录192.168.24.222使用jumpserver即可。


 829
829


 被折叠的 条评论
为什么被折叠?
被折叠的 条评论
为什么被折叠?
 到【灌水乐园】发言


