


使用Github API,将Github打造成一个稳定、便捷的网络数据中转站
使用Github API,将Github打造成一个稳定、便捷的网络数据中转站
前言
github作为一个稳定的代码托管库其实是可以当做免费数据中转站使用,实现数据的存储、自动更新、访问等等。
更为可喜的是,目前有现成的python库完成了github api的封装,我们直接使用 已经封装好的库就可以了。
本人使用的是:Pygithub, 项目使用文档:https://pygithub.readthedocs.io/en/latest/introduction.html
这个方法也可以用来做github的爬虫,自动化访问github的公开项目的内容。
库的安装方法:
pip3 install pygithub
库的使用方法:
要使用github API,首先需要拥有github的账号,或者github的access token。github账号密码是比较好获取的,但是这个不安全,很容易不小心把用户名密码泄露给其他人;因此,我们还是推荐使用access token来访问gitHub API,而且这个 access_token也好管理。
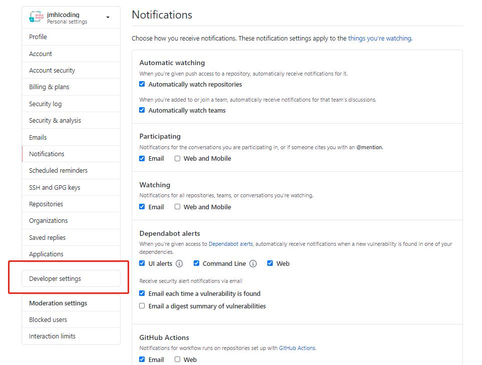
首先进入github的设置界面,点击“Developper setting”
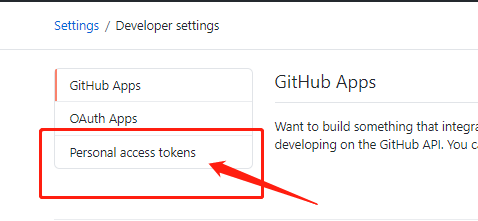
 然后选择 personal access token,
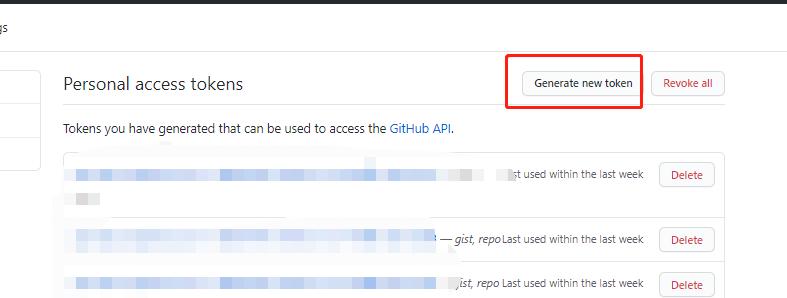
点击“Generate new token”,创建新的access_token。
选择所需的权限,然后给它起个名字,这里我们就只选择代码仓库的全部权限。
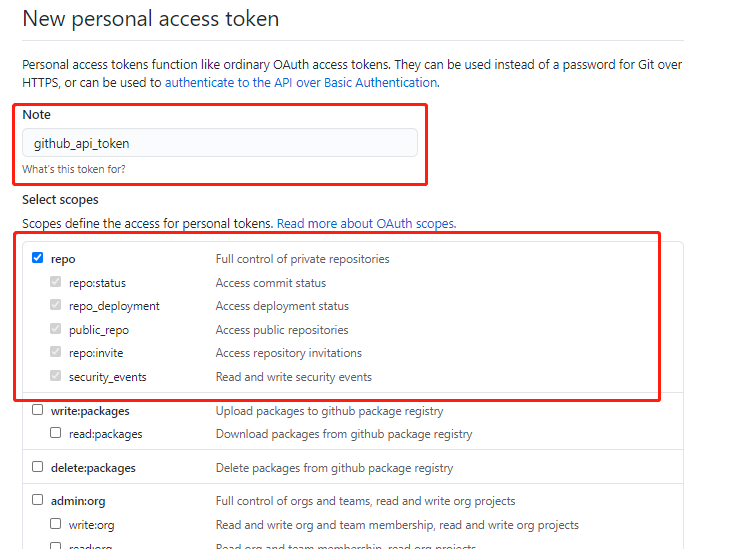
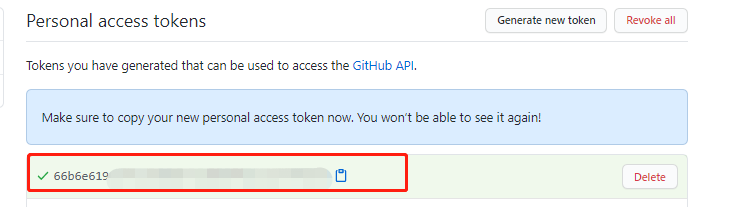
选择好后点击最下面的生成按钮,然后就可以看到生成的access_token了。
把这个access_token保存好,再次刷新github后这个串就不再显示了,如果遗忘的话只能重新申请了。
登录Github
__author__ = 'jmh081701'
from github import Github
import config
git = Github(login_or_token=config.config['access_token'])
访问Github仓库
##得到指定仓库
repo = git.get_repo("jmhIcoding/datastore")
##输出仓库的一些信息
##输出主题
print(repo.get_topics())
##显示这个仓库的stars数目
print(repo.stargazers_count)
【查】指定Github仓库的指定文件
contents= repo.get_contents(path="README.md")
如果文件不存在,执行这个函数会抛出异常:
github.GithubException.UnknownObjectException: 404 {"message": "Not Found", "documentation_url": "https://docs.github.com/rest/reference/repos#get-repository-content"}
否则,返回是一个github.ContentFile.ContentFile 对象。
这个对象里面的一些重要的方法和属性:
属性名含义type文件类型,取值:file或dir
size文件大小
name文件名
path文件的路径
content文件内容,被base64编码后的结果
decoded_content文件内容,经过base64解码后的结果
download_url文件的下载链接
访问一下:
print(contents.type)
print(contents.size)
print(contents.name)
print(contents.path)
print(contents.content)
print(contents.decoded_content)
print(contents.download_url)
输出结果:
file
40
README.md
README.md
IyBkYXRhc3RvcmUK5Z+65LqOZ2l0aHVi55qE5pWw5o2u5Lit6L2sCg==
b'# datastore\n\xe5\x9f\xba\xe4\xba\x8egithub\xe7\x9a\x84\xe6\x95\xb0\xe6\x8d\xae\xe4\xb8\xad\xe8\xbd\xac\n'
https://raw.githubusercontent.com/jmhIcoding/datastore/main/README.md?token=AESR3WOCTZT5A4OAY5637W27TDPYK
如果文件的内容是中文的话,base64解码后,注意使用utf在解码一次。
print(base64.b64decode(contents.content).decode('utf8'))
输出:
# datastore
基于github的数据中转
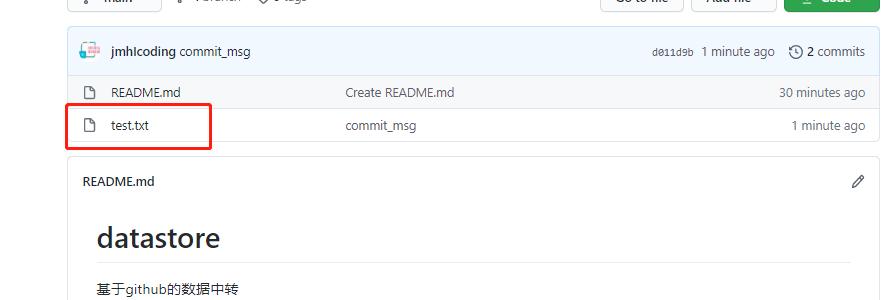
【增】 增加新的Github文件
填上文件路径path,提交的信息:message,和内容就可以了。
注意message最好不要有空格
repo.create_file(path="test.txt",message="commit_msg",content='test content')
执行后,我们看到仓库已经有这个文件了:
另外 文件路径,不支持新建文件夹。
【改】 修改Github文件内容
先获取文件,然后再调用update_file函数。
content = repo.get_contents('test.txt')
repo.update_file(path=content.path,message='update_msg',content='new content',sha=content.sha)
注意里面的sha参数,使用content.sha来获取,这个sha填被替换文件的哈希值,这是在做进一步的确认。
【删】 删除Github文件
先获取文件,再删除
content = repo.get_contents("text.txt")
repo.delete_file(path=content.path,message='delete',sha=content.sha)
上面的get_contents函数,都可以接“ref”参数,这个参数的作用是指明这个文件是那个分支、tag的, 默认是master分支。
The name of the commit/branch/tag. Default: the repository’s default branch (usually master)
使用Github API,将Github打造成一个稳定、便捷的网络数据中转站相关教程
使用jekins自动化部署git管理的spring boot项目到docker上
使用jekins自动化部署git管理的spring boot项目到docker上 使用jekins自动化部署git管理的spring boot项目到docker上 部署jekins 初始化jekins 访问jekins页面ip:8081 安装默认插件 更新插件源 安装插件 进行系统配置 创建docker执行脚本 创建任务 部署jekins
【Apollo】安装Apollo并配合使用Redis
【Apollo】安装Apollo并配合使用Redis 目录 一、安装启动 1. github拉取项目 2. 创建数据库 3. 修改/apollo/scripts/build.bat的数据库配置信息 4. 复制jar包并依次启用 5. apollo 登录界面 6. eureka 管理界面 二、使用(以搭配Redis为例) 1. 登进apollo,
automake 使用指南
automake 使用指南 转自:https://blog.csdn.net/trochiluses/article/details/49465147 在构建大型的C/C++项目时,往往需要借助Makefile. 然而手动编写makefile是相当复杂的,这一点在程序需要跨平台的时候表现地更为明显。在此背景下,我们需要借助于一些自
如何在maven项目中使用lombok中的@Data、@Slf4j等注解
如何在maven项目中使用lombok中的@Data、@Slf4j等注解 1、在maven项目的pom.xml文件中引入lombok依赖 dependency groupIdorg.projectlombok/groupId artifactIdlombok/artifactId/dependency 2、下载并安装jar 有2种方式在线安装或者本地安装,本来讲适用于所
vue 使用element 后台管理界面 左侧导航和面包屑导航
vue 使用element 后台管理界面 左侧导航和面包屑导航 只有最底层的children才跳转显示视图 const routes = [ { path: '/', name: '首页', component: Home, children: [ { path: '/', name: 'userlist', component: () = import('../views/userlist/userlist.
Vue v-for标签的使用
Vue v-for标签的使用 1.v-for标签作用是遍历数组或者遍历一个对象 2.例子 !DOCTYPE htmlhtml lang=enhead meta charset=UTF-8 titleTitle/title/headbodydiv id=content h2遍历数组/h2!-- ul--!-- li v-for=item in fruits{{item}}/li--!-- /ul-- !--除此之外
ScheduledExecutorService 使用
ScheduledExecutorService 使用 ScheduledExecutorService,我平时没有用过,他的最大优点除了线程池的特性以外,可以实现循环或延迟任务。 ScheduledExecutorService,是基于线程池设计的定时任务类,每个调度任务都会分配到线程池中的一个线程去执行,也就是说
如何在linux中安装并使用traceroute工具
如何在linux中安装并使用traceroute工具 安装方法: yum install -y traceroute 使用方法: traceroute +目标主机地址 eg:#traceroute baidu.com 一般当一行出现‘ * ’号时表示断开连接,一般情况下很难复连。 补充:在window中命令使用的方法为 #tracert +


 1966
1966


 被折叠的 条评论
为什么被折叠?
被折叠的 条评论
为什么被折叠?
 到【灌水乐园】发言


