


 本文介绍了如何在Linux上安装和运行ElasticSearch。首先,确认系统已安装Java环境,然后从官方网站下载并解压ES安装包。通过bin目录下的elasticsearch命令启动ES,检查9200端口是否正常工作。接着,学习了如何安装和查看插件,以及如何创建ES集群和检查集群健康状态。
公号:码农充电站pro
主页:https://codeshellme.github.io
本节来介绍 ES 的安装。
1,下载 ES
ES 是基于 Java 语言开发的,因此,要安装 ES,首先需要有 Java 环境。
从 ES 7.0 开始,ES 内置了 Java 环境,所以如果安装的是 7.0 及以上版本的 ES,就不需要额外安装 Java 环境了。
我们可以到 ES 的下载页面去下载 ES 安装包,你可以根据你的系统,选择不同的安装包进行安装。
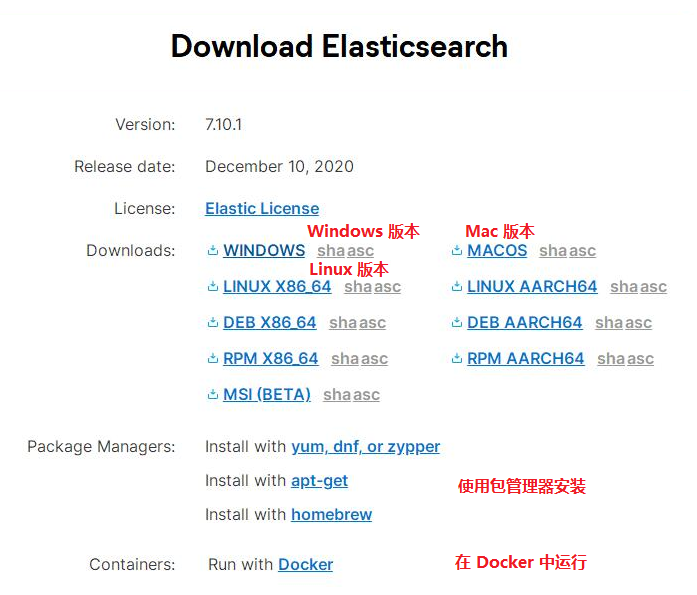
我这里选择的是 Windows 版本,下载好压缩包后,将其解压。解压后的目录如下所示:
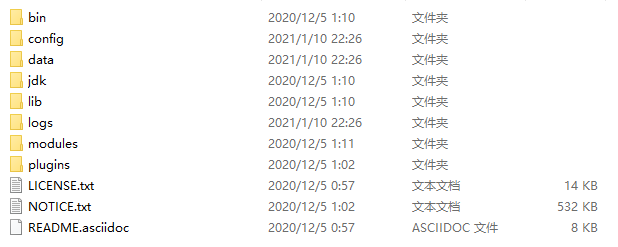
来看下每个目录的作用:
bin 目录中是一些工具命令。
data 目录存储数据文件。
jdk 目录是 Java 运行环境。
lib 目录是 Java 开发类库。
logs 目录用于存放日志。
modules 目录中包含了所有的 ES 模块。
plugins 目录包含所有已安装的插件。
config 目录是一些配置文件。
elasticsearch.yml 文件用于配置 ES 服务。
jvm.options 文件用于配置 JVM 参数。
其中 Xmx 和 Xms 建议设置的大小一样,且不超过机器内存的一半。
Xmx 和 Xms 默认为 1g。
这里有一些介绍,你可以参考一下。
2,启动 ES
bin 目录中有一个 elasticsearch 命令,用于运行 ES 实例。我们可以通过 --help 参数查看其帮助:
> bin\elasticsearch --help
Starts Elasticsearch
Option Description
------ -----------
-E Configure a setting
-V, --version Prints Elasticsearch version information and exits
-d, --daemonize Starts Elasticsearch in the background `在后台运行`
-h, --help Show help
-p, --pidfile Creates a pid file in the specified path on start
-q, --quiet Turns off standard output/error streams logging in console
-s, --silent Show minimal output
-v, --verbose Show verbose output
进入到解压后的目录中,在 Windows 系统中用下面命令来启动 ES:
bin\elasticsearch
在 Linux 系统中使用下面命令启动 ES:
bin/elasticsearch
如果启动成功,ES Server 将在本机的 9200 端口监听服务。
我们可以使用 curl 命令访问本机 9200 端口,查看 ES 是否启动成功。如果输出像下面这样,则说明启动成功:
> curl http://localhost:9200/
{
"name" : "LAPTOP-VH778PAK",
"cluster_name" : "elasticsearch",
"cluster_uuid" : "trxvXvAfQ5GxWe3D4vEIXA",
"version" : {
"number" : "7.10.1",
"build_flavor" : "default",
"build_type" : "zip",
"build_hash" : "1c34507e66d7db1211f66f3513706fdf548736aa",
"build_date" : "2020-12-05T01:00:33.671820Z",
"build_snapshot" : false,
"lucene_version" : "8.7.0",
"minimum_wire_compatibility_version" : "6.8.0",
"minimum_index_compatibility_version" : "6.0.0-beta1"
},
"tagline" : "You Know, for Search"
}
你也可以在浏览器中访问服务地址,来查看是否启动成功:

3,安装 ES 插件
我们可以通过安装 ES 插件来为 ES 扩展功能。
bin 目录中有一个 elasticsearch-plugin.bat 命令,是关于 ES 插件的命令,可以使用 --help 参数来查看其用法:
> bin\elasticsearch-plugin --help
A tool for managing installed elasticsearch plugins
Commands
--------
list - Lists installed elasticsearch plugins
install - Install a plugin
remove - removes a plugin from Elasticsearch
Non-option arguments:
command
Option Description
------ -----------
-E Configure a setting
-h, --help Show help
-s, --silent Show minimal output
-v, --verbose Show verbose output
使用 list 参数查看是否有插件:
> bin\elasticsearch-plugin list
没有任何输出,说明没有插件。
下面演示安装 analysis-icu 插件,这是一个分词插件:
> bin\elasticsearch-plugin install analysis-icu
-> Installing analysis-icu
-> Downloading analysis-icu from elastic
[=================================================] 100%
-> Installed analysis-icu
安装完成后,再次查看插件列表:
> bin\elasticsearch-plugin list
analysis-icu
可以看到,这时有了一个插件。
重新启动 ES 服务后,我们也可以访问 HTTP 接口来查看插件:
> curl localhost:9200/_cat/plugins
LAPTOP-VH778PAK analysis-icu 7.10.1
`服务名称` `插件名称` `插件版本`
添加 ?v 后缀可以查看字段的解释:
> curl localhost:9200/_cat/plugins?v
name component version `解释`
LAPTOP-VH778PAK analysis-icu 7.10.1
这里是关于 ES 插件的介绍,你可以了解一下。
4,运行 ES 集群
我们可以运行多个 ES 实例,将其组成一个 ES 集群,命令如下:
> bin\elasticsearch -E node.name=node1 -E cluster.name=escluster -E path.data=node1_data -d
> bin\elasticsearch -E node.name=node2 -E cluster.name=escluster -E path.data=node2_data -d
> bin\elasticsearch -E node.name=node3 -E cluster.name=escluster -E path.data=node3_data -d
其中 -E 用于指定命令参数,node.name 表示节点名称,cluster.name 表示集群名称,path.data 表示数据目录,-d 表示在后台运行实例。
查看集群中的节点:
> curl localhost:9200/_cat/nodes?v
ip heap.percent ram.percent cpu node.role master name
127.0.0.1 30 91 9 cdhilmrstw - node2
127.0.0.1 28 91 9 cdhilmrstw - node3
127.0.0.1 34 91 9 cdhilmrstw * node1
可以看到有 3 个节点,分别是 node1,node2,node3。其中标有星号 * 的节点为主节点。
默认情况下,集群中启动的第一个节点,会将自己选举为 Master 节点。
查看集群健康状态:
> curl localhost:9200/_cluster/health
{
"cluster_name":"escluster", `集群名称`
"status":"green", `健康状态`
"timed_out":false, `是否超时`
"number_of_nodes":3, `节点数量`
"number_of_data_nodes":3, `数据节点数量`
"active_primary_shards":0,
"active_shards":0,
"relocating_shards":0,
"initializing_shards":0,
"unassigned_shards":0,
"delayed_unassigned_shards":0,
"number_of_pending_tasks":0,
"number_of_in_flight_fetch":0,
"task_max_waiting_in_queue_millis":0,
"active_shards_percent_as_number":100
}
(本节完。)
推荐阅读:
ElasticSearch 入门简介
欢迎关注作者公众号,获取更多技术干货。


 被折叠的 条评论
为什么被折叠?
被折叠的 条评论
为什么被折叠?
 到【灌水乐园】发言


