


版权声明:本文为博主原创文章,未经博主允许不得转载。 https://blog.csdn.net/socho/article/details/51804720
解决Master单点问题,两台mysql互为主备,双向replication。当一master挂了,则将slave切换为master,继续工作。好,给定两台机器
主机A:192.168.1.201
主机B:192.168.1.202
一、互为主从
1.配置
主机A上,vim /etc/my.cnf,添加:
[mysqld]
log-bin=mysql-bin
server-id=1 #服务id要和B不同
binlog_do_db=db1
master-host = 192.168.1.202 #目标机器是B的地址
master-user = user1
master-password = pass1
master-port = 3306
master-connect-retry = 5
主机B上,vim /etc/my.cnf,添加:
[mysqld]
log-bin=mysql-bin
server-id=2 #服务id要和A不同
binlog_do_db=db1
master-host = 192.168.1.201 #目标机器是A的地址
master-user = user1
master-password = pass1
master-port = 3306
master-connect-retry = 5
在A上开启binlog,创建复制帐号
GRANT REPLICATION SLAVE,REPLICATION CLIENT ON *.* TO user1@'%' IDENTIFIED BY 'pass1';
在B上开启binlog,创建复制帐号
GRANT REPLICATION SLAVE,REPLICATION CLIENT ON *.* TO user1@'%' IDENTIFIED BY 'pass1';
为了方便,我们将用户名和密码两台机器都设成一致的。
在A上
我们先在A上创建数据库db1,里面的表内容随便写点啥就行了:
CREATE DATABASE db1;
USE db1;
CREATE TABLE `tb_2` (
`id` int(11) NOT NULL AUTO_INCREMENT,
`name` varchar(64) DEFAULT NULL,
PRIMARY KEY (`id`)
) ENGINE=MyISAM AUTO_INCREMENT=2 DEFAULT CHARSET=utf8;
INSERT INTO `tb_2` VALUES ('1', 'Michael');
查看下信息
mysql> show variables like 'ser%';
+---------------+-------+
| Variable_name | Value |
+---------------+-------+
| server_id | 1 |
+---------------+-------+
mysql> show master status;
+------------------+----------+--------------+------------------+
| File | Position | Binlog_Do_DB | Binlog_Ignore_DB |
+------------------+----------+--------------+------------------+
| mysql-bin.000001 | 447 | db1 | |
+------------------+----------+--------------+------------------+
可以看到A要同步的是db1数据库,当前bin-log编号是000001,位置是447。
查看A的数据
mysql> select * from tb_2;
+----+---------+
| id | name |
+----+---------+
| 1 | Michael |
+----+---------+
A有一条数据。
在B上
mysql> show variables like 'ser%';
+---------------+-------+
| Variable_name | Value |
+---------------+-------+
| server_id | 2 |
+---------------+-------+
mysql> show master status;
+------------------+----------+--------------+------------------+
| File | Position | Binlog_Do_DB | Binlog_Ignore_DB |
+------------------+----------+--------------+------------------+
| mysql-bin.000001 | 106 | db1 | |
+------------------+----------+--------------+------------------+
查看B的数据
mysql> select * from tb_2;
Empty set (0.00 sec)
B还没有数据,目前未同步。位置是000001:106,一会从A上同步过来。
2.开始同步
配置中已有replication的配置了,只要两个机器重启就行了,自动相互复制。
在A上
service mysqld restart
在B上
service mysqld restart
再在A上执行
mysql> show slave status\G
*************************** 1. row ***************************
Slave_IO_State: Waiting for master to send event
Master_Host: 192.168.1.202
Master_User: user1
Master_Port: 3306
Connect_Retry: 5
Master_Log_File: mysql-bin.000008
Read_Master_Log_Pos: 106
Relay_Log_File: mysqld-relay-bin.000001
Relay_Log_Pos: 251
Relay_Master_Log_File: mysql-bin.000008
Slave_IO_Running: Yes
Slave_SQL_Running: Yes
Replicate_Do_DB:
Replicate_Ignore_DB:
Replicate_Do_Table:
Replicate_Ignore_Table:
Replicate_Wild_Do_Table:
Replicate_Wild_Ignore_Table:
Last_Errno: 0
Last_Error:
Skip_Counter: 0
Exec_Master_Log_Pos: 106
Relay_Log_Space: 552
Until_Condition: None
Until_Log_File:
Until_Log_Pos: 0
Master_SSL_Allowed: No
Master_SSL_CA_File:
Master_SSL_CA_Path:
Master_SSL_Cert:
Master_SSL_Cipher:
Master_SSL_Key:
Seconds_Behind_Master: 0
Master_SSL_Verify_Server_Cert: No
Last_IO_Errno: 0
Last_IO_Error:
Last_SQL_Errno: 0
Last_SQL_Error:
A中的Slave_IO_Running 和 Slave_SQL_Running两个值都是YES,说明配置成功了。
B的配置就不贴了,也是配置成功的。
如果同步不成功:
用命令行的方式手动复制,比如在B上输入命令
change master to
master_host='192.168.1.201',
master_port=3306,
master_user='user1',
master_password='pass1';
然后使用start slave;开启从A向B的复制。
还有指定从某个地址开始复制的话,加两个参数
master_log_file='mysql-bin.000001',
master_log_pos=106;
反过来,要从B同步到A,就要在A上执行
change master to
master_host='192.168.1.202',
master_port=3306,
master_user='user1',
master_password='pass1';
同步好了之后,查看B的数据
mysql> select * from tb_2;
+----+---------+
| id | name |
+----+---------+
| 1 | Michael |
+----+---------+
好的,现在A和B数据一致了。
再看看A和B的状态
A机器
mysql> show master status;
+------------------+----------+--------------+------------------+
| File | Position | Binlog_Do_DB | Binlog_Ignore_DB |
+------------------+----------+--------------+------------------+
| mysql-bin.000001 | 447 | db1 | |
+------------------+----------+--------------+------------------+
B机器
mysql> show master status;
+------------------+----------+--------------+------------------+
| File | Position | Binlog_Do_DB | Binlog_Ignore_DB |
+------------------+----------+--------------+------------------+
| mysql-bin.000001 | 106 | db1 | |
+------------------+----------+--------------+------------------+
B的bin-log位置没有变,还是000001:106,但是数据确实已经到了。
3.在A和B上操作
1.先把A当作Master,在A上操作数据
从A上删除数据
mysql> delete from tb_2 where name='Michael';
Query OK, 1 row affected (0.00 sec)
此时A的bin-log位置是000001:546,而到B查看数据
mysql> select * from tb_2;
Empty set (0.00 sec)
确实已经同步删除了,不过B的bin-log位置依然是000001:106
2.再把B当作Master,在B上操作数据
INSERT INTO `tb_2`(name) VALUES ('Michael');
Query OK, 1 row affected (0.00 sec)
成功后,到A上去查
mysql> select * from tb_2;
+----+---------+
| id | name |
+----+---------+
| 2 | Michael |
+----+---------+
A也同步到了数据,至此说明A和B互为主从,在一个上面修改数据,就会同步到另外一个机器上是可行的。
查看下两机器状态
这次A的bin-log地址没有变化,还是000001:546,而变的是B,成了000001:239了,说明从机只有变成主机数据被修改的时候,才会改变自己的bin-log地址,同步是不会改变bin-log地址的。
接下来配置keepalived。
二、KeepAlived
上一步确保了互为主从设置成功后,接下来安装
yum install keepalived
看下版本
[root@localhost ~]# keepalived -v
Keepalived v1.2.13 (03/19,2015)
1.配置
然后在A服务器编辑KeepAlived的配置文件
vim /etc/keepalived/keepalived.conf
! Configuration File for keepalived
global_defs {
router_id HA_MySQL #标识,双主相同
}
vrrp_instance VI_1 {
state BACKUP #注意,主从两端都配置成了backup,因为使用了nopreempt,即非抢占模式
interface eth0
virtual_router_id 51 #分组,主备相同
priority 100 #优先级,这个高一点则先把它作为master
advert_int 1
nopreempt #不主动抢占资源,设置非抢占模式
authentication {
auth_type PASS
auth_pass 1111
}
virtual_ipaddress {
192.168.1.199
}
}
virtual_server 192.168.1.199 3306 {
delay_loop 2
lb_algo wrr #带有权重的轮询
lb_kind DR
persistence_timeout 60 #同一IP的连接60秒内被分配到同一台真实服务器
protocol TCP
real_server 192.168.1.201 3306 {
weight 3 #权重为3
notify_down /data/keepalived_shutdown.sh #当mysq服down时,执行此脚本,杀死keepalived实现切换, 自杀脚本.
TCP_CHECK {
connect_timeout 10
nb_get_retry 3
delay_before_retry 3
connect_port 3306
}
}
}
然后编辑B的配置文件
vim /etc/keepalived/keepalived.conf
! Configuration File for keepalived
global_defs {
router_id HA_MySQL
}
vrrp_instance VI_1 {
state BACKUP
interface eth0
virtual_router_id 51
priority 90 #优先级,这个低一点
advert_int 1
nopreempt
authentication {
auth_type PASS
auth_pass 1111
}
virtual_ipaddress { #虚拟IP (VIP)
192.168.1.199
}
}
virtual_server 192.168.1.199 3306 {
delay_loop 2 #每2秒检查一次real_server存活
lb_algo wrr
lb_kind DR
persistence_timeout 60
protocol TCP
real_server 192.168.1.202 3306 {
weight 3
notify_down /data/keepalived_shutdown.sh
TCP_CHECK {
connect_timeout 10 #连接超时时间
nb_get_retry 3 #重连次数
delay_before_retry 3 #重连间隔时间
connect_port 3306 #健康检查端口,配置自己mysql服务端口
}
}
}
有一点要注意的是,主从两端的state,都配置成了backup,因为使用了nopreempt,即非抢占模式。
举个例子,当主端先启动mysql实例和keepalived后,如果此时从端也启动了mysql实例和keepalived,那么vip不会跳到从端上去,即使它的优先级为100,要大于主端的90
而如果不设置nopreempt,那么这个时候,又分2种情况:
1.state相同,即都是master或都是backup
优先级高的,会占有vip,和角色无关
2.state不同,即master->backup或backup->master
优先级高的,会占有vip,和角色无关
前提不同,结果都是一样的,即优先级是主导,谁的优先级高,vip就漂到谁那里
可以看到A和B配置的共同点,就是virtual_ipaddress都是,这样当我们使用mysql的时候,就连接到这个虚拟ip上,由它进行转发到实体机。priority值高的先被访问,作为Master。这样实体机mysql的down机重启和转换主从角色则由keepalived来完成,对应用层透明,让应用无法感知。两台机器要通局域网,虚拟IP会被设置在他们共有的局域网内,不通的话两台机器各设置各的虚拟IP。
杀死keepalived的脚本
vim /data/keepalived_shutdown.sh
#!/bin/bash
#kill掉keepalived进程,以防止脑裂问题。
pkill keepalived
2测试
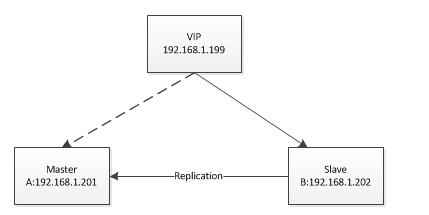
先给个图说下目前的状况,应用程序连接VIP,VIP连接到A机器,从A向B执行Replication同步。

1.连接虚拟ip
先查看下虚拟ip有没有,在设置的priority值高,也就是主机的那台机器上,这里是A机器,调用如下命令
[root@localhost data]# ip addr
1: lo: mtu 16436 qdisc noqueue state UNKNOWN
link/loopback 00:00:00:00:00:00 brd 00:00:00:00:00:00
inet 127.0.0.1/8 scope host lo
inet6 ::1/128 scope host
valid_lft forever preferred_lft forever
2: eth0: mtu 1500 qdisc pfifo_fast state UP qlen 1000
link/ether 08:00:27:eb:92:52 brd ff:ff:ff:ff:ff:ff
inet 192.168.1.201/24 brd 192.168.1.255 scope global eth0
inet 192.168.1.199/32 scope global eth0
inet6 fe80::a00:27ff:feeb:9252/64 scope link
valid_lft forever preferred_lft forever
可以看到已经有虚拟ip了,被绑定到了eth0上了。同时在B上面执行,则发现没有虚拟ip,说明现在A机器被选择了承担虚拟ip。接下来ping下它
[root@localhost data]# ping 192.168.1.199
PING 192.168.1.199 (192.168.1.199) 56(84) bytes of data.
64 bytes from 192.168.1.199: icmp_seq=1 ttl=64 time=0.104 ms
可以ping通哦,可以连接了!
用客户端连接共同的入口,虚拟ip
myslq -uroot -h192.168.1.119 -p
OK,连接上了,查下当前后端接入的是哪个实体机
mysql> show variables like 'server_id';
+---------------+-------+
| Variable_name | Value |
+---------------+-------+
| server_id | 1 |
+---------------+-------+
server_id=1是A机器。此时两台机器上的数据都是
mysql> select * from tb_2;
+----+---------+
| id | name |
+----+---------+
| 2 | Michael |
+----+---------+
2.修改数据
好,我们修改下数据看看
update tb_2 set name='andy' where name='Michael';
Query OK, 1 row affected (0.00 sec)
Rows matched: 1 Changed: 1 Warnings: 0
然后查看
mysql> select * from tb_2;
+----+------+
| id | name |
+----+------+
| 2 | andy |
+----+------+
单独开个客户端去查看A和B的机器,得到同样的效果,数据得到了同步
mysql> select * from tb_2;
+----+------+
| id | name |
+----+------+
| 2 | andy |
+----+------+
3.制造down机
把mysql进程直接杀掉,类似于机器down的情况。
ps -ef|grep mysql
分析结果,得到两个mysql的进程id,都给它杀掉
kill -9 7282
kill -9 7408
或者直接执行killall mysqld
然后再次查看server_id,短暂的失去连接,即使毫秒就恢复了
mysql> show variables like 'server_id';
No connection. Trying to reconnect...
Connection id: 751
Current database: *** NONE ***
+---------------+-------+
| Variable_name | Value |
+---------------+-------+
| server_id | 2 |
看样子是虚拟ip迁移了,在B上ip addr下
1: lo: mtu 16436 qdisc noqueue state UNKNOWN
link/loopback 00:00:00:00:00:00 brd 00:00:00:00:00:00
inet 127.0.0.1/8 scope host lo
inet6 ::1/128 scope host
valid_lft forever preferred_lft forever
2: eth0: mtu 1500 qdisc mq state UP qlen 1000
link/ether dc:85:de:9f:f3:27 brd ff:ff:ff:ff:ff:ff
inet 192.168.1.202/24 brd 192.168.1.255 scope global wlan0
inet 192.168.1.199/32 scope global wlan0
inet6 fe80::de85:deff:fe9f:f327/64 scope link
valid_lft forever preferred_lft forever
server_id=2,并且B机器加载上了虚拟ip,同时我们在A机器上使用ip addr看到虚拟ip已经不存在了,A机器的keepalived进程也死了。充分证明了现在虚拟ip迁移到了B机器上。当然要让A机器复活,自己另外写脚本重启吧。现在的情况变成了应用程序连接VIP,VIP连接到B机器,从B向A执行Replication同步。
3.复活机器
重启A机器上的mysql和keepalived
service mysqld start
service keepalived start
再次查看server_id,发现还是2,说明虚拟ip没有迁移回到A机器,这样就避免了脑裂问题
mysql> show variables like 'server_id';
+---------------+-------+
| Variable_name | Value |
+---------------+-------+
| server_id | 2 |
+---------------+-------+
---------------------


 2819
2819


 被折叠的 条评论
为什么被折叠?
被折叠的 条评论
为什么被折叠?
 到【灌水乐园】发言


