


简介: 在进行k8s实践中, services 是经常碰到的资源对象,services 充当了 k8s 集群 pod 服务抽象的功能,为后端pod 提供了负载均衡和服务发现,那他到底是如何工作的呢,这里从 services 的具体实现 kube-proxy 出发解读 services 的工作机制。
在 kubernetes 中的 services 是一组同 label 类型 pod 的服务抽象,为逻辑上的一组Pod提供了一致的访问策略,也可以理解为微服务(micro-service)。
我们先来看看 services 在 k8s 中的资源描述:
services:
apiVersion: v1kind: Servicemetadata: name: playmate-model namespace: rcmdspec: clusterIP: 10.247.168.174 ports: - name: grpc port: 8000 protocol: TCP targetPort: 8000 selector: app: playmate-model sessionAffinity: None type: ClusterIP我们可以看到 services 只提供 clusterIP 和一个 selector, 哪他是如何将流量转发到对应的pod 呢? 这里需要引入一个k8s资源概念 endpoints,我们看看 endpoints 的资源文件,可以通过 kubectl get endpoints 得到:
endpoints
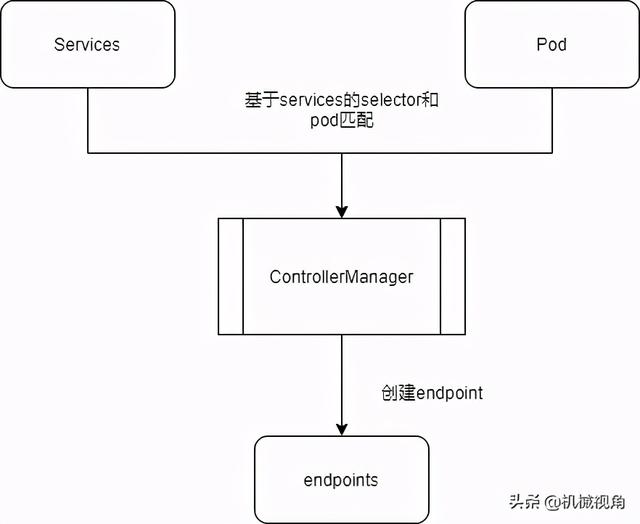
apiVersion: v1kind: Endpointsmetadata: name: playmate-model namespace: rcmdsubsets:- addresses: - ip: 10.0.2.137 nodeName: 10.213.20.91 targetRef: kind: Pod name: playmate-model-8cff8978f-mwtkt namespace: rcmd resourceVersion: "17169006" uid: 86898a37-4ff5-441d-a863-c70fa65d78f0 notReadyAddresses: - ip: 10.0.2.130 nodeName: 10.213.20.92 targetRef: kind: Pod name: playmate-model-89c8d5f8f-t2r5n namespace: rcmd resourceVersion: "15708217" uid: 6884d0c3-e37f-4907-9b43-2903224f7773 ports: - name: grpc port: 8000 protocol: TCP可以看出,最简单的 services 结构包含了一个 clusterIP,暴露端口和一个 selector 选择器。 endpoints 对象包含末端目标的ip地址和目标点的pod的信息。
而我们一般创建 serivces 并不需要手动创建 endpoints,集群会尝试根据 selector 找到对应的pod信息,然后基于找到的匹配的pod信息创建 pod 为后端的 endpoints 对象,流程如下图:
当然我们也可以手动创建 endpoints,比如我们为外部服务提供集群内的服务发现可以手动设置 services 和 endpoints:
apiVersion: v1kind: Servicemetadata: name: hbase-broker-1 namespace: rcmdspec: clusterIP: 10.247.180.39 ports: - port: 2181 protocol: TCP targetPort: 2181 sessionAffinity: None type: ClusterIPapiVersion: v1kind: Endpointsmetadata: name: hbase-broker-1 namespace: rcmdsubsets:- addresses: - ip: 10.10.14.115 # 外部服务地址 ports: - port: 2181 protocol: TCP从 kube-proxy 看 services 工作机制
kube-proxy 是负责 services 和 endpoints 在各节点的具体实现,kube-proxy 和 kubelet 一样会在每个节点都运行一个实例,为 services 提供最简单的 TCP, UDP和 SCTP 流量转发,转发到对应的目标(endpoints)。下面通过 kube-proxy 源码解读可以更好地了解 services 和 endpoints 的运作机制。
这里是基于release-1.17,commit sha:15600ef9855dbdfd6e07f6a76e660b1b6030387e 的源码进行解读
先从 cmd/kube-proxy/proxy.go 开始:
...func main() { ... command := app.NewProxyCommand() ... if err := command.Execute(); err != nil { os.Exit(1) }}这是个k8s命令的标准源码,声明命令调用Execute(读过 k8s 命令源码得都知道都是这个讨论~:)
看下 NewProxyCommond方法:
// NewProxyCommand creates a *cobra.Command object with default parametersfunc NewProxyCommand() *cobra.Command { opts := NewOptions() cmd := &cobra.Command{ Use: "kube-proxy", Long: `The Kubernetes network proxy runs on each node. Thisreflects services as defined in the Kubernetes API on each node and can do simpleTCP, UDP, and SCTP stream forwarding or round robin TCP, UDP, and SCTP forwarding across a set of backends.Service cluster IPs and ports are currently found through Docker-links-compatibleenvironment variables specifying ports opened by the service proxy. There is an optionaladdon that provides cluster DNS for these cluster IPs. The user must create a servicewith the apiserver API to configure the proxy.`, Run: func(cmd *cobra.Command, args []string) { verflag.PrintAndExitIfRequested() cliflag.PrintFlags(cmd.Flags()) if err := initForOS(opts.WindowsService); err != nil { klog.Fatalf("failed OS init: %v", err) } if err := opts.Complete(); err != nil { klog.Fatalf("failed complete: %v", err) } if err := opts.Validate(); err != nil { klog.Fatalf("failed validate: %v", err) } // 这里是执行 --> if err := opts.Run(); err != nil { klog.Exit(err) } }, Args: func(cmd *cobra.Command, args []string) error { for _, arg := range args { if len(arg) > 0 { return fmt.Errorf("%q does not take any arguments, got %q", cmd.CommandPath(), args) } } return nil }, } ... return cmd}// Run runs the specified ProxyServer.func (o *Options) Run() error { defer close(o.errCh) if len(o.WriteConfigTo) > 0 { return o.writeConfigFile() } // 声明一个 proxyserver 对象 proxyServer, err := NewProxyServer(o) if err != nil { return err } if o.CleanupAndExit { return proxyServer.CleanupAndExit() } o.proxyServer = proxyServer // proxyserver 执行 return o.runLoop()}// runLoop will watch on the update change of the proxy server's configuration file.// Return an error when updatedfunc (o *Options) runLoop() error { if o.watcher != nil { o.watcher.Run() } // run the proxy in goroutine go func() { err := o.proxyServer.Run() o.errCh Kubernetes 网络代理在每个节点上运行。网络代理反映了每个节点上 Kubernetes API 中定义的服务,并且可以执行简单的 TCP、UDP 和 SCTP 流转发,或者在一组后端进行循环 TCP、UDP 和 SCTP 转发。当前可通过 Docker-links-compatible 环境变量找到服务集群 IP 和端口,这些环境变量指定了服务代理打开的端口。有一个可选的插件,可以为这些集群 IP 提供集群 DNS。用户必须使用 apiserver API 创建服务才能配置代理。
cobra.Command 是一个标准的 k8s 命令行结构体,直接看 RUN 方法就可以了,RUN 里面有一个段对 kube-proxy 命令的描述:
Kubernetes 网络代理在每个节点上运行。网络代理反映了每个节点上 Kubernetes API 中定义的服务,并且可以执行简单的 TCP、UDP 和 SCTP 流转发,或者在一组后端进行循环 TCP、UDP 和 SCTP 转发。当前可通过 Docker-links-compatible 环境变量找到服务集群 IP 和端口,这些环境变量指定了服务代理打开的端口。有一个可选的插件,可以为这些集群 IP 提供集群 DNS。用户必须使用 apiserver API 创建服务才能配置代理。
这里核心的是 opts.Run() 方法,进去后可以看到一个 NewProxyServer 声明了一个ProxyServer结构体,调用了o.proxyServer.Run()方法,我们先看看 proxyServer 结构体。
ProxyServer 三种运行模式
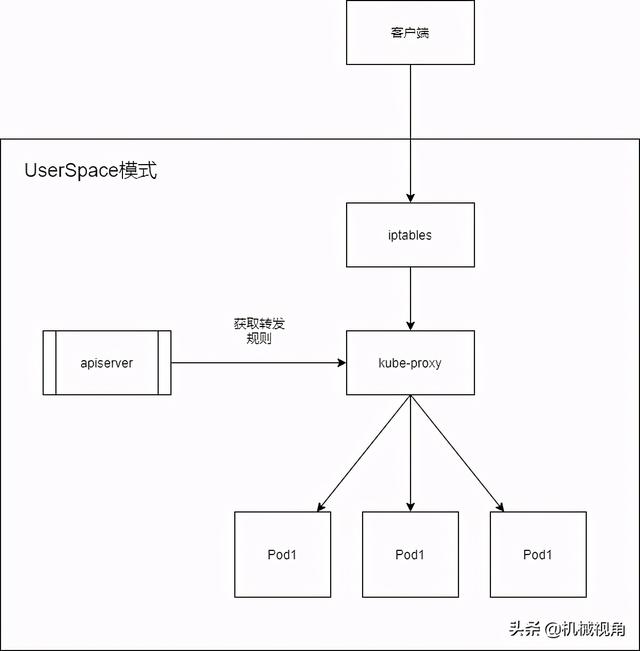
// NewProxyServer returns a new ProxyServer.func NewProxyServer(o *Options) (*ProxyServer, error) { return newProxyServer(o.config, o.CleanupAndExit, o.master)}func newProxyServer( config *proxyconfigapi.KubeProxyConfiguration, cleanupAndExit bool, master string) (*ProxyServer, error) { ... proxyMode := getProxyMode(string(config.Mode), kernelHandler, ipsetInterface, iptables.LinuxKernelCompatTester{}) ... if proxyMode == proxyModeIPTables { klog.V(0).Info("Using iptables Proxier.") ... proxier, err = iptables.NewProxier( iptInterface, utilsysctl.New(), execer, config.IPTables.SyncPeriod.Duration, config.IPTables.MinSyncPeriod.Duration, config.IPTables.MasqueradeAll, int(*config.IPTables.MasqueradeBit), config.ClusterCIDR, hostname, nodeIP, recorder, healthzServer, config.NodePortAddresses, ) ... } else if proxyMode == proxyModeIPVS { klog.V(0).Info("Using ipvs Proxier.") ... proxier, err = ipvs.NewProxier( iptInterface, ipvsInterface, ipsetInterface, utilsysctl.New(), execer, config.IPVS.SyncPeriod.Duration, config.IPVS.MinSyncPeriod.Duration, config.IPVS.ExcludeCIDRs, config.IPVS.StrictARP, config.IPTables.MasqueradeAll, int(*config.IPTables.MasqueradeBit), config.ClusterCIDR, hostname, nodeIP, recorder, healthzServer, config.IPVS.Scheduler, config.NodePortAddresses, ) ... } else { klog.V(0).Info("Using userspace Proxier.") // TODO this has side effects that should only happen when Run() is invoked. proxier, err = userspace.NewProxier( userspace.NewLoadBalancerRR(), net.ParseIP(config.BindAddress), iptInterface, execer, *utilnet.ParsePortRangeOrDie(config.PortRange), config.IPTables.SyncPeriod.Duration, config.IPTables.MinSyncPeriod.Duration, config.UDPIdleTimeout.Duration, config.NodePortAddresses, ) ... } return &ProxyServer{ Client: client, EventClient: eventClient, IptInterface: iptInterface, IpvsInterface: ipvsInterface, IpsetInterface: ipsetInterface, execer: execer, Proxier: proxier, Broadcaster: eventBroadcaster, Recorder: recorder, ConntrackConfiguration: config.Conntrack, Conntracker: &realConntracker{}, ProxyMode: proxyMode, NodeRef: nodeRef, MetricsBindAddress: config.MetricsBindAddress, EnableProfiling: config.EnableProfiling, OOMScoreAdj: config.OOMScoreAdj, ConfigSyncPeriod: config.ConfigSyncPeriod.Duration, HealthzServer: healthzServer, UseEndpointSlices: utilfeature.DefaultFeatureGate.Enabled(features.EndpointSlice), }, nil}NewProxyServer 提供了三种运行模式,iptables、IPVS和 userspace,userspace 代理模式算比较旧的一种模式,在 Kubernetes v1.0 中开始使用 user space, v1.2的时候默认模式已经改为 iptables 了,现在大部分集群中都是这种模式。

userspace 模式其实就是直接通过kube-proxy 将数据包转发到后端 Pods,kube-proxy 在这里起到了路由规则下发、包转发规则、负载均衡的功能,由于 kube-proxy 是运行在用户空间的,会存在用户空间和内核空间的频繁切换,这对性能影响很大,所以后面默认就换成 iptables 了。
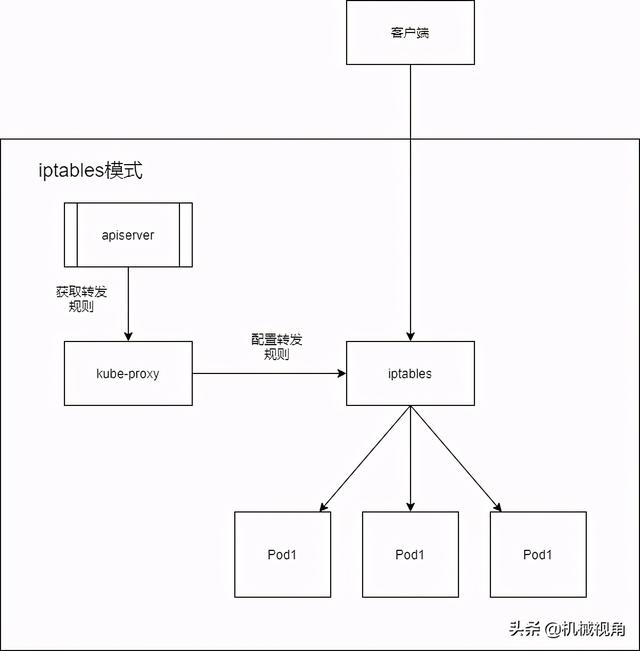
iptables 基于 netfilter 实现,所有操作都在内核空间相比基于 kube-proxy 直接做转发和负载均衡在性能上得到很大的提升。这里 kube-proxy 只是起到设置 iptables 的规则作用。
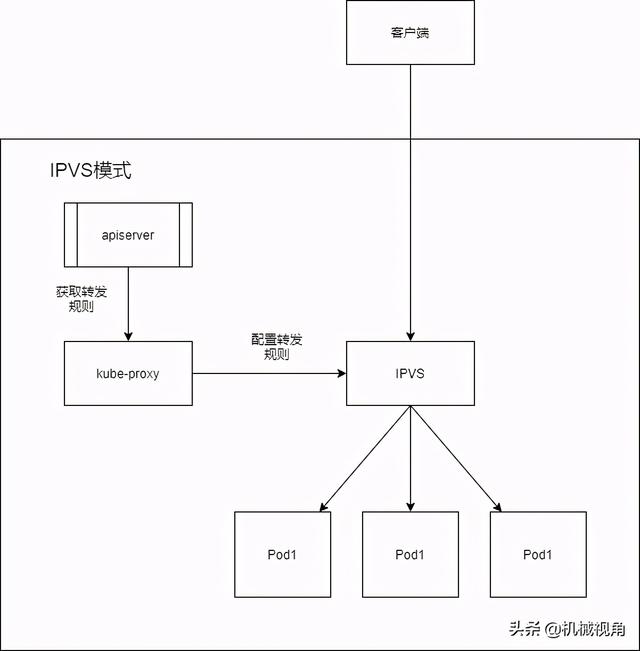
另一个是 IPVS, IPVS 在性能上比 iptables 更进一步,底层和 iptables 一样是基于 netfilter ,但IPVS 基于hash tabels来存储网络转发规则相比于 iptables 这种线性 O(n) 的算法要快很多。
但 1.17 版下 iptables 还是 kube-proxy 的默认选项,应该用得人也是最多得,这里就只介绍 iptables 的转发方式。
kube-proxy核心运行逻辑
okay,了解完 ProxyServer 结构,我们继续看看 kube-proxy 核心运行逻辑,也就是 Run()方法:
// Run runs the specified ProxyServer. This should never exit (unless CleanupAndExit is set).// TODO: At the moment, Run() cannot return a nil error, otherwise it's caller will never exit. Update callers of Run to handle nil errors.func (s *ProxyServer) Run() error { // 监控检查 // Start up a healthz server if requested if s.HealthzServer != nil { s.HealthzServer.Run() } // metrics 指标上报 // Start up a metrics server if requested if len(s.MetricsBindAddress) > 0 { proxyMux := mux.NewPathRecorderMux("kube-proxy") healthz.InstallHandler(proxyMux) proxyMux.HandleFunc("/proxyMode", func(w http.ResponseWriter, r *http.Request) { w.Header().Set("Content-Type", "text/plain; charset=utf-8") w.Header().Set("X-Content-Type-Options", "nosniff") fmt.Fprintf(w, "%s", s.ProxyMode) }) proxyMux.Handle("/metrics", legacyregistry.Handler()) ... } ... // 通过 client-go 的 informer 像 api-server 获取信息 // Make informers that filter out objects that want a non-default service proxy. informerFactory := informers.NewSharedInformerFactoryWithOptions(s.Client, s.ConfigSyncPeriod, informers.WithTweakListOptions(func(options *metav1.ListOptions) { options.LabelSelector = labelSelector.String() })) // Create configs (i.e. Watches for Services and Endpoints or EndpointSlices) // Note: RegisterHandler() calls need to happen before creation of Sources because sources // only notify on changes, and the initial update (on process start) may be lost if no handlers // are registered yet. // 创建 services serviceConfig := config.NewServiceConfig(informerFactory.Core().V1().Services(), s.ConfigSyncPeriod) serviceConfig.RegisterEventHandler(s.Proxier) // serviceconfig 执行 go serviceConfig.Run(wait.NeverStop) // 创建 endpoints 或 endpointSlice if s.UseEndpointSlices { endpointSliceConfig := config.NewEndpointSliceConfig(informerFactory.Discovery().V1beta1().EndpointSlices(), s.ConfigSyncPeriod) endpointSliceConfig.RegisterEventHandler(s.Proxier) go endpointSliceConfig.Run(wait.NeverStop) } else { endpointsConfig := config.NewEndpointsConfig(informerFactory.Core().V1().Endpoints(), s.ConfigSyncPeriod) endpointsConfig.RegisterEventHandler(s.Proxier) go endpointsConfig.Run(wait.NeverStop) } informerFactory.Start(wait.NeverStop) ... // Just loop forever for now... s.Proxier.SyncLoop() return nil}从这里可以看到, ProxyServer 主要包括几步:
- 监控检查
- metrics数据上报
- 通过 client-go 从apiserver 获取 services 和 endpoints/endpointSlice 配置
- 创建 services 和 endpoints/endpointSlice
- 进入循环
kube-proxy在 iptables 实现
在了解 ProxyServer 结构和运行原理之后,我们来看看 kube-proxy 是如何通过 iptables 创建 services 和 endpoints 的。
NewServiceConfig和NewEndpointSliceConfig
ServiceConfig 和 EndpointsConfig 是kube-proxy中用于监听service变化的组件,核心是三个方法AddFunc,UpdateFunc和DeleteFunc
// NewServiceConfig creates a new ServiceConfig.func NewServiceConfig(serviceInformer coreinformers.ServiceInformer, resyncPeriod time.Duration) *ServiceConfig { result := &ServiceConfig{ listerSynced: serviceInformer.Informer().HasSynced, } serviceInformer.Informer().AddEventHandlerWithResyncPeriod( cache.ResourceEventHandlerFuncs{ AddFunc: result.handleAddService, UpdateFunc: result.handleUpdateService, DeleteFunc: result.handleDeleteService, }, resyncPeriod, ) return result}// NewEndpointsConfig creates a new EndpointsConfig.func NewEndpointsConfig(endpointsInformer coreinformers.EndpointsInformer, resyncPeriod time.Duration) *EndpointsConfig { result := &EndpointsConfig{ listerSynced: endpointsInformer.Informer().HasSynced, } endpointsInformer.Informer().AddEventHandlerWithResyncPeriod( cache.ResourceEventHandlerFuncs{ AddFunc: result.handleAddEndpoints, UpdateFunc: result.handleUpdateEndpoints, DeleteFunc: result.handleDeleteEndpoints, }, resyncPeriod, ) return result}以 service 为例(endpoints和services类似)三个方法分别对应着OnServiceAdd,OnServiceUpdate和OnServiceDelete,这三个都是接口方法。
func (c *ServiceConfig) handleAddService(obj interface{}) { service, ok := obj.(*v1.Service) ... for i := range c.eventHandlers { klog.V(4).Info("Calling handler.OnServiceAdd") c.eventHandlers[i].OnServiceAdd(service) }}func (c *ServiceConfig) handleUpdateService(oldObj, newObj interface{}) { oldService, ok := oldObj.(*v1.Service) service, ok := newObj.(*v1.Service) ... for i := range c.eventHandlers { klog.V(4).Info("Calling handler.OnServiceUpdate") c.eventHandlers[i].OnServiceUpdate(oldService, service) }}func (c *ServiceConfig) handleDeleteService(obj interface{}) { service, ok := obj.(*v1.Service) ... for i := range c.eventHandlers { klog.V(4).Info("Calling handler.OnServiceDelete") c.eventHandlers[i].OnServiceDelete(service) }}这些接口的具体实现我们可以找到对应的实现,这里以 iptables 为例,因为找到 pkg/proxy/iptables/proxier.go 下面 Proxier 对应方法实现:
// OnServiceAdd is called whenever creation of new service object// is observed.func (proxier *Proxier) OnServiceAdd(service *v1.Service) { proxier.OnServiceUpdate(nil, service)}// OnServiceDelete is called whenever deletion of an existing service// object is observed.func (proxier *Proxier) OnServiceDelete(service *v1.Service) { proxier.OnServiceUpdate(service, nil)}// OnServiceUpdate is called whenever modification of an existing// service object is observed.func (proxier *Proxier) OnServiceUpdate(oldService, service *v1.Service) { if proxier.serviceChanges.Update(oldService, service) && proxier.isInitialized() { proxier.Sync() }}可以看到这增、删、改三个方法都是 Update实现的
serviceConfig.Run和endpointsConfig.Run
serviceConfig.Run 方法:
// RegisterEventHandler registers a handler which is called on every service change.func (c *ServiceConfig) RegisterEventHandler(handler ServiceHandler) { c.eventHandlers = append(c.eventHandlers, handler)}// Run waits for cache synced and invokes handlers after syncing.func (c *ServiceConfig) Run(stopCh 这里的 eventHandler 就是一个包含 Proxier 的数组,这里核心是OnServiceSynced方法,找到具体iptables proxier 的这个方法的具体实现:
// OnServiceSynced is called once all the initial even handlers were// called and the state is fully propagated to local cache.func (proxier *Proxier) OnServiceSynced() { proxier.mu.Lock() proxier.servicesSynced = true if utilfeature.DefaultFeatureGate.Enabled(features.EndpointSlice) { proxier.setInitialized(proxier.endpointSlicesSynced) } else { proxier.setInitialized(proxier.endpointsSynced) } proxier.mu.Unlock() // Sync unconditionally - this is called once per lifetime. proxier.syncProxyRules()}// This is where all of the iptables-save/restore calls happen.// The only other iptables rules are those that are setup in iptablesInit()// This assumes proxier.mu is NOT heldfunc (proxier *Proxier) syncProxyRules() { ...}kube-proxy 在 iptables 规则
到了核心的 syncProxyRules() 方法了,我们先看关键 iptables 的 chain 创建:
func (proxier *Proxier) syncProxyRules() { ... // Create and link the kube chains. // 创建链表 for _, jump := range iptablesJumpChains { if _, err := proxier.iptables.EnsureChain(jump.table, jump.dstChain); err != nil { klog.Errorf("Failed to ensure that %s chain %s exists: %v", jump.table, jump.dstChain, err) return } args := append(jump.extraArgs, "-m", "comment", "--comment", jump.comment, "-j", string(jump.dstChain), ) if _, err := proxier.iptables.EnsureRule(utiliptables.Prepend, jump.table, jump.srcChain, args...); err != nil { klog.Errorf("Failed to ensure that %s chain %s jumps to %s: %v", jump.table, jump.srcChain, jump.dstChain, err) return } } ... // Write table headers. writeLine(proxier.filterChains, "*filter") writeLine(proxier.natChains, "*nat") // Make sure we keep stats for the top-level chains, if they existed // (which most should have because we created them above). // 会获取所有存在的chains rule,然后将新的 chains rule 加入到最前面 for _, chainName := range []utiliptables.Chain{kubeServicesChain, kubeExternalServicesChain, kubeForwardChain} { if chain, ok := existingFilterChains[chainName]; ok { writeBytesLine(proxier.filterChains, chain) } else { writeLine(proxier.filterChains, utiliptables.MakeChainLine(chainName)) } } for _, chainName := range []utiliptables.Chain{kubeServicesChain, kubeNodePortsChain, kubePostroutingChain, KubeMarkMasqChain} { if chain, ok := existingNATChains[chainName]; ok { writeBytesLine(proxier.natChains, chain) } else { writeLine(proxier.natChains, utiliptables.MakeChainLine(chainName)) } } ...}var iptablesJumpChains = []iptablesJumpChain{ {utiliptables.TableFilter, kubeExternalServicesChain, utiliptables.ChainInput, "kubernetes externally-visible service portals", []string{"-m", "conntrack", "--ctstate", "NEW"}}, {utiliptables.TableFilter, kubeServicesChain, utiliptables.ChainForward, "kubernetes service portals", []string{"-m", "conntrack", "--ctstate", "NEW"}}, {utiliptables.TableFilter, kubeServicesChain, utiliptables.ChainOutput, "kubernetes service portals", []string{"-m", "conntrack", "--ctstate", "NEW"}}, {utiliptables.TableFilter, kubeServicesChain, utiliptables.ChainInput, "kubernetes service portals", []string{"-m", "conntrack", "--ctstate", "NEW"}}, {utiliptables.TableFilter, kubeForwardChain, utiliptables.ChainForward, "kubernetes forwarding rules", nil}, {utiliptables.TableNAT, kubeServicesChain, utiliptables.ChainOutput, "kubernetes service portals", nil}, {utiliptables.TableNAT, kubeServicesChain, utiliptables.ChainPrerouting, "kubernetes service portals", nil}, {utiliptables.TableNAT, kubePostroutingChain, utiliptables.ChainPostrouting, "kubernetes postrouting rules", nil},}const ( // the services chain kubeServicesChain utiliptables.Chain = "KUBE-SERVICES" // the external services chain kubeExternalServicesChain utiliptables.Chain = "KUBE-EXTERNAL-SERVICES" // the nodeports chain kubeNodePortsChain utiliptables.Chain = "KUBE-NODEPORTS" // the kubernetes postrouting chain kubePostroutingChain utiliptables.Chain = "KUBE-POSTROUTING" // KubeMarkMasqChain is the mark-for-masquerade chain KubeMarkMasqChain utiliptables.Chain = "KUBE-MARK-MASQ" // KubeMarkDropChain is the mark-for-drop chain KubeMarkDropChain utiliptables.Chain = "KUBE-MARK-DROP" // the kubernetes forward chain kubeForwardChain utiliptables.Chain = "KUBE-FORWARD")可以看到 kube-proxy 的 chain 都是在 filter 表和 nat 表下创建的。
我们可以通过iptables -S -t 看对应的表的chain规则。
这里找一个安装了 k8s 的节点,通过iptables命令看 nat 表:
...-A PREROUTING -m comment --comment "kubernetes service portals" -j KUBE-SERVICES...-A KUBE-SERVICES -d 10.247.91.74/32 -p tcp -m comment --comment "rcmd/playmate-rank:grpc cluster IP" -m tcp --dport 8000 -j KUBE-MARK-MASQ-A KUBE-SERVICES -d 10.247.91.74/32 -p tcp -m comment --comment "rcmd/playmate-rank:grpc cluster IP" -m tcp --dport 8000 -j KUBE-SVC-YTWGRZ3E3MPBXGU3...-A KUBE-SVC-YTWGRZ3E3MPBXGU3 -j KUBE-SEP-EVJ6H5FW5OUSCV2Y...-A KUBE-SEP-EVJ6H5FW5OUSCV2Y -s 10.0.2.250/32 -j KUBE-MARK-MASQ-A KUBE-SEP-EVJ6H5FW5OUSCV2Y -p tcp -m tcp -j DNAT --to-destination 10.0.2.250:8000对于LB的路由路径:
...-A KUBE-SERVICES -d 10.247.248.210/32 -p tcp -m comment --comment "istio-system/istio-ingressgateway-external:rcmd cluster IP" -m tcp --dport 8000 -j KUBE-MARK-MASQ-A KUBE-SERVICES -d 10.247.248.210/32 -p tcp -m comment --comment "istio-system/istio-ingressgateway-external:rcmd cluster IP" -m tcp --dport 8000 -j KUBE-SVC-TBZWFMENS353FQVB-A KUBE-SERVICES -d /32 -p tcp -m comment --comment "istio-system/istio-ingressgateway-external:rcmd loadbalancer IP" -m tcp --dport 8000 -j KUBE-FW-TBZWFMENS353FQVB...-A KUBE-FW-TBZWFMENS353FQVB -m comment --comment "istio-system/istio-ingressgateway-external:rcmd loadbalancer IP" -j KUBE-MARK-MASQ-A KUBE-FW-TBZWFMENS353FQVB -m comment --comment "istio-system/istio-ingressgateway-external:rcmd loadbalancer IP" -j KUBE-SVC-TBZWFMENS353FQVB-A KUBE-FW-TBZWFMENS353FQVB -m comment --comment "istio-system/istio-ingressgateway-external:rcmd loadbalancer IP" -j KUBE-MARK-DROP对于 nodeport 的形式:
...-A KUBE-SERVICES -d /32 -m comment --comment "kubernetes service nodeports; NOTE: this must be the last rule in this chain" -j KUBE-NODEPORTS...-A KUBE-NODEPORTS -p tcp -m comment --comment "istio-system/istio-ingressgateway-external:rcmd" -m tcp --dport -j KUBE-MARK-MASQ-A KUBE-NODEPORTS -p tcp -m comment --comment "istio-system/istio-ingressgateway-external:rcmd" -m tcp --dport -j KUBE-SVC-TBZWFMENS353FQVB这里的 KUBE-SVC-YTWGRZ3E3MPBXGU3 和 KUBE-SEP-EVJ6H5FW5OUSCV2Y, KUBE-FW-TBZWFMENS353FQVB 这些是通过对 servicePortName 和 协议生成:
// servicePortChainName takes the ServicePortName for a service and// returns the associated iptables chain. This is computed by hashing (sha256)// then encoding to base32 and truncating with the prefix "KUBE-SVC-".func servicePortChainName(servicePortName string, protocol string) utiliptables.Chain { return utiliptables.Chain("KUBE-SVC-" + portProtoHash(servicePortName, protocol))}// serviceFirewallChainName takes the ServicePortName for a service and// returns the associated iptables chain. This is computed by hashing (sha256)// then encoding to base32 and truncating with the prefix "KUBE-FW-".func serviceFirewallChainName(servicePortName string, protocol string) utiliptables.Chain { return utiliptables.Chain("KUBE-FW-" + portProtoHash(servicePortName, protocol))}// serviceLBPortChainName takes the ServicePortName for a service and// returns the associated iptables chain. This is computed by hashing (sha256)// then encoding to base32 and truncating with the prefix "KUBE-XLB-". We do// this because IPTables Chain Names must be <= 28 chars long, and the longer// they are the harder they are to read.func serviceLBChainName(servicePortName string, protocol string) utiliptables.Chain { return utiliptables.Chain("KUBE-XLB-" + portProtoHash(servicePortName, protocol))}func portProtoHash(servicePortName string, protocol string) string { hash := sha256.Sum256([]byte(servicePortName + protocol)) encoded := base32.StdEncoding.EncodeToString(hash[:]) return encoded[:16]}


 496
496


 被折叠的 条评论
为什么被折叠?
被折叠的 条评论
为什么被折叠?
 到【灌水乐园】发言


