


---恢复内容开始---
1. Ansible概述
ansible是新出现的自动化运维工具,基于Python开发,集合了众多运维工具(puppet、cfengine、chef、func、fabric)的优点,实现了批量系统配置、批量程序部署、批量运行命令等功能。同时,它是基于模块工作的,本身没有批量部署的能力。真正具有批量部署的是ansible所运行的模块,ansible只是提供一种框架。主要包括:
(1)连接插件connection plugins:负责和被操作端实现通信;
(2)host inventory:指定操作的主机,在一个配置文件里面定义主机;
(3)各种模块核心模块、command模块、自定义模块;
(4)借助于插件完成记录日志邮件等功能;
(5)playbook:剧本执行多个任务时,可以让节点一次性运行多个任务
2. Ansible架构
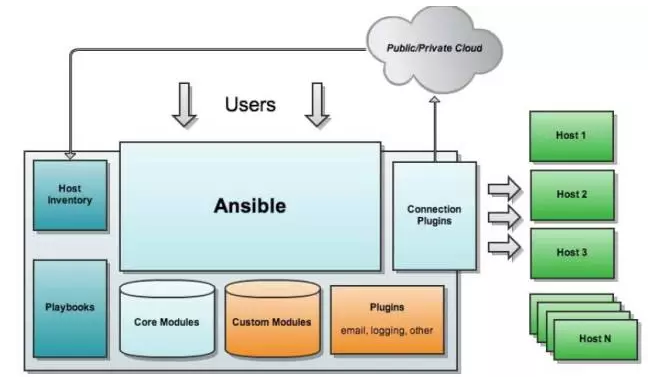
关于Ansible相关的组件说明:
Ansible:Ansible的核心程序Host Lnventory:记录了每一个由Ansible管理的主机信息,信息包括ssh端口,root帐号密码,ip地址等等。可以通过file来加载,可以通过CMDB加载Playbooks:YAML格式文件,多个任务定义在一个文件中,使用时可以统一调用,“剧本”用来定义那些主机需要调用那些模块来完成的功能.Core Modules:Ansible执行任何管理任务都不是由Ansible自己完成,而是由核心模块完成;Ansible管理主机之前,先调用core Modules中的模块,然后指明管理Host Lnventory中的主机,就可以完成管理主机。Custom Modules:自定义模块,完成Ansible核心模块无法完成的功能,此模块支持任何语言编写。Connection Plugins:连接插件,Ansible和Host通信使用
3. 安装Ansible服务
3.1 环境说明
1. 操作系统
[root@node-1 ~]# cat /etc/redhat-release
CentOS Linux release 7.4.1708 (Core)
2. 主机信息
| 主机名 | 角色 | IP地址 |
| node-1 | 控制端 | 192.168.122.201 |
| node-2 | 被控端 | 192.168.122.202 |
| node-3 | 被控端 | 192.168.122.203 |
3. ansible版本
[root@HappyLau ~]# rpm -q ansible
ansible-2.4.2.0-2.el7.noarch
3.2 环境准备
1. ansible控制端生成密钥对(public keys和private key),以实现控制端无密码登陆到其他agent节点
[root@node-1 ~]# ssh-keygen -t rsa -P ''
Generating public/private rsa key pair.
Enter file in which to save the key (/root/.ssh/id_rsa):
Created directory '/root/.ssh'.
Your identification has been saved in /root/.ssh/id_rsa.
Your public key has been saved in /root/.ssh/id_rsa.pub.
The key fingerprint is:
SHA256:07pXVe4yF3J67Kbj1eS5qvT1cWmbQyztSkLdKds1u14 root@node-1
The key's randomart image is:
+---[RSA 2048]----+
|                 |
|                .|
|               o |
|         .  ..ooo|
|        S .. +B=+|
|         o. .o*OX|
|        .  + o*&E|
|         .o +.+=X|
|        .. .o*B*o|
+----[SHA256]-----+
2. 将生成的public key拷贝到其他节点
[root@node-1 ~]# ssh-copy-id -i /root/.ssh/id_rsa.pub root@192.168.122.202
[root@node-1 ~]# ssh-copy-id -i /root/.ssh/id_rsa.pub root@192.168.122.203
3. 校验SSH无密码登陆
[root@node-1 ~]# ssh root@192.168.122.202 hostname
node-2
[root@node-1 ~]# ssh root@192.168.122.203 hostname
node-3
3.3 安装ansbile
[root@node-1 ~]# yum install ansible -y

相关命令介绍:
/usr/bin/ansible Ansibe AD-Hoc 临时命令执行工具,常用于临时命令的执行/usr/bin/ansible-doc Ansible 模块功能查看工具/usr/bin/ansible-galaxy 下载/上传优秀代码或Roles模块的官网平台,基于网络的/usr/bin/ansible-playbook Ansible 定制自动化的任务集编排工具/usr/bin/ansible-pull: Ansible远程执行命令的工具(使用较少,海量机器时使用,对运维的架构能力要求较高)/usr/bin/ansible-vault Ansible 文件加密工具/usr/bin/ansible-console Ansible基于Linux Consoble界面可与用户交互的命令执行工具
/usr/share/ansible_plugins Ansible高级自定义插件目录(需要python基础)/etc/ansible/ansible.cfg 配置文件/etc/ansible/hosts 主机清单
ansible的配置,默认ansible安装好之后即可使用,不需要做过多的配置,实际生产环境中根据主机数量而定,适当给予调有,如下是ansible默认配置文件:
[root@node-1 ~]# vim /etc/ansible/ansible.cfg
[defaults]
inventory = /etc/ansible/hosts 读取被管理端的主机列表
library = /usr/share/my_modules/ 模块路径
module_utils = /usr/share/my_module_utils/ 模块工具
remote_tmp = ~/.ansible/tmp 远程执行临时路径
local_tmp = ~/.ansible/tmp 本地执行临时路径
forks = 5 执行时forks进程数
poll_interval = 15 poll执行间隔
sudo_user = root sudo执行用户
ask_sudo_pass = True
ask_pass = True
transport = smart
remote_port = 22
module_lang = C
module_set_locale = False
3.4 定义主机组
通过修改/etc/ansible/hosts文件,定义ansible管理的主机,可以基于如下三种方式定义:
1. 单个主机地址,可以用IP地址和主机名表示,例如:
green.example.com
blue.example.com
192.168.100.1
192.168.100.10
2. 将多个相同功能的主机定义为主机组,例如:
[webservers]
alpha.example.org
beta.example.org
192.168.1.100
192.168.1.110
3. 使用正则表达是定义主机或主机组中的主机,例如:
www[001:006].example.com
[dbservers]

db01.intranet.mydomain.net
db02.intranet.mydomain.net
10.25.1.56
10.25.1.57

db-[99:101]-node.example.com
如下定义了一个demo_group主机组,将node-2和node-3两台主机加入到该组内,便于后续直接通过组管理ansible的主机,如下:
[root@node-1 ~]# vim /etc/ansible/hosts
[demo_group]
192.168.122.202
192.168.122.203
测试主机组的功能,可以使用ansible里面的ping模块检查主机是否存活:
[root@node-1 ~]# ansible demo_group -m ping
192.168.122.203 | SUCCESS => {
    "changed": false,
    "ping": "pong"
}
192.168.122.202 | SUCCESS => {
    "changed": false,
    "ping": "pong"
}
4. ansible模块使用
1. command模块,用于执行shell命令
[root@node-1 ~]# ansible demo_group -m command -a "ifconfig eth0"
192.168.122.202 | SUCCESS | rc=0 >>
eth0: flags=4163<UP,BROADCAST,RUNNING,MULTICAST>  mtu 1500
        inet 192.168.122.202  netmask 255.255.255.0  broadcast 192.168.122.255
        inet6 fe80::5054:ff:fee2:dbd6  prefixlen 64  scopeid 0x20<link>
        ether 52:54:00:e2:db:d6  txqueuelen 1000  (Ethernet)
        RX packets 15143  bytes 1576866 (1.5 MiB)
        RX errors 0  dropped 0  overruns 0  frame 0
        TX packets 1149  bytes 136894 (133.6 KiB)
        TX errors 0  dropped 0 overruns 0  carrier 0  collisions 0

192.168.122.203 | SUCCESS | rc=0 >>
eth0: flags=4163<UP,BROADCAST,RUNNING,MULTICAST>  mtu 1500
        inet 192.168.122.203  netmask 255.255.255.0  broadcast 192.168.122.255
        inet6 fe80::5054:ff:fe10:8a8e  prefixlen 64  scopeid 0x20<link>
        ether 52:54:00:10:8a:8e  txqueuelen 1000  (Ethernet)
        RX packets 15550  bytes 1604586 (1.5 MiB)
        RX errors 0  dropped 0  overruns 0  frame 0
        TX packets 1581  bytes 174724 (170.6 KiB)
        TX errors 0  dropped 0 overruns 0  carrier 0  collisions 0
2. copy模块,用于将文件拷贝至远程
[root@node-1 ~]# ansible demo_group -m copy -a "src=/root/get_eth0_ip.sh dest=/root mode=744 owner=root group=root"
192.168.122.203 | SUCCESS => {
    "changed": true,
    "checksum": "fb3ef7bb8252274b34fca33cc6830d00f84230ff",
    "dest": "/root/get_eth0_ip.sh",
    "gid": 0,
    "group": "root",
    "md5sum": "ae7de9e7b1b43e039387d6cd50d339cd",
    "mode": "0744",
    "owner": "root",
    "secontext": "system_u:object_r:admin_home_t:s0",
    "size": 54,
    "src": "/root/.ansible/tmp/ansible-tmp-1519730959.9-70486339465362/source",
    "state": "file",
    "uid": 0
}
192.168.122.202 | SUCCESS => {
    "changed": true,
    "checksum": "fb3ef7bb8252274b34fca33cc6830d00f84230ff",
    "dest": "/root/get_eth0_ip.sh",
    "gid": 0,
    "group": "root",
    "md5sum": "ae7de9e7b1b43e039387d6cd50d339cd",
    "mode": "0744",
    "owner": "root",
    "secontext": "system_u:object_r:admin_home_t:s0",
    "size": 54,
    "src": "/root/.ansible/tmp/ansible-tmp-1519730959.89-208121206365432/source",
    "state": "file",
    "uid": 0
}

检查:
[root@node-1 ~]# ansible demo_group -m command -a "ls -l /root"
192.168.122.203 | SUCCESS | rc=0 >>
total 8
-rw-------. 1 root root 1571 Feb 25 23:40 anaconda-ks.cfg
-rwxr--r--. 1 root root   54 Feb 27 06:29 get_eth0_ip.sh

192.168.122.202 | SUCCESS | rc=0 >>
total 8
-rw-------. 1 root root 1571 Feb 25 23:40 anaconda-ks.cfg
-rwxr--r--. 1 root root   54 Feb 27 06:29 get_eth0_ip.sh
3. shell模块,用于执行复杂的脚本,将需要实现的功能写入到shell脚本中,使用copy模块将脚本拷贝到远程,使用shell模块来调用,如下以获取eth0的IP地址为例
shell脚本内容:
[root@node-1 ~]# cat /root/get_eth0_ip.sh
#!/bin/bash

ifconfig eth0 | awk '/inet / {print $2}'

通过上面的copy模块拷贝至ansible的agent端,然后然后如下执行:
[root@node-1 ~]# ansible demo_group -m shell -a "/root/get_eth0_ip.sh"
192.168.122.203 | SUCCESS | rc=0 >>
192.168.122.203

192.168.122.202 | SUCCESS | rc=0 >>
192.168.122.202


 3963
3963


 被折叠的 条评论
为什么被折叠?
被折叠的 条评论
为什么被折叠?
 到【灌水乐园】发言


