


TSLint
TSLint是一个可扩展的静态分析工具,用于检查TypeScript代码的可读性,可维护性和功能性错误。收到现代编辑和构建系统的广泛支持,并且可以使用您自己的路由,配置和格式化。
安装
npm install tslint typescript -g
运行linter之前,请确保TypeScript源文件能够正确编译。
用法 tslint [options] [file ...]
-v, --version  输出版本号
-c, --config [config]  配置文件
-e, --exclude <exclude>  从路径扩展中全局排除
--fix  修正了选择规则的链接错误(这可能会覆盖linted文件)
--force  返回状态码0,即使有lint错误
-i, --init  生成一个tslint。当前工作目录中的json配置文件
-o, --out [out]  输出文件
--outputAbsolutePaths  输出文件路径是否是绝对路径
-r, --rules-dir [rules-dir]  规则目录
-s, --formatters-dir [formatters-dir]  格式器目录
-t, --format [format]  输出格式(散文、json、时髦、冗长、pmd、msbuild、checkstyle、vso、文件列表、codeFrame)
--test   测试tslint为指定的目录生成正确的输出
-p, --project [project]  tsconfig。json文件
-h, --help  输出使用信息
默认情况下,TSLint将查找tslint.json正在创建的文件的目录中指定的配置文件,如果未找到,则搜索祖先目录。查看规则部分,了解有关可用规则的更多详细信息。
tslint接受以下命令行选项
-c, --config:
    tslint将使用配置文件的位置来确定哪些规则被激活,以及哪些选项可以    提供给规则。如果没有指定选项,配置文件名为tslint。使用json,只要它存在于路径中。文件的格式是规则:/规则列表/,其中/规则列表/是一个键:值逗号分隔的rulename列表:规则选项对。规则选项可以是布尔true/false值,表示规则是否被使用,或者是一个布尔值,……布尔值提供与非列表情况相同的角色,而列表的其余部分则是传递给规则的选项,该规则将决定它所检查的内容(例如,max-line长度规则的字符数,或者禁止禁止规则的功能)。

-e, --exclude:
   一个文件名或glob,表示从linting中排除文件。如果您需要多个选项,可以多次提供此选项 globs表示要排除哪些文件。

--fix:
    修正了选择规则的链接错误。这可能会覆盖linted文件。

--force:
    返回状态码0,即使有任何lint错误。
    作为npm脚本运行时很有用。

-i, --init:
    生成一个tslint。当前工作目录中的json配置文件。

-o, --out:
    将结果输出到的文件名。默认情况下,tslint输出到stdout,通常是您运行它的控制台。

--outputAbsolutePaths:
    如果是真的,输出中的所有路径都是绝对的。

-r, --rules-dir:
    另一个规则目录,用于用户创建的规则。
    tslint将始终检查其默认规则目录
    在检查用户提供的信息之前,节点模块/tslint/lib/规则
    规则目录,所以用户提供的规则目录中的规则
    与基本规则相同的名称将不会被加载。

-s, --formatters-dir:
    为用户创建的格式化程序,另一个格式化目录。
    格式化程序是将格式化tslint输出的文件
    把它写在stdout或文件中——out。默认的
    目录,节点模块/tslint/构建/格式化程序,将永远是
    首先检查,所以用户创建的表单具有相同的名称
    因为基础格式化程序将不会被加载。

-t, --format:
    格式化程序用于格式化linter的结果
    把它输出到stdout或者文件中传递出去。的核心
    格式器是散文(人类可读)、json(机器可读)
    和详细。如果不使用此选项,则散文是默认的。
    其他内置选项包括pmd、msbuild、checkstyle和vso。
    如果——formatters-dir,可以添加和使用额外的格式化程序
    选项设置。

--test:
    在匹配的目录上运行tslint,并检查tslint输出
    匹配.lint文件中的预期输出。自动加载
    tslint。作为配置文件的目录中的json文件
    测试。请参阅完整的tslint文档了解更多关于如何
    这可以用来测试定制规则。

-p, --project:
    包含tsconfig的路径或目录。将会是json文件
    用于确定哪些文件将被连接。这个标志还使
    需要类型检查器的规则。

-v, --version:
    当前版本的tslint。

-h, --help:
    打印此帮助消息。
TSLint 代码规则
https://palantir.github.io/tslint/rules/
测试
编写测试程序来探索和确认应用的行为。测试的作用有:
1. 测试守护由于代码变化而打破已有代码(“回归”)的情况。
2. 不管代码被正确使用还是错误使用,测试程序起到澄清代码的作用。
3. 测试程序暴露设计和实现可能出现的错误,测试程序从很多角度为代码亮出警示灯
工具与技术
可以用多种工具和技术来编写运行Angular测试程序。
Jasmine
测试框架提供所有编写基本测试的工具,自带HTML测试运行器,用来在浏览器中执行测试程序
Angular测试工具
为被测试的Angular应用代码创建测试环境。在应用代码与Angular环境互动时,来限制和控制应用的部分代码
Karma
在开发应用的过程中编写和运行单元测试的理想工具,能成为项目开发和连续一体化进程的不可分割的一部分。
Protractor
编写和运行e2e端对端的程序,端对端程序像用户体验应用程序那样探索它。
在测试中一条进程运行真正的应用,另一条运行Protractor测试程序,模拟用户行为,判断应用在浏览器中的反应是否正确。
独立单元测试.vs.Angular测试工具集
独立单元测试用于测试那些完全不依赖Angular或不需要注入值的类实例。
测试程序员会new出一个测试类的实例,为构造函数参数提供所需的测试替身,然后测试该实例的API接口。
我们应该为管道和服务书写独立的单元测试
也可以同样为组件写独立单元测试,不过独立单元测试无法体现组件与Angular交互。
具体来说,就是不能发现组件类如何与它的模板或其他组件交互。
这时就需要Angular测试工具集,包括TestBed类和一些来自@angular/core/testing的助手函数。
第一个Karma测试
创建1st.spec.ts。用Jasmine编写的测试程序都被叫做specs,文件名后缀必须是.spec.ts。
这是karma.conf.js和其他工具所坚持和遵循的规约。
将测试程序spec放到app文件夹下的任意位置,karma.conf.js告诉Karma在这个文件夹下找测试程序文件
describe('1st tests', () => {
  it('true is true', () => expect(true).toBe(true));
});
运行:npm test,该命令编译应用及其测试代码,启动Karma,两个进程都监视相关文件,往控制台输入信息和检测变化时自动重新运行
Karma会打开浏览器并开始向控制台输出,查看控制台的输出,大致如下
> npm test
...
[0] 1:37:03 PM - Compilation complete. Watching for file changes.
...
[1] Chrome 51.0.2704: Executed 0 of 0 SUCCESS
    Chrome 51.0.2704: Executed 1 of 1 SUCCESS
SUCCESS (0.005 secs / 0.005 secs)
编译器和Karma都在运行,信息[0]是编译器输入,[1]是Karma的输入
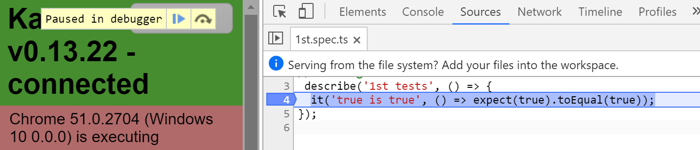
调试测试程序
在浏览器中,像调试应用一样调试测试程序spec。
显示Karma的浏览器窗口(之前被隐藏了)。
点击“DEBUG”按钮;它打开一页新浏览器标签并重新开始运行测试程序
打开浏览器的“Developer Tools”(Windows上的Ctrl-Shift-I或者OSX上的`Command-Option-I)。
选择“sources”页
打开1st.spec.ts测试文件(Control/Command-P, 然后输入文件名字)。
在测试程序中设置断点。
刷新浏览器...然后它就会停在断点上。
测试一个组件
大多数开发人员首先要测试的就是Angular组件,首先我们创建一个组件banner-inline.component.ts
import { Component } from '@angular/core';

@Component({
  selector: 'app-banner',
  template: '<h1>{{title}}</h1>'
})
export class BannerComponent {
  title = 'Test Tour of Heroes';
}
我们推荐将单元测试的spec配置文件放到与应用程序源代码文件所在的同一个文件夹中,因为:
-
这样的测试程序很容易被找到
-
你可以一眼看出应用程序的那些部分缺乏测试程序。
-
临近的测试程序可以展示代码是如何在上下文中工作的
-
当你移动代码(无可避免)时,你记得一起移动测试程序
-
当你重命名源代码文件(无可避免),你记得重命名测试程序文件。
什么时候我应该把测试spec文件放到测试目录中?
应用程序的整合测试spec文件可以测试横跨多个目录和模块的多个部分之间的互动。 它们不属于任何部分,很自然,没有特别的地方存放它们。
通常,在test目录中为它们创建一个合适的目录比较好。
当然,测试助手对象的测试spec文件也属于test目录,与它们对应的助手文件相邻。
组件对应的测试代码banner-inline.component.spec.ts放在同一目录下
import {BannerComponent} from "./banner-inline.component";
import {ComponentFixture, TestBed} from "@angular/core/testing";
import {DebugElement} from "@angular/core";
import {By} from "@angular/platform-browser";

describe('BannerComponent (inline template)', () => {
  let comp: BannerComponent;
  let fixture: ComponentFixture<BannerComponent>; let de: DebugElement; let el: HTMLElement; beforeEach(() => { TestBed.configureTestingModule({ declarations: [BannerComponent], // declare the test component  }); fixture = TestBed.createComponent(BannerComponent); comp = fixture.componentInstance; // BannerComponent test instance // query for the title <h1> by CSS element selector de = fixture.debugElement.query(By.css('h1')); el = de.nativeElement; }); });
TestBed测试台
TestBed测试台是Angular测试工具集中的首要概念,他创建Angular测试模块(一个NgModule)
可以通过调用它的configureTestingModule方法来为要测试的类生成模块环境。
其效果是,可以把被测试的组件从原有的应用模块中剥离出来,附件到一个动态生成的Angular测试模块上。
而该测试模块可以为这些测试进行特殊剪裁。
configureTestingModule方法接受一个类似@NgModule的元数据对象,这个元数据对象具有标准的Angular模块的大多数属性。
这里的元数据对象只是声明了要测试的组件BannerComponent。这个元数据中没有imports属性因为:
1.默认的测试模块配置中已经有了BannerComponent所需的一切
2.BannerComponent不需要与任何其他组件交互
在beforeEach中调用configureTestingModule,以便TestBed可以在运行每个测试之前都把自己重置会它的基础状态
基础状态中包含一个默认的测试模块配置,它包含每个测试都需要的那些声明(组件、指令和管道)以及服务提供商
之前提到的测试垫片初始化测试模块配置到一个模块,这个模块和@angular/platform-browser中的BrowserModule类似
这个默认的配置只是测试的基础性工作,稍后我们会调用TestBed.configureTestingModule来传入更多元数据,
这些元数据定义了额外的imports、declarations、providers和适用于这些测试的概要(Schema)
可选的override方法可以微调配置的各个方面
createComponent方法
在配置好TestBed之后,我们可以告诉他创建一个待测组件的实例,这个例子中
TestBed.createComponent创建了一个BannerComponet的实力,并返回一个ComponentFixture
调用了createComponent之后就不要再重新配置TestBed了
createComponent方法封闭了当前的TestBed实例,以免将来在配置它
我们不能再调用任何TestBed的方法修改配置:不能调用configureTestingModule或任何override方法。
如果这么做,TestBed就会抛出错误。
ComponentFixture、DebugElement、query(By.css)
createComponent方法返回ComponentFixtrue,用来控制和访问已创建的组件所在的测试环境。
这个fixture提供了对组件实例自身的访问,同时还提供了用来访问组件的DOM元素的DebugElement对象。
title属性被插值到DOM的<h1>标签中,用CSS选择器从fixture的DebugElement中query<h1>元素
query方法接受predicate函数,并搜索fixture的整个DOM树,试图寻找第一个满足predicate函数的元素。
queryAll方法返回一列数组,包含所有DebugElement中满足predicate的元素。
predicate是返回布尔值的函数,predicate查询接受DebugElement参数,如果元素符合选择条件便返回true。
By类是Angular测试工具之一,它生成游泳的predicate。它的By.css静态方法产生标准CSS选择器predicate
与JQuery选择器相同的方法过滤。
最后这个配置把DebugElement中的nativeElementDOM元素赋值给el属性,测试程序将判断el是否包含期待的标题文本。
测试程序
再每个测试程序之前,Jasmin都一次运行beforeEach函数。
import {BannerComponent} from './banner-inline.component';
import {ComponentFixture, TestBed} from '@angular/core/testing';
import {DebugElement} from '@angular/core';
import {By} from '@angular/platform-browser';

describe('BannerComponent (inline template)', () => {
  let comp: BannerComponent;
  let fixture: ComponentFixture<BannerComponent>; let de: DebugElement; let el: HTMLElement; beforeEach(() => { TestBed.configureTestingModule({ declarations: [BannerComponent], // declare the test component  }); fixture = TestBed.createComponent(BannerComponent); comp = fixture.componentInstance; // BannerComponent test instance // query for the title <h1> by CSS element selector de = fixture.debugElement.query(By.css('h1')); el = de.nativeElement; }); it('should display original title', () => { fixture.detectChanges(); expect(el.textContent).toContain(comp.title); }); it('should display a different test title', () => { comp.title = 'Test Title'; fixture.detectChanges(); expect(el.textContent).toContain('Test Title'); }); });
测试程序向DebugElement获取原生HTML元素,来满足自己的期望
detectChanges:在额始终的Angular变量检测
每个测试程序都通过调用fixture.detectChanges()来通知Angular执行变更检测。
第一个测试程序立刻这么做,出发数据绑定和并将title属性发送到DOM元素中。
第二个测试程序在更改组件的title属性之后才调用fixture.detectChanges,新值出现在DOM元素中。
产品阶段,当Angular创建组件、用户输入、异步动作完成时,自动触发变更检测。
TestBed.createComponent不会出发变更检测,该工具不会自动将组件的title属性值推送到数据绑定的元素
下面的测试程序展示了这个事实:
it('no title in the DOM until manually call `detectChanges`', () => {
    expect(el.textContent).toEqual('');
  });
这种行为是有意为之,在Angular初始化数据绑定或者调用生命周期钩子之前,它给测试者机会来查看或改变组件的状态。
自动变更检测
BannerComponent的测试频繁调用detectChanges,有些测试人员更希望Angular的测试环境自动进行变更检查。
这可以通过为TestBed配置上ComponentFixtureAutoDetect提供商来做到。
首先从测试工具库中导入它:创建banner.component.detect-changes.spec.ts
然后添加测试模块配置providers数组
import {ComponentFixtureAutoDetect, TestBed} from '@angular/core/testing';
import {BannerComponent} from './banner-inline.component';

describe('BannerDetectChanges', () => {
  beforeEach(() => {
    TestBed.configureTestingModule({
      declarations: [BannerComponent],
      providers: [
        {
          provide: ComponentFixtureAutoDetect, useValue: true
        }
      ]
    });
  });
});
下面测试阐明了自动变更检测的工作原理
import {ComponentFixture, ComponentFixtureAutoDetect, TestBed} from '@angular/core/testing';
import {BannerComponent} from './banner-inline.component';
import {DebugElement} from '@angular/core';
import {By} from '@angular/platform-browser';

describe('BannerDetectChanges', () => {
  let comp: BannerComponent;
  let fixture: ComponentFixture<BannerComponent>; let de: DebugElement; let el: HTMLElement; beforeEach(() => { TestBed.configureTestingModule({ declarations: [BannerComponent], providers: [ { provide: ComponentFixtureAutoDetect, useValue: true } ] }); fixture = TestBed.createComponent(BannerComponent); comp = fixture.componentInstance; de = fixture.debugElement.query(By.css('h1')); el = de.nativeElement; }); it('should display original title', () => { // Hooray! No `fixture.detectChanges()` needed  expect(el.textContent).toContain(comp.title); }); it('should still see original title after comp.title change', () => { const oldTitle = comp.title; comp.title = 'Test Title'; // Displayed title is old because Angular didn't hear the change :(  expect(el.textContent).toContain(oldTitle); }); it('should display updated title after detectChanges', () => { comp.title = 'Test Title'; fixture.detectChanges(); // detect changes explicitly  expect(el.textContent).toContain(comp.title); }); });
第一个测试程序展示了自动检测的好处。
第二个和第三个测试程序展示了一个重要的局限性,Angular测试环境不会知道测试程序改变了组件的title属性。
自动检测只对异步行为比如承诺的解析、计时器和DOM事件作出反应。
但是直接修改组件属性值的这种同步更新是不会出发自动检测的,测试程序必须手动调用fixture.detectChange()
与其怀疑测试工具会不会执行变更检测,总是显式调用detectChanges(),即使在不需要的时候也没有任何坏处。
测试带有外部模块的组件
BannerComponent的行为和刚才的版本相同,但是实现方式不同,它有一个外部模板和CSS文件,通过templateUrl和styleUrls属性来指定。
创建banner.component
import { Component } from '@angular/core';

@Component({
  selector: 'app-banner',
  templateUrl: './banner.component.html',
  styleUrls:  ['./banner.component.css']
})
export class BannerComponent {
  title = 'Test Tour of Heroes'; }
这些测试有一个问题,TestBed.createComponent方法是同步的。
但是Angular模板编译器必须在创建组件实例之前先从文件系统中读取这些值,而这是异步的。
以前测试内联模板时使用的设置方式不适用于外部模板。
异步的beforeEach
BannerComponet测试的设置方式必须给Angular模板编译器一些时间来读取文件。
以前放在beforeEach中的逻辑被拆分成两个beforeEach调用。
第一个beforeEach处理异步编译工作
import {async, TestBed} from '@angular/core/testing';
import {BannerComponent} from './banner.component';

beforeEach(async(() => {
  TestBed.configureTestingModule({
    declarations: [BannerComponent]
  }).compileComponents();
}));
async函数被用作调用beforeEach的参数,async函数是Angular测试工具集的一部分,这里必须引入他。
它接受一个无参数的函数,并返回一个函数,这个函数会作为实参传给beforeEach
async参数的内容看起来非常像同步版beforeEach的函数体,并不能很明显的看出来这是异步函数。
内部实现上,async会把beforeEach的函数体放进一个特殊的异步测试区,隐藏了异步执行的内部机制。
这就是为了调用异步的TestBed.compileComponents方法所要做的一切。
compileComponents方法
TestBed.configureTestingModule方法返回TestBed类,以便你可以链式调用TestBed的其它静态方法,比如compileComponent
TestBed.compileComponents方法会异步编译这个测试模块中配置的所有组件。
BannerComponent是唯一要编译的组件,当compileComponents完成时,外部组件和css文件会被内联。
TestBed.createComponent会用同步的方式创建一个BannerComponent的新实例。
这个例子中,TestBed.compileComponents只会编译BannerComponent
所有这些组件都可能含有外部模板和css文件,TestBed.compileComponents会同时异步便宜所有这些声明的组件。
调用了compileComponents之后就不能再配置TestBed了,务必确保compileComponents是调用TestBed.createComponent
来实例化待测组件之前的最后一步。
compileComponents方法封闭了当前的TestBed实例,以免将来再配置它。
不能再调用任何TestBed的方法修改配置:不能调用configureTestingModule或任何override方法,否则会抛出错误。
同步beforeEach
在异步测试后,还需要用同步测试来完成接下来的步骤。
步骤与异步类似,测试运行器会先等待第一个异步beforeEach函数执行完成后再调用第二个
compileComponents会返回一个Promise,来让我们立即执行额外的任务,比如把第二个beforeEach放到回掉函数then里面。
但是因为不方便阅读,所以大部分还是写两个beforeEach调用的方式。
import { async, ComponentFixture, TestBed } from '@angular/core/testing';
import { By }              from '@angular/platform-browser';
import { DebugElement }    from '@angular/core';

import { BannerComponent } from './banner.component';

describe('BannerComponent (templateUrl)', () => {

  let comp:    BannerComponent;
  let fixture: ComponentFixture<BannerComponent>; let de: DebugElement; let el: HTMLElement; // async beforeEach beforeEach(async(() => { TestBed.configureTestingModule({ declarations: [ BannerComponent ], // declare the test component  }) .compileComponents(); // compile template and css  })); // synchronous beforeEach beforeEach(() => { fixture = TestBed.createComponent(BannerComponent); comp = fixture.componentInstance; // BannerComponent test instance // query for the title <h1> by CSS element selector de = fixture.debugElement.query(By.css('h1')); el = de.nativeElement; }); it('no title in the DOM until manually call `detectChanges`', () => { expect(el.textContent).toEqual(''); }); it('should display original title', () => { fixture.detectChanges(); expect(el.textContent).toContain(comp.title); }); it('should display a different test title', () => { comp.title = 'Test Title'; fixture.detectChanges(); expect(el.textContent).toContain('Test Title'); }); });
测试有依赖的组件
组件经常依赖其他服务,例如下方组件
import { Component, OnInit } from '@angular/core';

import { UserService }       from './user.service';

@Component({
  selector: 'app-welcome',
  template: '<h3 class="welcome" ><i>{{welcome}}</i></h3>'
})
export class WelcomeComponent  implements OnInit {
  welcome = '-- not initialized yet --'; constructor(private userService: UserService) { } ngOnInit(): void { this.welcome = this.userService.isLoggedIn ? 'Welcome, ' + this.userService.user.name : 'Please log in.'; } }
其中UserService就是模拟作用,没有东西。下面看一下测试模块配置
import {ComponentFixture, TestBed} from '@angular/core/testing';
import {WelcomeComponent} from "./welcome.component";
import {DebugElement} from "@angular/core";
import {UserService} from "./user.service";

describe('WelCome Spec', () => {
  let comp: WelcomeComponent;
  let fixture: ComponentFixture<WelcomeComponent>; let de: DebugElement; let el: HTMLElement; const userServiceStub = { isLoggedIn: true, user: {name: 'Test User'} }; TestBed.configureTestingModule({ declarations: [WelcomeComponent], providers: [{provide: UserService, useValue: userServiceStub}] }); });
在测试配置中不但声明了被测试的组件,而且在providers数组添加了UserService依赖,但不是真实的UserService。
实际上,服务替身通常更合适进行测试。我们模拟了userService的服务替身。
获取注入服务,一共有两种方法
Injector
Angular的注入是层次化的,可以有很多层注入器,从根TestBed创建的注入器来贯穿整个组件树。
最安全有效的方法就是从被测试的组件的注入器获取,组件注入器是fixture的DebugElement的属性。
let userService = fixture.debugElement.injector.get(UserService);
TestBed.get
也可以通过TestBed.get方法来从根注入器中获取服务,更加简洁。但是只有Angular使用测试的根注入器中的那个服务实例来注入到组件时才有效
userService = TestBed.get(UserService);
获取注入服务其实是服务克隆,与传递过去的对象不一致
beforeEach(() => {
  // stub UserService for test purposes
  userServiceStub = {
    isLoggedIn: true,
    user: { name: 'Test User'}
  };

  TestBed.configureTestingModule({
     declarations: [ WelcomeComponent ],
     providers:    [ {provide: UserService, useValue: userServiceStub } ]
  });

  fixture = TestBed.createComponent(WelcomeComponent);
  comp    = fixture.componentInstance; // UserService from the root injector userService = TestBed.get(UserService); // get the "welcome" element by CSS selector (e.g., by class name) de = fixture.debugElement.query(By.css('.welcome')); el = de.nativeElement; });
it('should welcome the user', () => {
  fixture.detectChanges();
  const content = el.textContent;
  expect(content).toContain('Welcome', '"Welcome ..."');
  expect(content).toContain('Test User', 'expected name');
});

it('should welcome "Bubba"', () => {
  userService.user.name = 'Bubba'; // welcome message hasn't been shown yet
 fixture.detectChanges(); expect(el.textContent).toContain('Bubba'); }); it('should request login if not logged in', () => { userService.isLoggedIn = false; // welcome message hasn't been shown yet  fixture.detectChanges(); const content = el.textContent; expect(content).not.toContain('Welcome', 'not welcomed'); expect(content).toMatch(/log in/i, '"log in"'); });
第一个测试程序是合法测试程序,确认这个被模拟的UserService是否被调用和工作正常。
第二个测试程序是验证变换用户名字的效果
第三个测试程序是检查如果用户没有登录,组件是否显示正确信息
测试异步服务组件
大部分数据服务向远程服务器发起HTTP请求,响应必须是异步的。
@Component({
  selector: 'twain-quote',
  template: '<p class="twain"><i>{{quote}}</i></p>'
})
export class TwainComponent  implements OnInit {
  intervalId: number;
  quote = '...';
  constructor(private twainService: TwainService) { } ngOnInit(): void { this.twainService.getQuote().then(quote => this.quote = quote); } }
ngOnInit的twainService.getQuote返回Promise,显然是异步操作。一般来讲不会真正去发送请求,而是仿真请求。
beforeEach(() => {
  TestBed.configureTestingModule({
     declarations: [ TwainComponent ],
     providers:    [ TwainService ],
  });

  fixture = TestBed.createComponent(TwainComponent);
  comp    = fixture.componentInstance;

  // TwainService actually injected into the component
  twainService = fixture.debugElement.injector.get(TwainService);

  // Setup spy on the `getQuote` method
  spy = spyOn(twainService, 'getQuote')
        .and.returnValue(Promise.resolve(testQuote));

  // Get the Twain quote element by CSS selector (e.g., by class name)
  de = fixture.debugElement.query(By.css('.twain')); el = de.nativeElement; });
与其伪造服务对象,它注入了真实的服务,并用Jasmine的spy替换关键的getQuote方法。称为:刺探(Spy)真实服务
spy设计是所有调用getQuote的方法都会收到立刻解析的承诺,得到一条预设的名言。spy拦截了实际getQuote方法,不会联系服务端。
it('should not show quote before OnInit', () => {
  expect(el.textContent).toBe('', 'nothing displayed');
  expect(spy.calls.any()).toBe(false, 'getQuote not yet called');
});

it('should still not show quote after component initialized', () => {
  fixture.detectChanges();
  // getQuote service is async => still has not returned with quote
  expect(el.textContent).toBe('...', 'no quote yet');
  expect(spy.calls.any()).toBe(true, 'getQuote called'); }); it('should show quote after getQuote promise (async)', async(() => { fixture.detectChanges(); fixture.whenStable().then(() => { // wait for async getQuote fixture.detectChanges(); // update view with quote  expect(el.textContent).toBe(testQuote); }); })); it('should show quote after getQuote promise (fakeAsync)', fakeAsync(() => { fixture.detectChanges(); tick(); // wait for async getQuote fixture.detectChanges(); // update view with quote  expect(el.textContent).toBe(testQuote); }));
同步测试程序
前两个测试程序是同步的,在Spy的帮助下,验证了在Angular调用ngOnInit期间发生的第一次变更检测后,getQuote被调用了。
这两者都不能证明被显示的值是服务提供的,虽然spy返回了解析的承诺,但是内容还没有到来。
这个测试程序必须等待JavaScript引擎一整个回合,返回值才会有效,该测试程序必须要变成异步的。
注意第三个测试程序的async方法,async函数是Angular TestBed的一部分,通过将测试代码放在特殊的异步测试区域来运行。
async函数简化了异步测试程序的代码,会在beforeEach中被调用。
虽然async做了很多工作来尽量隐藏异步特性,但在测试程序中里面调用函数时,有时还是会体现他们的异步行为。
fakeAync可选方法,进一步移除了异步行为,提供了更加直观的代码经验。
whenStable方法
测试程序必须等待getQuote在JavaScript引擎的下一回合中被解析。
本测试对twainService.getQuote返回的承诺没有直接访问,因为它被埋没在TwainComponent.ngOnInit里
对于只测试组件API表面的测试来说,是无法被访问的。
异步测试区域可以访问getQuote承诺,因为它拦截所有调用异步方法所发出的承诺,不管他在那里。
ComponentFixture.whenStable方法返回它自己的承诺,在getQuote承诺完成时被解析。
stable的意思是当所有待处理的异步行为完成时的状态,在stable后whenStable承诺被解析。
然后测试程序继续运行,开始下一轮变更检测,通过Angular来更新DOM,getQuote辅助方法提取出显示元素的文本。
fakeAsync方法
第四个测试程序用不同的方法验证同样的组件行为。
在it参数中,async被fakeAsync替换,fakeAsync是另一种Angular测试工具
和async一样,接受无参数函数并返回一个函数,变成Jasmine的it函数的参数,通过特殊的测试区域运行测试程序,让代码更加简单直观。
tick函数
是Angular测试工具之一,只能在fakeAsync的主体中被调用。
调用tick()模拟时间的推移,直到全部待处理的异步任务都已完成,这个测试案例中,包含getQuote承诺的解析。
不返回任何结果,没有任何承诺需要等待,直接执行与之前相同的代码。
jasmine.done
虽然async和fakeAsync函数大大的简化了异步测试,你仍然可以回退到传统的Jasmine异步测试技术上。
仍然可以接受done回调的函数传给it。但是,你必须链接承诺、处理错误、并在适当的时候调用done
带有done回调的测试函数,适合涉及intervalTimer的代码或者异步Observable函数的场景。
it('should show quote after getQuote promise (done)', (done: any) => {
  fixture.detectChanges();

  // get the spy promise and wait for it to resolve
  spy.calls.mostRecent().returnValue.then(() => {
    fixture.detectChanges(); // update view with quote
    expect(el.textContent).toBe(testQuote);
    done();
  });
});
测试输入输出组件
带有导入和导出的组件通常出现在宿主组件的视图模板上,使用属性绑定来设置输入属性。使用事件绑定来监听输出属性触发的事件。
测试的目的是验证这样的绑定和期待的那样正常工作,测试程序应该设置导入值并监听导出事件。
<dashboard-hero *ngFor="let hero of heroes"  class="col-1-4"
  [hero]=hero  (selected)="gotoDetail($event)" >
</dashboard-hero>

@Component({
  selector:    'dashboard-hero',
  templateUrl: './dashboard-hero.component.html',
  styleUrls: [ './dashboard-hero.component.css' ]
})
export class DashboardHeroComponent { @Input() hero: Hero; @Output() selected = new EventEmitter<Hero>(); click() { this.selected.emit(this.hero); } }
例如上面的代码,*ngFor循环中设置每个组件的hero input属性到迭代的值,并监听组件selected事件。
有下列几种测试方案:
把它当做独立的组件来测试
把它当做被替代组件使用的组件来测试
独立测试
// async beforeEach
beforeEach( async(() => {
  TestBed.configureTestingModule({
    declarations: [ DashboardHeroComponent ],
  })
  .compileComponents(); // compile template and css
}));

// synchronous beforeEach
beforeEach(() => {
  fixture = TestBed.createComponent(DashboardHeroComponent);
  comp    = fixture.componentInstance;
  heroEl  = fixture.debugElement.query(By.css('.hero')); // find hero element

  // pretend that it was wired to something that supplied a hero
  expectedHero = new Hero(42, 'Test Name'); comp.hero = expectedHero; fixture.detectChanges(); // trigger initial data binding });
使用compileComponents异步编译完成组件后,设置执行另一个同步的beforeEach
值得注意的是,expectedHero赋值给组件hero属性的方式,模拟了迭代器中通过属性绑定的赋值方式。
然后看测试程序
it('should display hero name', () => {
  const expectedPipedName = expectedHero.name.toUpperCase();
  expect(heroEl.nativeElement.textContent).toContain(expectedPipedName);
});
验证英雄名字通过绑定被传递到模板了,实际页面如下
<div (click)="click()" class="hero">
  {{hero.name | uppercase}}
</div>
第二个测试程序验证点击行为,点击英雄应该触发selected事件,可供宿主组件监听:
it('should raise selected event when clicked', () => {
  let selectedHero: Hero;
  comp.selected.subscribe((hero: Hero) => selectedHero = hero);

  heroEl.triggerEventHandler('click', null);
  expect(selectedHero).toBe(expectedHero);
});
这个组件公开EventEmitter属性,测试程序像宿主组件那样来描述它
heroEl是个DebugElement,代表了英雄所在的<div>。测试程序用click事件名字来调用triggerEventHandler
调用.click()时,click事件绑定作出相应。
如果组件像期待的那样工作,click通知组件的selected属性就会发出hero对象,测试程序通过订阅
selected事件而检测到这个值,所以测试应该成功。
triggerEventHandler方法
Angular的DebugElement.triggerEventHandler可以用事件的名字触发任何数据绑定事件。
第二个参数是传递给事件处理器的事件对象。测试程序用null事件对象触发click事件
heroEl.triggerEventHandler('click', null);
测试程序假设运行事件的事件处理器-组件的click方法-不关心事件对象。
其他处理器将会更加严格。比如RouterLink指令期待事件对象,并且该对象具有button属性,
代表了已被按下的鼠标按钮。如果该事件对象不具备上面的条件,指令变会抛出错误。
点击按钮、链接、任意HTML元素是很常见的测试任务。
把click触发过程封装到辅助方法中可以简化这个任务,比如下面的click辅助方法:
/** Button events to pass to `DebugElement.triggerEventHandler` for RouterLink event handler */
export const ButtonClickEvents = {
   left:  { button: 0 },
   right: { button: 2 }
};

/** Simulate element click. Defaults to mouse left-button click event. */
export function click(el: DebugElement | HTMLElement, eventObj: any = ButtonClickEvents.left): void { if (el instanceof HTMLElement) { el.click(); } else { el.triggerEventHandler('click', eventObj); } }
第一个参数是用来点击的元素,如果你愿意,可以将自定义的事件对象传递给第二个参数。
默认的是鼠标左键事件对象,它被许多事件处理器接受,包括RouterLink指令。
下面是使用click辅助函数重新编写的上一个测试程序。
it('should raise selected event when clicked', () => {
  let selectedHero: Hero;
  comp.selected.subscribe((hero: Hero) => selectedHero = hero);

  click(heroEl);   // triggerEventHandler helper
  expect(selectedHero).toBe(expectedHero);
});
在测试宿主组件中测试组件
在前面的方法中,测试本身扮演了宿主组件的角色。
当正常数据绑定到宿主组件时,还会正常工作吗?
使用实际的宿主来测试是可行的,但是这么做似乎不合算。像下面这样使用测试宿主组件来模拟更加容易
//dashboard-hero.component.spec.ts

@Component({
  template: `
    <dashboard-hero [hero]="hero" (selected)="onSelected($event)"></dashboard-hero>`
})
class TestHostComponent {
  hero = new Hero(42, 'Test Name');
  selectedHero: Hero;

  onSelected(hero: Hero) {
    this.selectedHero = hero;
  }
}
测试宿主组件不用理会Router、HeroService服务,甚至*ngFor循环。
测试宿主将组件的hero导入属性设置为它的模拟英雄,将组件的selected事件绑定到它的onSelected处理器,
使用selectedHero属性来记录发送来的英雄,然后测试检查这个属性来验证事件确实发送了正确的英雄。
配置使用测试宿主的测试程序与配置孤立测试相似。
beforeEach( async(() => {
  TestBed.configureTestingModule({
    declarations: [ DashboardHeroComponent, TestHostComponent ], // declare both
  }).compileComponents();
}));

beforeEach(() => {
  // create TestHostComponent instead of DashboardHeroComponent
  fixture  = TestBed.createComponent(TestHostComponent);
  testHost = fixture.componentInstance;
  heroEl   = fixture.debugElement.query(By.css('.hero')); // find hero
  fixture.detectChanges(); // trigger initial data binding
});
这个测试模块配置展示了两个非常重要的区别:
它同时声明了DashboardHerComponent和TestHostComponent
它创建了TestHostComponent,而非DashboardHeroComponent
createComponet返回fixture里有TestHostComponent实例,而非DashboardHeroComponet组件实例。
创建TestHostComponet有创建DashboardHero的副作用,因为后者出现在前者的模板中。
英雄元素的查询语句仍然可以在测试DOM中找到他,尽管元素树比以前更深。
it('should display hero name', () => {
  const expectedPipedName = testHost.hero.name.toUpperCase();
  expect(heroEl.nativeElement.textContent).toContain(expectedPipedName);
});

it('should raise selected event when clicked', () => {
  click(heroEl);
  // selected hero should be the same data bound hero
  expect(testHost.selectedHero).toBe(testHost.hero);
});
只有selected事件的测试不一样,确保被选择的DashboardHero英雄确实通过事件绑定被传递到宿主组件
测试带路由器的组件
测试实际的DashbaordComponent似乎令人生畏,因为注入了Router
constructor(
  private router: Router,
  private heroService: HeroService) {
}
同时还注入了HeroService,但是我们已经知道如何伪造它。Router的API非常复杂,并且它缠绕了其他服务和许多应用的先决条件。
幸运的是,DashbaordComponet没有使用Router做很多事情
gotoDetail(hero: Hero) {
  let url = `/heroes/${hero.id}`;
  this.router.navigateByUrl(url);
}
通常都是这样的,原则上,你测试的是组件,不是路由器,应该只关心在指定的条件下,
组件是否导航到正确的地址。用模拟类来替换路由器是一种简单的方案,下面代码应该可以:
class RouterStub {
  navigateByUrl(url: string) { return url; }
}
现在我们来利用Router和HeroService的测试stub类来配置测试模块,并为接下来的测试创建实例
beforeEach( async(() => {
  TestBed.configureTestingModule({
    providers: [
      { provide: HeroService, useClass: FakeHeroService },
      { provide: Router,      useClass: RouterStub }
    ]
  })
  .compileComponents().then(() => {
    fixture = TestBed.createComponent(DashboardComponent);
    comp = fixture.componentInstance;
  });
下面的测试程序点击显示的英雄,并利用spy来确认Router.navigateByUrl被调用了而且传进的url是所期待的值。
it('should tell ROUTER to navigate when hero clicked',
  inject([Router], (router: Router) => { // ...

  const spy = spyOn(router, 'navigateByUrl');

  heroClick(); // trigger click on first inner <div class="hero">

  // args passed to router.navigateByUrl()
  const navArgs = spy.calls.first().args[0];

  // expecting to navigate to id of the component's first hero
  const id = comp.heroes[0].id;
  expect(navArgs).toBe('/heroes/' + id,
    'should nav to HeroDetail for first hero'); }));
inject函数
注意第二个it参数里面的inject函数。
it('should tell ROUTER to navigate when hero clicked',
  inject([Router], (router: Router) => { // ...
}));
inject函数是Angular测试工具之一,注入服务到测试函数,以供修改、监视、操纵
inject函数有两个参数:
1.一列数组,包含了Angular依赖注入令牌
2.一个测试函数,参数与注入令牌数组里的每个项目严格的一一对应
使用TestBed注入器来注入
inject函数使用当前的TestBed注入器,并且只返回这个级别提供的服务,不会返回组件提供商提供的服务。
这个例子通过当前的TestBed注入器来注入Router,对这个测试程序员来说,这是没问题的。
因为Router是由应用的根注入器来提供的。
如果你需要组件自己的注入器提供的服务,调用
userService = fixture.debugElement.injector.get(UserService);
使用组件自己的注入器来获取实际注入到组件的服务。
inject函数关闭当前TestBed实例,使他无法再被配置。不能再调用任何TestBed配置方法,configureTestModule或者任何override方法,否则TestBed将抛出错误。
不要再调用inject以后再试图配置TestBed。
测试带有路由和路由参数的组件
点击英雄触发导航到hero/:id,其中id就是路由参数。
路由器将:id令牌的值推送到ActivateRoute.params可观察属性里,Angular注入ActivatedRoute到HeroDetailComponent中,然后组件提取id,这样他就可以通过HeroDetailService获取相应的英雄。
constructor(
  private heroDetailService: HeroDetailService,
  private route:  ActivatedRoute,
  private router: Router) {
}
HeroDetailComponent在它的ngOnInit方法中监听ActivatedRoute.params的变化
ngOnInit(): void {
  // get hero when `id` param changes
  this.route.paramMap.subscribe(p => this.getHero(p.has('id') && p.get('id')));
}
route.params之后的表达式链接了可观察操作符,从params中提取id然后链接forEach操作符来订阅id变化事件。每次id变化时,用户被导航到不同的英雄。
forEach将新的id值传递到组件的getHero方法,获取英雄并将它赋值到组件的hero属性。
如果id参数无效,pluck操作符就会失败,catch将失败当做创新英雄来处理。
通过操纵被注入到组件构造函数的ActivatedRoute服务,测试程序可以探索HeroDetail是如何对不同的id参数值作出相应的。
现在你已经知道如何模拟Router和数据服务,模拟ActivatedRoute遵循类似的模式,但是有个额外枝节:ActivatedRoute.params是可观察对象。
可观察对象的测试替身
detail.spec.ts依赖ActivatedRouteStub来为每个测试程序设置ActivatedRoute.params值。
是跨应用、可复用的测试辅助类,建议将这样的辅助类放在app目录下的testing的目录
import { BehaviorSubject } from 'rxjs/BehaviorSubject';
import { convertToParamMap, ParamMap } from '@angular/router';

@Injectable()
export class ActivatedRouteStub {

  // ActivatedRoute.paramMap is Observable
  private subject = new BehaviorSubject(convertToParamMap(this.testParamMap));
  paramMap = this.subject.asObservable();

  // Test parameters
  private _testParamMap: ParamMap; get testParamMap() { return this._testParamMap; } set testParamMap(params: {}) { this._testParamMap = convertToParamMap(params); this.subject.next(this._testParamMap); } // ActivatedRoute.snapshot.paramMap get snapshot() { return { paramMap: this.testParamMap }; } }
这个stub类有下列值得注意的特征:
这个stub类只实现ActivatedRoute的两个功能:params和snapshot.params
BehaviorSubject驱使这个stub类的params可观察对象,并为每个params的订阅者返回同样的值,直到他接收到新值。
HeroDetail链接它的表达式到这个stub类的params可观察对象,该对象现在被测试者的控制之下。
设置testParams属性导致subject将指定的值推送进params,触发上面描述过的HeroDetail的params订阅,和导航的方式一样。
设置testParams属性同时更新这个stub类内部值,用于snapshot属性的返回
(snapshot是组件使用路由参数的另一种流行方法)
测试可观察对象的替身
describe('when navigate to existing hero', () => {
  let expectedHero: Hero;

  beforeEach( async(() => {
    expectedHero = firstHero;
    activatedRoute.testParamMap = { id: expectedHero.id };
    createComponent();
  }));

  it('should display that hero\'s name', () => {
    expect(page.nameDisplay.textContent).toBe(expectedHero.name);
  });
});
https://angular.cn/guide/testing#the-second-synchronous-beforeeach


 7786
7786


 被折叠的 条评论
为什么被折叠?
被折叠的 条评论
为什么被折叠?
 到【灌水乐园】发言


