


环境:
虚拟机ubuntun16.0.4
Tensorflow 版本号:0.12.0(仅使用cpu下)
Tensorflow安装见:
http://blog.csdn.net/yhhyhhyhhyhh/article/details/54429034
或者:
http://www.tensorfly.cn/tfdoc/get_started/os_setup.html
本文将利用Tensorflow以softmax回归和卷积神经网络两种模型简单測试MNIST数据集,高速实现手写数字识别的測试。仅Tensorflow作为练习,不解说过多模型、框架等理论知识。
文件夹
1.MNIST数据集
2.softmax回归測试MNIST
3.卷积神经网络測试MNIST
4.Tensorflow学习文档
1.MNIST数据集
MNIST数据集的官网:http://yann.lecun.com/exdb/mnist/
依照TensorFlow中文社区教程的方法将MNIST数据训练数据和測试数据载入到自己的代码中。
1)下载MNIST数据集
input_data.py文件下载:input_data.py
在终端中执行:python ~/Test/input_data.py
(我的数据集和input_data.py文件放在了主文件夹下的Test文件夹下,注意路径。)
2)载入到代码中
在用到MNIST数据的python代码中增加下面:
#导入MNIST数据
import input_data
mnist = input_data.read_data_sets('MNIST_data/', one_hot=True)每个MNIST数据单元有两部分组成(训练数据集和測试数据集都是):一张包括手写数字的图片和一个相应的标签。
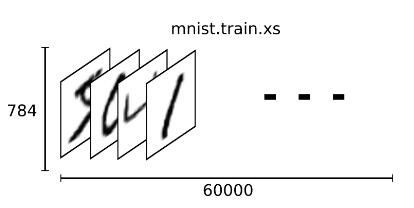
因此,在MNIST训练数据集中,mnist.train.images 是一个形状为 [60000, 784] 的张量。第一个维度数字用来索引图片。第二个维度数字用来索引每张图片中的像素点。
在此张量里的每个元素,都表示某张图片里的某个像素的强度值,值介于0和1之间。
相相应的MNIST数据集的标签是介于0到9的数字,用来描写叙述给定图片里表示的数字。为了用于这个教程,我们使标签数据是”one-hot vectors”。 一个one-hot向量除了某一位的数字是1以外其余各维度数字都是0。所以在此教程中,数字n将表示成一个仅仅有在第n维度(从0開始)数字为1的10维向量。
比方。标签0将表示成([1,0,0,0,0,0,0,0,0,0,0])。因此。 mnist.train.labels 是一个 [60000, 10] 的数字矩阵。

2.softmax回归測试MNIST
1)softmax回归模型
点击查看softmax回归具体解说的一个帖子:
简单来说。softmax回归是logistic回归对多分类问题的推广,当是两分类时,就是logistic回归。softmax回归更适合类别间是相互排斥的,比方字符识别等。Softmax代价函数与logistic 代价函数在形式上非常相似。仅仅是在Softmax损失函数中对类标记的 个可能值进行了累加。
2)简单測试MNIST
注意路径。
yhh@ubuntu:~/Test$ python input_data.py
yhh@ubuntu:~/Test$ python softmax_tf_mnist.py
softmax回归測试MNIST的完整代码:
softmax_tf_mnist.py
# -*- coding: utf-8 -*-
'''softmax回归測试MNIST数据集'''
import input_data
import tensorflow as tf
#导入MNIST数据
mnist = input_data.read_data_sets("MNIST_data/", one_hot=True)
#softmax回归模型中的x,W,b
x = tf.placeholder("float", [None, 784])
W = tf.Variable(tf.zeros([784,10]))
b = tf.Variable(tf.zeros([10]))
#softmax回归模型
y = tf.nn.softmax(tf.matmul(x,W) + b)
y_ = tf.placeholder("float", [None,10])
#计算交叉熵
cross_entropy = -tf.reduce_sum(y_*tf.log(y))
#设置TensorFlow用梯度下降算法以0.01的学习速率最小化交叉熵
train_step = tf.train.GradientDescentOptimizer(0.01).minimize(cross_entropy)
#初始化变量
init = tf.initialize_all_variables()
#评估模型
correct_prediction = tf.equal(tf.argmax(y,1), tf.argmax(y_,1))
accuracy = tf.reduce_mean(tf.cast(correct_prediction, "float"))
#开启Tesnsorflow
sess = tf.Session()
sess.run(init)
#循环训练模型
for i in range(1000):
  batch = mnist.train.next_batch(100)
  sess.run(train_step,feed_dict={x: batch[0], y_: batch[1]})
#输出结果
print "softmax回归測试MNIST数据集正确率:"
print sess.run(accuracy, feed_dict={x: mnist.test.images, y_: mnist.test.labels})
结果,为了降低执行时间。我直接把训练次数设置的非常小.
训练次数设置为1000时:

3.卷积神经网络測试MNIST
1)卷积神经网络
一篇解说cnn的博文:
http://www.36dsj.com/archives/24006
2)測试MNIST
yhh@ubuntu:~/Test$ python cnn_tf_mnist.py假设未导入MNIST数据集的话,先执行:
yhh@ubuntu:~/Test$ python input_data.py结果,为了降低执行时间。我直接把训练次数设置的非常小.
训练次数设置为1000时:

卷积神经网络測试MNIST的完整代码:
cnn_tf_mnist.py
# -*- coding: utf-8 -*-
'''卷积神经网络測试MNIST数据'''
#导入MNIST数据
import input_data
import tensorflow as tf
mnist = input_data.read_data_sets('MNIST_data/', one_hot=True)
sess = tf.InteractiveSession()
x = tf.placeholder("float", shape=[None, 784])
y_ = tf.placeholder("float", shape=[None, 10])
W = tf.Variable(tf.zeros([784,10]))
b = tf.Variable(tf.zeros([10]))
sess.run(tf.initialize_all_variables())
#权重初始化函数,用一个较小的正数来初始化偏置项
def weight_variable(shape):
  initial = tf.truncated_normal(shape, stddev=0.1)
  return tf.Variable(initial)
def bias_variable(shape):
  initial = tf.constant(0.1, shape=shape)
  return tf.Variable(initial)
#卷积和池化函数
def conv2d(x, W):
  return tf.nn.conv2d(x, W, strides=[1, 1, 1, 1], padding='SAME')

def max_pool_2x2(x):
  return tf.nn.max_pool(x, ksize=[1, 2, 2, 1],
                        strides=[1, 2, 2, 1], padding='SAME')
#第一层卷积
W_conv1 = weight_variable([5, 5, 1, 32])
b_conv1 = bias_variable([32])
#把x变成一个4d向量
x_image = tf.reshape(x, [-1,28,28,1])
#把x_image和权值向量进行卷积。加上偏置项。然后应用ReLU激活函数。
#进行池化。
h_conv1 = tf.nn.relu(conv2d(x_image, W_conv1) + b_conv1) h_pool1 = max_pool_2x2(h_conv1) #第二层卷积 W_conv2 = weight_variable([5, 5, 32, 64]) b_conv2 = bias_variable([64]) h_conv2 = tf.nn.relu(conv2d(h_pool1, W_conv2) + b_conv2) h_pool2 = max_pool_2x2(h_conv2) #密集连接层 W_fc1 = weight_variable([7 * 7 * 64, 1024]) b_fc1 = bias_variable([1024]) h_pool2_flat = tf.reshape(h_pool2, [-1, 7*7*64]) h_fc1 = tf.nn.relu(tf.matmul(h_pool2_flat, W_fc1) + b_fc1) #为了降低过拟合。在输出层之前增加dropout keep_prob = tf.placeholder("float") h_fc1_drop = tf.nn.dropout(h_fc1, keep_prob) #增加一个softmax层。就像softmax regression一样 W_fc2 = weight_variable([1024, 10]) b_fc2 = bias_variable([10]) y_conv=tf.nn.softmax(tf.matmul(h_fc1_drop, W_fc2) + b_fc2) #训练设置 cross_entropy = -tf.reduce_sum(y_*tf.log(y_conv)) train_step = tf.train.AdamOptimizer(1e-4).minimize(cross_entropy) correct_prediction = tf.equal(tf.argmax(y_conv,1), tf.argmax(y_,1)) accuracy = tf.reduce_mean(tf.cast(correct_prediction, "float")) sess.run(tf.initialize_all_variables()) #训练 for i in range(1000): batch = mnist.train.next_batch(50) if i%100 == 0: train_accuracy = accuracy.eval(feed_dict={ x:batch[0], y_: batch[1], keep_prob: 1.0}) print "-->step %d, training accuracy %.4f"%(i, train_accuracy) train_step.run(feed_dict={x: batch[0], y_: batch[1], keep_prob: 0.5}) #终于评估 print "卷积神经网络測试MNIST数据集正确率: %g"%accuracy.eval(feed_dict={ x: mnist.test.images, y_: mnist.test.labels, keep_prob: 1.0})
事实上Tensorflow0.12.0安装时下载的源代码及models中也有mnist卷积神经网络測速的样例。
在:

能够将整个文件夹拷贝到home文件夹下。便于查看和改动。
能够直接执行该demo:
yhh@ubuntu:~/Test$ python ./tensorflow/models/image/mnist/convolutional.py
部分输出结果:

4.Tensorflow学习文档
Tenssorflow中文社区:
http://www.tensorfly.cn/tfdoc/tutorials/mnist_pros.html


 249
249


 被折叠的 条评论
为什么被折叠?
被折叠的 条评论
为什么被折叠?
 到【灌水乐园】发言


